Step by Step tying guides plus other contributions from branch members.
Superb clarity images with easy to follow INSTRUCTIONS and essential tying tips (we’ve also included fishing hints for some). As well as some recollections of fishing trips.
- Is This an Obsession? – Eddie Wilkinson January 2026
- The Organza Traffic Light Diawl Bach – A Fly for November – Les Lockey October 2025
- The Floating Sparkler- A Fly for October – Les Lockey September 2025
- The Pearly Daddy (Sid Knight)- A Fly for September – Les Lockey August 2025
- The Invicta (James Ogden) – A Fly for August – Les Lockey July 2025
- The Cooper Bug – Dry Fly / Emerger (Jack Cooper) – A Fly for July – Les Lockey July 2025
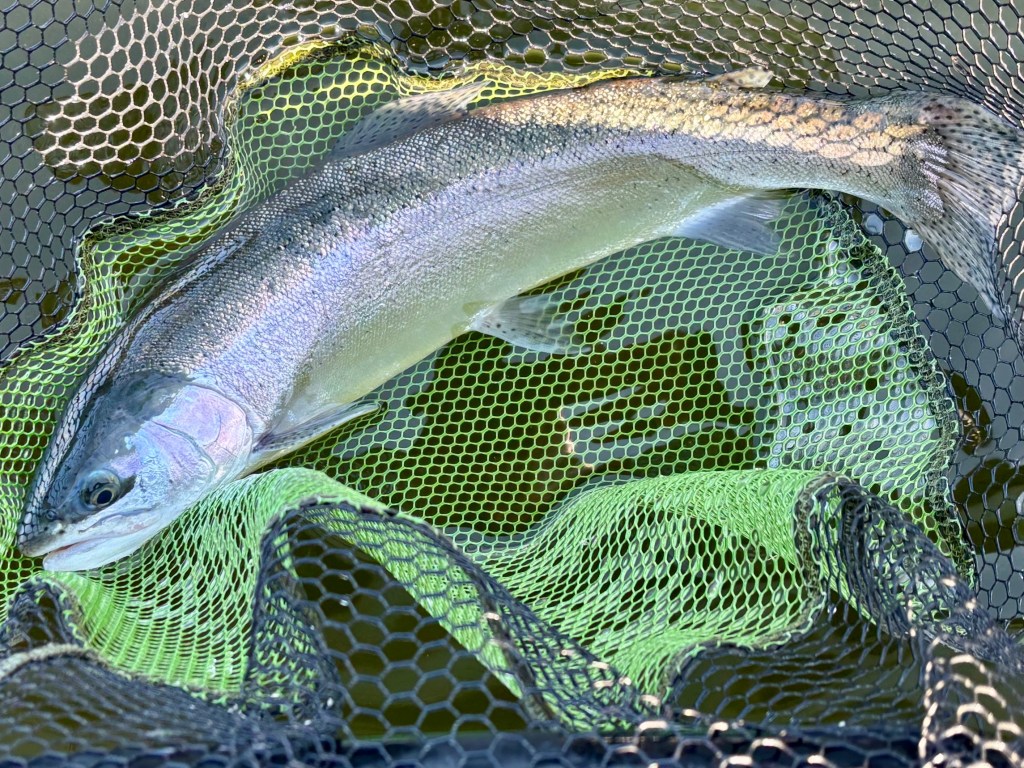
- Coldingham Loch Trip – Les Lockey May 2025
- The Midas Dry Fly – (P. Davison) – A Fly for June – Les Lockey May 2025
- Mike’s Dry Hawthorn – A Fly for May – Les Lockey April 2025
- The Irish Cormorant – A Fly for April – Les Lockey March 2025
- The Upper River Test at Longparish, November 2024
- The Humongous – A Fly for November – Les Lockey September 2024
- Trip to Lake Vyrnwy – Eddie Wilkinson September 2024
- The Pine Squirrel Zonker – A Fly for October – Les Lockey August 2024
- Gold Award at the Branch – Gary Kirk July 2024
- The Wet Daddy (Stan Headley) – A Fly for September – Les Lockey August 2024
- The Little Black – A Fly for August – Les Lockey July 2024
- The CDC and Elk Sedge (Dry Fly) – A Fly for July – Les Lockey June 2024
- The Foam Hatching Buzzer – A Fly for June – Les Lockey May 2024
- The Peacock Eye Diawl Bach – A Fly for May – Les Lockey April 2024
- Report for the River Alyn, 7th March 2024
- The Twisted F.A.B (Foam Assisted Blob)- A Fly for April – Les Lockey March 2024
- The Ephemeroptera Patterns – Les Lockey 20/02/2024
- The Split Cormorant – A Fly for November – Les Lockey October 2023
- The Mohican – A Fly for October – Les Lockey, September 2023.
- The Foam Daddy – A Fly for September – Les Lockey, August 2023.
- The Threadless Green Diawl Bach – A Fly for August – Les Lockey, July 2023.
- The Elastic Caddis Pupa – A Fly for July – Les Lockey, June 2023.
- The Quill Cormorant – A Fly for June – Les Lockey, May 2023.
- The foam bodied Hawthorn – A Fly for May – Les Lockey, April 2023.
- The Kate McLaren – A Fly for April – Les Lockey, March 2023.
- The Copper Cruncher – A Fly for November – Les Lockey, October 2022.
- Lake Vyrnwy in August 2022 – Eddie Wilkinson, September 2022.
- The Rabbit Perch Fry – A Fly for October – Les Lockey, September 2022.
- The App’s Bloodworm (Fluorescent Pink) – A Fly for September – Les Lockey, August 2022.
- A Week at Coldingham Loch – Mike Warburton, July 2022.
- The Black Foam Beetle (Dry) – A Fly for August – Les Lockey, July 2022.
- At Last – The Return to Lake Vyrnwy – Eddie Wilkinson, June 2022.
- The Damselfly Nymph – A Fly for July – Les Lockey, June 2022.
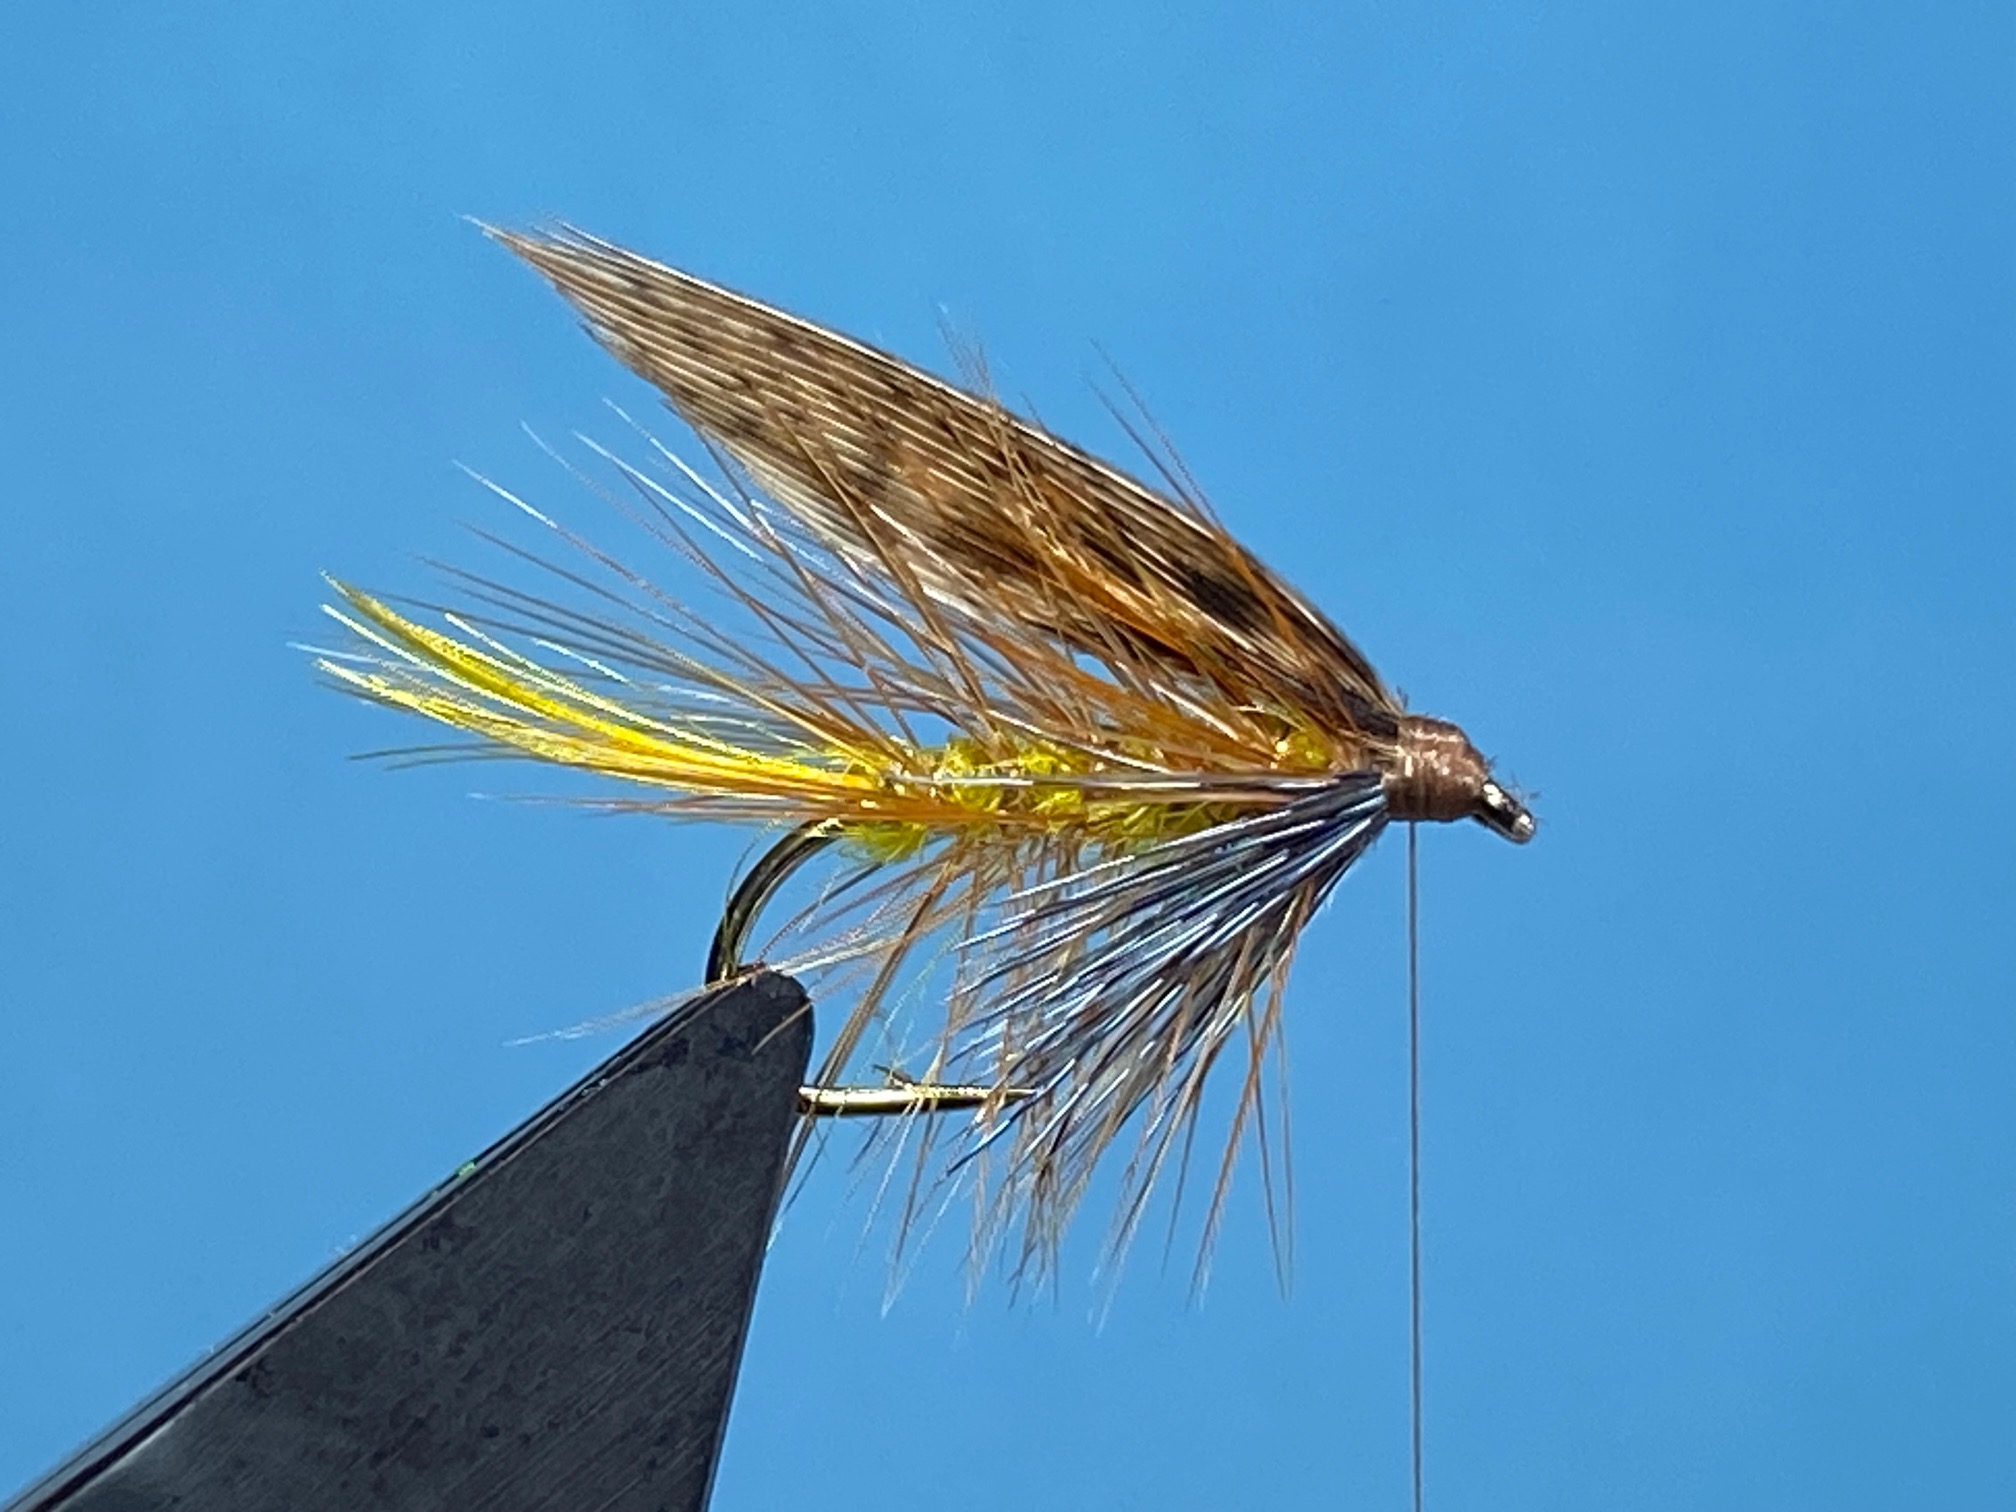
- The Yellow Owl (Emerger) – A Fly for June – Les Lockey, May 2022.
- The Summer Bibio (Dry) – A Fly for May – Les Lockey, April 2022.
- Dennis the Menace Midge Pupa – A Fly for April- Les Lockey, March 2022.
- Tying an Olive Parachute – a video by Carl.
- A Privileged Happening – Mike Warburton – Aug. 2016.
- Some more tips from one of our members – Ni Rogers, Aug 2016.
- A Trip To Brenig – Eddie Wilkinson – July 2016.
- Casting for Recovery at Coniston Hotel and Country Estate – Mike Warburton.
- A Day Trip to Blithfield Fishery, Staffs – Donald Couper, April 2016.
Is This an Obsession?
My fly tying started in the late 1970’s, the usual cheap vice (Indian AA, that I still use) and a few bits of materials. As my other hobby at the time was Wildfowling and Game shooting, fur and feathers were not a problem!
We had moved from a large 3 bedroom Victorian terrace to a small 2 bedroom detached bungalow so there was NO tying / hunting gear room!
As with most fly-tying people I had a temporary spot in our small bungalow, the dining room table in the conservatory.Things had to be “movable” at a moments notice.
Time moves on, as does my fly tying, another vice (or two) is added, more “gear” is accumulated. We have a garage and a small shed (that leaks). The cars do not live in the garage, a motorcycle and two bicycles do, along with 2 freezers, waders coats rods and reels. Guns in the loft (locked cabinet).
As we have no children (our choice) our fondly called 2 bedroom bungalow (never found the 2nd bedroom), did seem big enough – at the time.
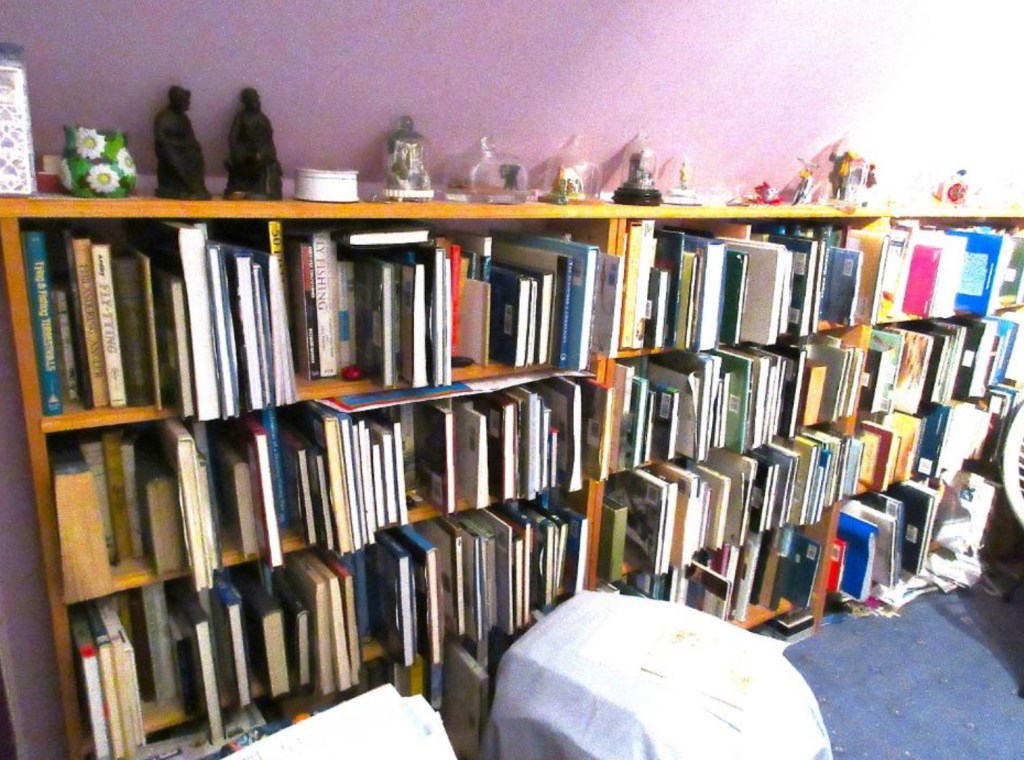
A decision was made in 2008 (ish) to “extend” the house, upstairs, initially as a bedroom plus library (fishing, shooting, work related and reading books) and fixed flytying station (at last). A stud wall separated the areas.
All good so far and for a few years it worked. Rain at night became a problem, as it is very noisy on Velux windows, so the bedroom downstairs was “Returned”. The stud wallupstairs was removed and the whole area was transformed into a “Workroom”. My library had grown by now and my shooting days were coming to an end. Guns and shooting paraphernalia went. The outside shed collapsed on me, so a new idea formed in our minds.
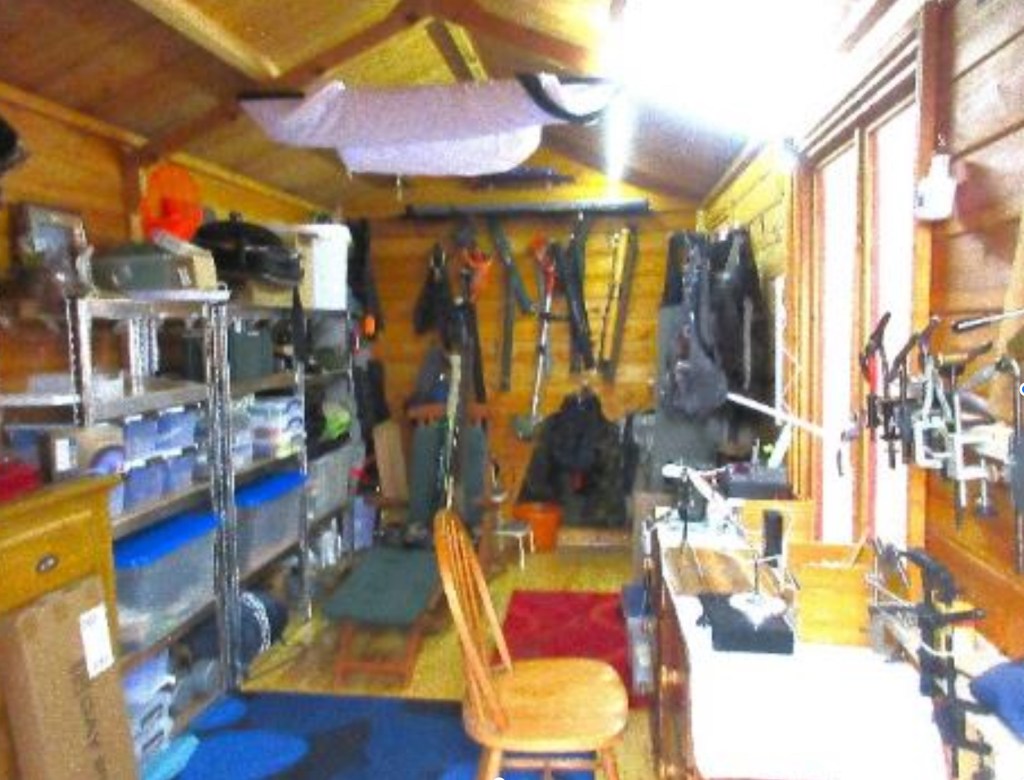
Before retirement I had a “Garden Room” built (2011) Triple bi fold doors at the front, side window and rear door. Decking was put at the front along with outdoor furniture. All ready for me in 2013, when I did retire. Inside was ready for a tying bench, bookcase was in, rods, reels, float tube were all there, things were looking good. Due to my large motorcycle in the garage, the electric bicycles were in MY mancave!
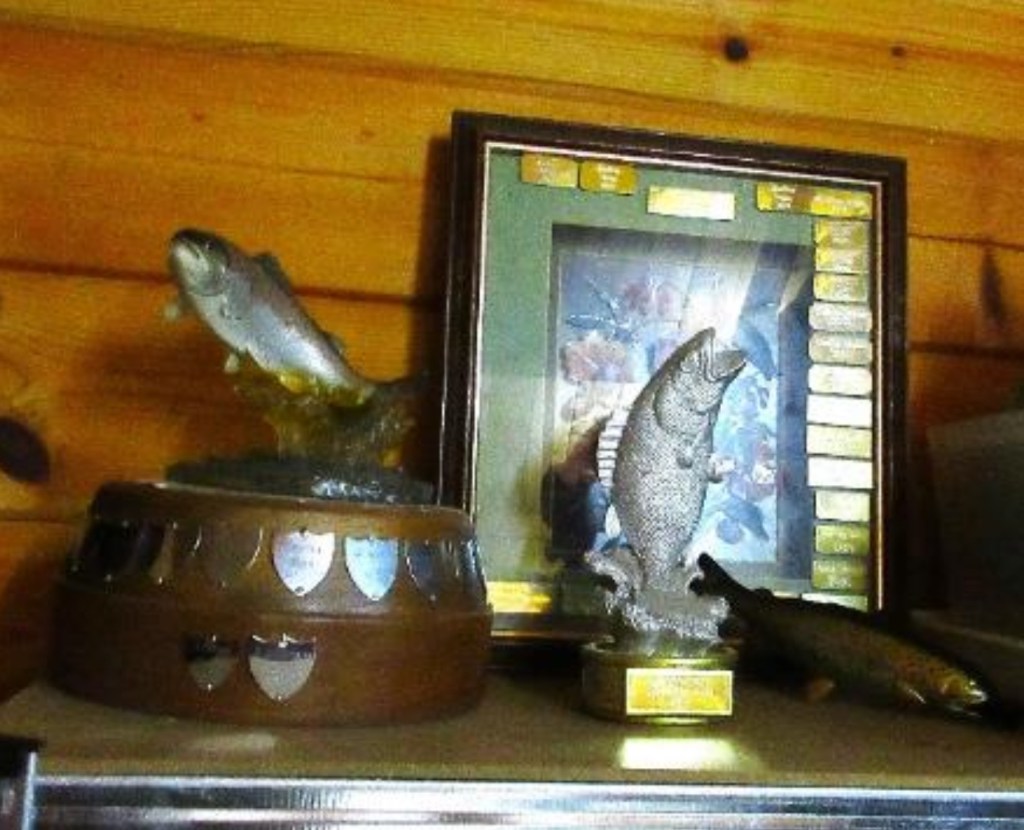
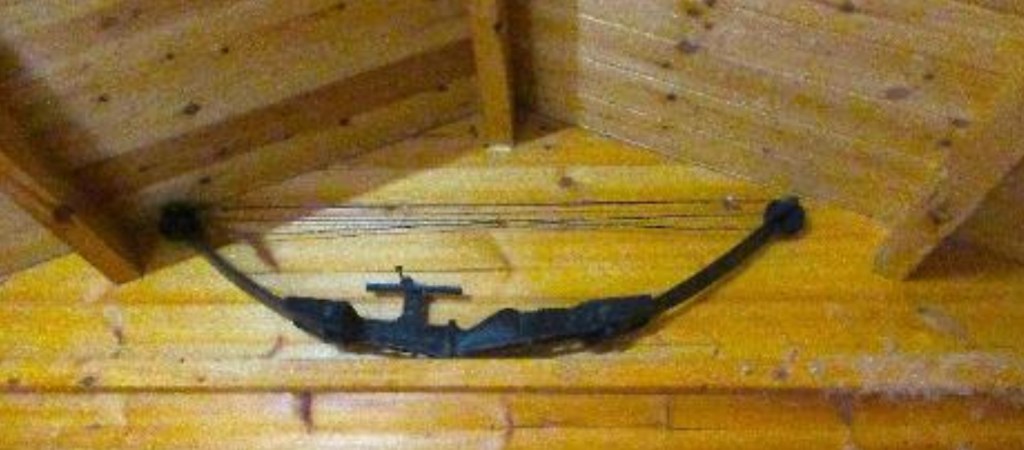
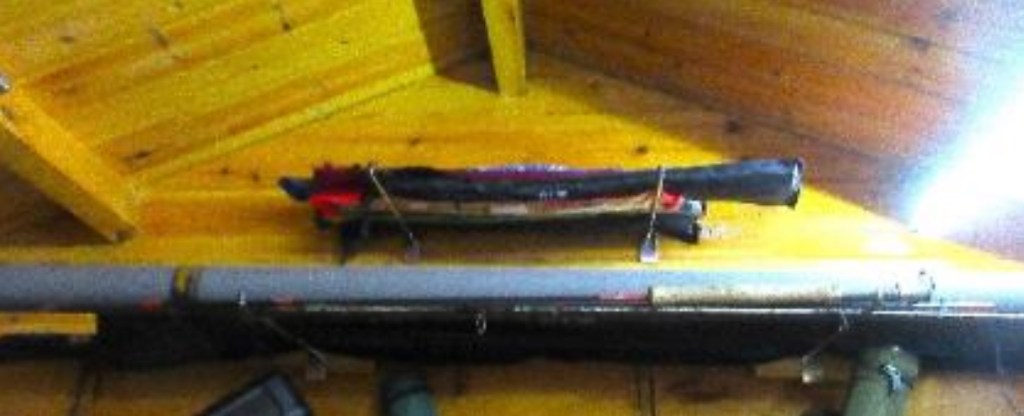
Time for some pictures!

By 2015 my wife was looking to retire and had some hobbies to look forward to. Things started to appear in the Mancave, so much so, that drastic action was needed! I put up a stud wall 2/3rds of the way down – to “Protect” my fishing gear. Unfortunately, my end had no light!
I had to concentrate my efforts indoors for my “Fly Tying”. Upstairs was decked out, surely it would be enough?
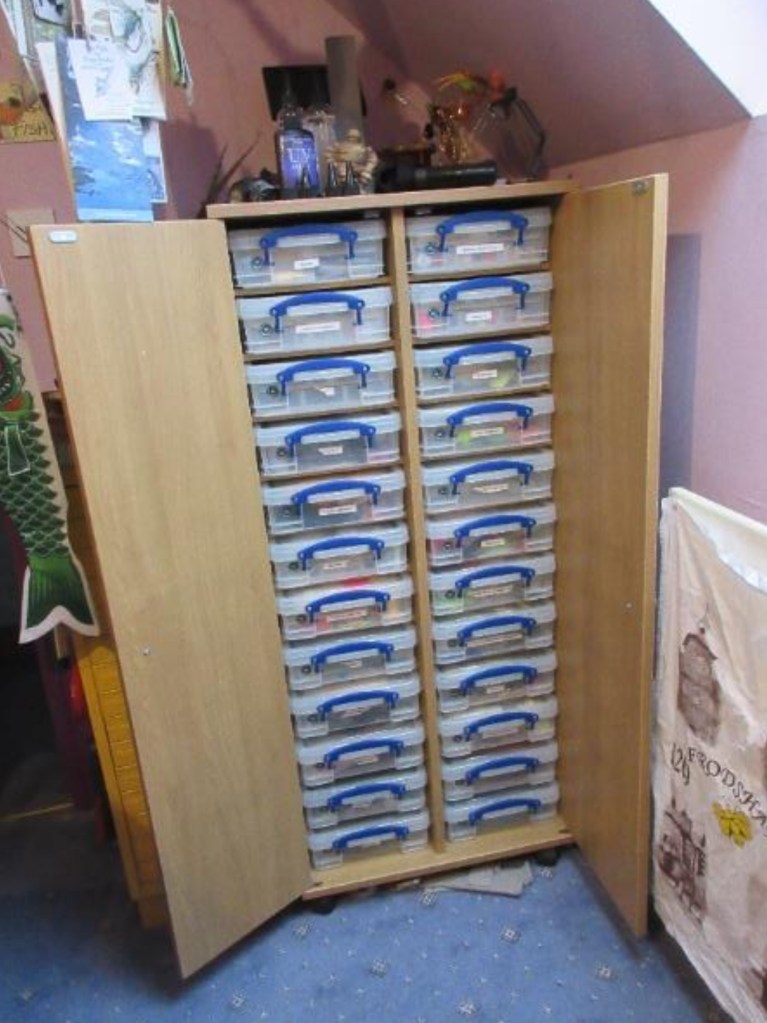
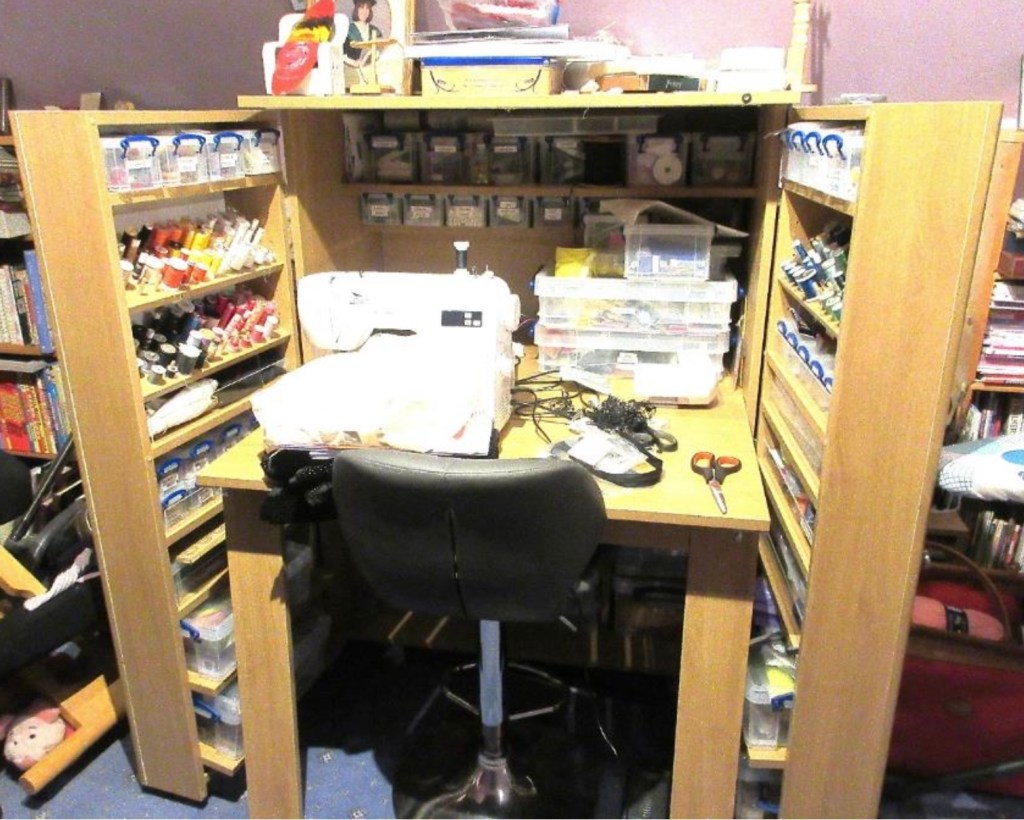
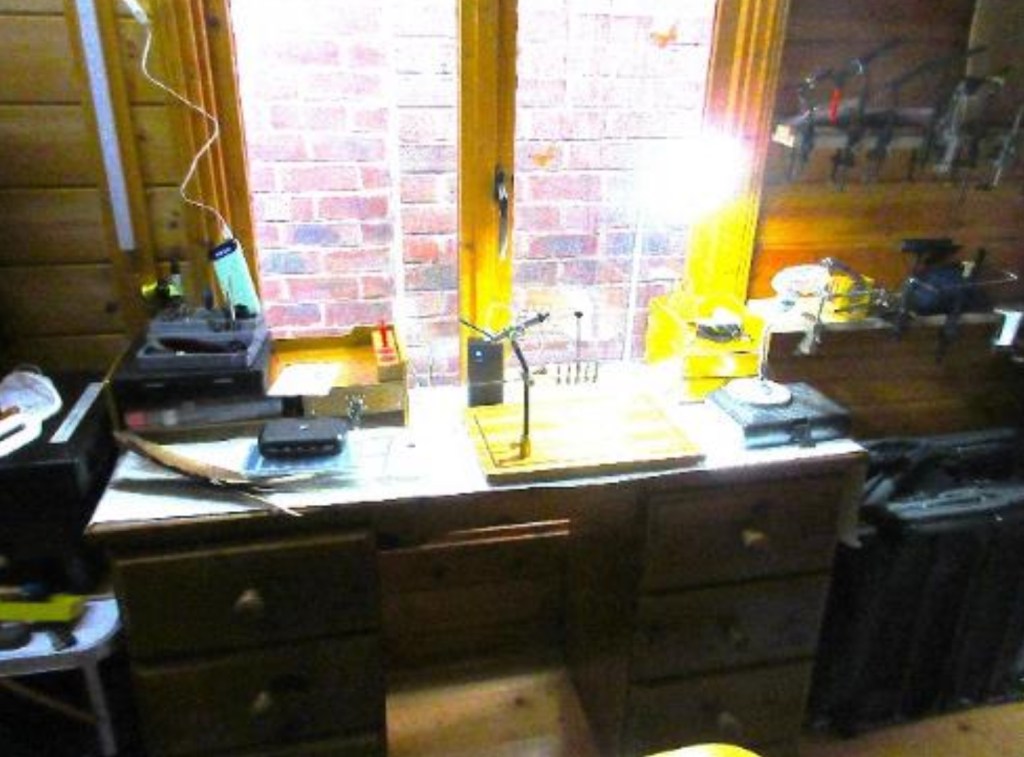
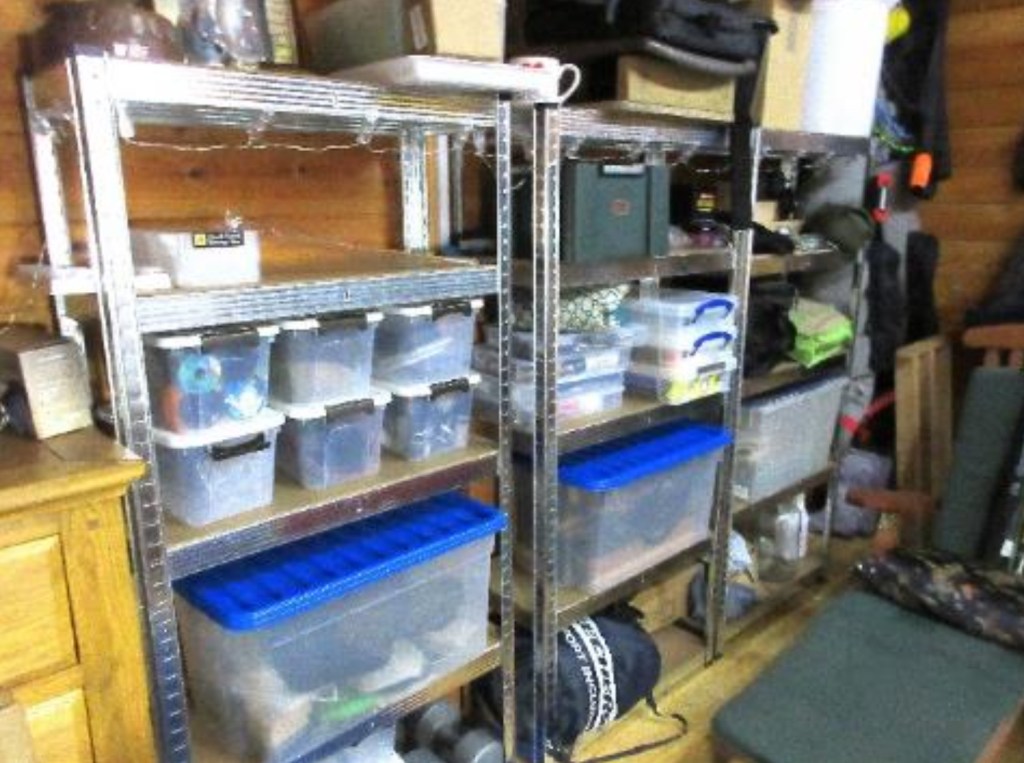
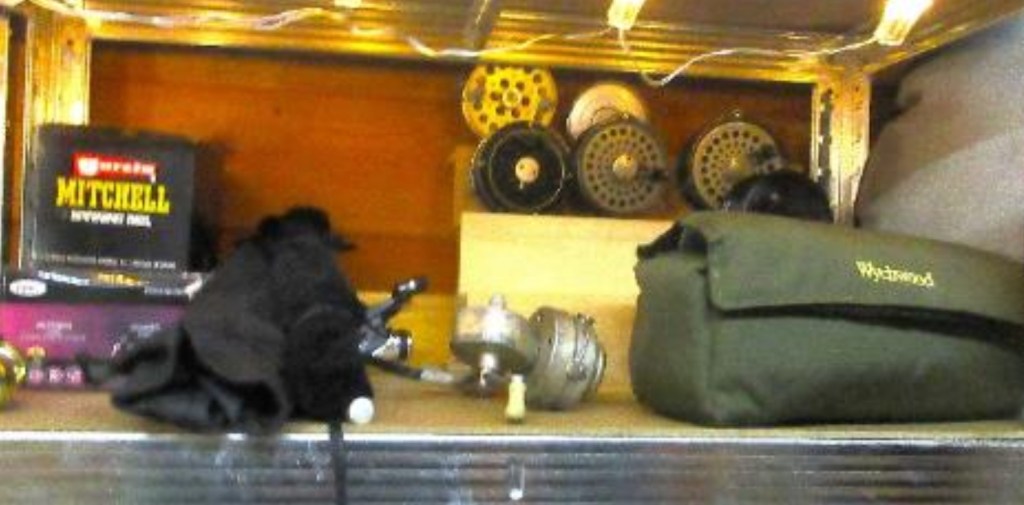
The tying station and storage:

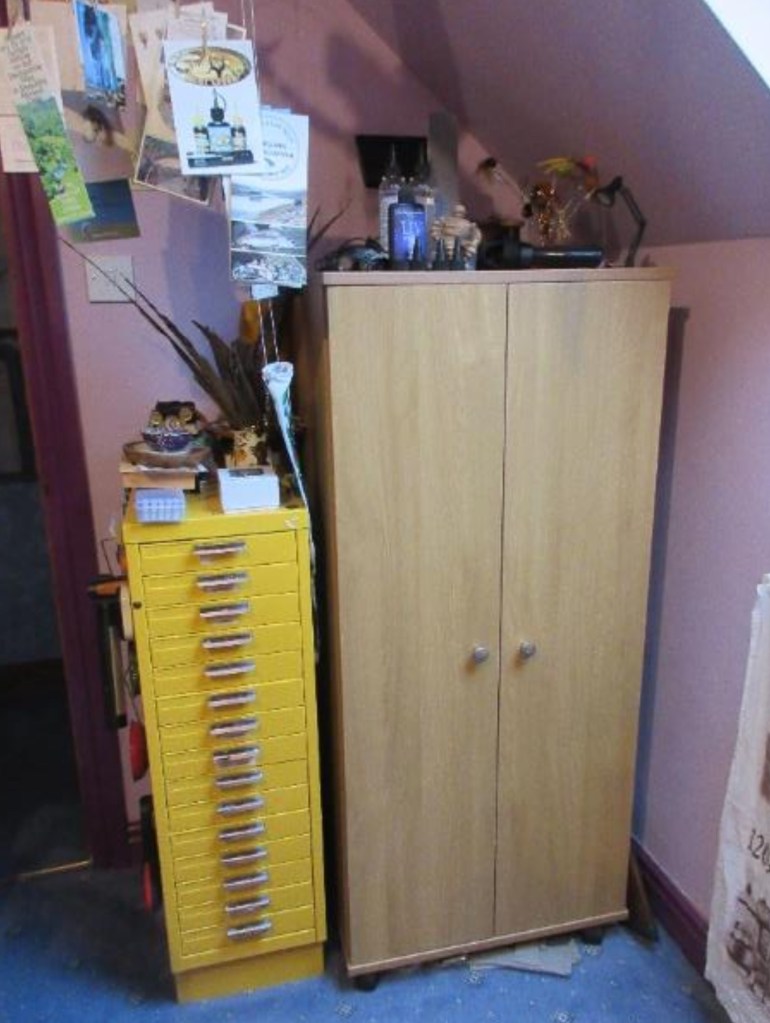

2nd part is for larger projects and my wife’s “craft” area
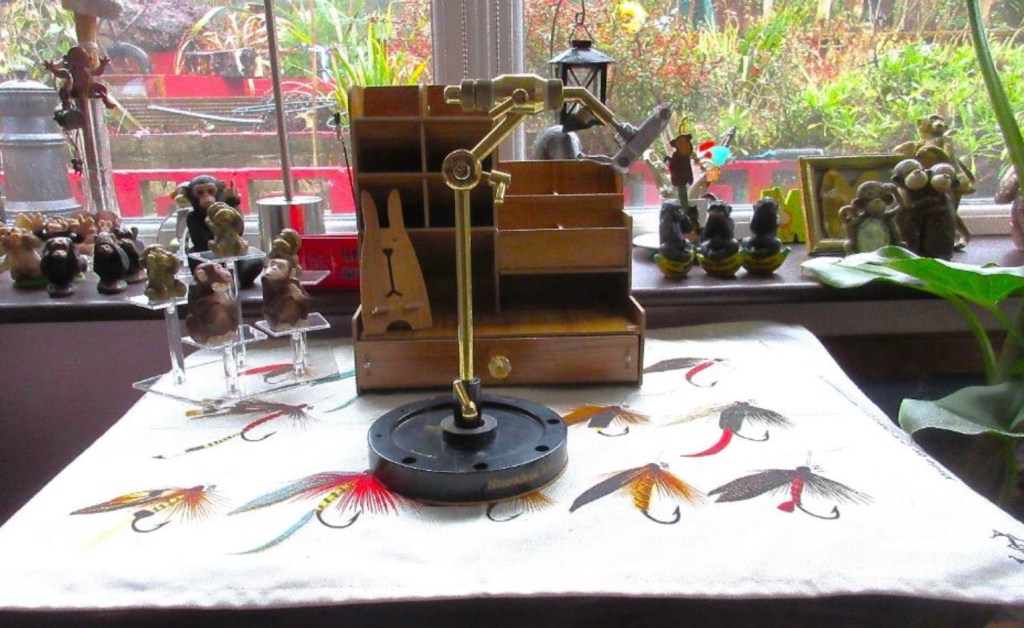
Downstairs the conservatory had been replaced (due to leaks and lack of heating) with an Orangery! I now have another tying station in there, just so I can keep my wife company while she does “jigsaws”, but only 4 draws for my storage! (and yes, we do have a “monkey” fascination)
Outside, my wife has moved nearly all her gear into another shed (even larger than the mancave). The “large” motorcycle has gone, that means the electric bikes are now in the garage. Unfortunately, now I can see what is there, I may “just may” have too much gear – no strike that, never too much!
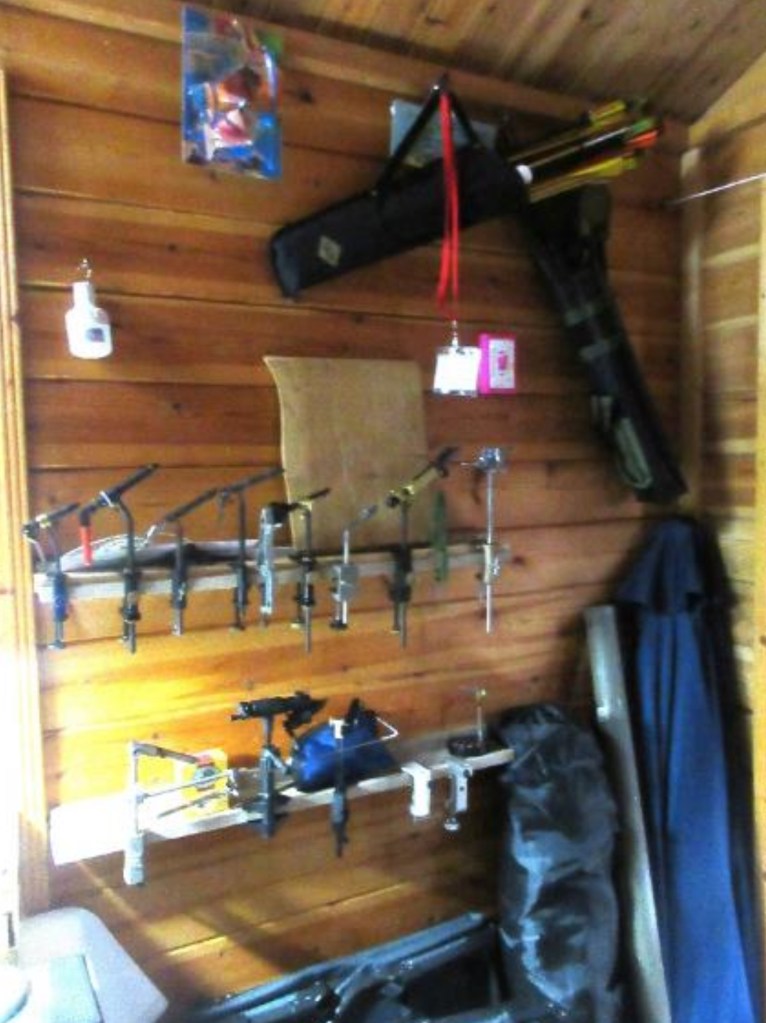
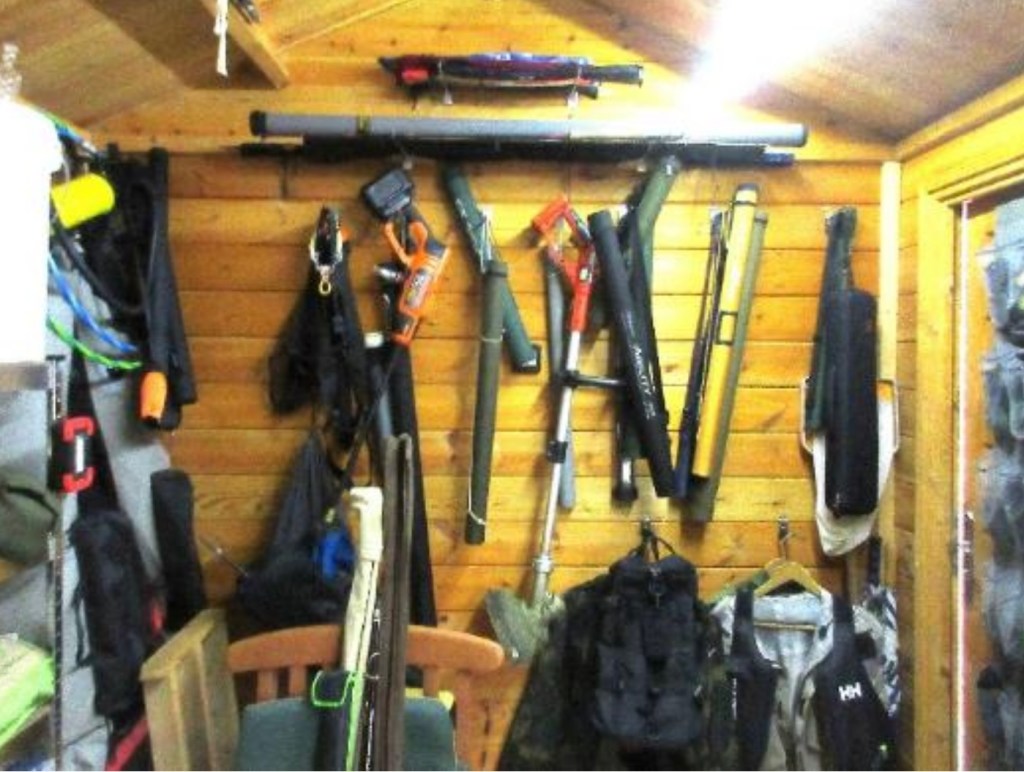
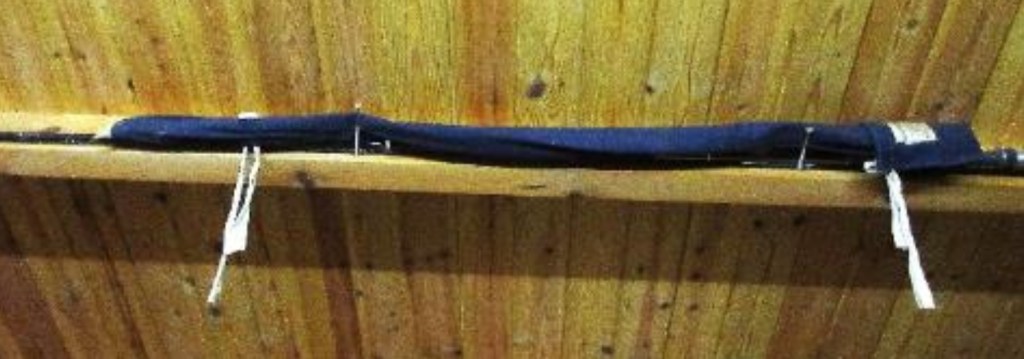
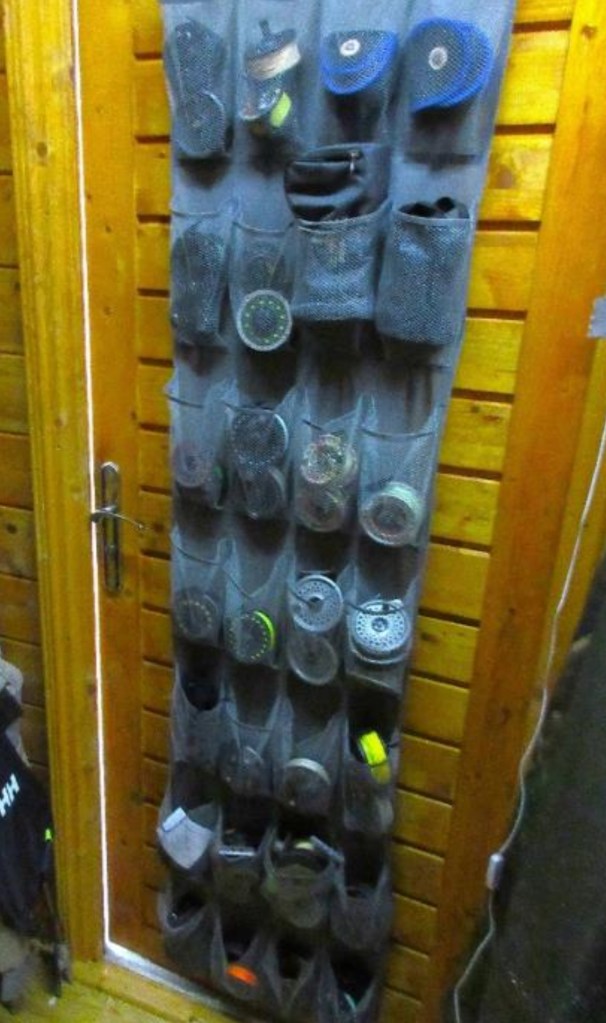
To match the rods, a few reels – handy tip the reel holder is a door hanging shoe rack! It holds an awful lot of reels!!
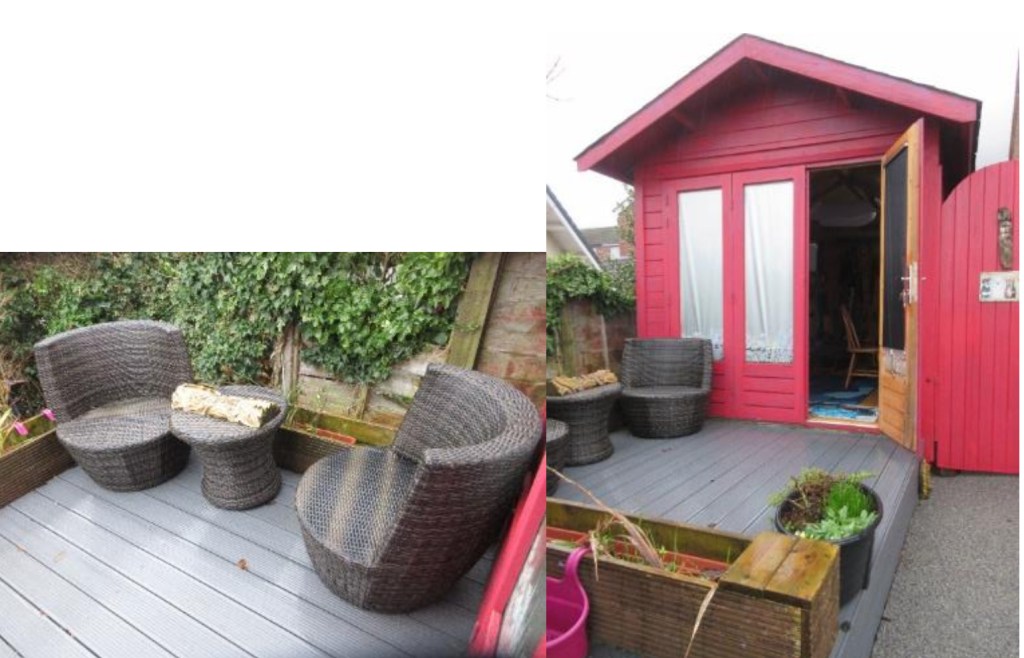
A change to the decking and mancave colour.
All in all 2026 is looking good! So far I have only ordered one more rod and reel, but the BFFI is only a week away!
Eddie Wilkinson – Jan ’26
The Organza Traffic Light Diawl Bach Nymph – A Fly for November
Hook: B175, size 10, or similar.
Thread: Black Veevus GSP, 50D, or any 8/0 black thread.
Tail: Black cock hackle fibres.
Flashback: Red holographic tinsel with pearl tinsel over.
Body: Black Organza ribbon prepared as a tapered hackle.
Throat Hackle: Black cock hackle fibres.
Cheeks: Split Jungle Cock nail feather.
Head: Spectra Flash dubbing, dark peacock, or Hends UV Ice dub, No 15 black.

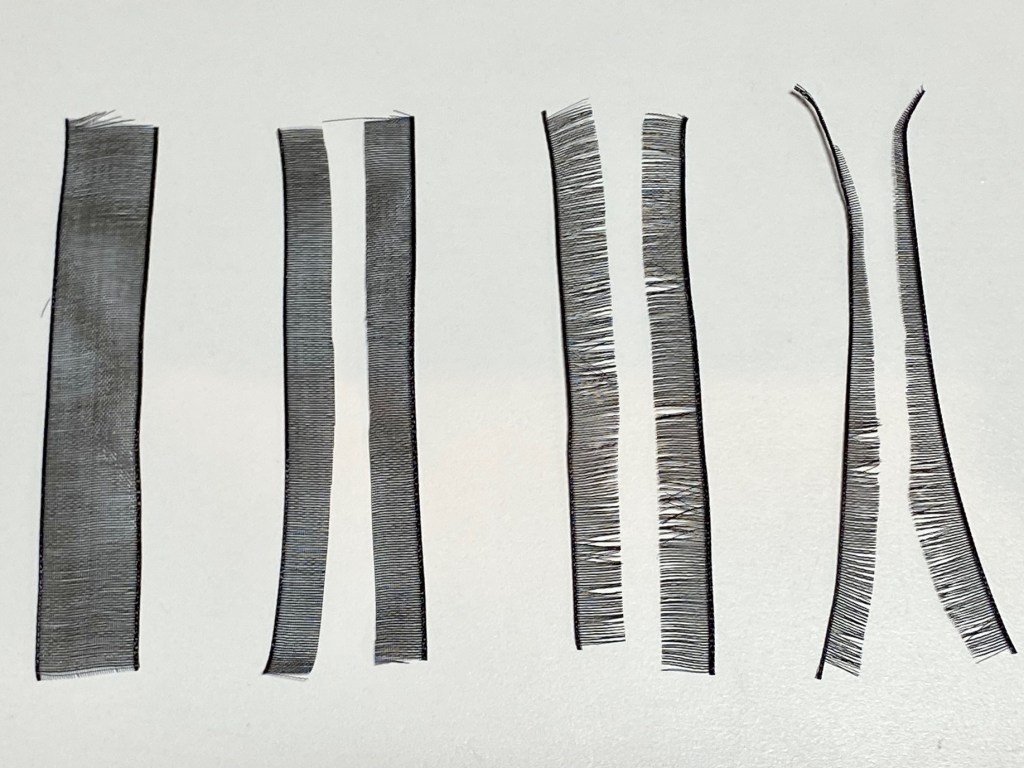
To prepare the Organza body hackle, take a 7.5 cm. (3”) length of black Organza ribbon and cut it lengthways down the centre. From the resulting two halves, remove all the longitudinal strands which are woven between the transverse fibres. Take each half in turn and trim the remaining transverse fibres into a taper, with the fibre length ranging from 4mm down to 1mm. and set them aside for later.
Photo 1. Secure the hook in the vice, wind on a bed of thread from the eye to just before the hook point and remove the waste thread.
Photo 2. Align the tips of a bunch of cock hackle fibres, pull them off the feather stem and with the fibres about the same length as the body, tie them in as a tail, directly onto the bare shank using 2 or 3 thread turns wound towards the hook bend. Trim the waste ends to the length of the body.
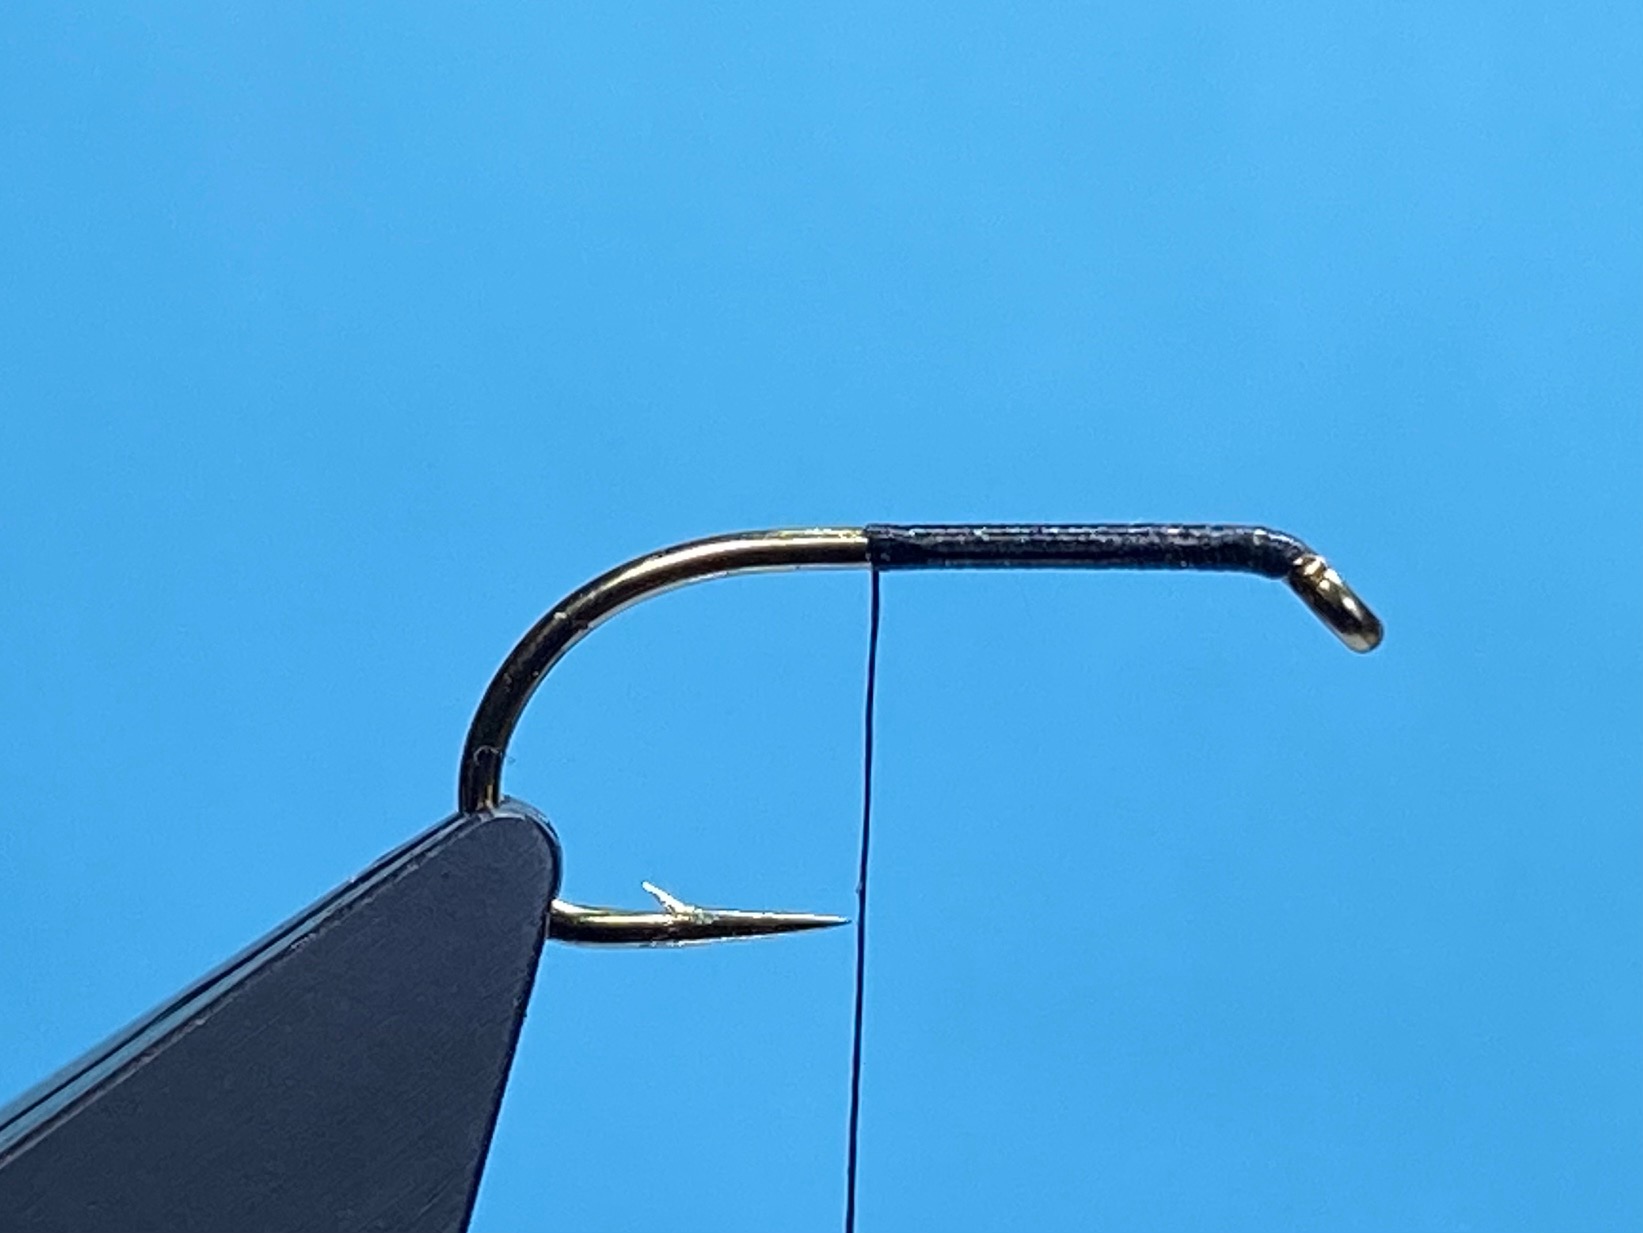

Photo 3. In similar fashion, tie in a length of pearl tinsel followed by a length of red holographic tinsel ensuring they both sit squarely on top of the shank with the waste ends the same length as the body. Bind down all the materials with thread stopping about 2mm. from the eye and return the thread to the tail.
Photo 4. Take one of the tapered pieces of Organza and trim away the end few transverse fibres from the narrow end to leave just the outer edge, or selvage. Position the trimmed selvage edge along the side of the shank with the tapered fibres starting at the tail and pointing upwards, then tie in the Organza securely with well waxed thread. Continue to bind down the selvage to about 2mm. from the eye.
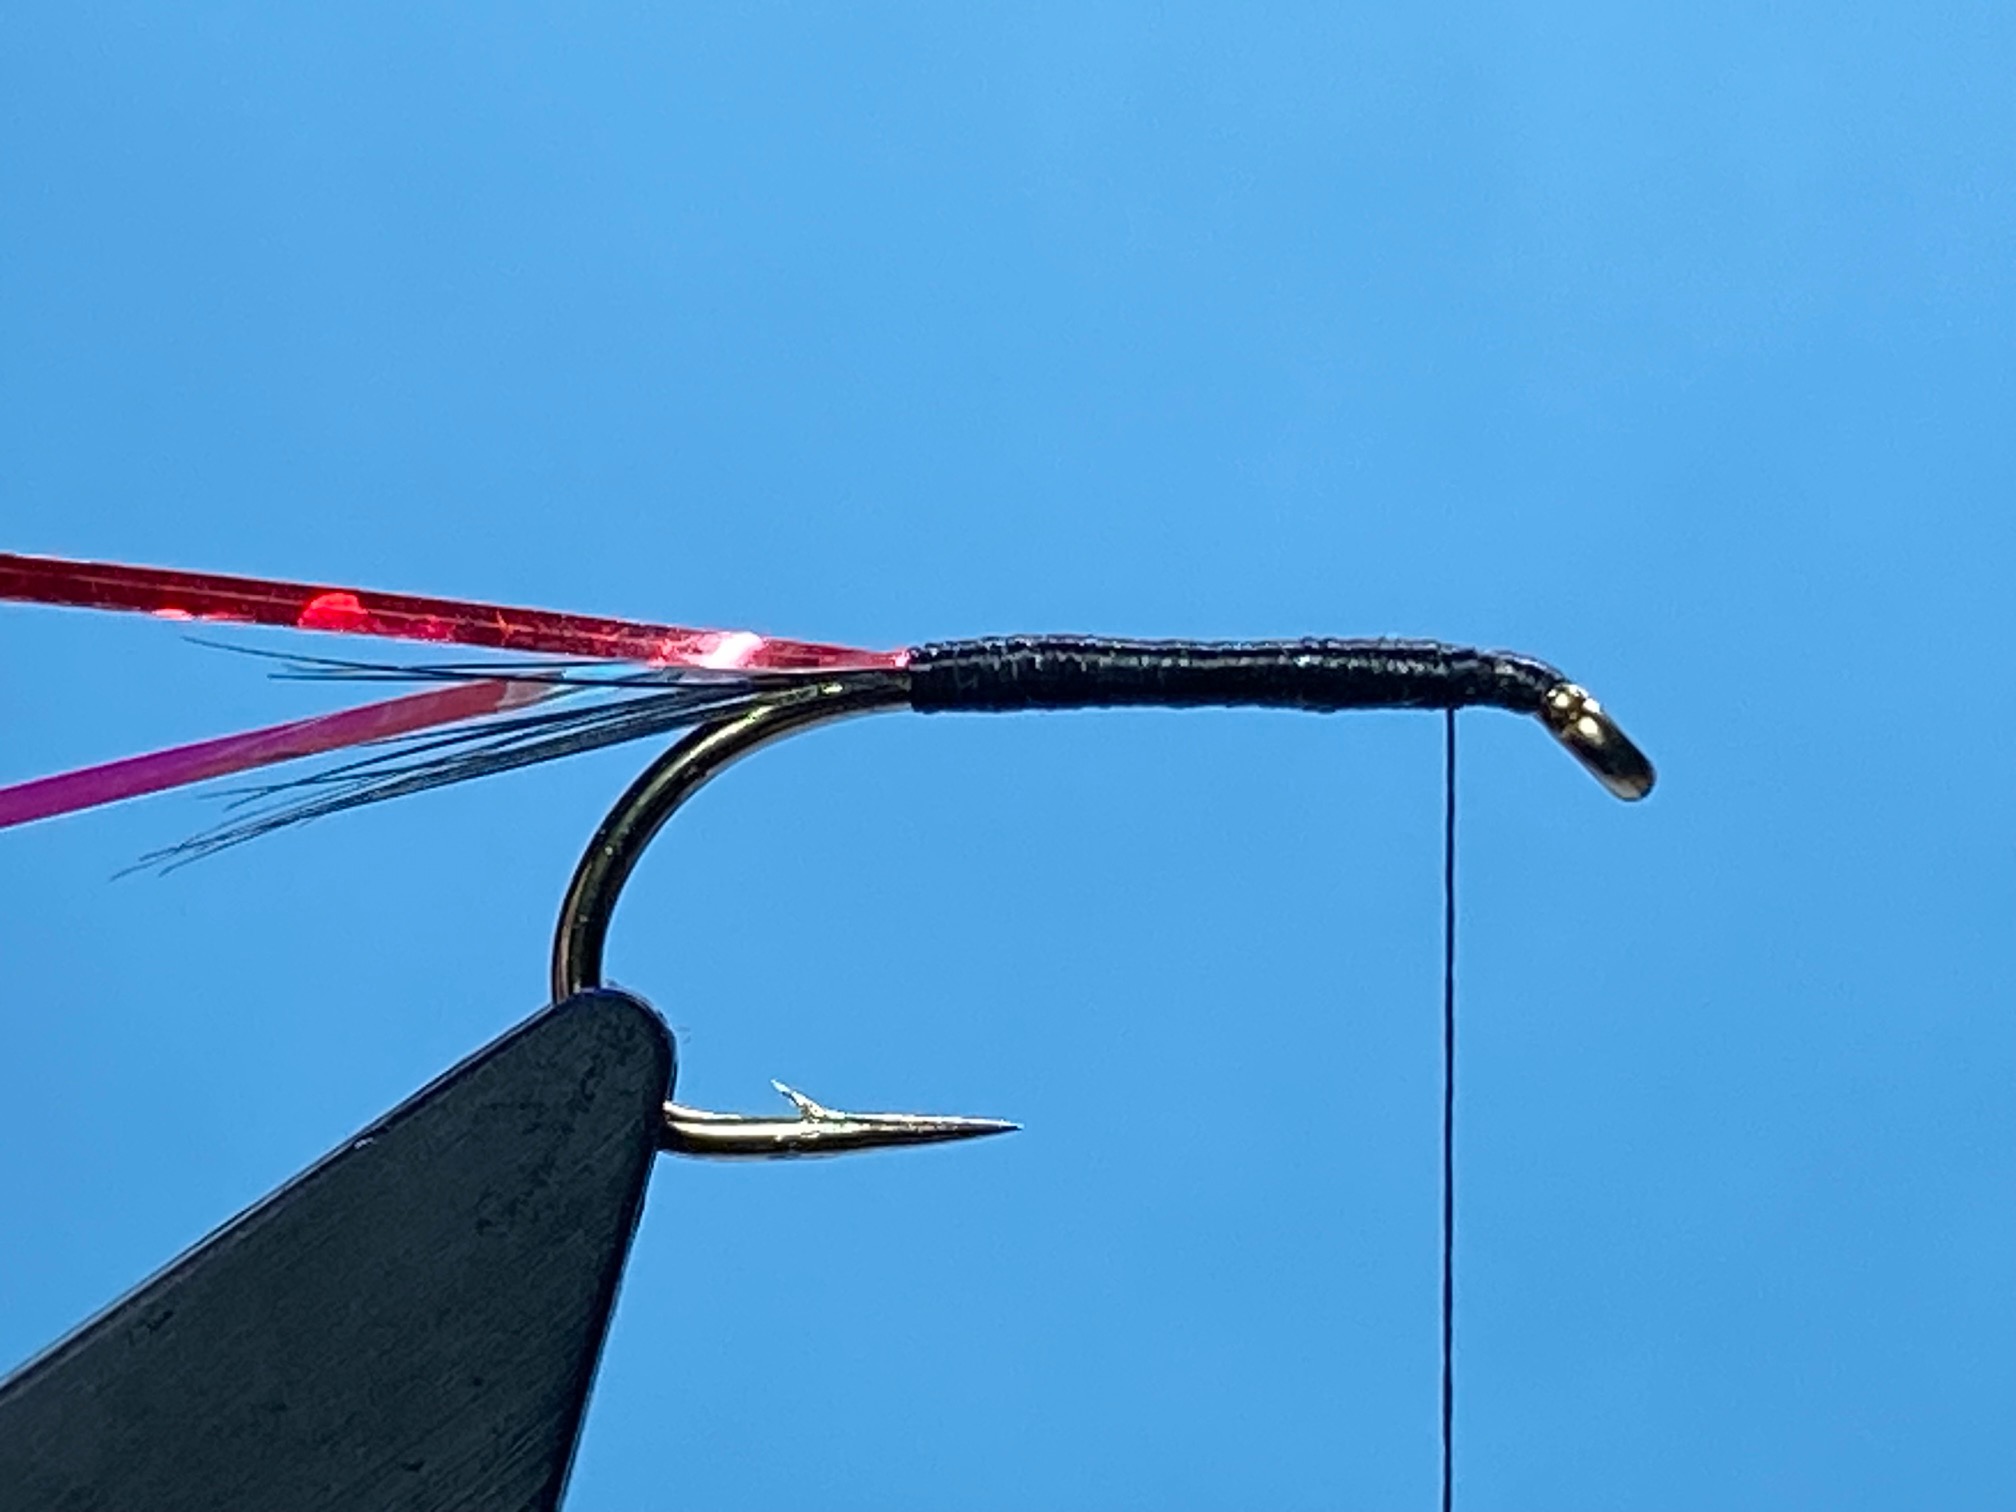
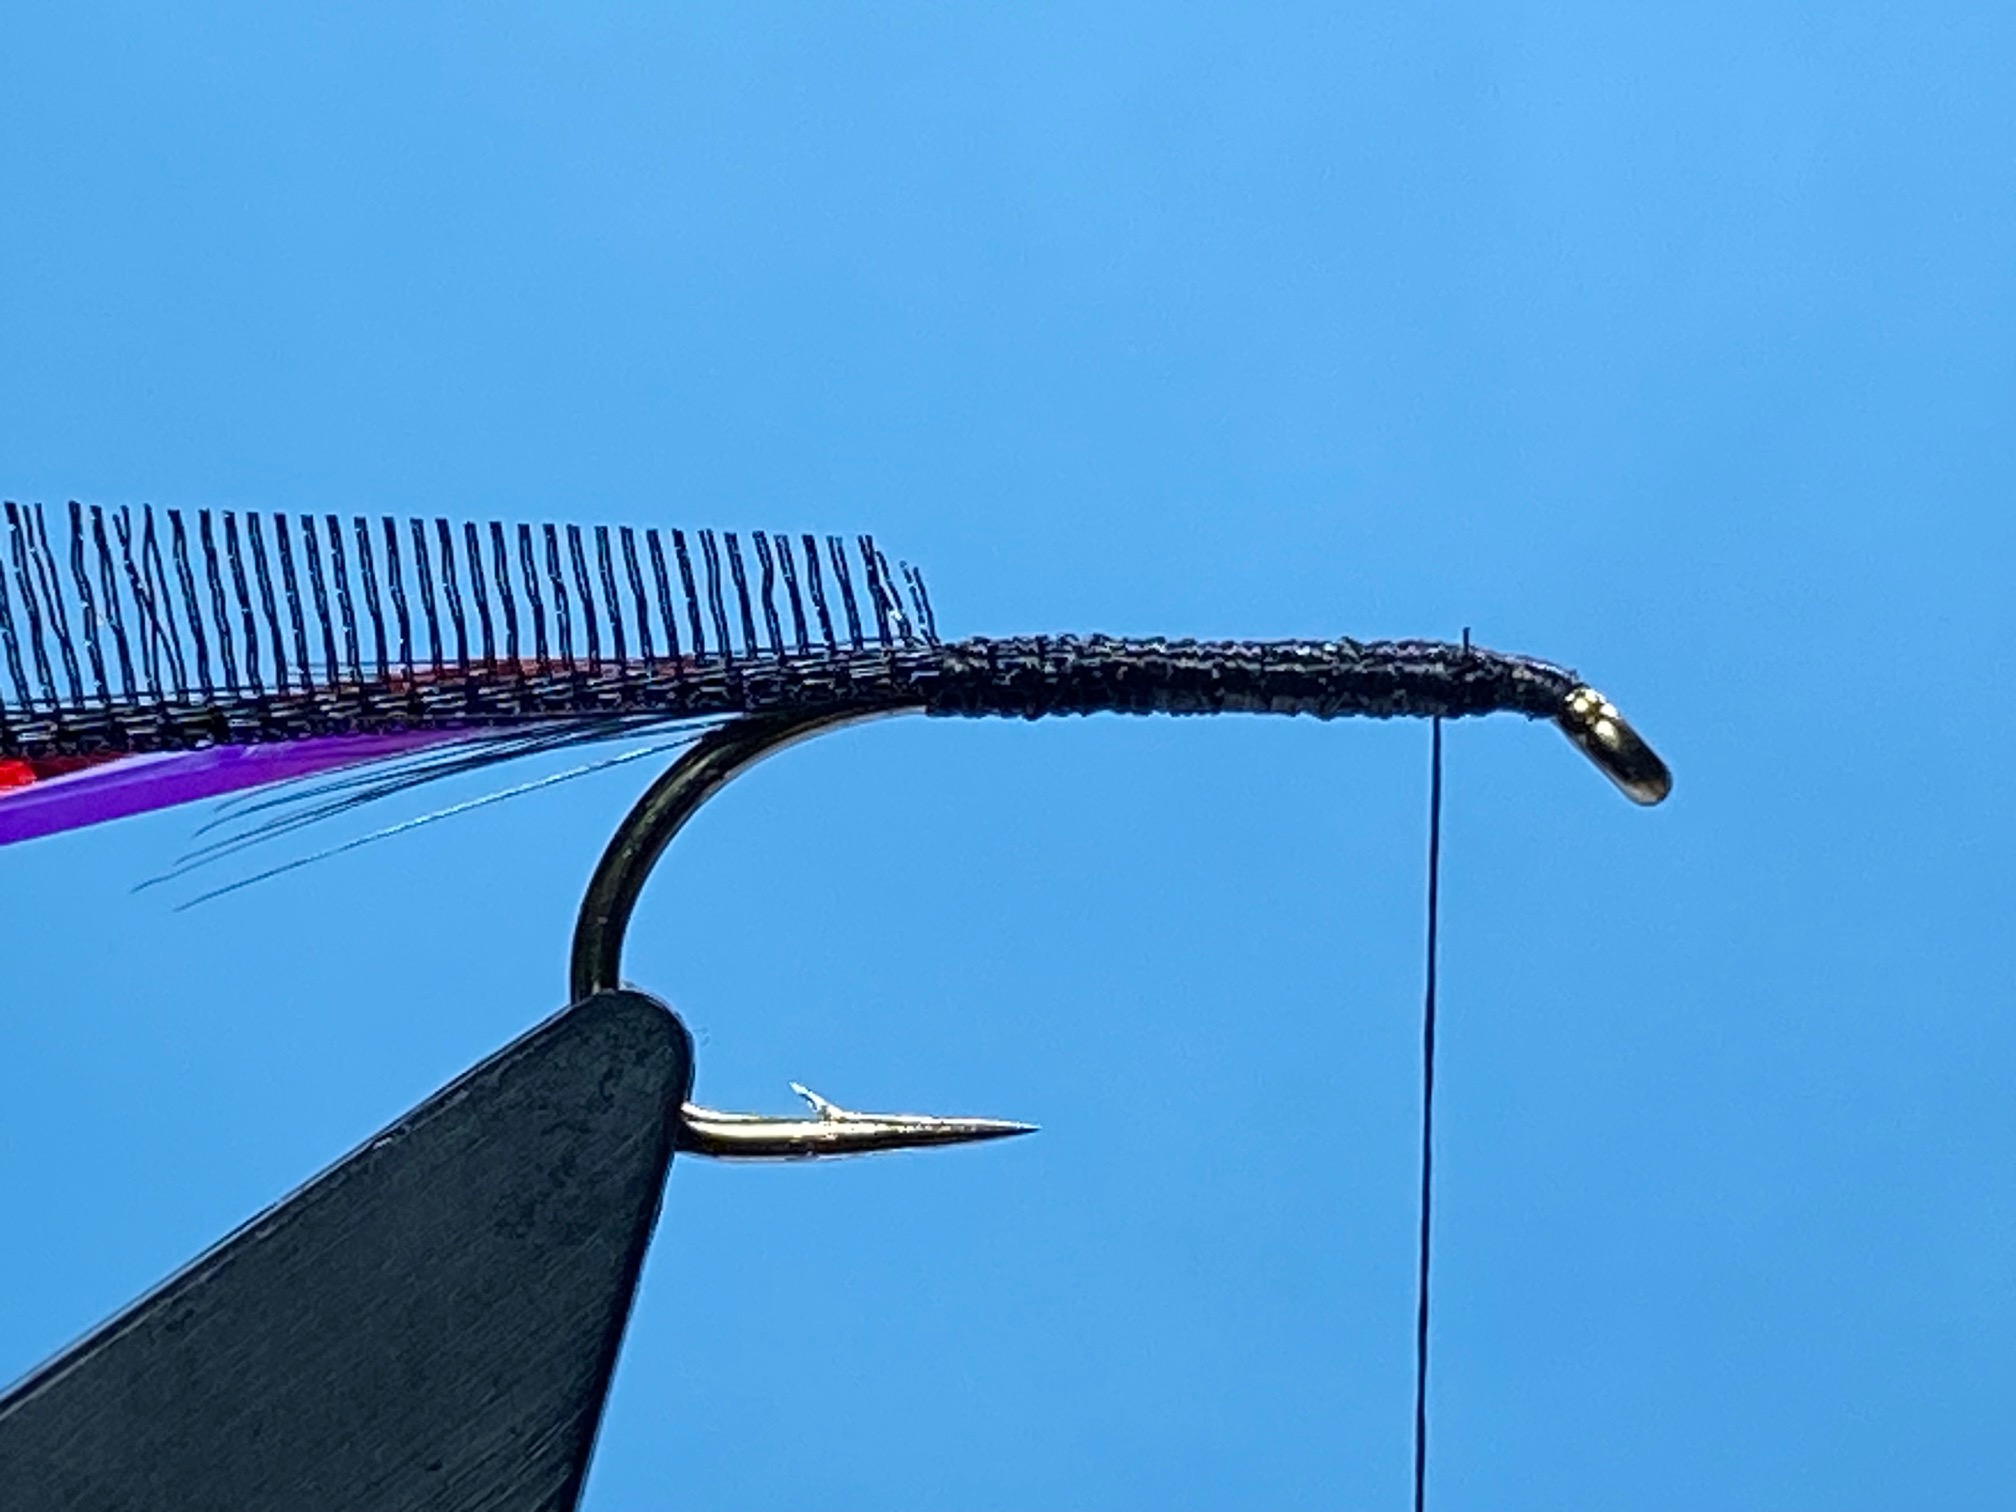
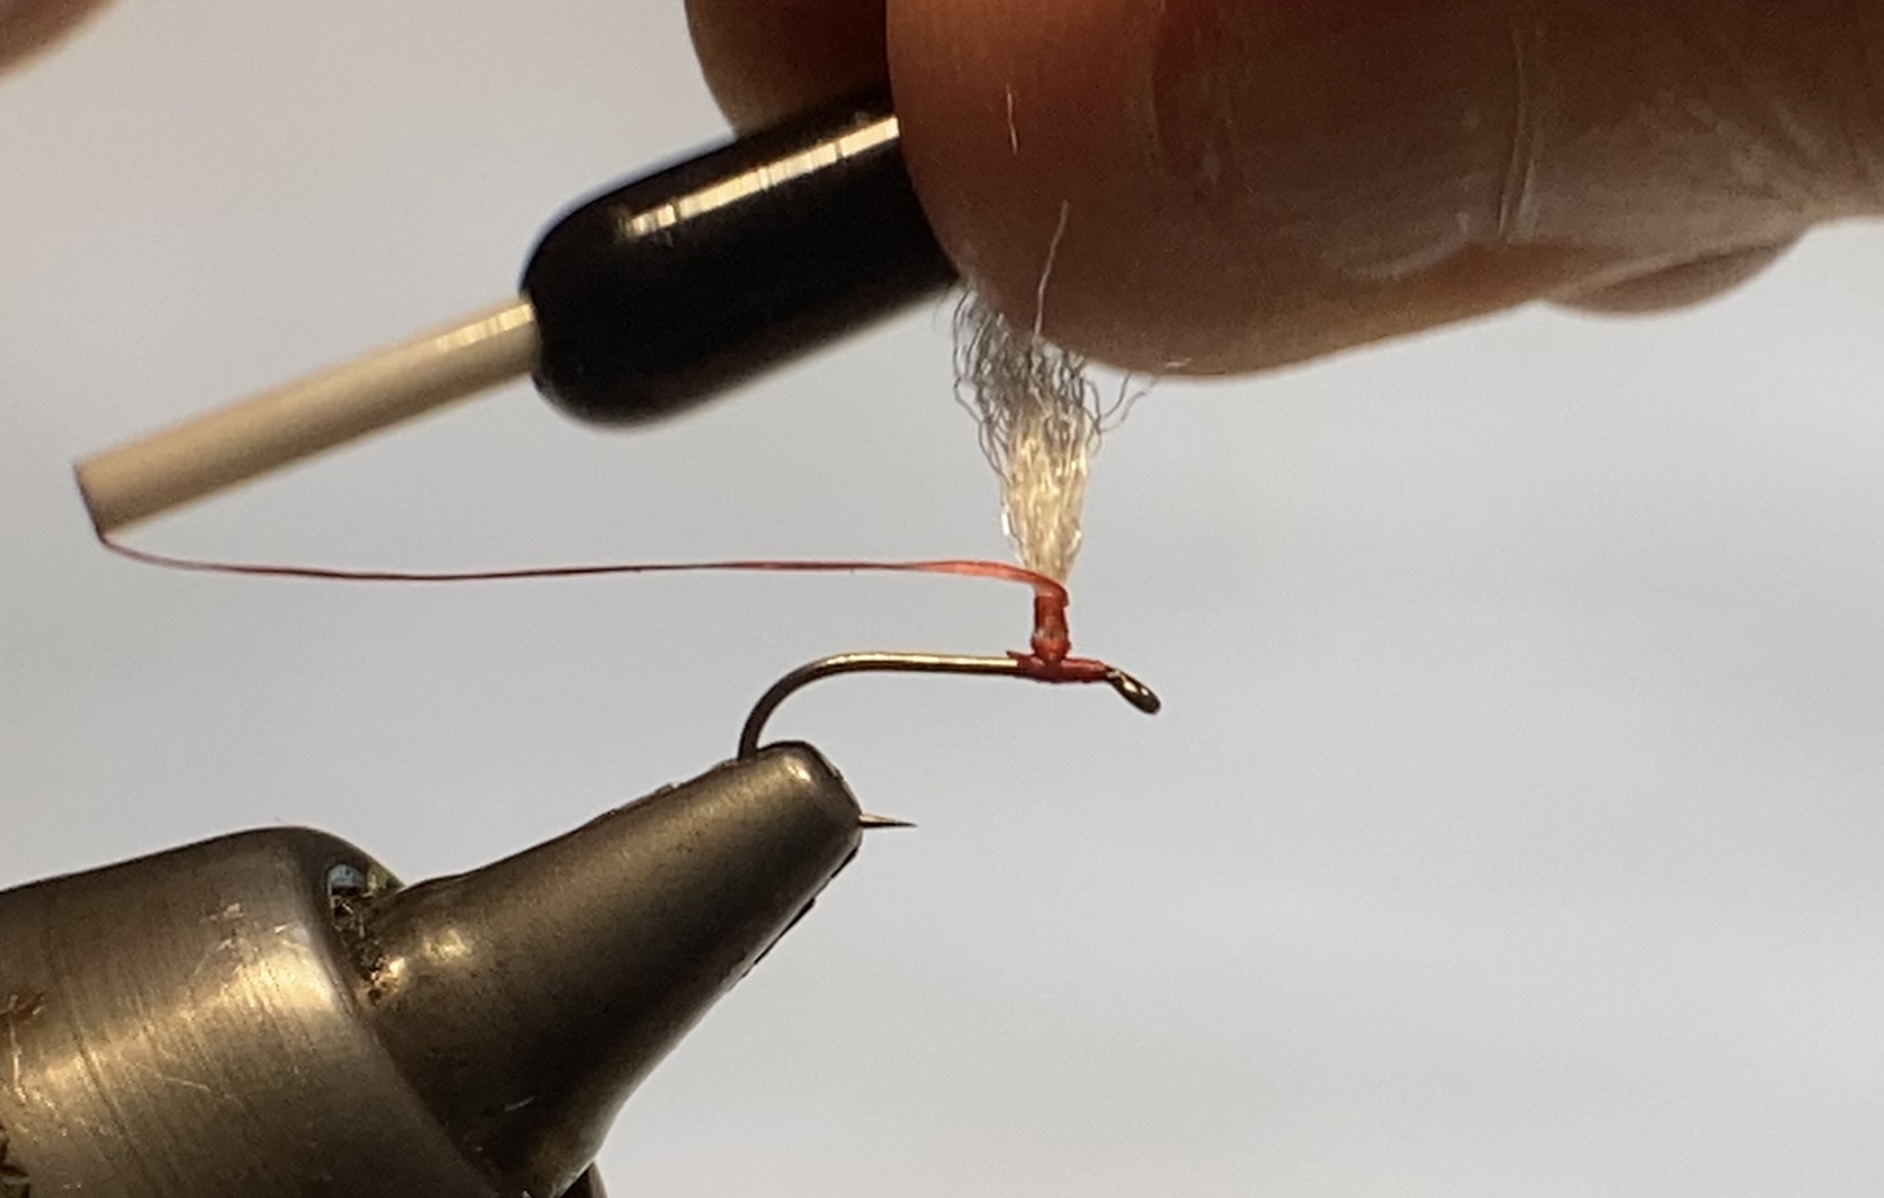
Photo 5. Under tension and ensuring the tinsel stays on top of the shank, pull the red holographic tinsel forward, and tie it down securely at the eye. Carefully apply a light coat of varnish on top of the red holographic tinsel and while it is still wet, pull the pearl tinsel forward over the wet varnish and secure the tinsel with thread at the eye, then remove both excess tinsels.
Photo 6. Wind the tapered Organza hackle in open spirals up the shank, ensuring the fibres point rearward and the tinsels remain on top of the hook shank. Tie down the Organza hackle securely at the head and remove the excess Organza hackle.
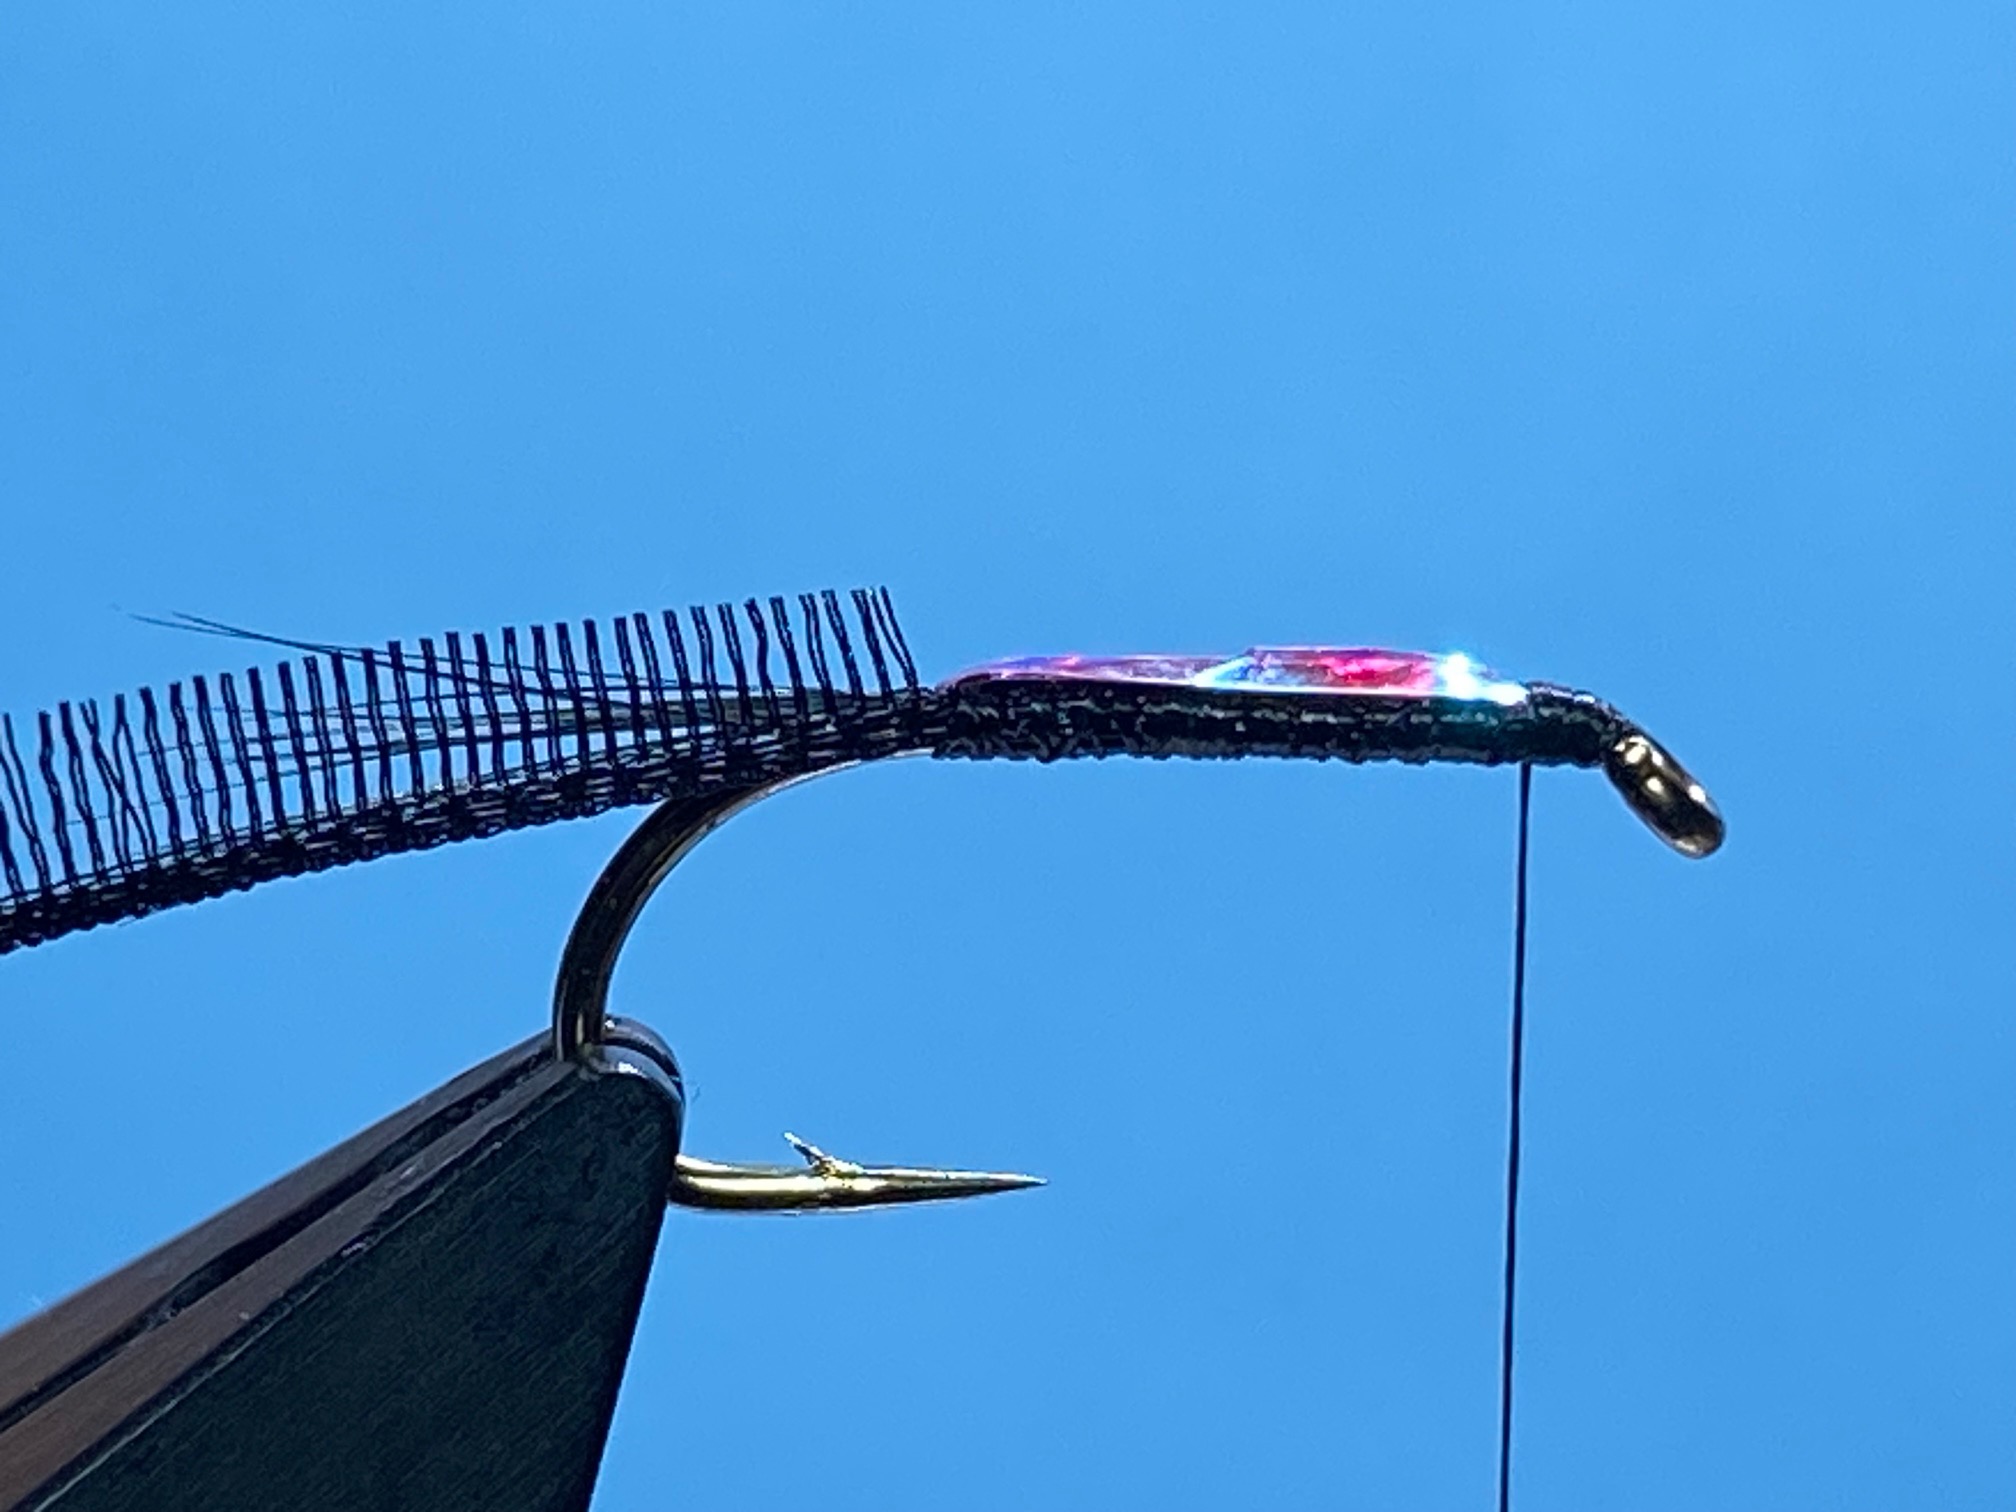

Photo 7. Align another bunch of cock hackle fibres as before and remove them from the hackle stem. Using a couple of upward pinch and loops, tie in the fibres below the shank as a throat hackle. If necessary, manipulate the fibres with your thumb nail to spread the fibres evenly below the shank, then lock them in place with a couple of tight turns of waxed thread. Remove the waste hackle fibre ends and tidy the area with thread.
Photo 8. Position a split jungle cock nail feather equally on either side of the hook shank and secure in place with tight turns of thread. Fold the waste feather stem back and bind it down with thread, then keeping the thread taught, break off the excess feather.


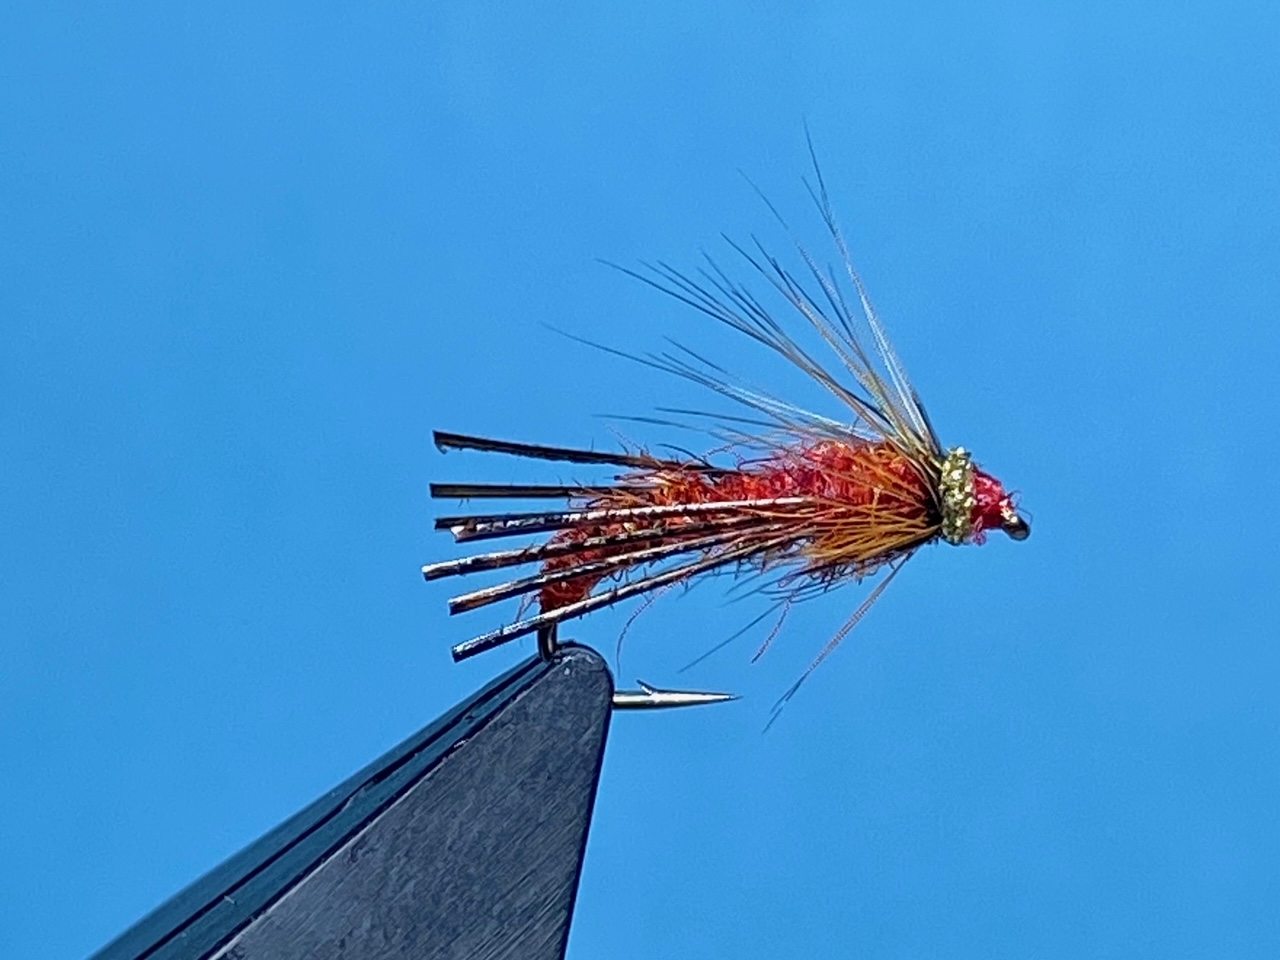
Photo 9. Dub a little dubbing onto the thread and wind it on to form a small head. Add some varnish to the thread, stroke back any dubbing fibres from the eye and whip finish through the varnish. Remove the thread to complete the fly.
Tying Tips
- Conventional Diawl Bach patterns tied with peacock herl or even pheasant tail fibres are often not very robust, but those made with Organza hackles are incredibly strong and as an added bonus, the individual Organza fibres impart a fair bit of movement to what is usually a very immobile pattern.
- Organza ribbon was originally made from silk, but most modern Organza ribbons are now made from either nylon or polyester. They come in a wide variety of colours and widths, with 12-15mm. being about right for trout flies. It is readily available from craft shops and haberdashery outlets, but it can also be purchased from fly tying suppliers usually labelled as Pseudo Hackle, but in terms of value for money, this is a much more expensive option.
- Organza ribbon consists of transverse fibres fixed along both outside edges (selvages), with numerous longitudinal filaments woven in between. To prepare a length of ribbon for use as a short palmered body hackle, the ribbon needs to be cut lengthways down the centre and all the longitudinal filaments removed from the two resulting halves, leaving just the selvages with the transverse fibres attached. The transverse fibres on each half of the ribbon can then be trimmed to a fine taper with fibres ranging from approximately 1 to 4 mm. in length. The narrow end of each tapered hackle can then have a few of the transverse fibres cut off leaving just the dark selvedge edge which is used to tie in the Organza hackle.
- Although not strictly necessary, I always tie down the two tinsels at the head separately, as this allows me to apply a light coat of varnish on top of the red holographic tinsel before securing the pearl tinsel on top. This introduces a very slight separation between the two tinsels which I feel intensifies the colour shifting, traffic light effect and also helps to keep both tinsels together. Initially at least, this effect seems quite bold, but after the Organza hackle has been wound over it, the effect becomes much more subtle as it shines and shifts between the fibres.
- When winding the tapered Organza hackle up the body, keep it taught, but take care to keep both tinsels squarely aligned on top of the shank.
- Remember to leave enough room at the eye for the cheeks and dubbed head. About 2mm. on a size 10 hook is a good guide.
- Coloured goose biots can be used as an alternative to the jungle cock nailfeather cheeks.
Fishing Hints
- This is an excellent year round nymphal pattern but is arguably most effective at the end of the season when the trout have become sated on fry.
- It can be fished on any density line depending on the prevailing conditions, although my preference would usually be for either a floating or long midge tip line.
- I often use this fly on the dropper with last month’s floating sparkler fry pattern on the point making a rather unusual, but very effective washing line set up, ideal for fishing over shallow water or decaying weed beds,but it can be equally effective when fished as part of a team of nymphsand cast towards the shore with a pulled retrieve.
Les Lockey – Oct ‘25
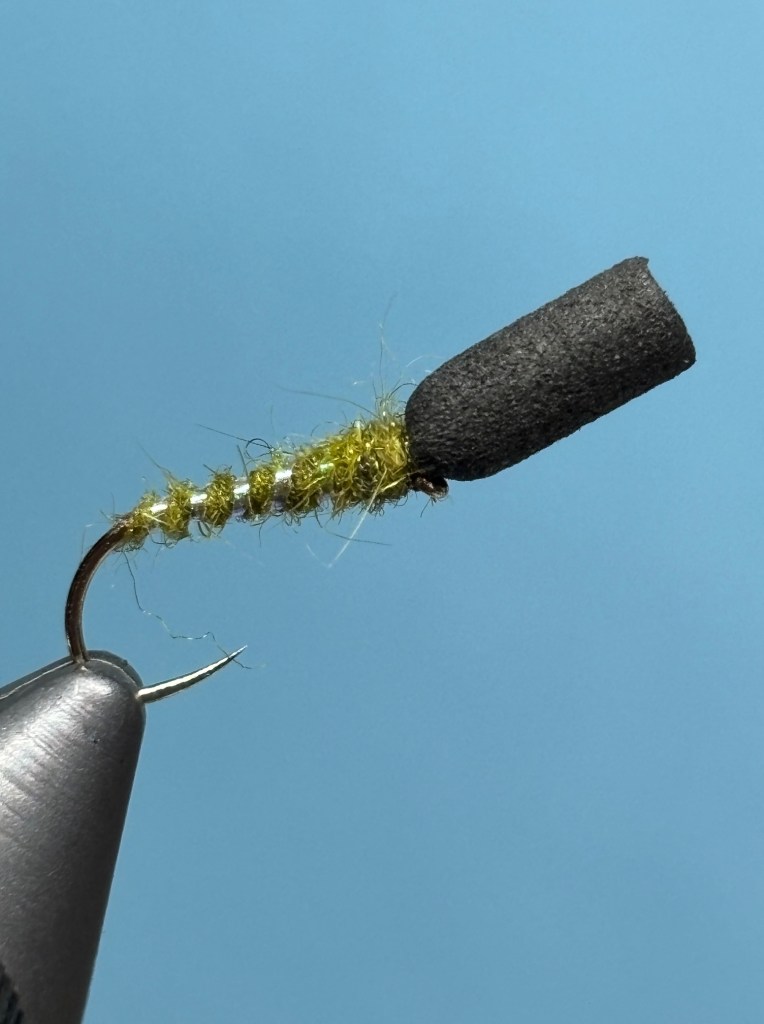
The Floating Sparkler Fry – A Fly for October
Hook: Competition Barbless, size 10, (from Flybox), or similar.
Thread: Black Veevus GSP, 50D.
Wing and Tail: Holographic black and gold Angle Flash, or similar.
Underwing: Olive Aero Dry Wing.
Body: 3mm White Plastazote foam cylinder.
NB: Superglue is an essential component in the tying of this pattern.

Photo 1. Place the hook in the vice and lay down a bed thread from the eye to just before the bend. Remove the thread tag and return the thread to the eye.
Photo 2. Take a bunch of the flash material approximately 10 cm in length and tie it in on top of the hook shank so that equal amounts of material extend behind the hook bend and in front of the hook eye. Keeping the flash material on top of the shank, bind it down with thread to just before the hook bend.


Photo 3. Trim one end of the foam cylinder to a point and tie in the cylinder by the prepared point and then take the thread to the eye.
Photo 4. Add a touch of superglue to the thread underbody and carefully wind the foam over the glue stopping at the eye. Secure the foam in place with several turns of well waxed thread and remove the excess foam.

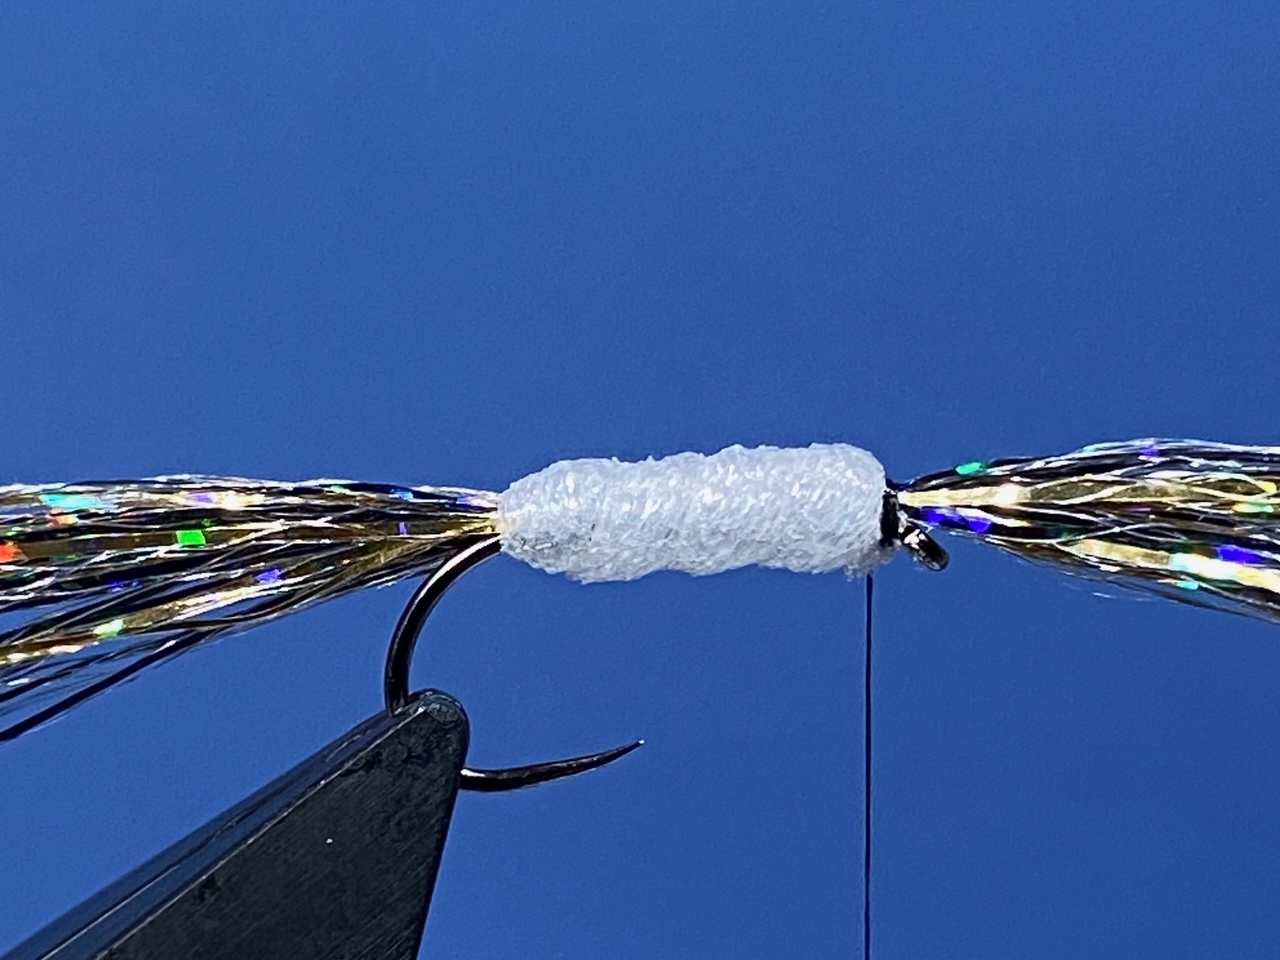
Photo 5. Double a length of Aero Dry Wing and tie it in centrally with the front half forward of the eye.
Photo 6. Take the thread in front of the flash material and wind it back pushing the forward facing materials upright in the process. Whip finish and remove the thread.
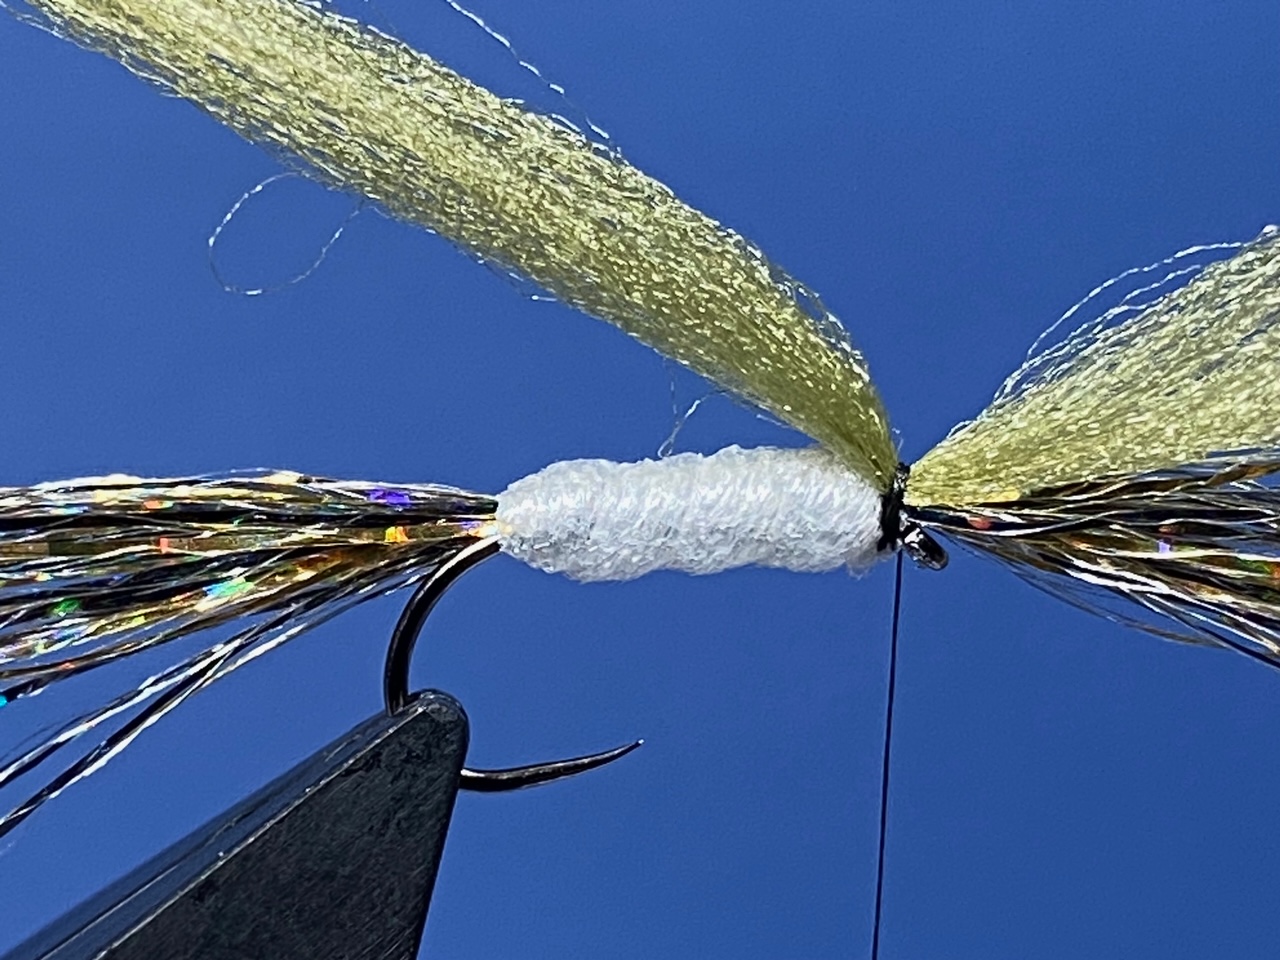
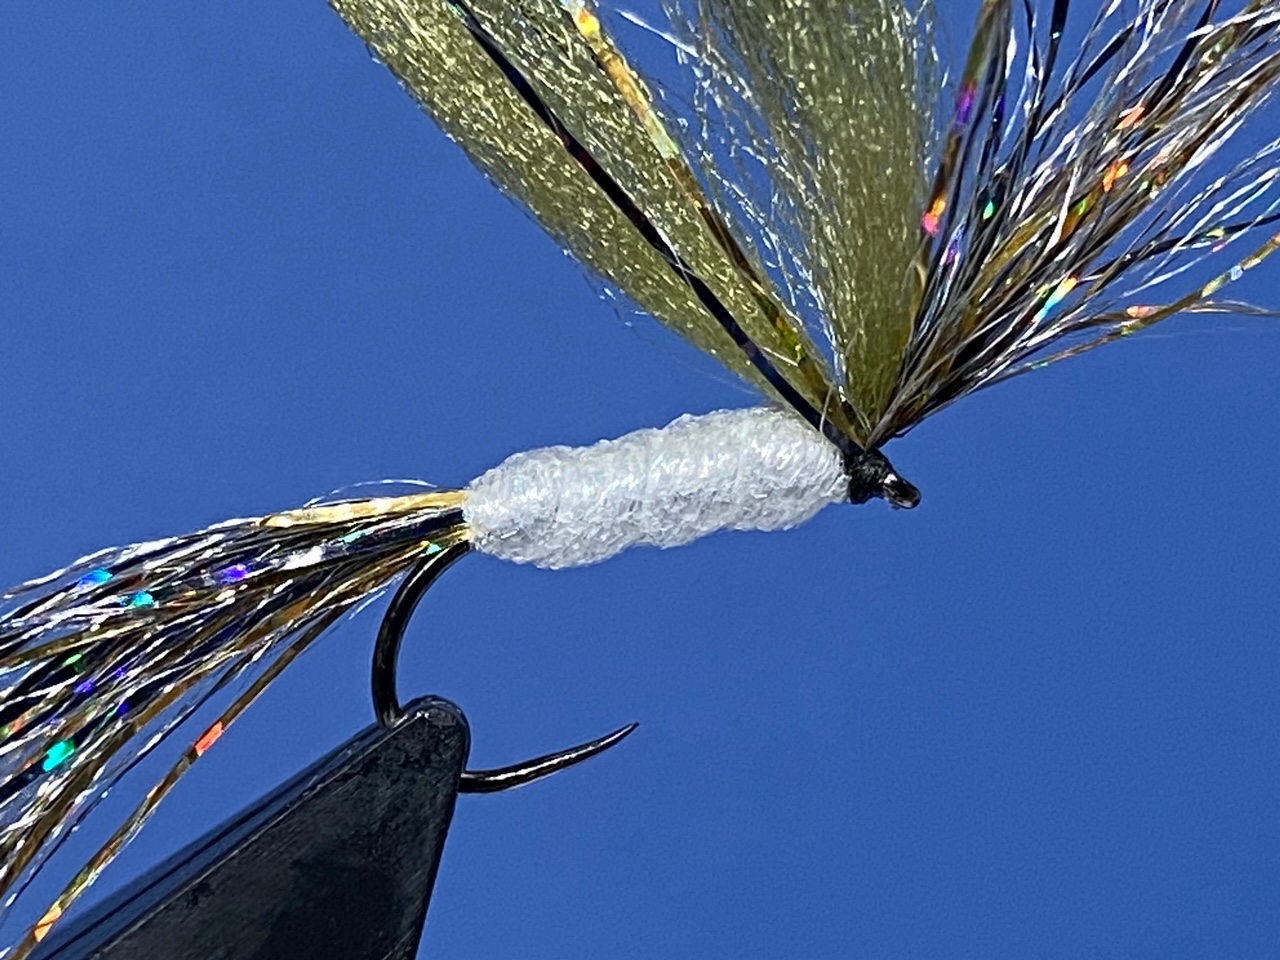
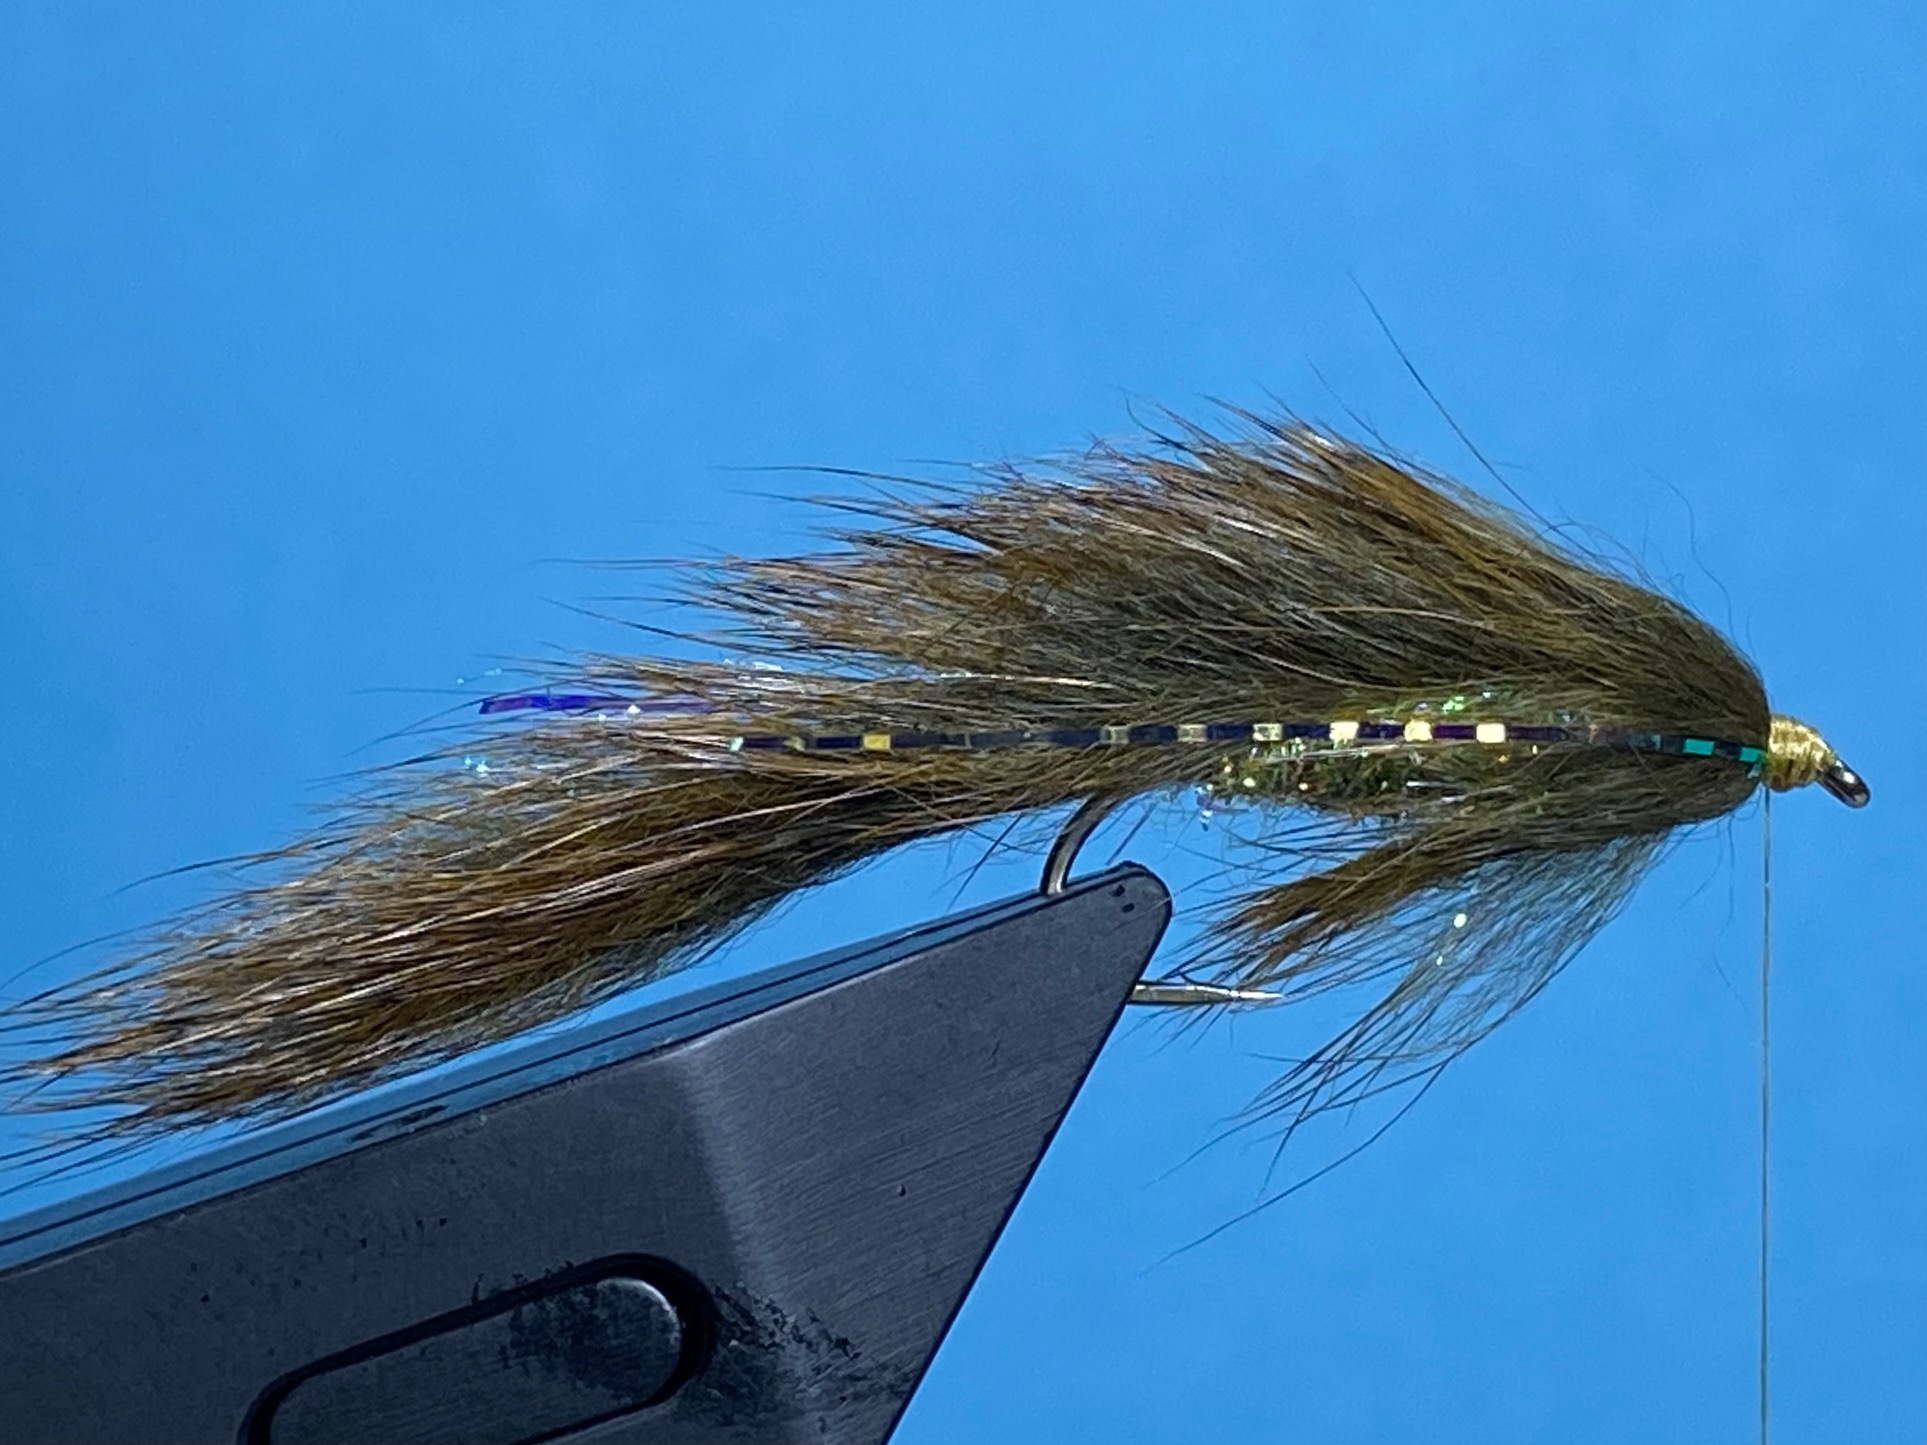
Photo 7. Pull all the upright material evenly back over the top of the foam bodyto form a tight head, and keeping the material in this position, brush some superglue onto the front of the material while continuing to hold the materials in place until the glue soaks in and sets. Once set, the flash and dry wing material should lie along the top of the foam body.
Photo 8. Apply a light coat of UV resin to the head section of the fly and cure it with a torch.


Photo 9. To complete the fly, trim the material with an angled upward cut to give a “fishy” shape.
Tying Tips
- This is a very simple, if somewhat unusual, pattern to tie, and as its construction relies heavily on the use of Superglue, be careful not to get glue on your fingers while giving the glue plenty of time to permeate through the wing materials and to dry thoroughly. The glue needs to be runny in order to permeate between the strands of the flash material, so the fresher the glue the better.
- If Angle Flash is not available, your favourite flash material can be substituted for the tail and wing material.
- Only use Plastazote foam cylinders for the body. High density foam cylinders are not pliable enough to be easily wound around the hook shank.
- Olive and black are good alternative colours to use for the body.
- Although I don’t bother, decal eyes can be added as an additional triggerpoint, if required. Just glue them in position, coat them with UV resin and cure with a torch.
Fishing Notes
- Coldingham Loch has good populations of perch and sticklebacks that become an important food resource for the trout from July onwards, but particularly towards the end of the season when stickleback and perch fry congregate in large shoals in shallow water around bankside structuresuch as jetties, dying weed beds, along the edge of the lilies and around the large stones in Swing Gate Bay. As a result, a floating or long midge tip line are usually the best options for fishing the floating sparkler fry pattern.
- I usually fish the pattern as a single fly using short pulls with long pauses to imitate an injured fry slowly floating to the surface, but it can also be popped through the surface, or as part of a team with a couple of Diawl Bachs or pearly pheasant tail nymphs above it.
Les Lockey – Sept ’25
The Pearly Daddy – (Sid Knight) – A Fly for September
Hook: Kamasan B800 lure hook, size 10.
Weight: 3.3 mm. Gold brass bead.
Tag: Glo Brite Floss, No 12, Fl. Green.
Thread: White UTC 70, and Veevus, 12/0, rusty dun.
Rib: Small UTC copper wire.
Underbody: White UTC 70 thread.
Overbody: Uni Pearl Mylar, size 12.
Thorax: Hare’s mask and fox squirrel fur, mixed.
Legs: 6 Cock pheasant centre tail fibres, knotted twice.
Wing: 2 Cree cock hackle point tips.
Hackle: Ginger or Cree cock.

Photo 1. Feed the bead on to the hook small hole first, and then secure the hook in the vice. For the tag, catch on the Glo Brite floss opposite the hook point and with the waste end over the hook bend, wind on the floss to the start of the hook bend and back to just before the starting position.
Photo 2. Pull the waste end of the floss over the top of the tag and secure it with the floss, then remove the waste floss.

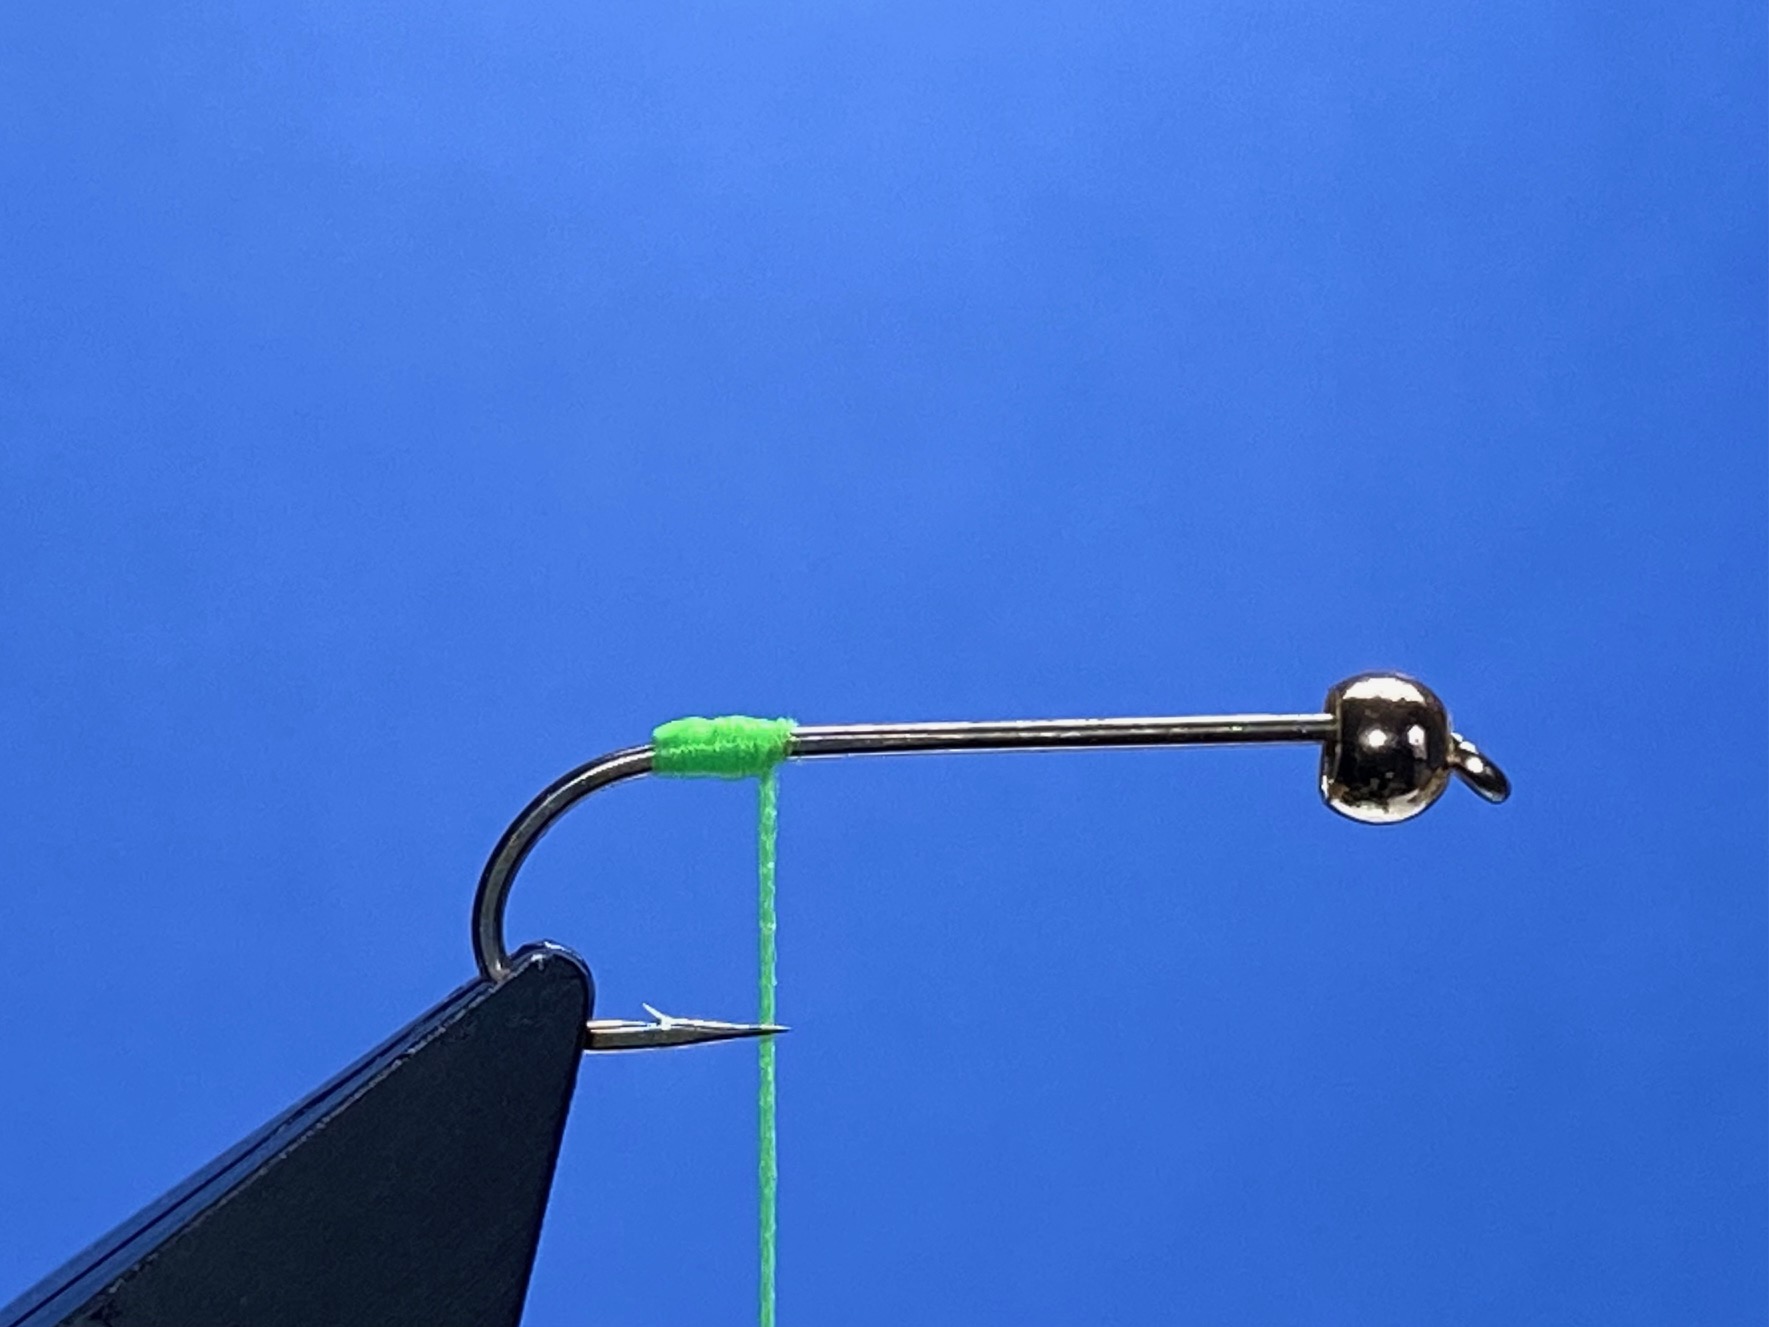
Photo 3. Starting behind the bead, wind on the white thread in touching turns, remove the excess thread and continue the thread to the floss tag.Secure the floss with the thread and remove the floss. Apply a small drop of UV resin to the tag and cure it with a torch.
Photo 4. Leaving the waste ends the same length as the body, tie in the copper wire followed by the pearl Mylar. Bind down both waste ends with thread stopping at the thorax position. Continue to form a smooth underbody by winding the thread in touching turns down to the tag and back to the thorax.
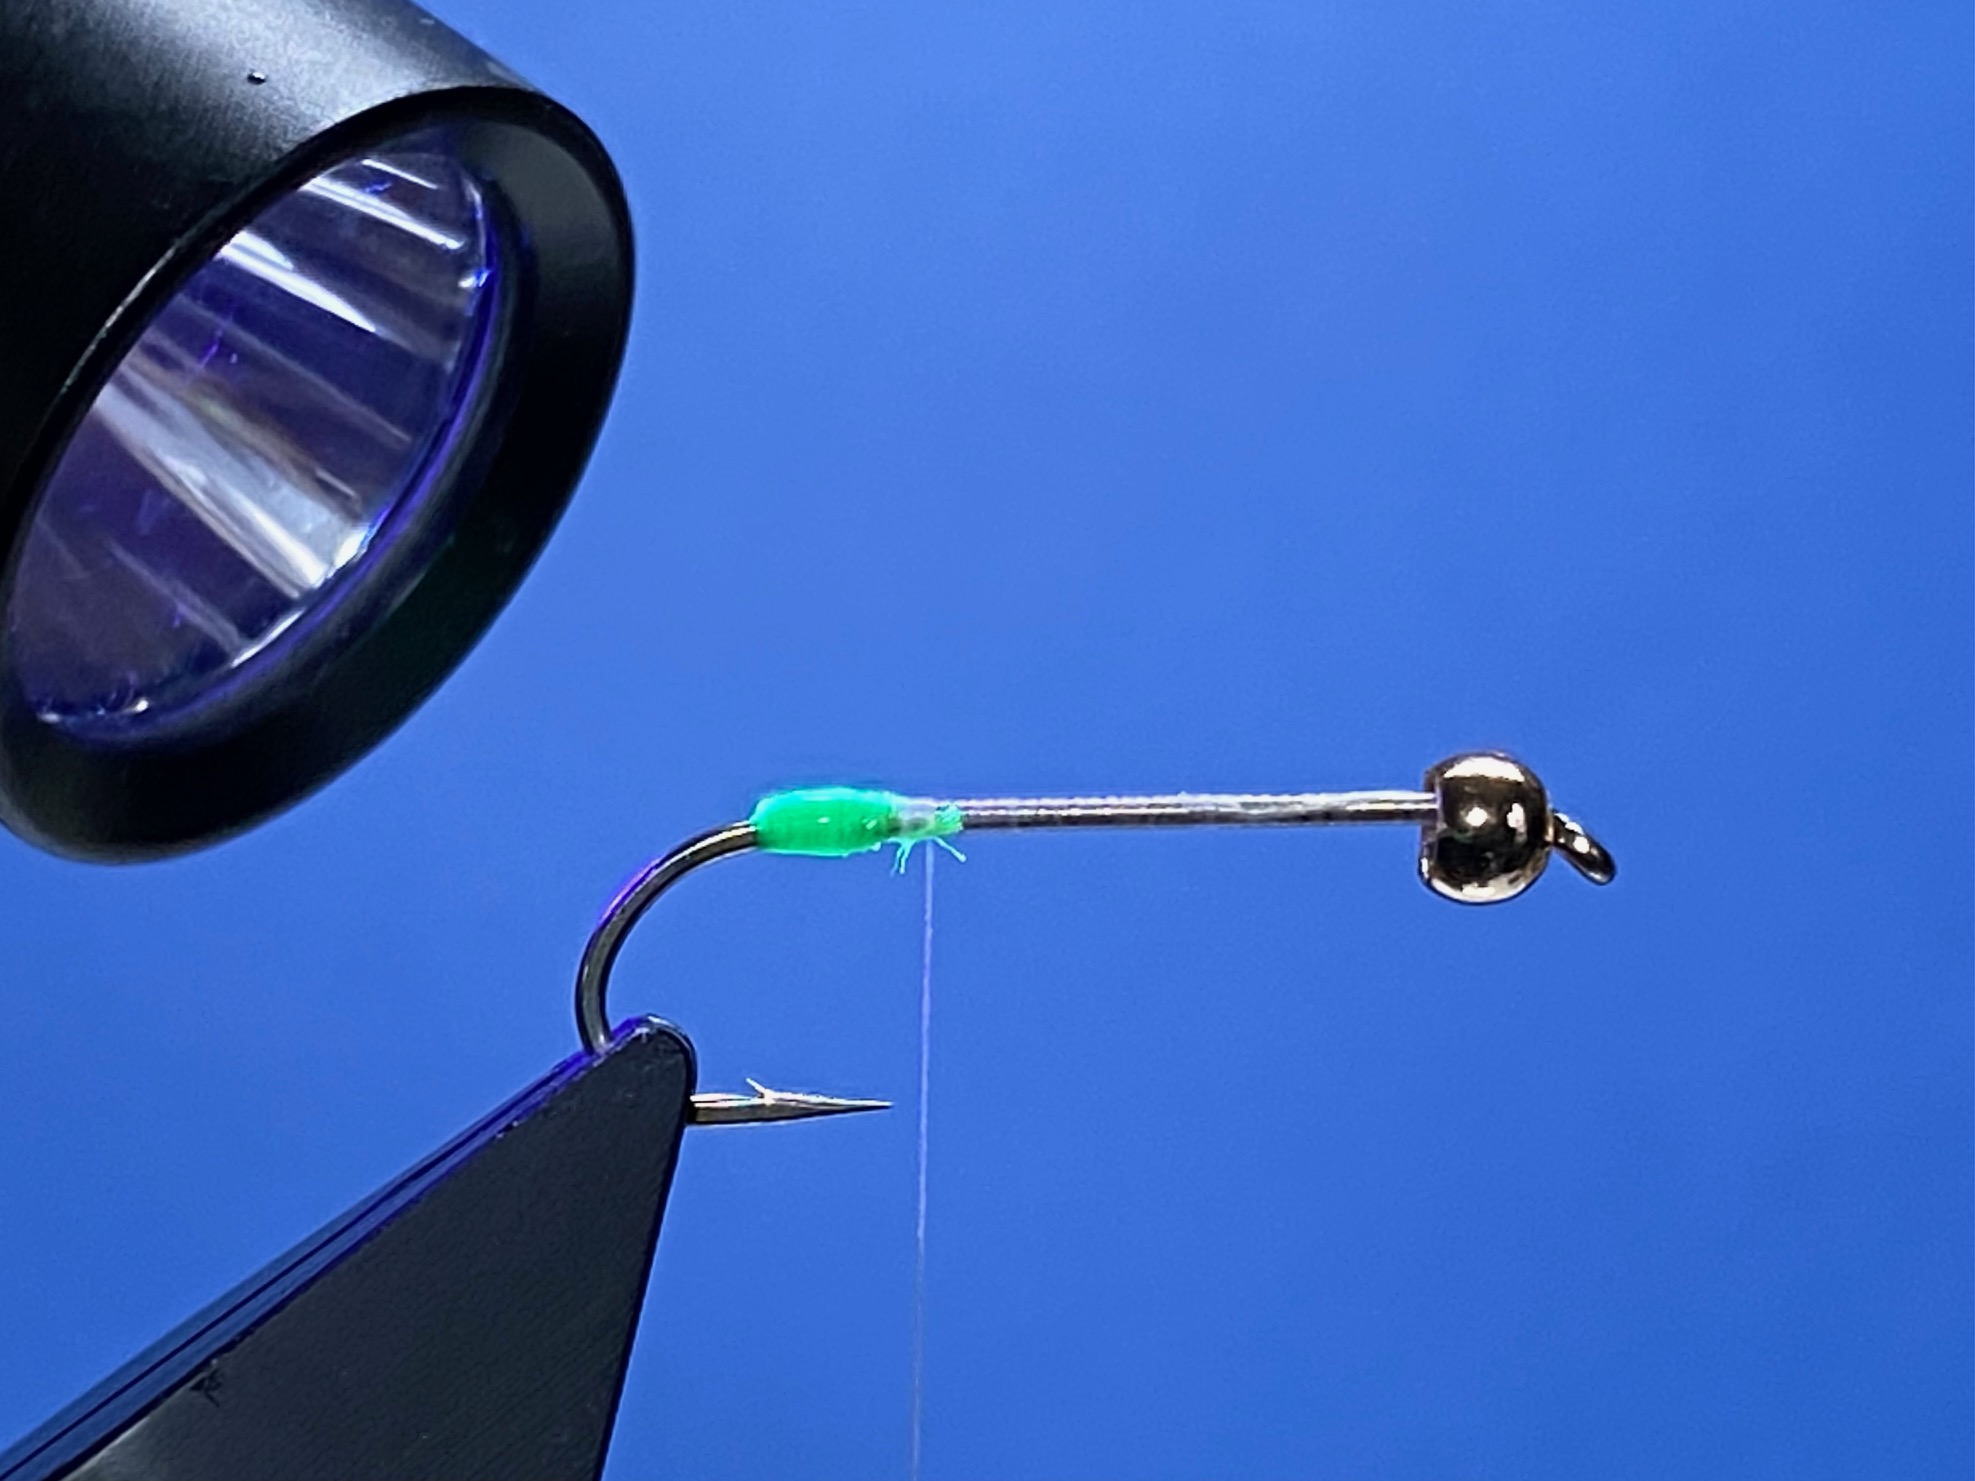

Photo 5. Wind the pearl Mylar over the white underbody in slightly overlapping turns, tie it down at the thorax and remove the waste Mylar. Wind the copper wire in open turns over the body and tie it down at the thorax. Continue to bind down the wire to the bead and worry off the excess wire.
Photo 6. Catch on the rusty dun thread and remove the waste thread tag. Use the rusty dun thread to secure the white thread and then remove the white thread. Dub a little of the fur mix onto the new thread and wind it on to form the rear part of a small thorax.

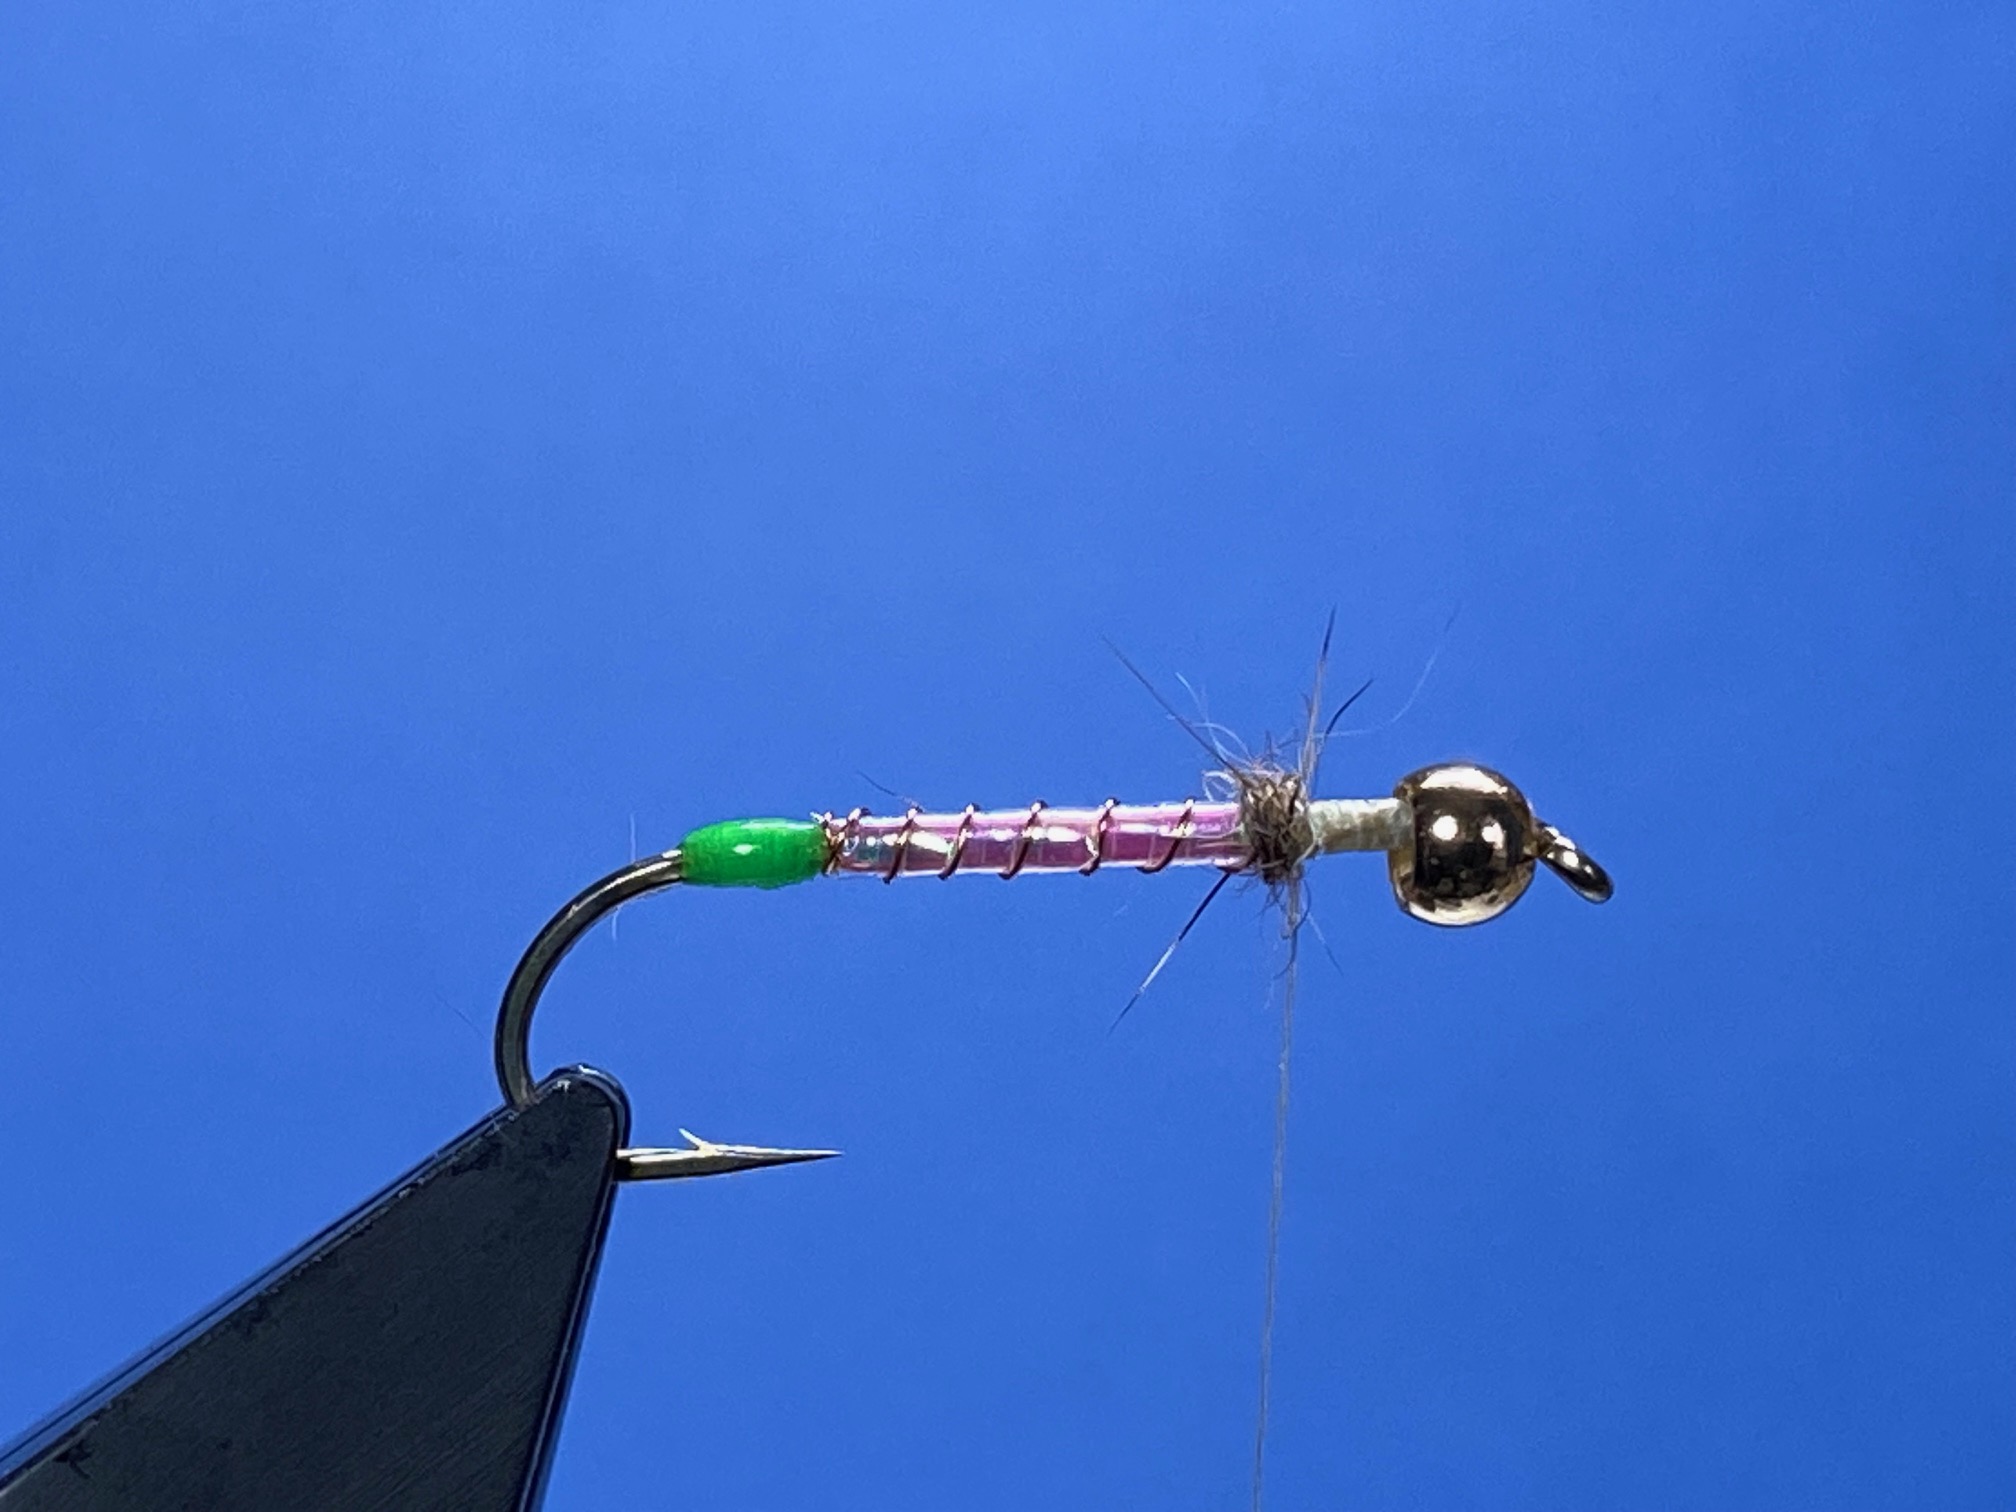
Photo 7. Tie in 3 knotted pheasant tail fibres on either side of the shank with their tips extending well past the hook bend, then remove the waste fibre ends.
Photo 8. Align the tips of two Cree hackle points and using a couple of pinch and loops, tie them in on top of the shank with their tips extending just past the hook bend. Now separate the hackle points into a V shape and lock them in position with a couple of turns of thread tight up against the dubbing.


Photo 9. Remove the basal fluffy fibres from the bottom of the cock hackle and trim the stem to about 2mm. in length. Using well waxed thread, secure the hackle by the short stem. Apply a little more fur dubbing to the thread and starting at the base of the wings, wind on the second part of the thorax.
Photo 10. Wind the hackle in open turns over the dubbing, tie it down behind the bead, and remove the excess hackle. Apply a touch more fur dubbing to the thread and wind it on to cover the turns of thread securing the hackle.

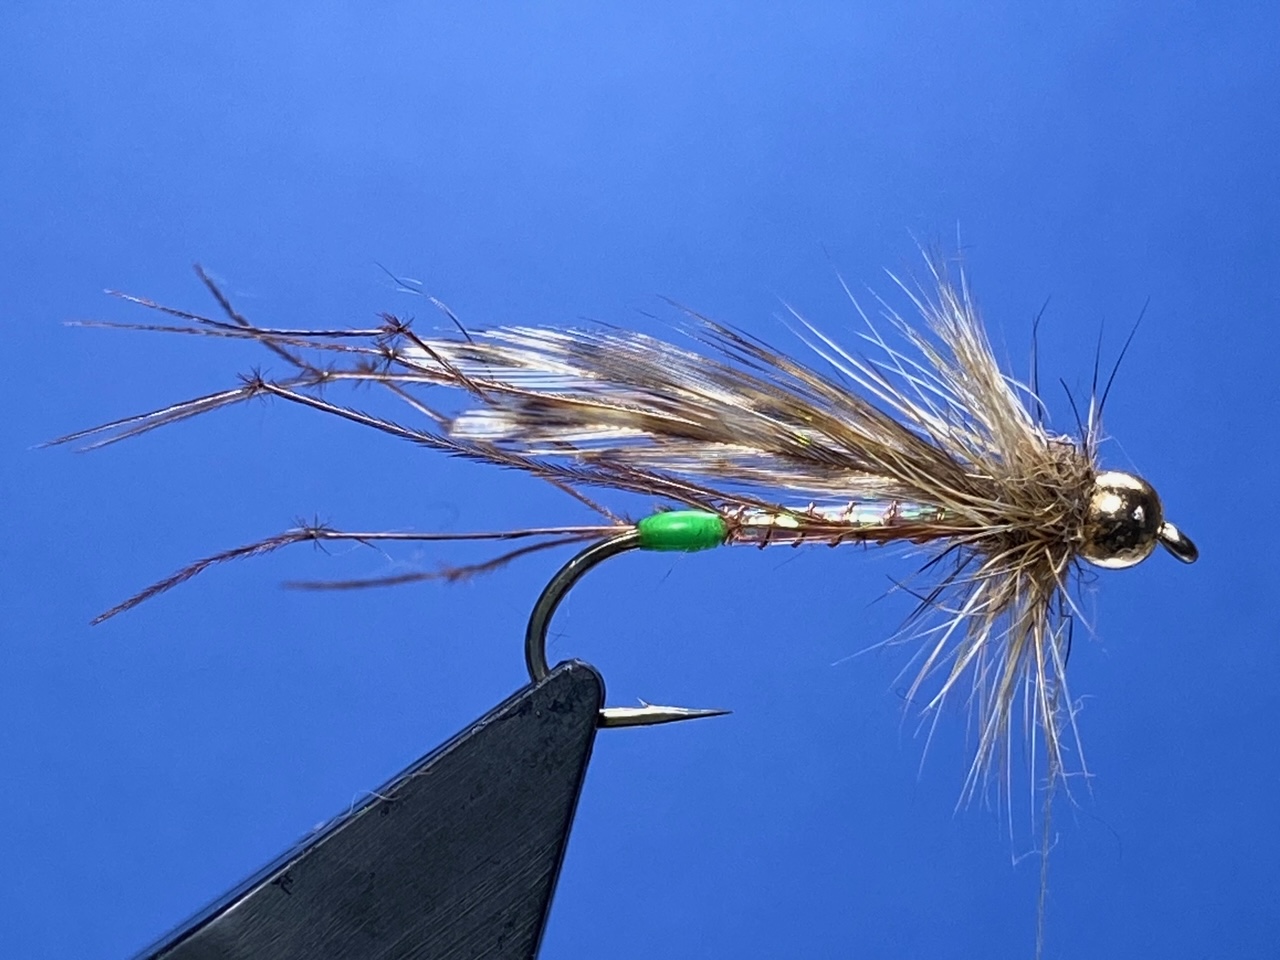

Photo 11. Add some varnish to the thread, whip finish through it and cut off the thread, to complete the fly.
Tying Tips
- Given the long list of materials for this fly, it might be thought of as a difficult fly to tie, but it is actually quite straightforward, so long as youleave enough space at the thorax for the legs, wings, and hackle.
- Pulling the waste end of the floss over the top of the tag stops the tag from slipping down around the hook bend and is something I do without thinking, but with the advent of UV resin, this is not strickly necessary.
- White flat thread makes a nice smooth underbody on which to wind the pearl Mylar, but a more muted thread colour such as rusty dun is bestused for the rest of the fly.
- The thorax is dubbed in three parts, so it needs to be kept small and fine. The first part of the thorax helps to separate the legs and wings, while winding the hackle over the second part of the thorax helps to bed in the hackle, and the third part of the thorax is simply to cover the thread wraps used to tie down the hackle and gently force the hackle fibres rearward.
Fishing hints
- This is an excellent pattern from the vice of the late Sid Knight, who was probably best known for controversially trying to patent Trevor Housby’s dog nobbler. Thankfully this was refused, but the idea of having a weighted bead at the head to increase movement in the fly, was truly a lightbulb moment that has now been widely adopted throughout the world of fly tying and fly fishing.
- Despite never having seen a crane fly with a green butt and a white pearly body, this is a very effective pattern, even when crane flies are nowhere to be seen.
- It is usually fished on a floating line and long leader with a jerky retrieve to maximise movement in the legs. However, and perhaps rather surprisingly, the fly also works well when fished static, either under an indicator, or with a very, very slow figure of eight.
Les Lockey – Aug ’25
The Invicta – (James Ogden) – A Fly for August
Hook: Kamasan B170 or B175, wet fly hook, sizes 10 – 14.
Thread: Veevus GSP, 50D, in black or brown, or any black or brown thread.
Tail: Golden pheasant crest feather.
Rib: Fine oval gold tinsel, or gold wire for smaller hook sizes.
Body: Yellow seal’s fur.
Hackle: Furnace or Red Game cock hackle.
Throat hackle: Blue Jay fibres.
Wing: Hen pheasant centre tail fibres.

Photo 1. With the hook secured in the vice, start the thread a couple of millimeters from the eye and wind on a bed of thread to a point opposite the barb and remove the thread tag.
Photo 2. Using just a couple of thread turns, tie in the golden pheasant crest feather on top of the hook shank as a tail, approximately equal in length to the body of the fly, then trim off the excess feather the same length as the body. In similar fashion, tie in the oval tinsel rib.


Photo 3. Bind down both materials to the end of the body and return the thread to the tail.
Photo 4. Dub some seal’s fur onto the thread and wind the dubbing noodle up the shank to form a tapered body.


Photo 5. Remove the fluffy fibres from the base of the cock hackle and trim the stalk to about 2mm. in length. Secure the feather by the short stalk using a few tight turns of waxed thread.
Photo 6. Wind on two close turns of hackle at the head and continue to palmer the hackle in open turns down the body to the tail. Trap the hackle with the oval tinsel and continue to wind the tinsel in open turns through the hackle to the end of the body. Secure the tinsel with a few turns of thread and remove the excesstinsel. Tidy the area with thread ready for the throat hackle and trim off the hackle tip at the tail.


Photo 7. Align the tips of a small bunch of blue jay fibres and remove them from the feather stem. Position the bunch of fibres beneath the shank with the fibre tips reaching the hook point and tie them in place with a couple of turns of waxed thread. Carefully manipulate the fibres with your thumb nail to form an evenly distributed throat or beard hackle, then secure in place with several more turns of thread, before carefully cutting off the waste butt ends. Tidy the area with thread ready for the wing.
Photo 8. Select two feather slips of equal widths from opposite sides of a hen pheasant centre tail feather. Place the slips together with the good sides facing out and align the feather tips. Position the pair of slips on top of the shank with the tips extending to about the tip of the tail and carefully tie them in using a couple of pinch and loop thread turns.


Photo 9. Check the wing is sitting correctly and then with well waxed thread, secure the wing in position with several more turns of thread. Hold the wing to avoid it twisting and then cut off the excess wing fibres. Bring the thread to the hook eye, and winding rearward, bind down the cut ends of the wing forming a neat head as you go.
Photo 10. Whip finish, remove the thread, and varnish the head to complete the fly.

Tying Tips
- In this pattern, yellow seal’s fur is used for the body, hen pheasant centre tail fibres for the wing and blue jay fibres for the throat hackle, making it a good test of your fly tying skills, but yellow wool, hen pheasant wing quills and blue guinea fowl feather fibres are commonly used as much easier and cheaper alternatives.
- The thread colour for this pattern should be black, but I like to use a mid-brown coloured thread which I feel blends better with the overall tonal range of the fly.
- Whenever possible, try to select a nicely curved golden pheasant crest feather for the tail, as this creates a much more balanced fly. You can create a nice curve in these feathers by soaking the feathers in boiling water, then remove them with a pair of tweezers and mould them around a smooth, cold, curved surface such as the neck of a bottle, metal tubeetc. and when dry, the feathers will have taken on the curve of their substrate.
- When tying in the oval tinsel rib, always make the first securing thread turn towards the eye and away from the tail. This helps to avoid the tinselfrom disturbing the set of the tail particularly at the point where the rib isused to trap the palmered body hackle.
- For the beard or throat hackle, use a well-marked blue jay feather,ensuring the fibres are long enough to reach the hook point. Once a suitable feather has been selected, align the tips of a bunch of fibres, and while holding the aligned fibre tips, pull them off the stem. The fibres can then be positioned under the shank and tied in using an upward pinch and loop, or alternatively, the hook can be inverted and the fibres tied down in the usual manner. I make a couple of locating thread turns to hold the fibres in position and then gently spread the fibres around the underside of the shank with my thumb nail, before securing in place with tighter turns of thread and trimming off the waste ends. It is important to then form a stable and smooth thread base on which to tie the wing.
- Hen pheasant centre tail wing slips are used for the wing in this pattern, but these are notoriously difficult to work with, which is why most tiers use hen pheasant wing quills as a much simpler alternative. There are two main problems with hen pheasant tail fibres – firstly, the taper of the majority of the fibres is invariable far too long, and secondly, the individual fibres are quite coarse and don’t hold together well. That said, if you can get fresh hen pheasant centre tail feathers, and only take wing slips from the bottom inch or so at the base of the feather, this should help mitigate these problems.
- The method I use to tie the wing starts by separating wing slips of equal width on each side of the feather stem and then pulling them off the stem.This also pulls off a small part of the stem which helps to keep the fibres together and allows the slips to be manipulated without the fibres separating. The wing slips are then placed together back to back, ensuringthey are equal in width and the tips are aligned. I then gauge the paired wing slips for length and hold them tightly in position with the bottom of the slips on top of the shank, and using the pinch and loop method, I carefully take the thread up the side of the wing and pinch it between my left thumb and the hook shank, then I loop the thread over the wing and pinch it again between my fore finger and hook shank on the other side of the hook, forming a thread loop over the wing slips and pinched between finger and thumb. The thread is then slowly and carefully pulled straight down under even tension while the wing slips remain tightly held between finger and thumb. This process is repeated twice more before releasing my grip on the wing slips to assess the wing. Assuming wing length and orientation is ok, I take hold of the wing and make a couple more turns of thread towards the eye to secure the wing in position and while still holding the wing between finger and thumb, I cut off the waste wing fibres. This supports the wing and stops it from twisting when being cut. Once trimmed, the thread is taken to the eye and wound back into the cut fibre ends forming a nice head in the process, but it is important not to wind the thread past the point where the first pinch and loop was made, as this will distort the wing.
Fishing Notes
- This is truly a classic traditional wet fly dating back to around 1850, but don’t let that put you off. It has withstood the test of time for a very good reason – it works, and not just as a caddis or sedge imitation. Rather surprisingly, the Invicta and its silver bodied cousin also work really well when fish are taking pin fry.
- I fish the pattern anytime from June to September, and always on the top dropper, using either a floating or sink tip line, invariably with a sedge pupa or small damsel nymph on the point, but it can also work well on the point or top dropper when fishing a team of wet flies.
- When fished as a caddis imitation, it often works best in the early eveningbefore a caddis hatch becomes visible at the surface. In this case I like to fish a weighted sedge pupa on the point with the Invicta on the dropper.
Les Lockey – July ‘25
The Cooper Bug – Dry Fly / Emerger (Jack Cooper) – A Fly for July
Hook: Kamasan B170, size 10 to 16.
Thread: Roman Moser Powersilk, 10/0, Olive, or colour to match hatching insect.
Tail, Shellback & Head: Cow Elk or White Tail Coastal deer hair.
Body: Orkney Peach Seal’s fur, or colour to match hatching insect.

Photo 1. Secure the hook in the vice and starting at the eye, wind on a bed of thread to just before the hook bend and remove the waste thread.
Photo 2. Cut a small bunch of Elk hair from the hide, remove any broken fibres and underfur before inserting the hair, tips first, into a hair stacker. Tap the stacker a few times on the bench to align the tips and carefully separate the two parts of the stacker to reveal the aligned tips.


Photo 3. Carefully remove the aligned hair from the stacker and with the tips as a tail, tie in the elk hair on top of the shank and make a couple of locking turns in front of the elk hair.
Photo 4. Dub some seal’s fur on to the thread and wind the dubbing noodle up the shank to form a slightly tapered body.
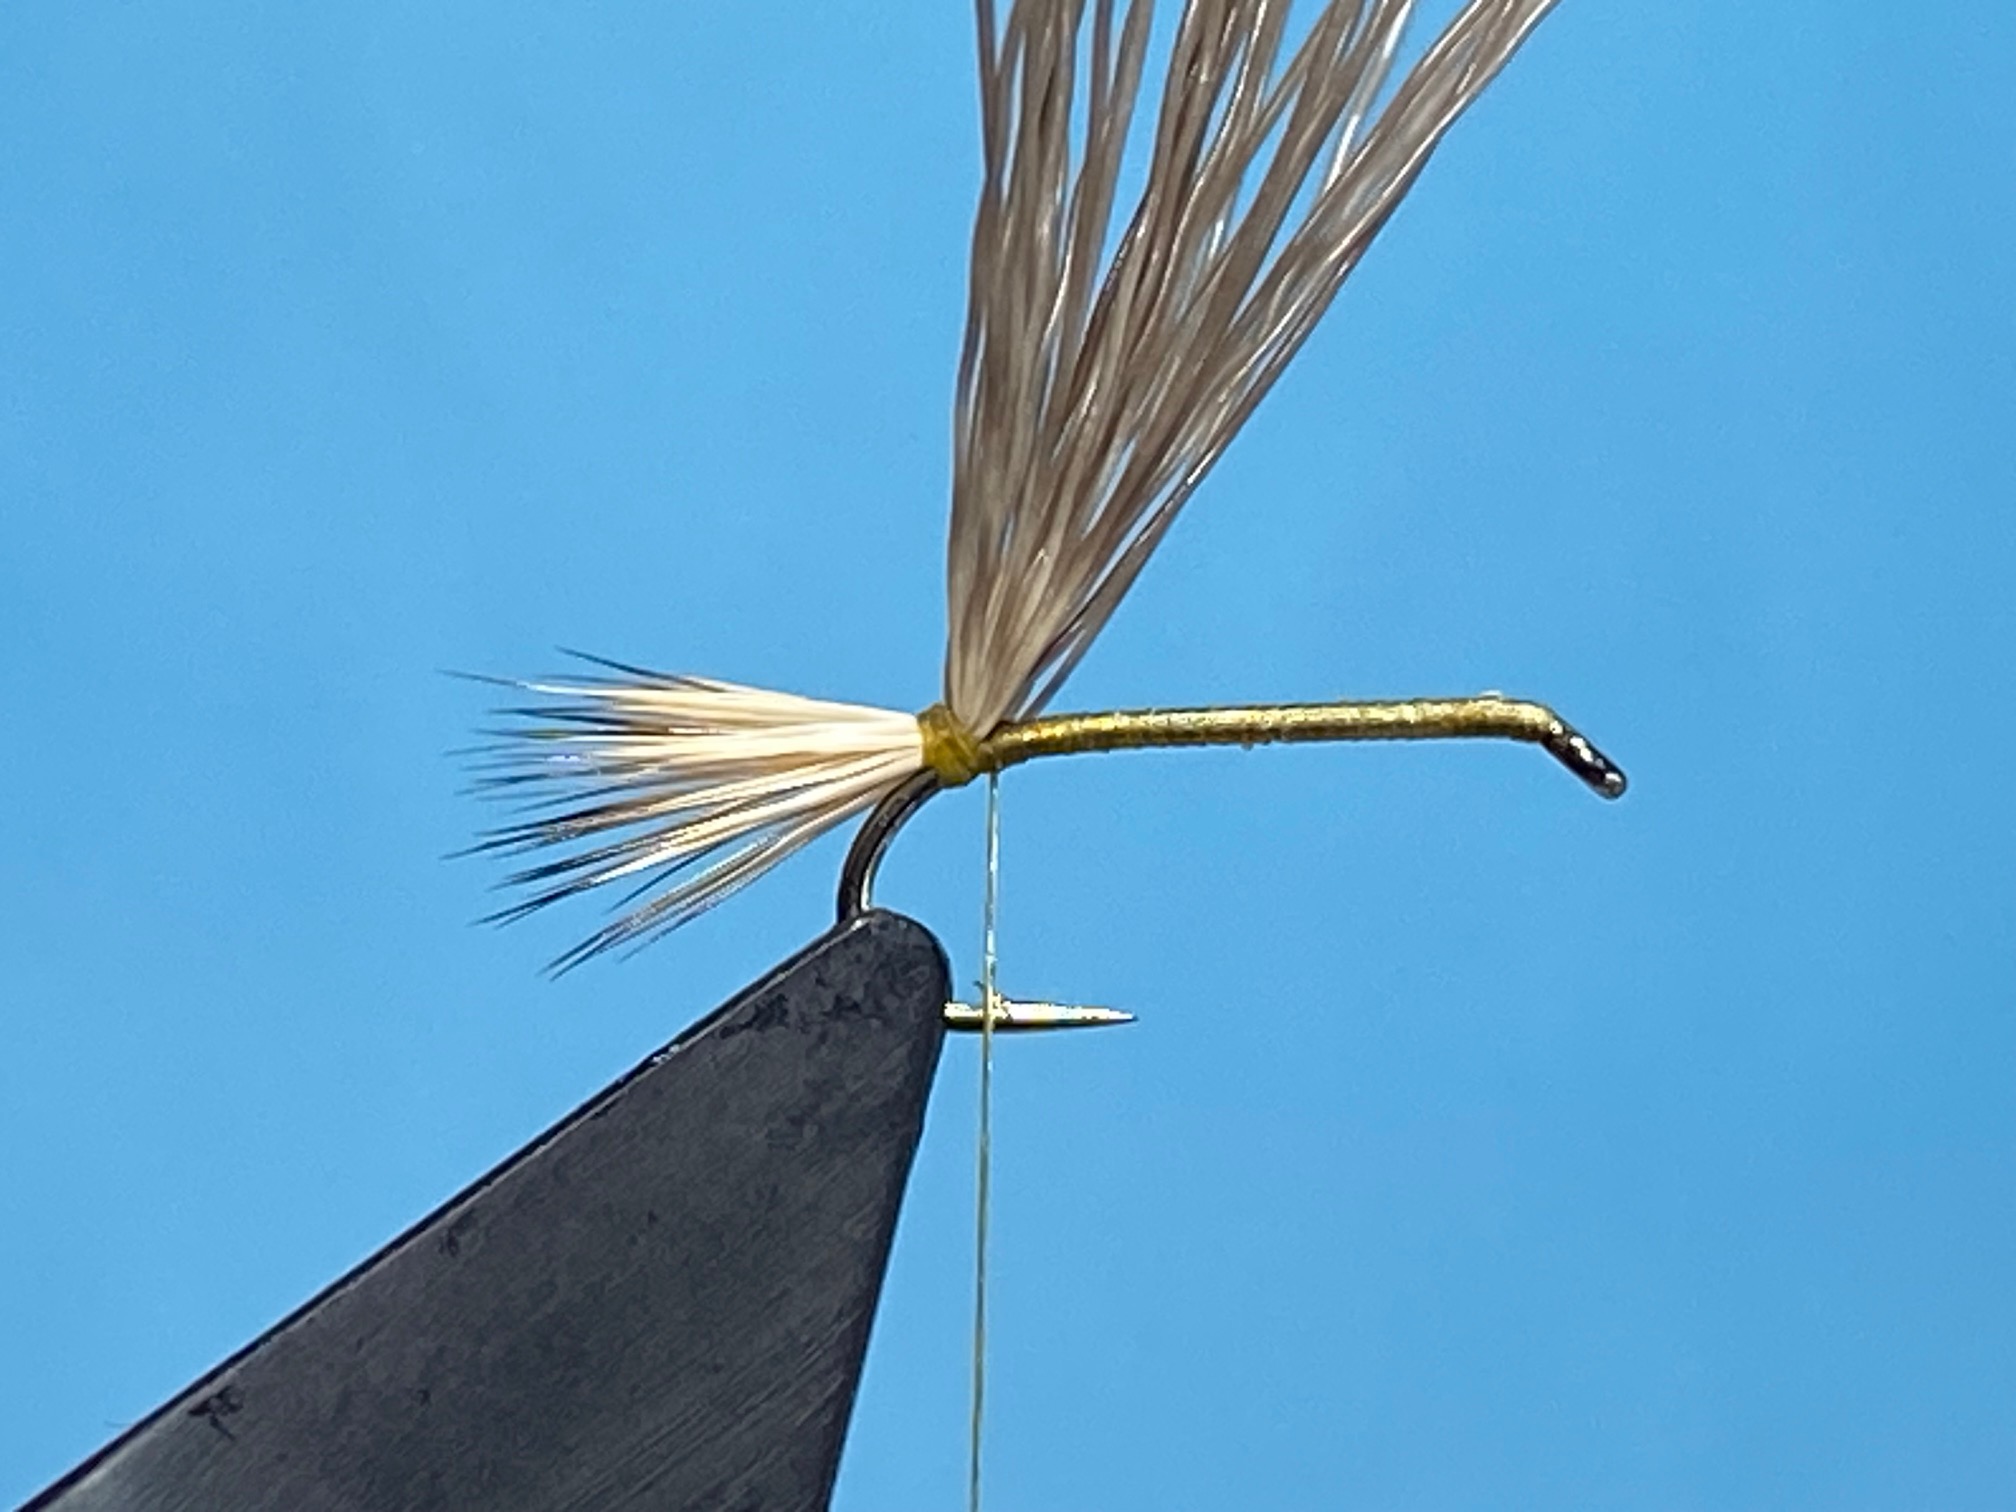

Photo 5. Keeping the elk hair fibres straight and under light tension, form a shellback by gently pulling the fibres over the top of the dubbed body then tiethem down at the head.
Photo 6. Lift up the elk hair and make a couple of locking thread turns in front of the elk hair. Tidy the head with a few turns of thread, apply some varnish to the thread and whip finish through it, then remove the thread.

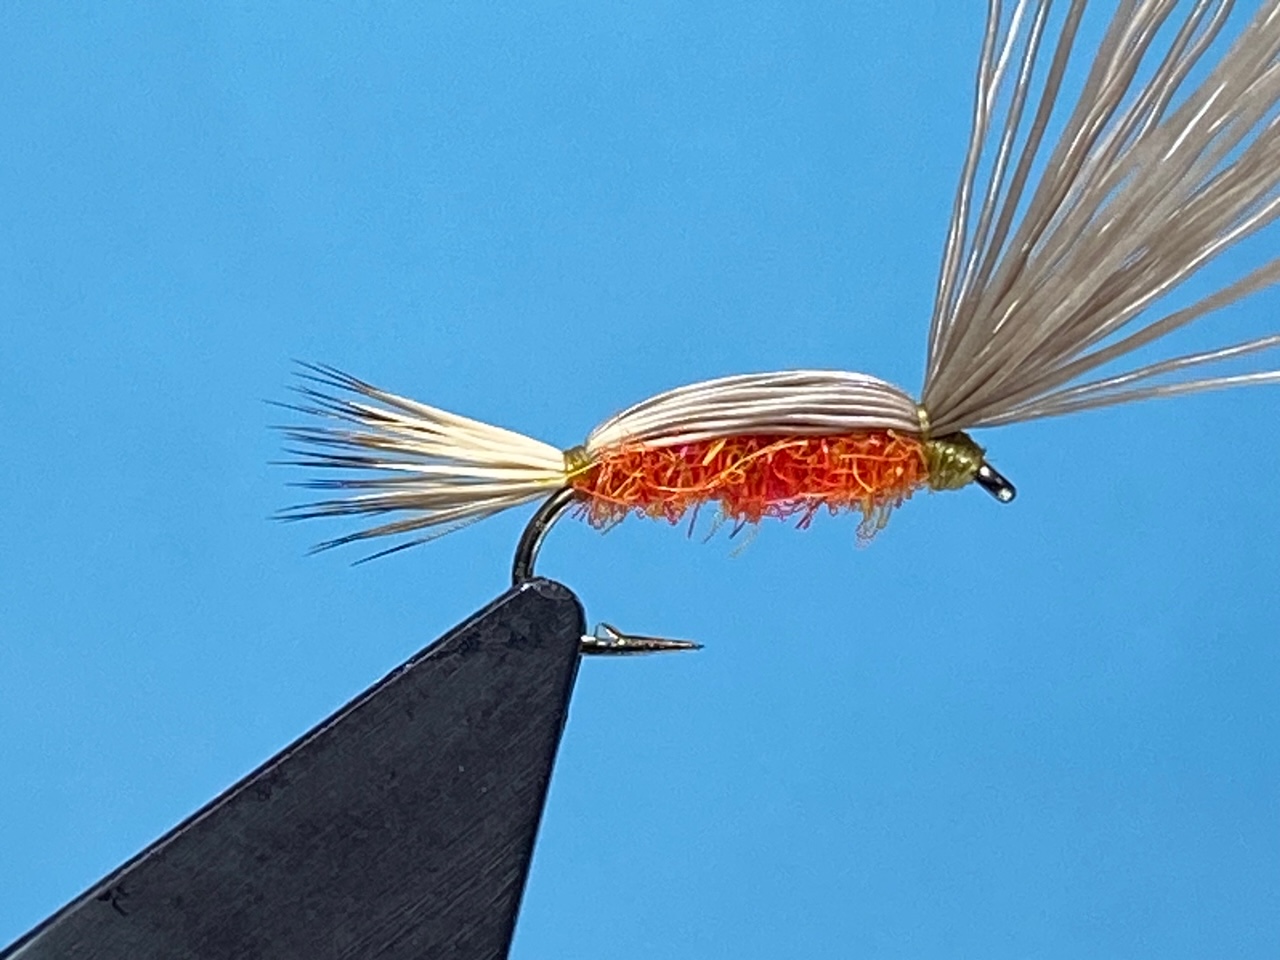
Photo 7. To complete the fly, trim off the excess elk hair leaving a short stubprotruding over the eye.
Tying Tips
- This fly was created by Jack Cooper from New England, in the 1930s, and was so successful that he tried to have the pattern patented, but thankfully this was rejected. The pattern itself is arguably a method of tying, rather than an exact pattern, since hook size, body colour, and indeed the body material itself, can all be changed to match a variety of insects ranging from hatching buzzers to emerging sedges.
- With 17 sub species of White Tail deer and 8 sub species of Mule deer, plus Caribou and Moose, most commercially available deer hair for fly tying comes from America, although in the UK, Roe and Red deer, can be added to that list. However, when it comes to Elk hair the picture is rather confusing, since hair marketed as Elk hair is not from Elk at all but comes from a larger American relation of the Red deer called a Wapiti. In addition, here in the UK and Europe, the animal we know as Elk, is actually called Moose in the USA.
- Ideally, the best hair to use for this pattern is early season cow elk, but such a specific hair can be difficult to source in the UK, although we are beginning to see a much wider selection of deer hair on offer from specialist companies like Hareline and Nature Spirit.
- Cut away the bunch of hair from as close to the skin as possible. This makes cutting successive bunches much more straightforward.
- Before stacking the hair, take the bunch of fibres and hold the tips between finger and thumb then twist it slightly to spread the fibres, then pull away any broken fibres and remove the fine underfur, either by hand, or with the aid of a fine nit comb, which is my preferred option. It is important to remove as much of the underfur as possible, otherwise the hair will not stack or align properly. Interestingly, the quantity of underfur present in deer hair depends on when the animal was culled, with early season hair having the least and late season the most.
- In terms of quantity, once stacked and lightly compressed, the bunch of hair should be slightly thicker than the lead in a pencil.
- When tying in the elk hair tail, I hold the tips tightly between fore finger and thumb and make a lightly tensioned turn of thread around just the hair at a point as close to my thumb as possible, before making a second turn of thread around the hair and the hook shank at the same point. This helps to limit the amount of flair in the tail and allows a precise tie in point for the bunch of hair.
- Orkney peach is a vibrant peachy orange colour with shades of yellow and reddish pink mixed in, but it is rarely available commercially, so I mix my own using fluorescent seal’s fur in orange, yellow and red roughly in the ratio 40:40:20. I use a coffee grinder to achieve a well-integrated blend, but it is easy enough to do by hand for small quantities.
- Don’t be shy with the dubbing for the body. The body should be thick enough to allow the elk hair to sit on top of it without falling down around the sides.
- Fine chenille, pheasant tail fibres, peacock herl, CDC and a host of other dubbing materials can all be used for the body, depending on your preference and the insect being imitated.
- For added protection, coat the Elk hair shellback with a fine layer of UV resin and cure with a torch.
- To aid floatation, liberally apply Mucilin dry fly silicone to the fly and allow it to dry overnight before transferring to your fly box.
Fishing Notes
- This is a great summer searching pattern, with the knack of bringing fish up to the surface, especially during hot weather, and when fished as a team in different colours and sizes, it is an excellent way of hedging your bets when you are not sure what the fish are feeding on.
- The pattern can be fished throughout the season, to reflect whatever insects are on the water at any given time, be that midges, olives, sedges, or even beetles. Simply change the size of hook and the colour of the body to match the hatch.
- When the weather is hot and calm, I tend to fish this pattern as a single dry fly on a floating line with a tapered leader, but at other times, I fish the fly on the dropper, often with a foam beetle or a CDC shuttlecock pattern on the point.
- I always coat the pattern with Mucilin liquid silicone and allow it to dry overnight to aid floatation, but after the fly has caught, I rub a small amount of Gink into the tail and head fibres to restore its floatability.
- This is perhaps not the most durable pattern, but it is very effective, so it pays to have your fly box well stocked with a good mix of colours and sizes.
Les Lockey – May ’25
Les and Mike’s Coldingham Fishing Trip 3rd May – 10th May 2025
Sunday the 4th was a big shock to the system. Mike and I left sunny Cheshire on Saturday with the temperature nudging 27 degrees only to be faced on Sunday with a temperature of 8 degrees and a biting 20 mph northerly wind whose wind chill made it feel more like 4 or 5 degrees and as mad keen dry fly anglers we decided a walk round the loch would be time better spent that flogging ourselves in totally unsuitable conditions. On our walk, it was interesting to note that while sheltered spots held lots of small black bibionids, mostly on bright yellow water buttercups and dandelions, the more exposed gorse bushes were almost devoid of any visible fly life and even the alder flies that were present, were only found on the sheltered side of the bushes. The big surprise was there were no hawthorn flies to be seen at all.
Monday dawned bright, sunny and thankfully a fair bit warmer, while the wind had eased considerably. After a leisurely start, we headed to the top of the North end and found a massive buzzer hatch underway with fish rising everywhere. Taking a closer look at the flies on the water and those that landed in the boat showed the flies to be mainly dark olive in colour, but as the day progressed, hatches of olives and some tan sedges kept the fish rising. Despite this, actually catching these feeding trout proved trickier than you might think. We had lots of offers and also lost several fish that seemed to be well hooked using olive CDCs and olive hoppers, but it was the ever reliable Yellow Owl tied on a short shank size 12 hook that was by far my most successful pattern of the day bringing 12 fish to the net including a lovely brown of about 6lb. Mike chose a different tack and fished a hawthorn and grey Shipman’s buzzer and he finished with 6 fish to the net.

On Tuesday, we started by anchoring close to the lilies in boat jetty bay where we both picked up a couple of fish on the Yellow Owl before moving to the north end. Once again fish were rising, although the fly life was less prolific and the rises more random. After a few offers and a couple of quick on and off takes to the Yellow Owl, I changed to a Shiphammer and it was a revelation as fish after fish confidently took the fly but annoyingly, they all somehow managed to slip the hook when seemingly well hooked. Disappointed at losing so many fish, I changed to a size 16 olive top hat emerger and finally managed to bring 3 fish to the net, including a truly memorable brown trout estimated at 10lb that only just fitted in the net. Mike was not to be out done as he landed a couple of beautiful browns both of which were around the 6lb mark, before it was time to head back for our now ritual gastronomic extravagance of a BBQ – Sirloin steak, Jersey Royal potatoes and salad, followed by barbequed bananas soaked in Malibu with Mackie’s Madagascan vanilla ice cream all washed down with a glass or two of a very nice old vine Zinfandel – beautiful.


Wednesday started with a stiffer wind from the east and despite the bright sunshine, it was still quite cool which kept the fish down. We started in Swing Gate Bay fishing teams of buzzers and managed a couple of fish on vicar and olive buzzers, but thankfully the wind eased which allowed us to drift out of Swing Gate Bay and a change to a dry detached bodied parachute hawthorn on the point and a Yellow Owl on the dropper brought a couple of browns to the net on the hawthorn just as we turned into Lochside bay. Shortly afterwards the wind changed direction and the temperature rose noticeably allowing us to drift back and forth across the narrows bringing another 6 fish to the net and all to the hawthorn. Eventually we ended up at anchor at the top of the North end where all my remaining fish fell to the Yellow Owl on the dropper. Mike plugged away with his hawthorn and was rewarded with several good browns and a few more lost in play. Remarkably, out of the 21 fish netted today, all but 6 were browns and despite there being very few natural hawthorn flies on the water, our hawthorn imitation was extremely productive on the day.


Thursday was a very similar story with a good number of fish, predominantly browns, brought to the net on the dry hawthorn and the Yellow Owl until the wind changed direction yet again and rising fish all but disappeared.
Our last day started off full of anticipation as light southerly winds allowed us to drift out from the jetty across to Lochside bay. Almost immediately I hooked and lost a good fish on the hawthorn, but that was it until we neared the East bank where we both picked up a couple of lovely browns. Deciding to drift the narrows, proved a good decision as we again both landed some nice fish on the hawthorn. However, as the day wore on and the wind direction changed, we headed for a final crack at the rising fish at the North end of the loch, but unlike previous days, the fish were now being distinctly fussy, no doubt due to all the fishing pressure they had received during the week. That is not to say we didn’t hook any fish. We actually hooked lots, but we simply could not get them to hold on. In desperation we decided to try something completely different. Mike put on a bright green foam beetle and I selected a Norwegian pattern called the Leatherman, which looks like a cross between a beetle and a shuttlecock buzzer and within minutes we were both netting fish. I ended the day with 13 fish to the net, while Mike managed 6 but we both lost at least the same number again. Such is the wonder and delight of fly fishing and in the words of Mike “bring it on”!

The Midas Dry Fly – (P. Davison) – A Fly for June
Hook: Kamasan B170, sizes 10 or 12.
Thread: UNI 8/0, red.
Rib: 4lb. Clear Monofilament / Nylon.
Abdomen: Equal amounts of red, orange, & fiery brown seal’s fur with a pinch of claret mixed in.
Legs: Hen Pheasant centre tail fibres, 4 on each side of body.
Thorax: Seal’s fur, as for abdomen.
Hackle: Greenwell’s Cock Hackle.
Head: 2 Strands of gold Lite Brite, dubbed..
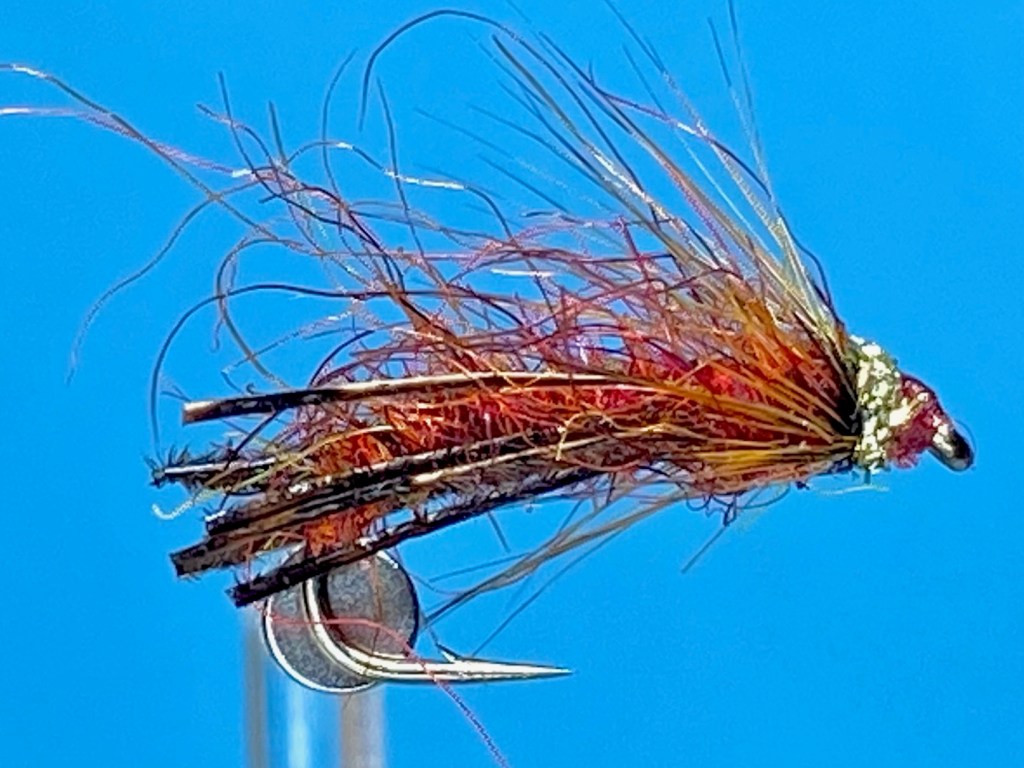
Photo 1. With the hook secured in the vice, start the thread at the eye and lay down a short bed of thread and remove the waste thread.
Photo 2. Crimp the end of a piece of 4lb monofilament nylon and using well waxed thread, tie it in securely. Continue to tightly bind down the nylon with the thread to halfway round the hook bend.

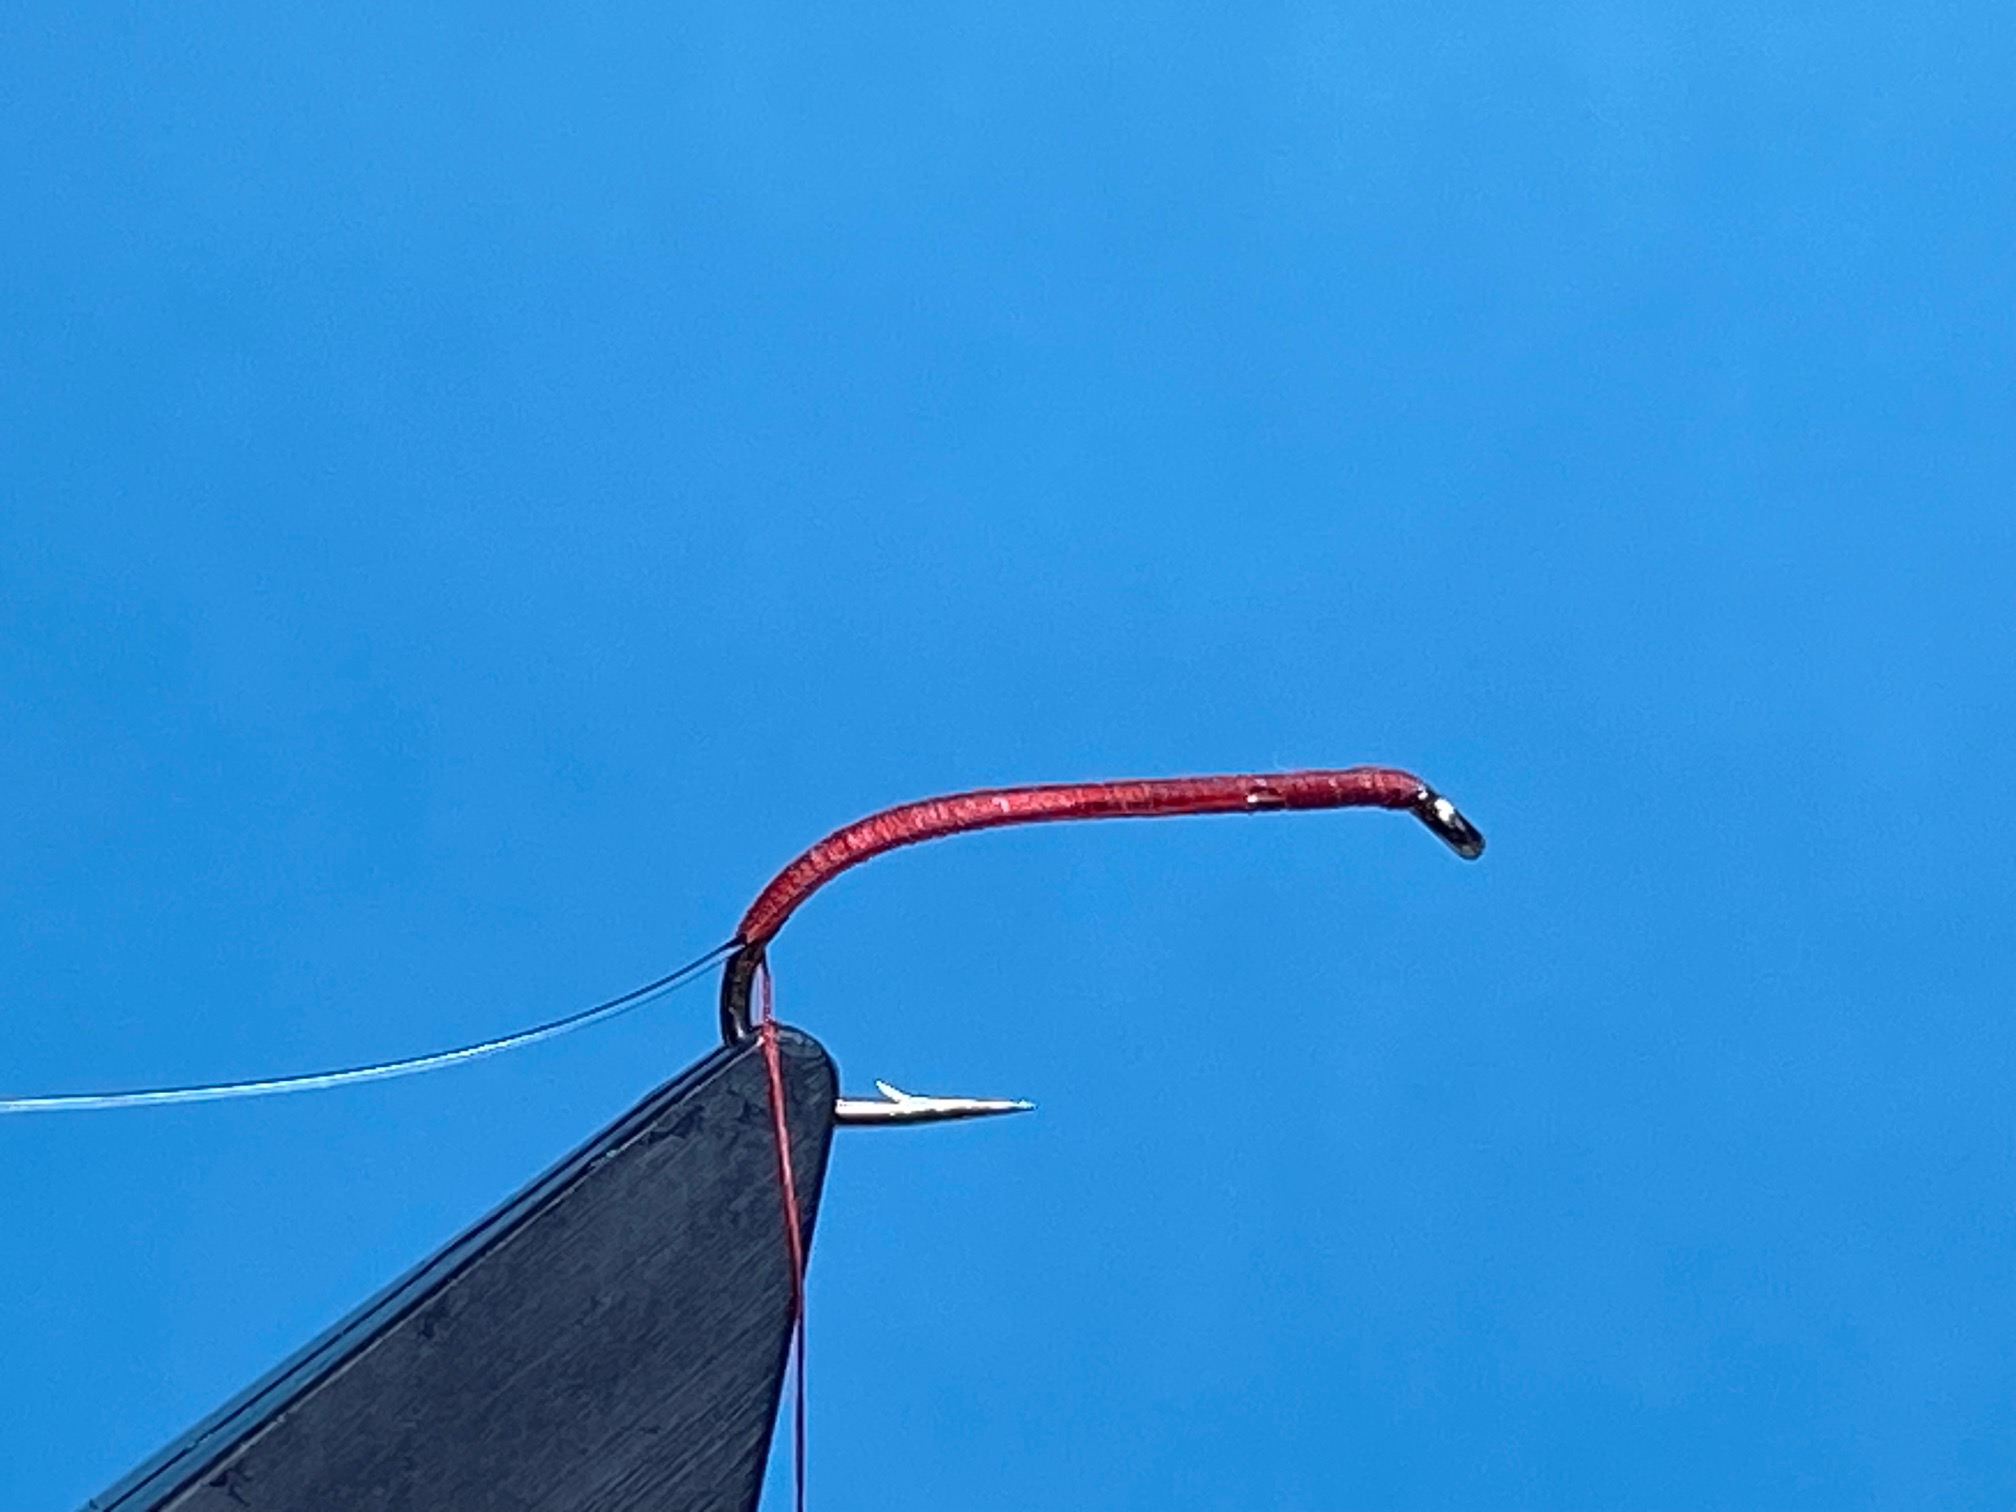
Photo 3. Generously dub the seal’s fur mix onto the thread and wind it on to form a chunky but tight abdomen.
Photo 4. Now wind the monofilament in the opposite spiral up the abdomen as a rib and tie it down at the thorax. Continue to bind down the nylon to just before the eye, then remove the excess nylon and return the thread to the abdomen.
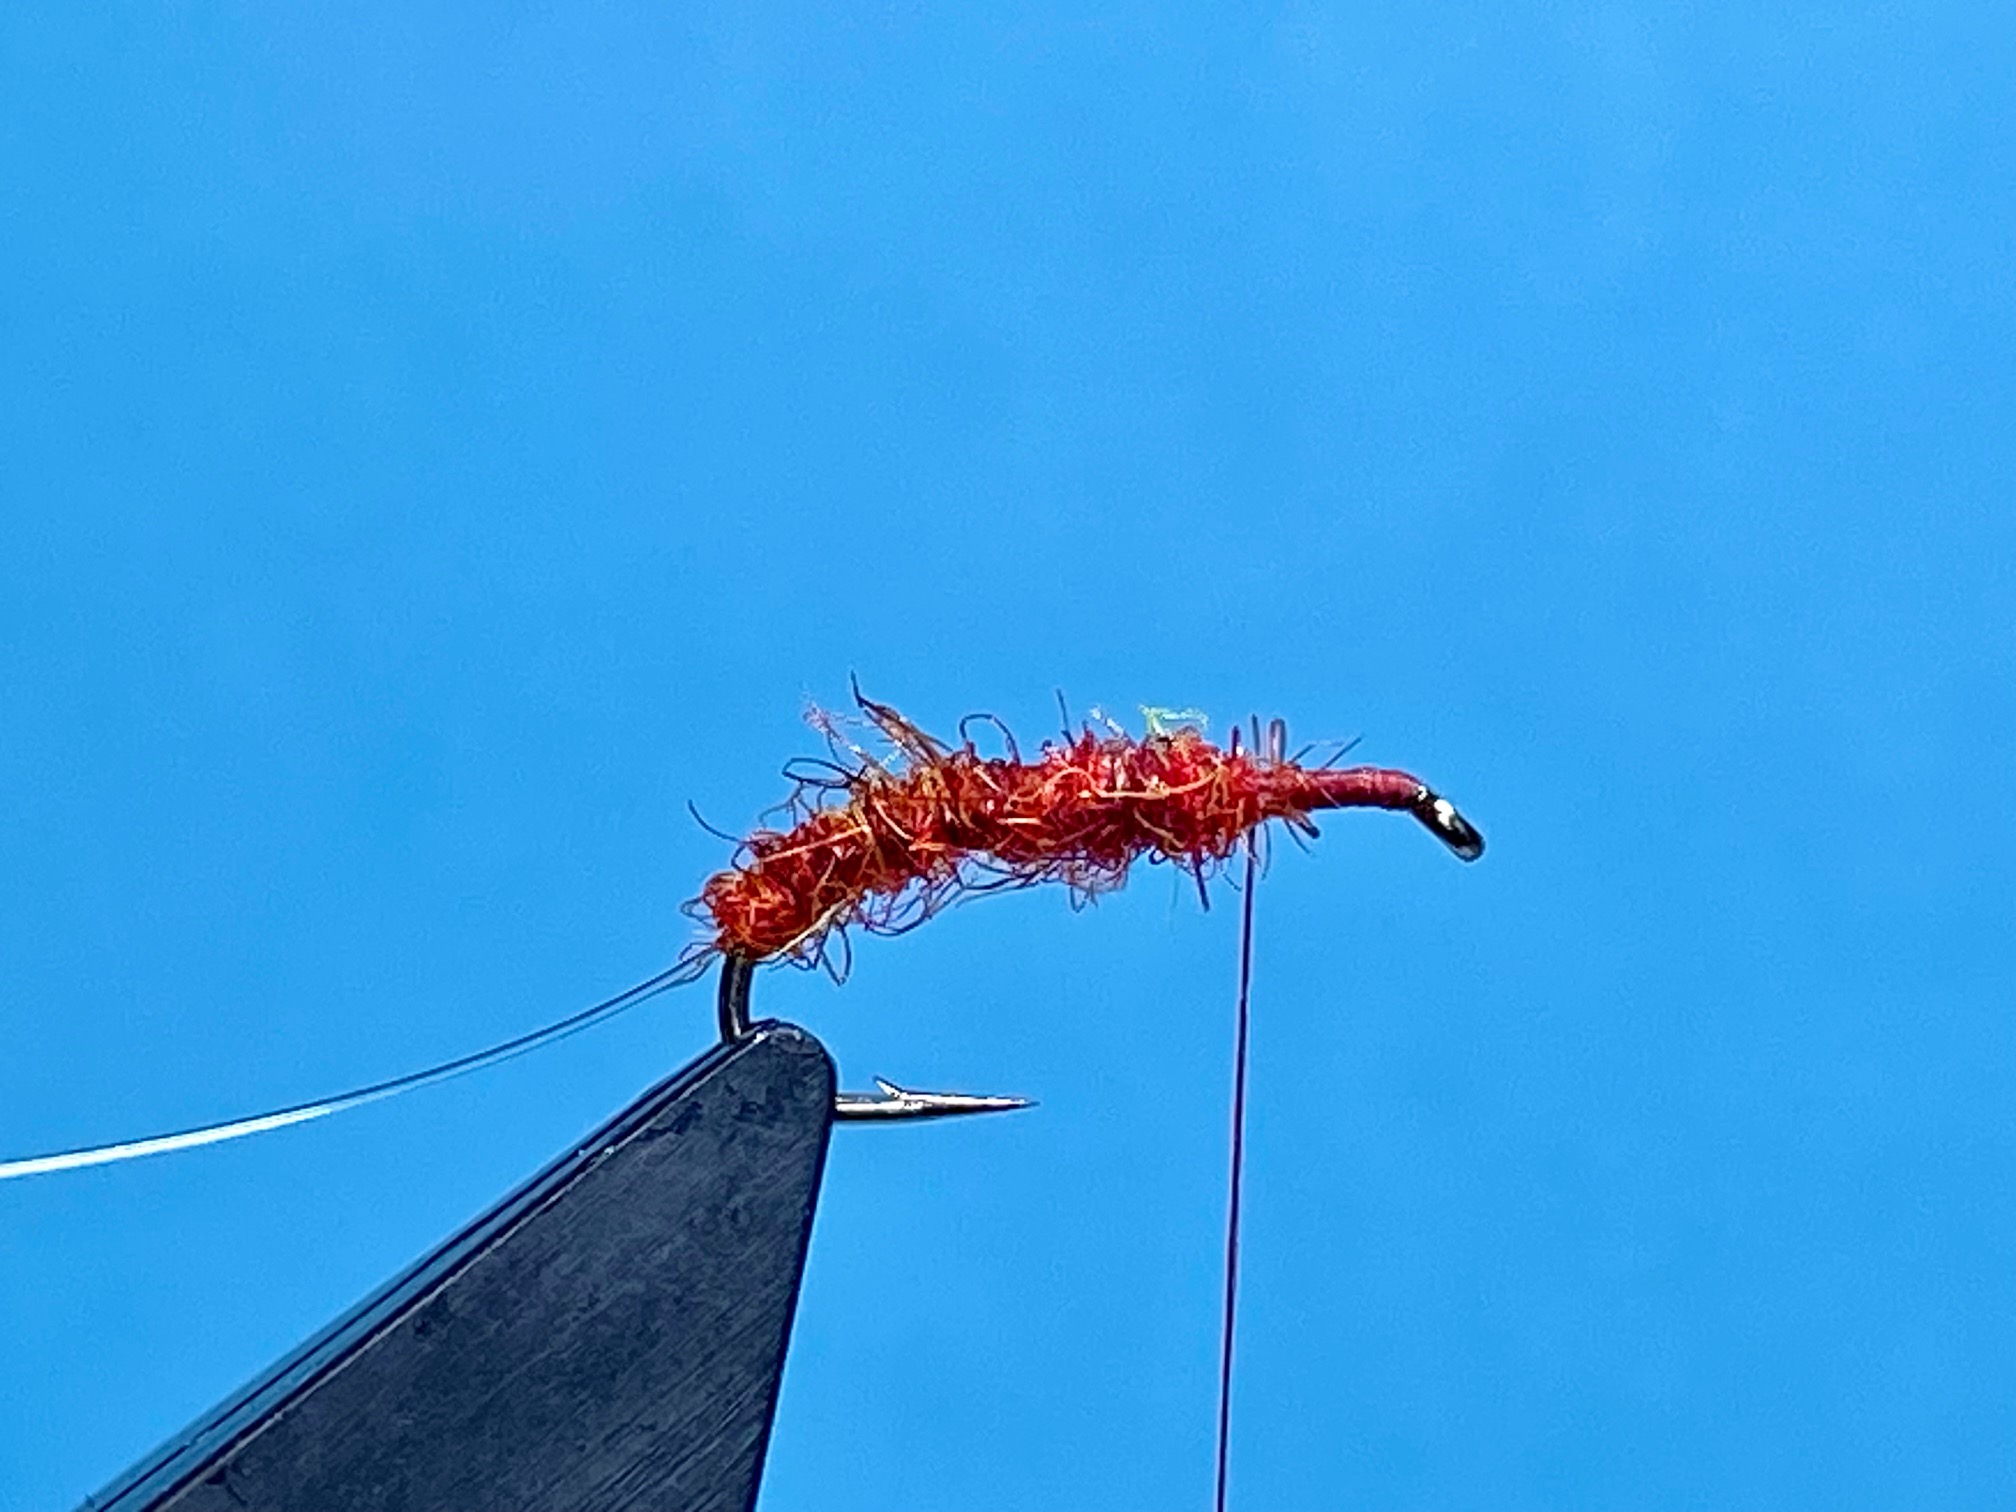

Photo 5. Tie in 4 hen pheasant tail fibres on each side of the abdomen in reverse, ie. with the butt ends pointing slightly downwards and the tips over the eye. Secure in position with a few more thread turns and remove the waste tips. Return the thread to the thorax.
Photo 6. Dub more of the seal’s fur mix onto the thread and wind on a chunky thorax.
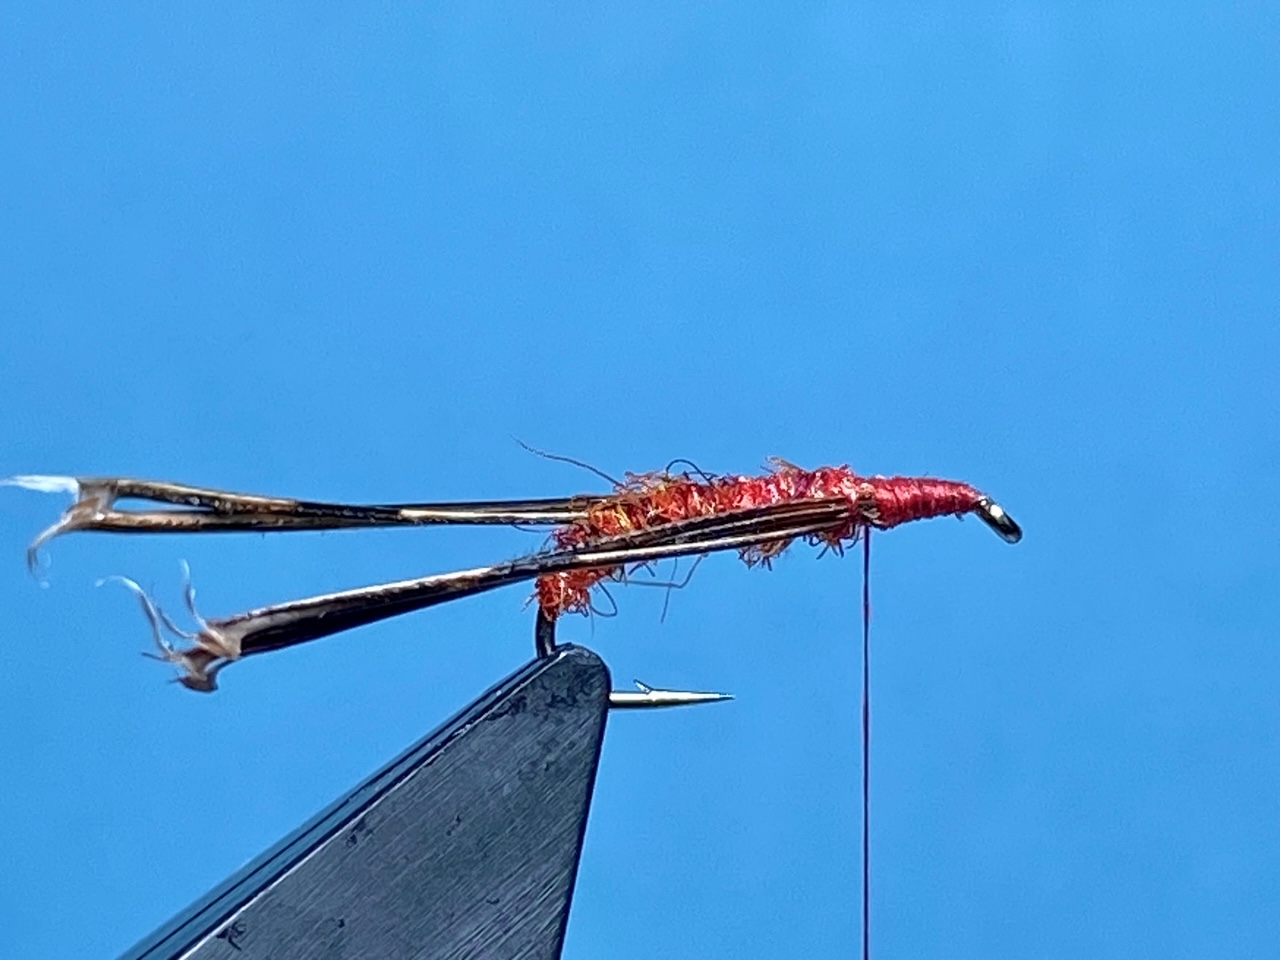

Photo 7. Remove the soft fibres from the base of the hackle feather and trim the stalk to about 2mm. in length. Using well waxed thread, tie in the hackle by the small stalk, and winding towards the eye, make 3 or 4 turns of hackle. Secure with thread and remove the waste hackle.
Photo 8. Dub the Lite Brite onto the thread and wind it on at the base of the hackle, forcing the hackle fibres back in the process.
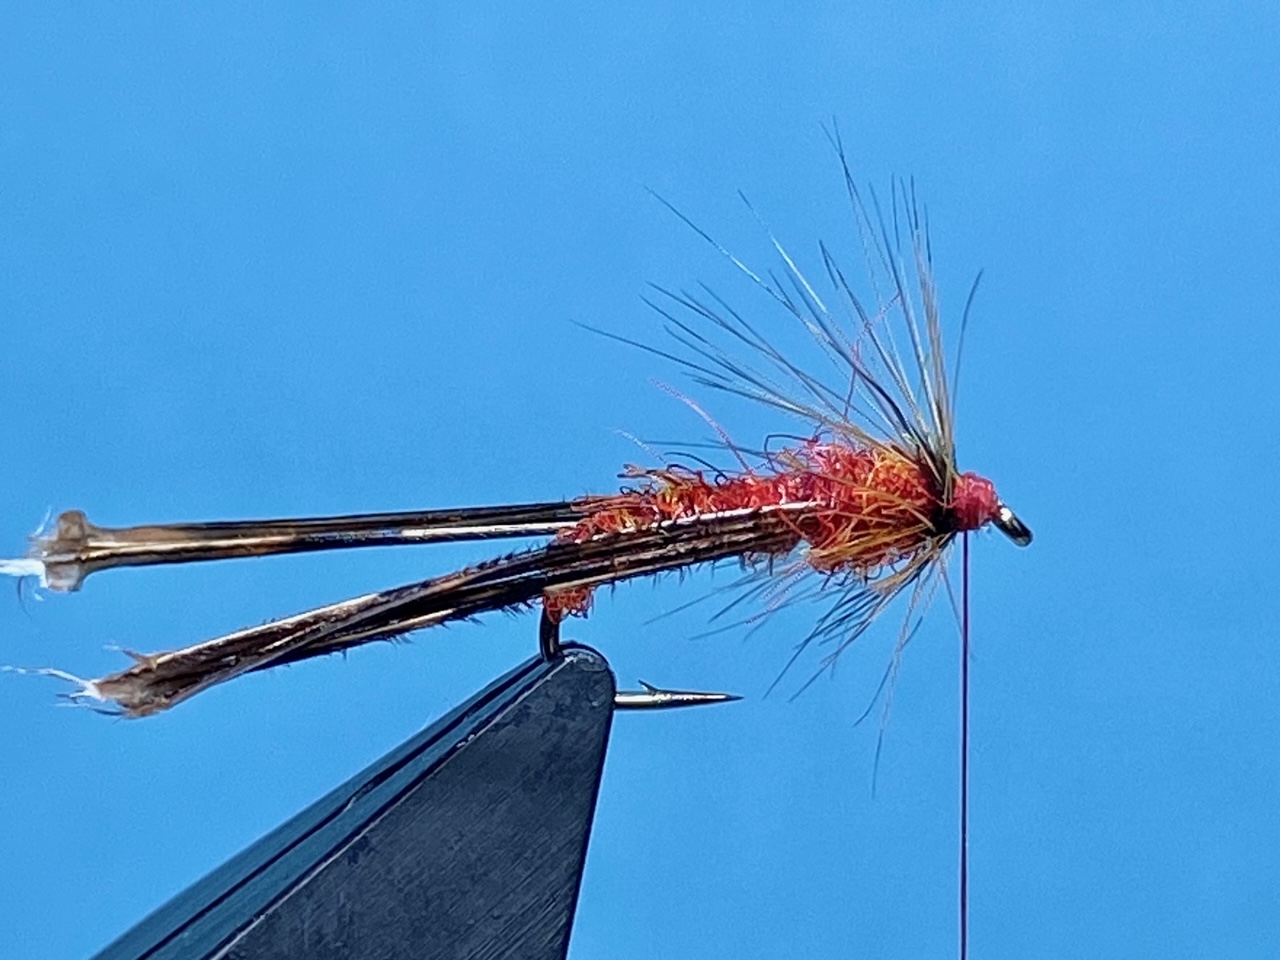

Photo 9. Form a neat head, add some varnish to the thread and whip finish through it then remove the thread. Trim the pheasant tail leg fibres equally to just past the hook bend.
Photo 10. To complete the fly, take a piece of Velcro and rub the top of the fly vigorously to bring out the seal’s fur fibres.

Tying Tips
- This is a straightforward, if somewhat unusual fly to tie. In order to obtain its fuzzy, rough appearance, the seal’s fur dubbing needs to be applied tightly, and in sufficient quantity, to allow the fur to be aggressively raked out with Velcro. As a guide, the same quantity of dubbing used for the abdomen, should be used for the thorax.
- Nylon monofilament is used as a more durable rib, capable of withstanding vigorous brushing, but it is very slippy, so it is important to crimp the end of the nylon and use well waxed thread to ensure it is securely anchored to the hook.
- I mix the various colours of seal’s fur in a coffee grinder aiming to achieve a brownish brick red colour.
- The legs on this fly are rather unusual in that they are simply straight hen pheasant tail fibres, tied with the thick ends facing rearward and pointing slightly down, which again is to help withstand the Velcro brushing, but don’t worry if the legs become misaligned. That is all part of the pattern.
- When dubbing the Lite Brite head, less is more. Two stands of Lite Brite is ample. Start winding the dubbed Lite Brite over the base of the hackle and work towards the eye, stroking back any forward facing fibres as you go.
- In order to maximize the fly’s buoyancy, liberally brush Mucilin Silicone Dry Fly liquid onto the fly and allow it to dry overnight before transferring to your fly box.
Fishing Notes
- This unusual dry fly relies on its fuzzy outline to attract the attention of the trout, and to remain buoyant. It has proved its worth on large reservoirs and small stillwaters alike and is generally considered to be a caddis imitation, although I am not so sure about that as it has worked best for me when lots of terrestrial insects are on the water and caddis flies are nowhere to be seen.
- I use this pattern when I’m not sure what is on the trout’s menu, and it is always a surprise to me when this tangled mass of fibres is taken. I often fish the pattern on the point with a top hat buzzer on the dropper, but there have been times when a single Midas cast to rising fish has outscored every other dry fly I tried.
Les Lockey – May ’25
Mike’s Dry Hawthorn – A Fly for May
Hook: Kamasan B160, short shank hook, size 12.
Thread: Veevus GSP, 50D, black, or any fine black thread.
Legs: 4 knotted black pheasant tail fibres, tied trailing back.
Body: A strip of 2mm. black craft foam cut 3mm. wide and tapered at one end.
Wing: White Tiemco Aero Dry Wing.
Thorax: Black seal’s fur, or similar..

Photo 1. With the hook secured in the vice, start the thread behind the eye and wind on a bed of thread stopping opposite the hook point and remove the waste thread tag. From a piece of 2mm. thick craft foam, cut off a strip 3 mm. wide and pinch off one end to create a tapered end. Use a lighter to carefully flame the tapered end of the foam, then roll the foam between damp fingers to produce a smooth tapered finish. Set the foam strip aside for later.
Photo 2. Tie in 2 knotted pheasant tail fibre legs on each side of the hook shank to extend well beyond the bend of the hook. Remove the waste fibres.


Photo 3. For the abdomen, securely tie in the foam strip on top of the shank with the tapered end extending about 5mm beyond the bend of the hook. Continue to bind down the foam to immediately behind the hook eye and return the thread to the foam tie in point.
Photo 4. Take a length of white Aero Dry Wing, fold it in half, and tie it in as a wing over the top of the rearward facing foam. Bind down the butt ends to the hook eye with well waxed thread.

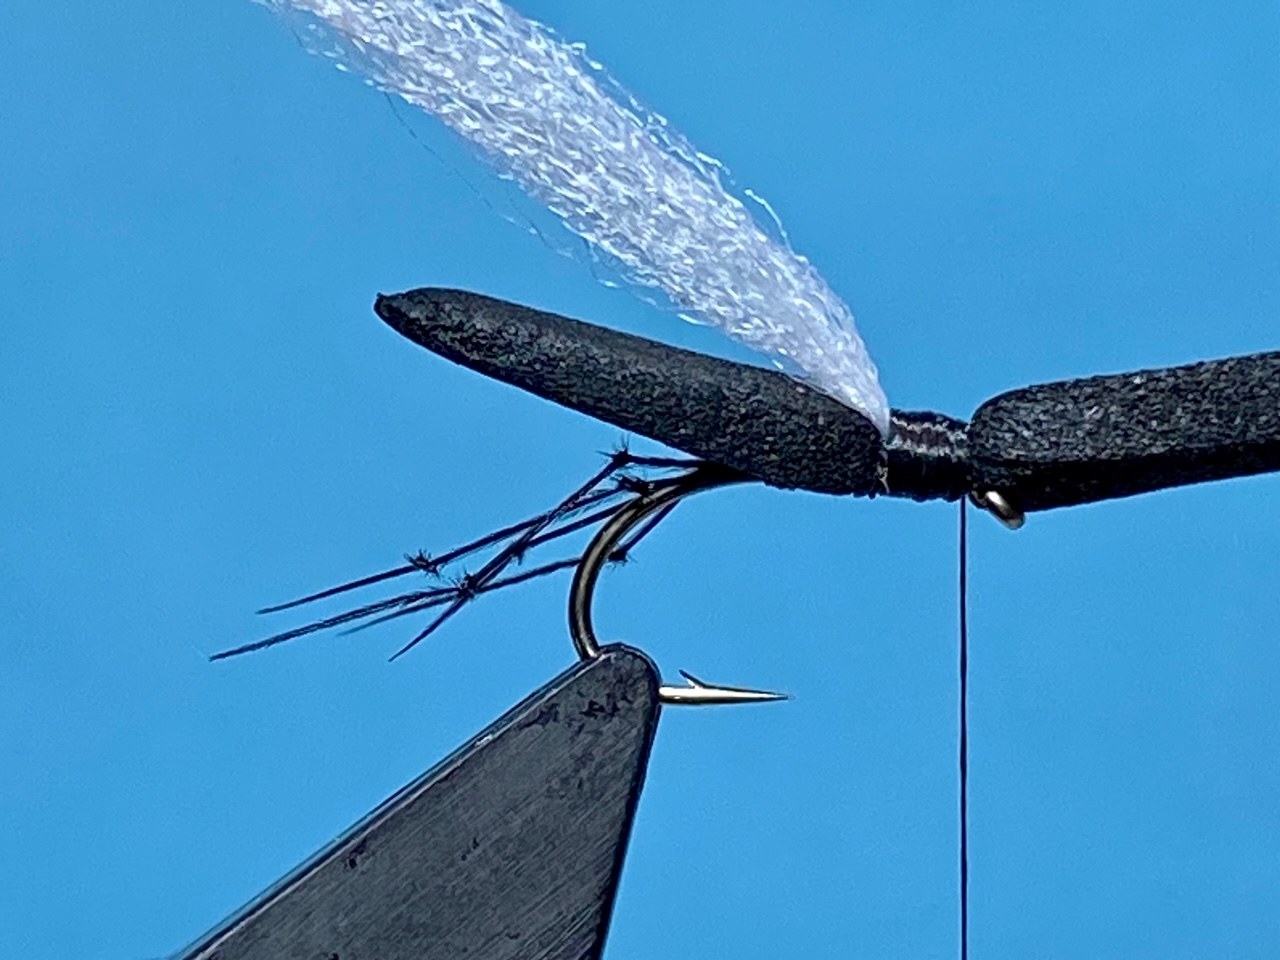
Photo 5. Dub some seal’s fur onto the thread and wind it on to form a tight, chunky thorax, leaving the thread at the base of the wing.
Photo 6. Under slight tension, pull the forward facing foam back over the top of the thorax and secure it in position with 2 turns of well waxed thread.
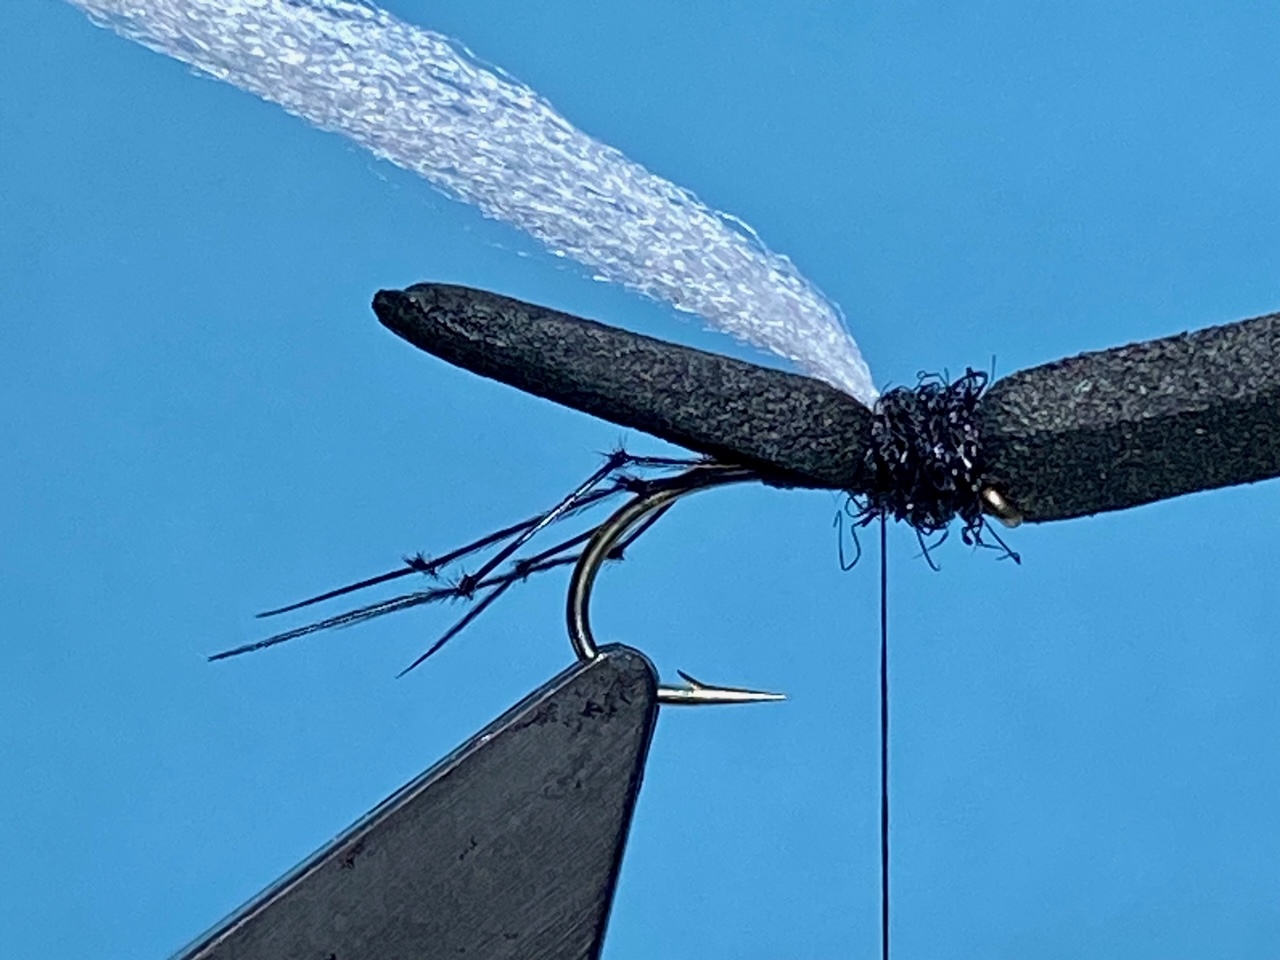


Photo 7. Add a drop of varnish or superglue to the thread and make a 3 turn whip finish through it and remove the thread. Cut off the excess foam thorax cover leaving a small foam stub. Finally trim the Aero Dry Wing the same length as the foam body and brush out a few strands of the seal’s fur thorax to complete the fly.
Tying Tips
- I find it best to prepare the detached foam bodies in batches. This speeds up the tying process and makes it easier to judge the amount of flame required to smooth the foam. Always keep your fingers wet when smoothing the heated foam to avoid burnt fingers.
- This is a simple fly to tie, but it is essential to make sure the foam body is securely tied down. To this end, well waxed thread helps greatly, but for a belt and braces approach, tie down the foam over a drop superglue.
- This pattern can be easily adapted to make an excellent Heather Fly imitation for use later in the season. Simply change the colour of the legs and the rear part of the thorax from black to red.
Fishing Hints
- In May ’22, my pal Mike Warburton and I had a great week’s dry fly fishing during regular falls of hawthorn flies, but on our last day, the detached foam bodied parachute pattern that had proved so successful all week seemed to lose its effectiveness, as the once confident and unmissable takes morphed into a variety of cautious, swirls and subtle sips, that proved almost impossible to convert into solid hook ups. This sent Mike rummaging through his fly boxes until he came up with this fly which immediately turned these half-hearted offers into solid hook ups. Just why this pattern succeeded when the charms of a previously very successful pattern had waned, I’m not sure. Perhaps this fly sits lower in the surface film, but it certainly produced the goods on the day, and importantly it is very easy to tie.
- Fish the fly singly on a floating line and strong leader and get ready for some explosive action.
Les Lockey – April ‘25
The Irish Cormorant – A Fly for April
Hook: Kamasan B100 or B110, Grub hook, sizes 10 to 14.
Thread: Black Veevus GSP, 50D, or any fine flat thread.
Rib: Red holographic tinsel.
Body: Black Veevus GSP, 50D.
Hackle: Black Chinese cock or genetic hen.
Wing: Bronze mallard.
Eyes: Split Jungle Cock nail feather.

Photo 1. With the hook secured in the vice, start the thread behind the eye and wind on a short bed of thread and remove the waste thread.
Photo 2. Tie in a length of holographic tinsel and with touching turns of thread, bind it down to well round the hook bend and return the thread to about 2mm. from the eye, again using touching turns of thread.

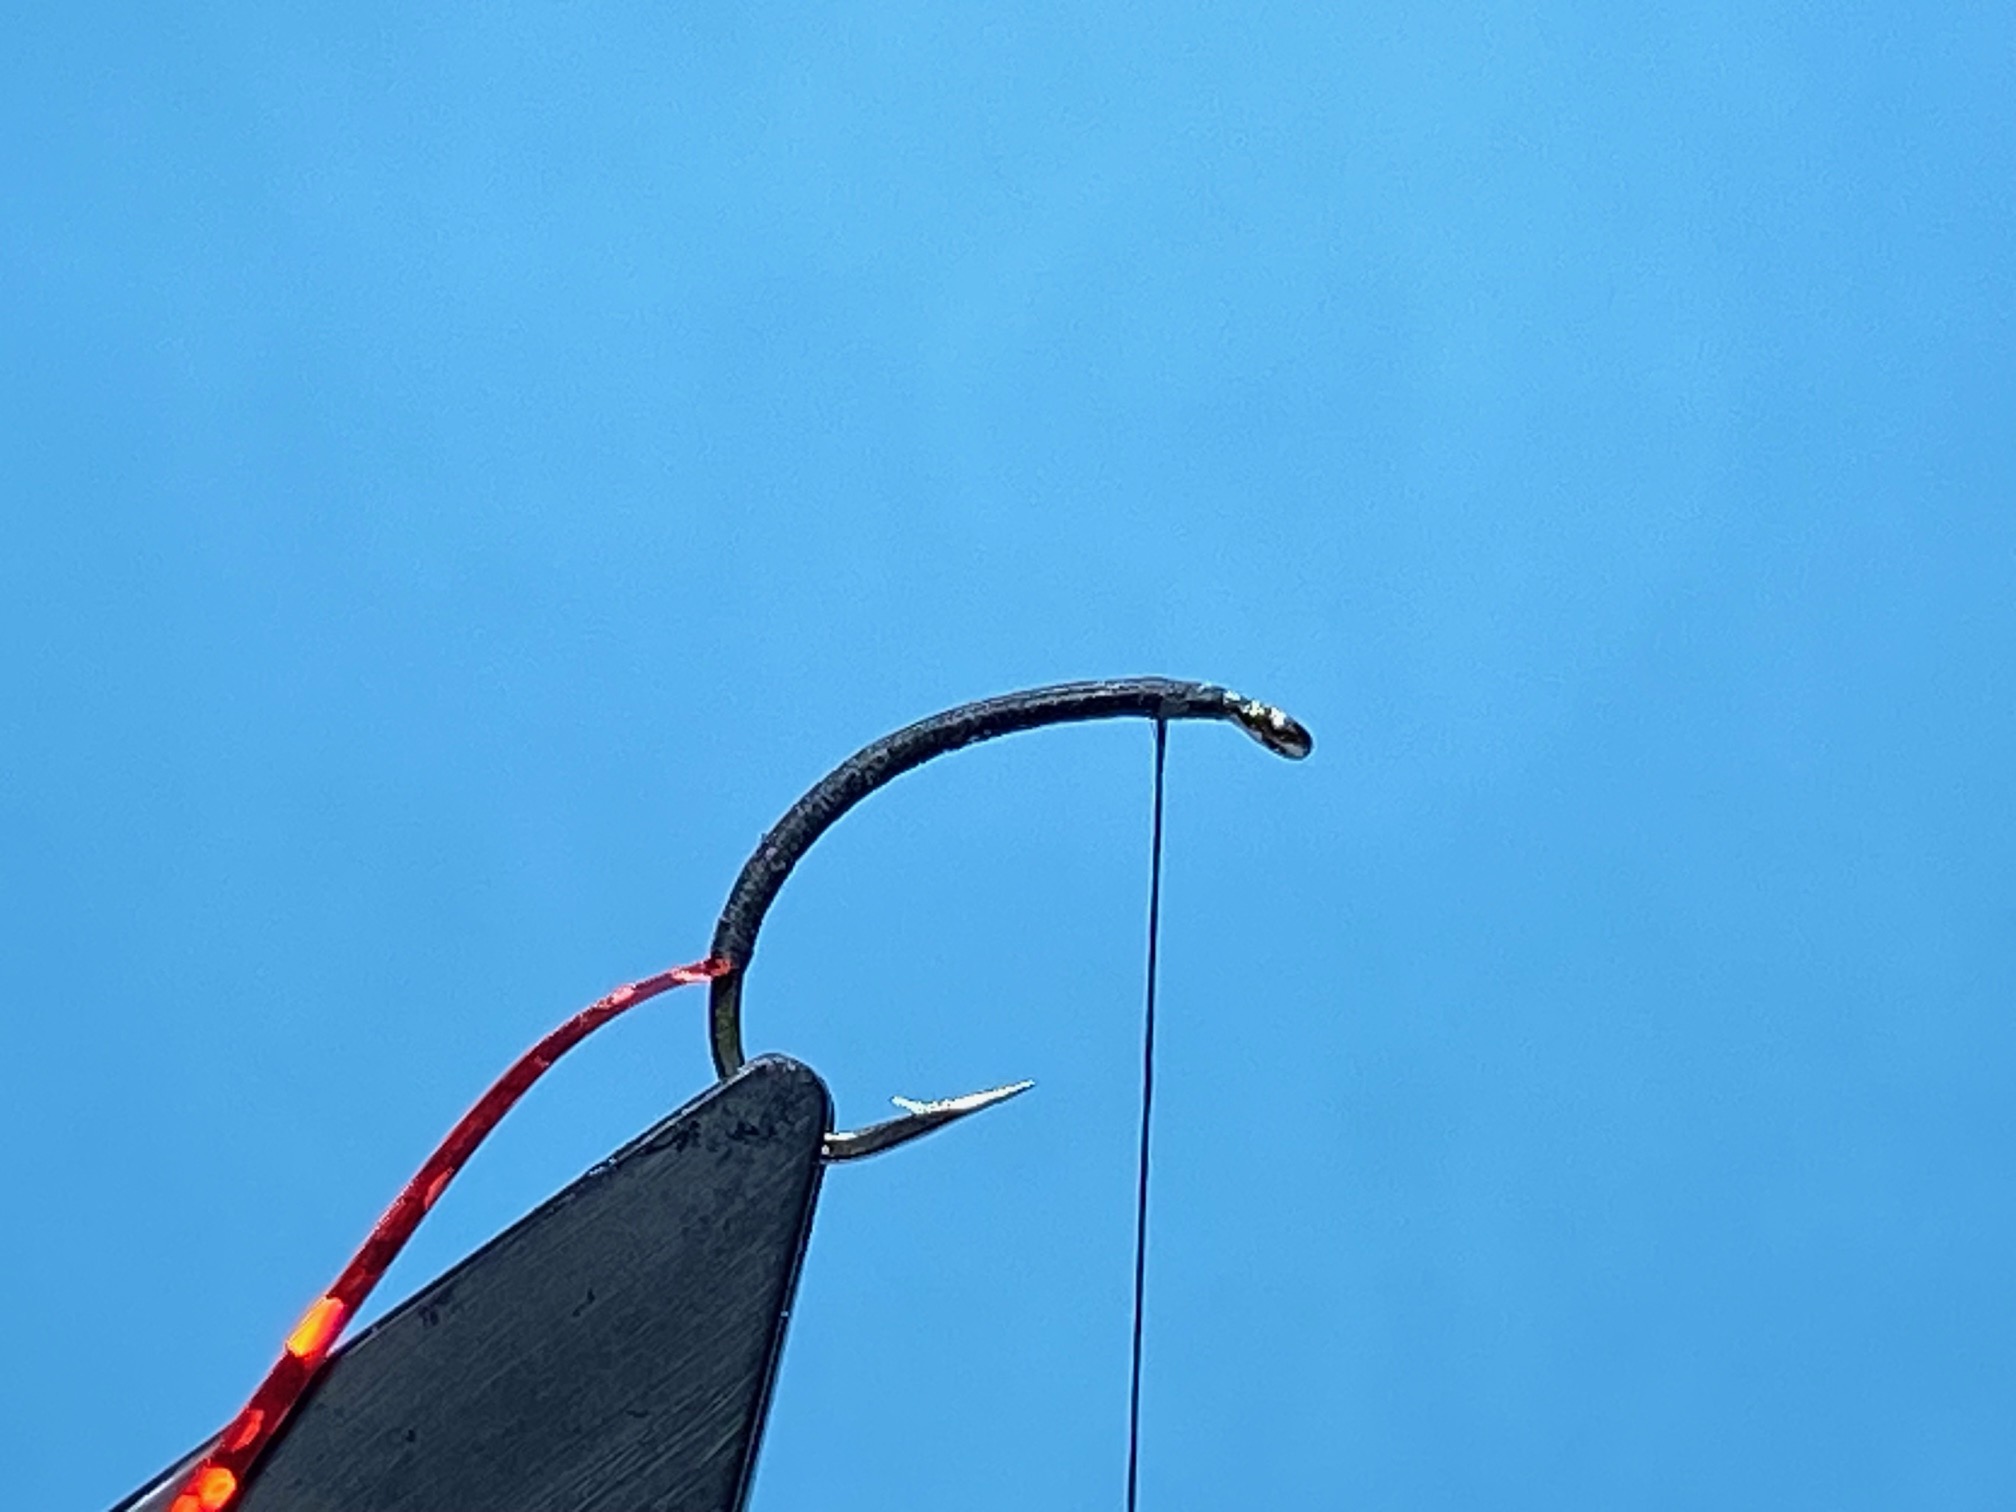
Photo 3. Wind the tinsel in open spirals up the body as a rib and tie it down securely at the head. Remove the excess tinsel. Make a 3 turn whip finish and remove the thread. Coat the ribbed section of the body with a thin layer of UV resin and cure with a torch.
Photo 4. Reattach the thread at the eye and remove the waste thread. Remove the fluffy fibres from the base of the hackle and trim the stem to about 2mm. in length. Wax the thread and use it to secure the hackle by the short stem.
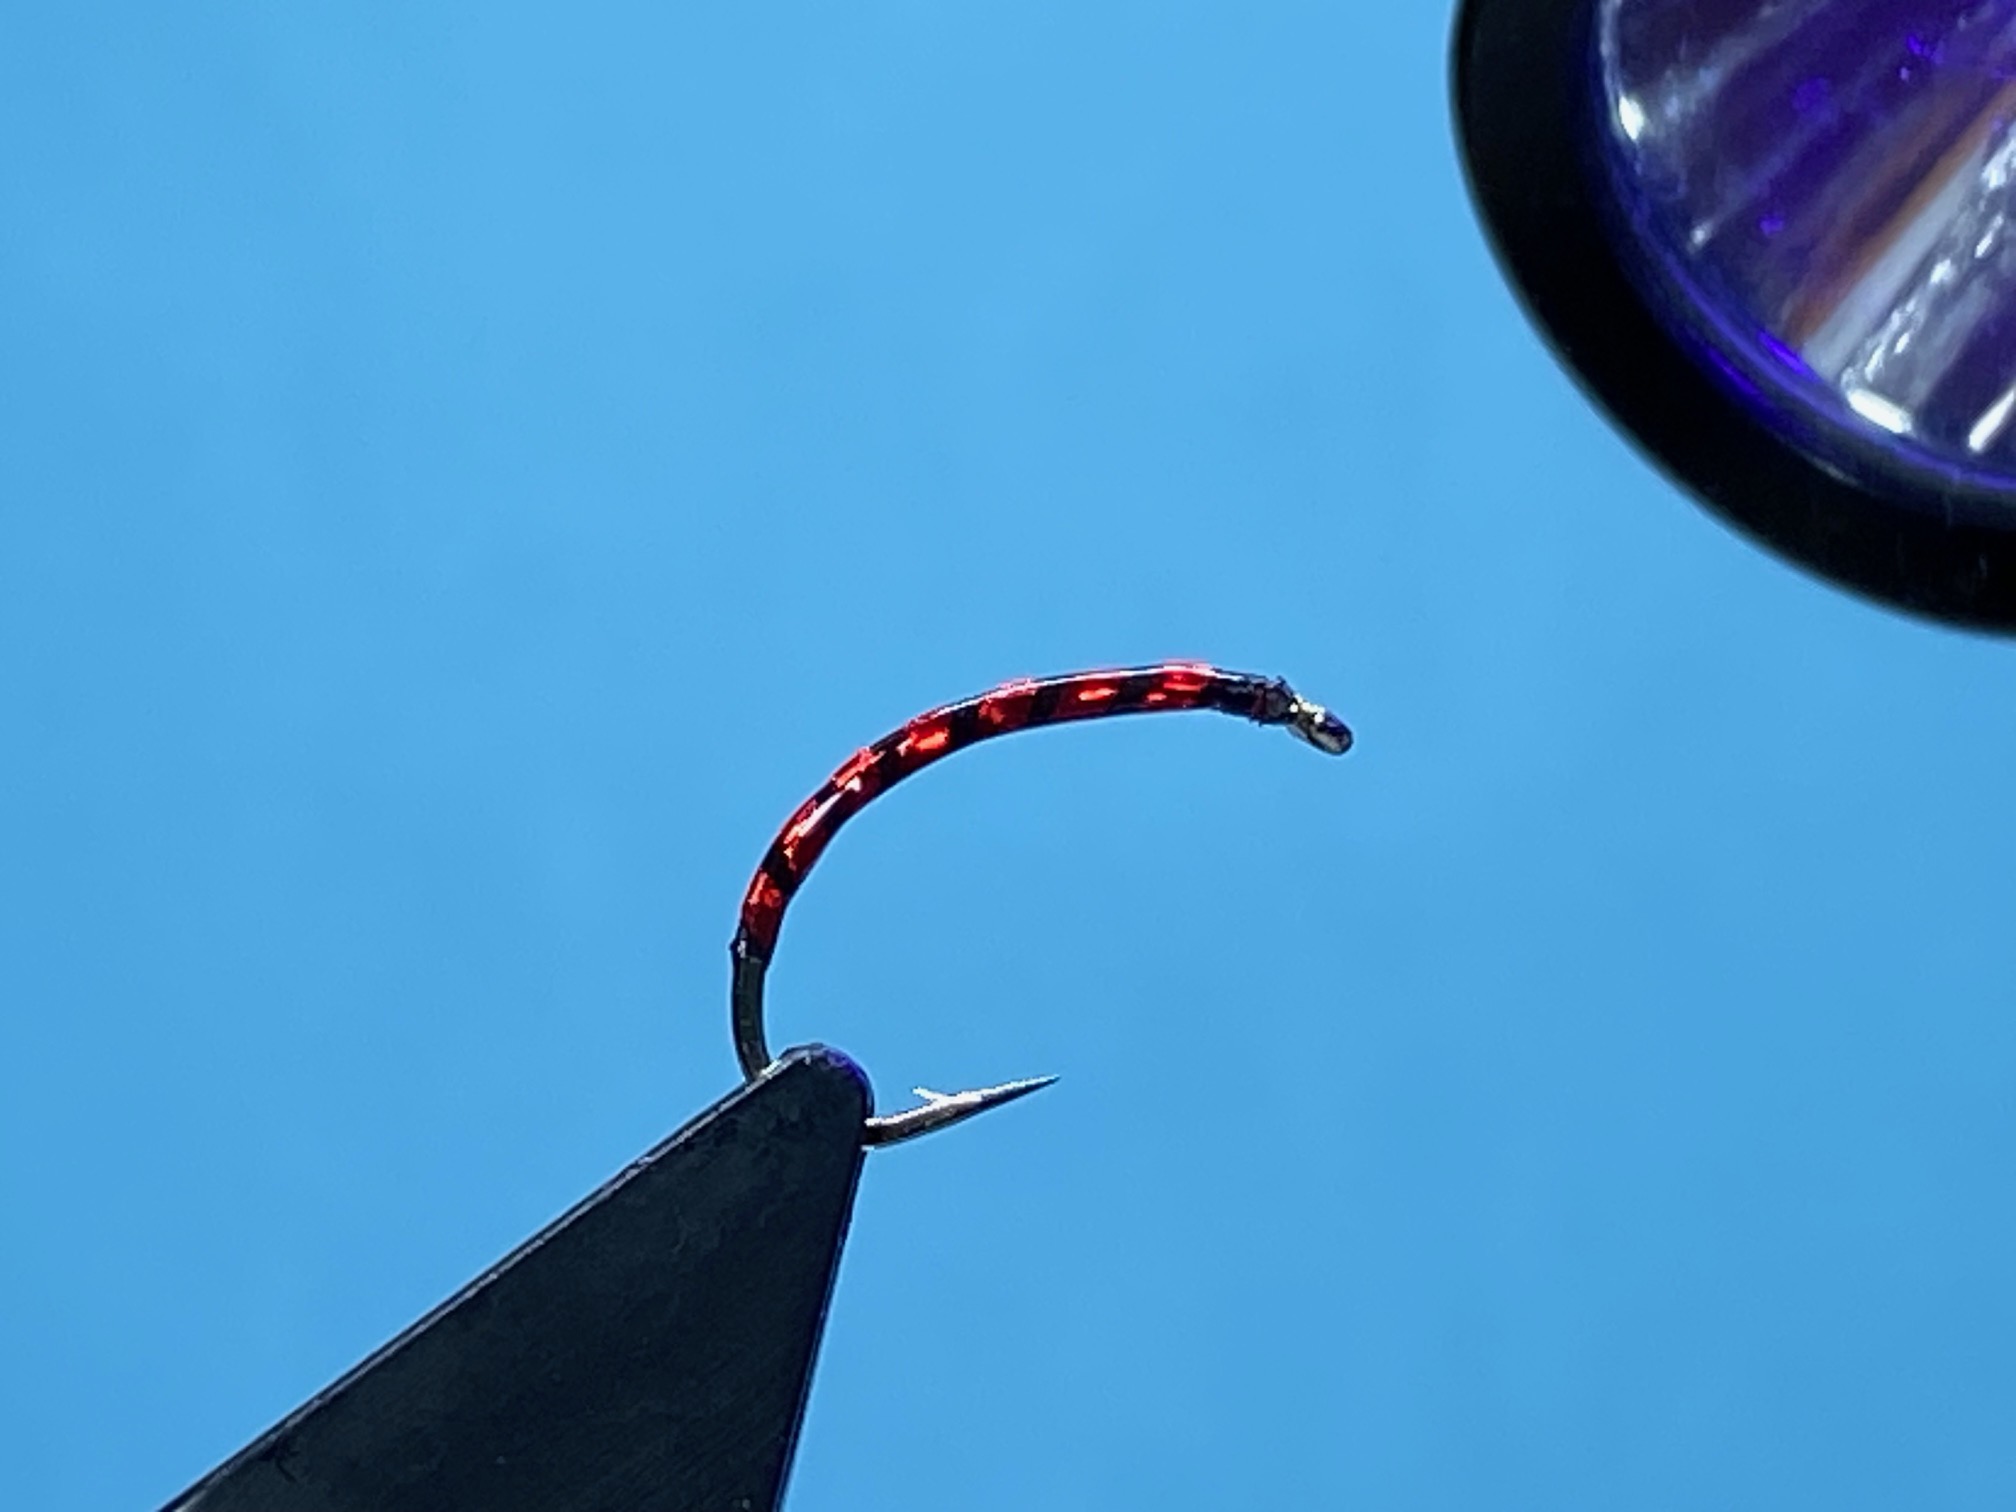
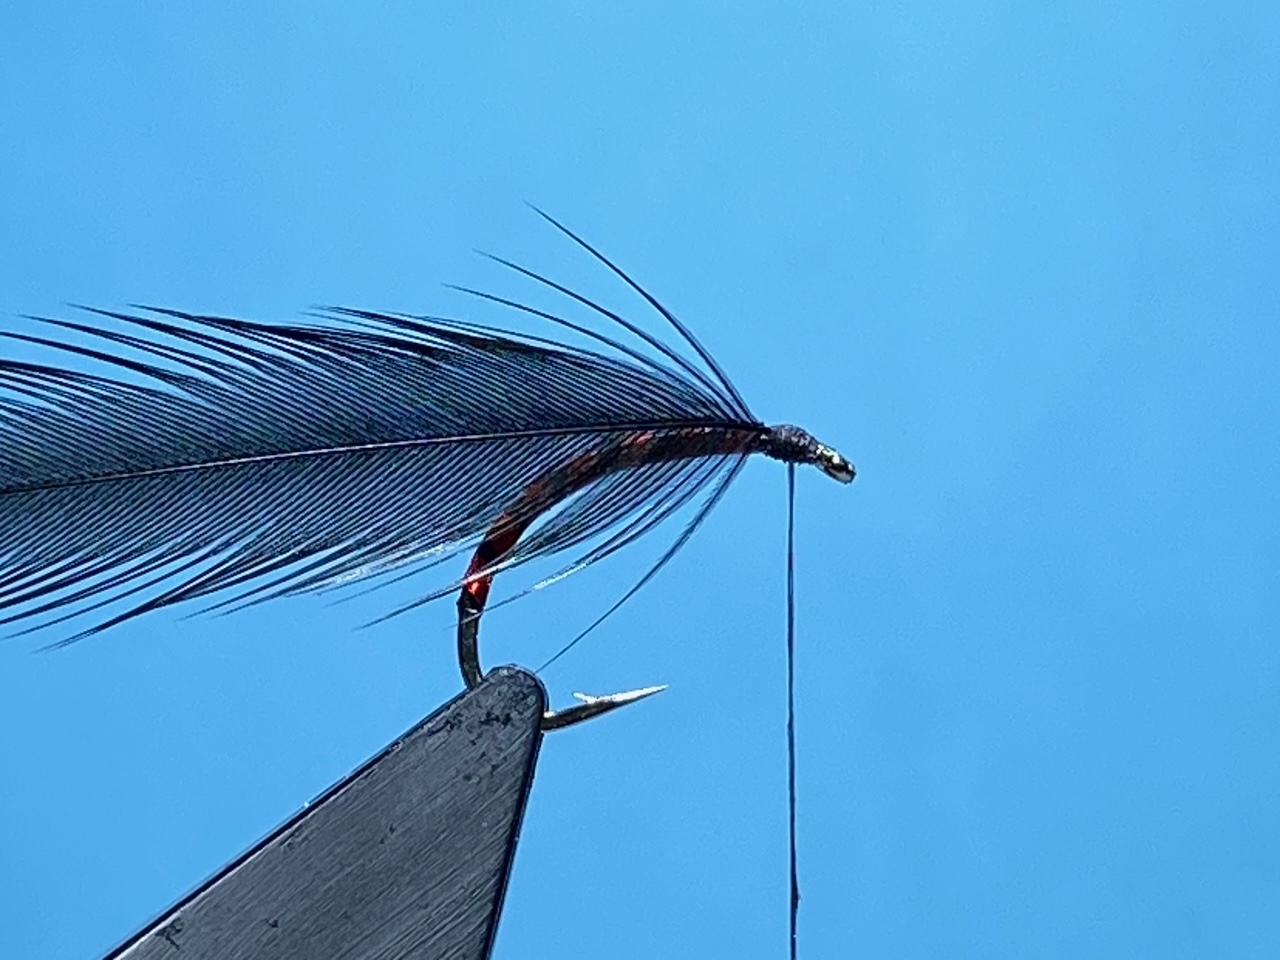
Photo 5. Wind on no more than 2 turns of hackle, stroking back the fibres after each turn, then secure the feather with thread, and remove the excess hackle.
Photo 6. For the wing, take a strip of bronze mallard fibres about 8mm. wide, and align the tips, then holding the fibres tightly, tear the strip away from the feather stem. Guage the feather strip for length and with the good side of the feather facing up, fold the feather slip in half and tie it down securely on top of the shank with well waxed thread.
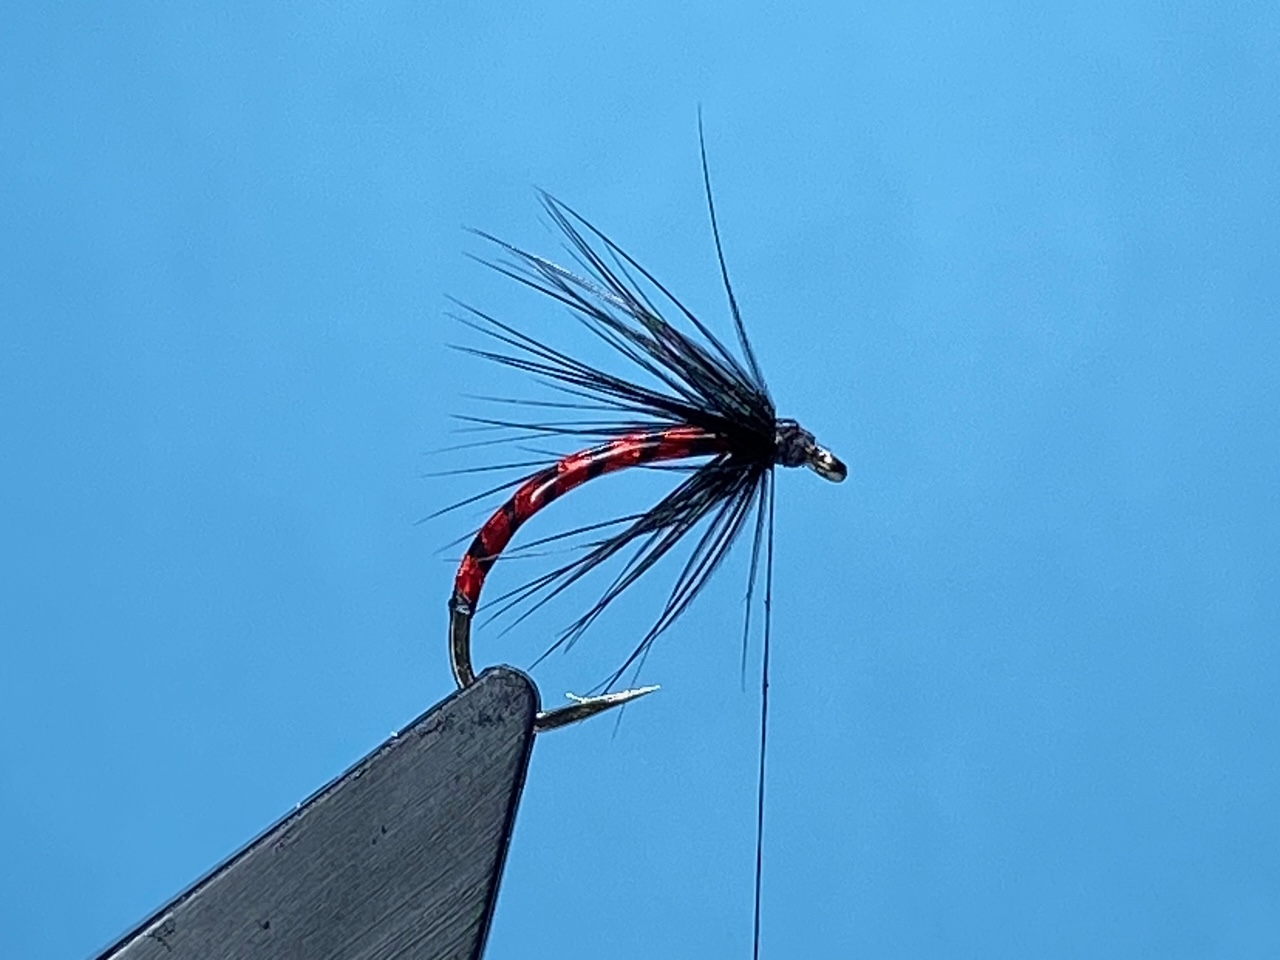

Photo 7. With the wing in place, hold the wing and carefully cut off the waste bronze mallard fibres. Bind down the cut ends and tidy the head area as you go.
Photo 8. Take a split jungle cock nail feather and with well waxed thread, tie it in centrally so that one split nail sits on each side of the wing. Bind down the jungle cock stem to the eye, fold the feather stem back and continue to bind the feather down working back towards the wing. Remove the waste jungle cock feather.


Photo 9. Tidy the head, whip finish and varnish the head to complete the fly.
Tying Tips
- This pattern is a cross between a buzzer and a cormorant and is tied in similar fashion to a lightly dressed Irish duck fly.
- A flat thread enables the hook shank to be quickly and smoothly covered, but the thread should be removed before coating the body with UV resin. If necessary, a finer thread can then be reattached in order to secure the remaining materials.
- Although the rib on this fly is red holographic tinsel, pearl or holographic silver tinsel are good alternatives.
- The usual hackle used for this pattern is a soft Chinese cock hackle, but for a bit more movement, I like to use just 1 turn of a genetic hen hackle.
- To form the wing, take the duly aligned bronze mallard strip and fold it in half so the good side of the feather faces outwards, then gauge the strip for length ensuring the tips are just longer than the bend of the hook. Now hold the wing on top of the shank and secure with a couple of tight pinch and loop turns of well waxed thread. This should be enough to hold the wing in place and allow the position and length to be assessed. Assuming the wing is sitting correctly, make a few more thread turns heading towards the hook eye for additional security. Don’t be tempted to take the thread back beyond the first thread turn used to secure the wing as this could cause the wing to become misaligned. When dealing with feather wings, it is advisable to hold the wing while using scissors to remove the waste butt end fibres as this will prevent the wing from twisting or moving while the cut is made.
Fishing Hints
- This is a very good early season pattern, but other colour combinations such as olive body, pearl rib and Greenwell’s hackle or hot orange body with plain Mylar rib and furnace hackle, both with the bronze mallard wing, are well worth having in your fly box.
- Use the heavier B110 grub hook for fishing deeper in the water column at the very start of the season and change to the lighter B100 version as the water warms up.
- My preference is to fish the lighter wire B100 version on the top dropper, either as part of a team of wet flies, or in conjunction with a heavy buzzer on the point. The pattern also works well when fished as part of a team of cormorants on the washing line, usually using a long midge tip line.
- When olive midges are present, try suspending an olive version between 2 dries on a modified washing line, using a floating line.
Les Lockey – Mar ’25
Upper Test at Longparish Nov 2024
In 2023 I had my first trip to the Upper River Test, fishing for grayling on the Longparish stretch. This year I once more fished the Longparish water but this time the Upper Mill beat. The beat allows wading during the grayling season and the river is of nice depth and steady bottom so it’s easy to stick to the encouraged “gentle wading”.

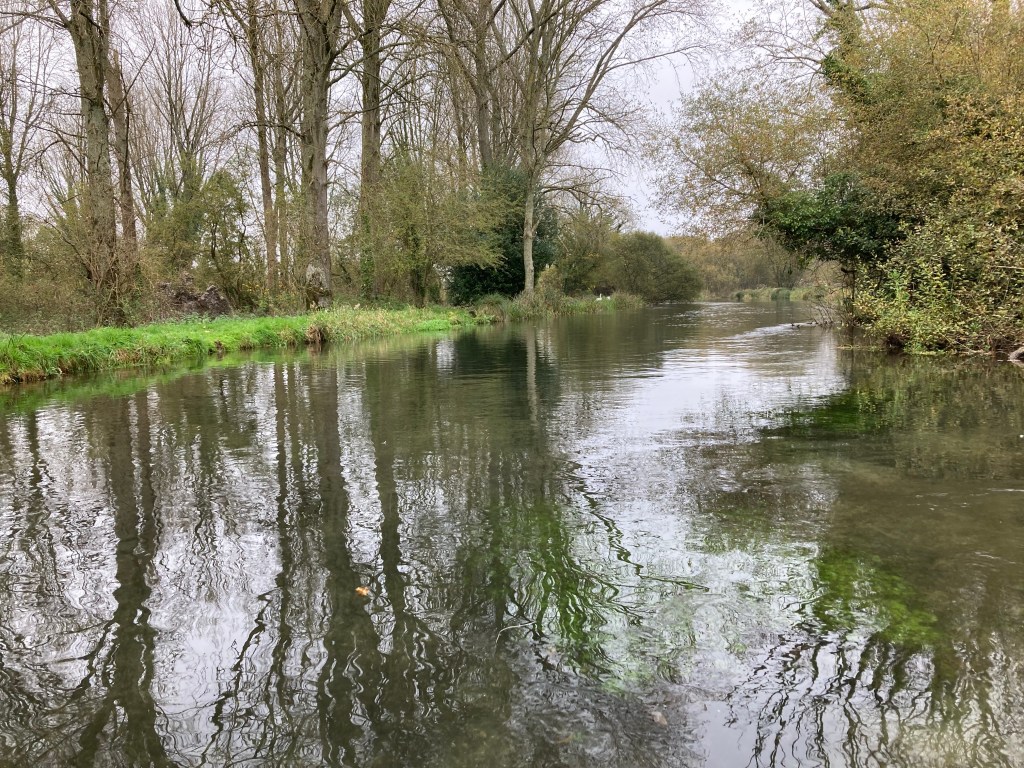
I met the keeper at 9am and he gave me time to put my boots and waders on before we walked the beat, about 3/4 mile or so in total, downstream of the car park a lovely secluded gentle flowing water, leading up to a short public access area with a nice mill outflow. Upstream was a wider section that can be fished from bank or by wading, about 1/2 a mile up to the top of the beat, level smooth glides leading to more varied riffled water. The fishery only allows 1 rod on the beat, max 2 rods if fishing together.

I started down stream and elected for a PTN, based on the advice from the keeper that there could be BWOs hatching. A little late I thought to myself based on the northern waters, but not so as I found out when I inspected the substrate. A number of grayling were taken on this in the glides and riffles on indicator up stream nymph. At the mill outflow a few more grayling were landed on the same fly.


By 11:45 I’d had 9 fish, a good start I thought as I headed to the car for a sandwich and early lunch – despite the mild conditions I expected to stop fishing before 4pm as the temperature would drop and the dark soon sets in.
The upstream beat was next and whether it was the beat itself or that the temperature might have slightly increased I can’t say, but the fishing was first class. Again nymph prevailed, the lighter version proving more productive than the weighted version. A number of fish were rising but it was tough to change from the upstream nymph as it was so successful. Flies emerging were large dark olives,medium and blue winged olives, caddis, needle flies and medium stoneflies, very healthy and the river has lovely weed levels and is very clear of any unwanted growth.
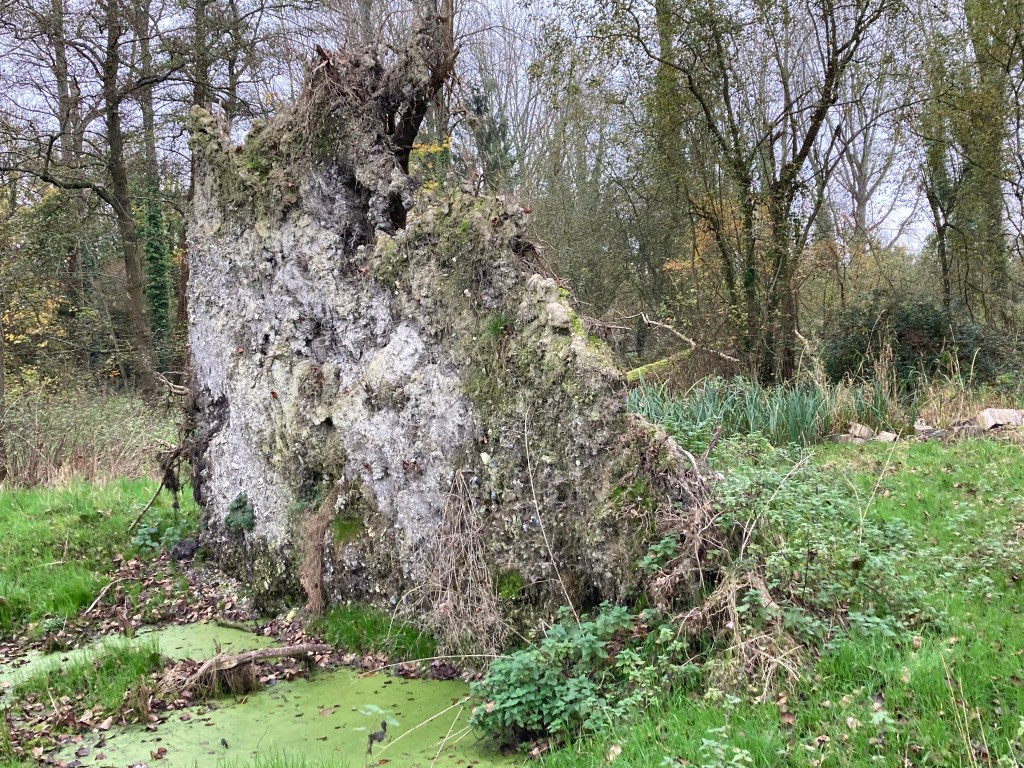
An interesting sight on the walk to the river was an up turned tree root, which I looked briefly at to see if any flint stone that might be present – I recall hearing once that it’s often a good place to find some, not on this occasion though, perhaps I was wrong!
So all in all I ended up with good numbers of grayling, I truly lost count to be honest, as well as some lovely conditioned out of season though unavoidable trout. The silence on the river was amazing, no road noise at all, especially on the upstream section and as ever it’s a privilege to fish the water, thoroughly recommended.
Anna from Upstream Dry Fly is available via the link below.
Tel: 01264 560976
Upstream Dry Fly Fishing
www.upstreamdryfly.com
The Humongous – A Fly for November
Hook: Kamasan B175, size 8 or 10.
Thread: Black Veevus GSP, 50D.
Eyes: Medium silver bead chain.
Tail: A dozen or so strands of silver holographic Flashabou with a bunch of black marabou over.
Rib: Silver wire, medium.
Body: 3mm. silver metallic Fritz.
Hackle: Barred Cree/Chinchilla, soft Chinese cock or grizzle hen hackle

Photo 1. Secure the hook in the vice, wind on a short bed of thread, remove the waste and return the thread to just short of the eye.
Photo 2. Secure a pair of bead chain eyes squarely on top of the shank usingfigure of eight thread wraps wound over a spot of superglue.

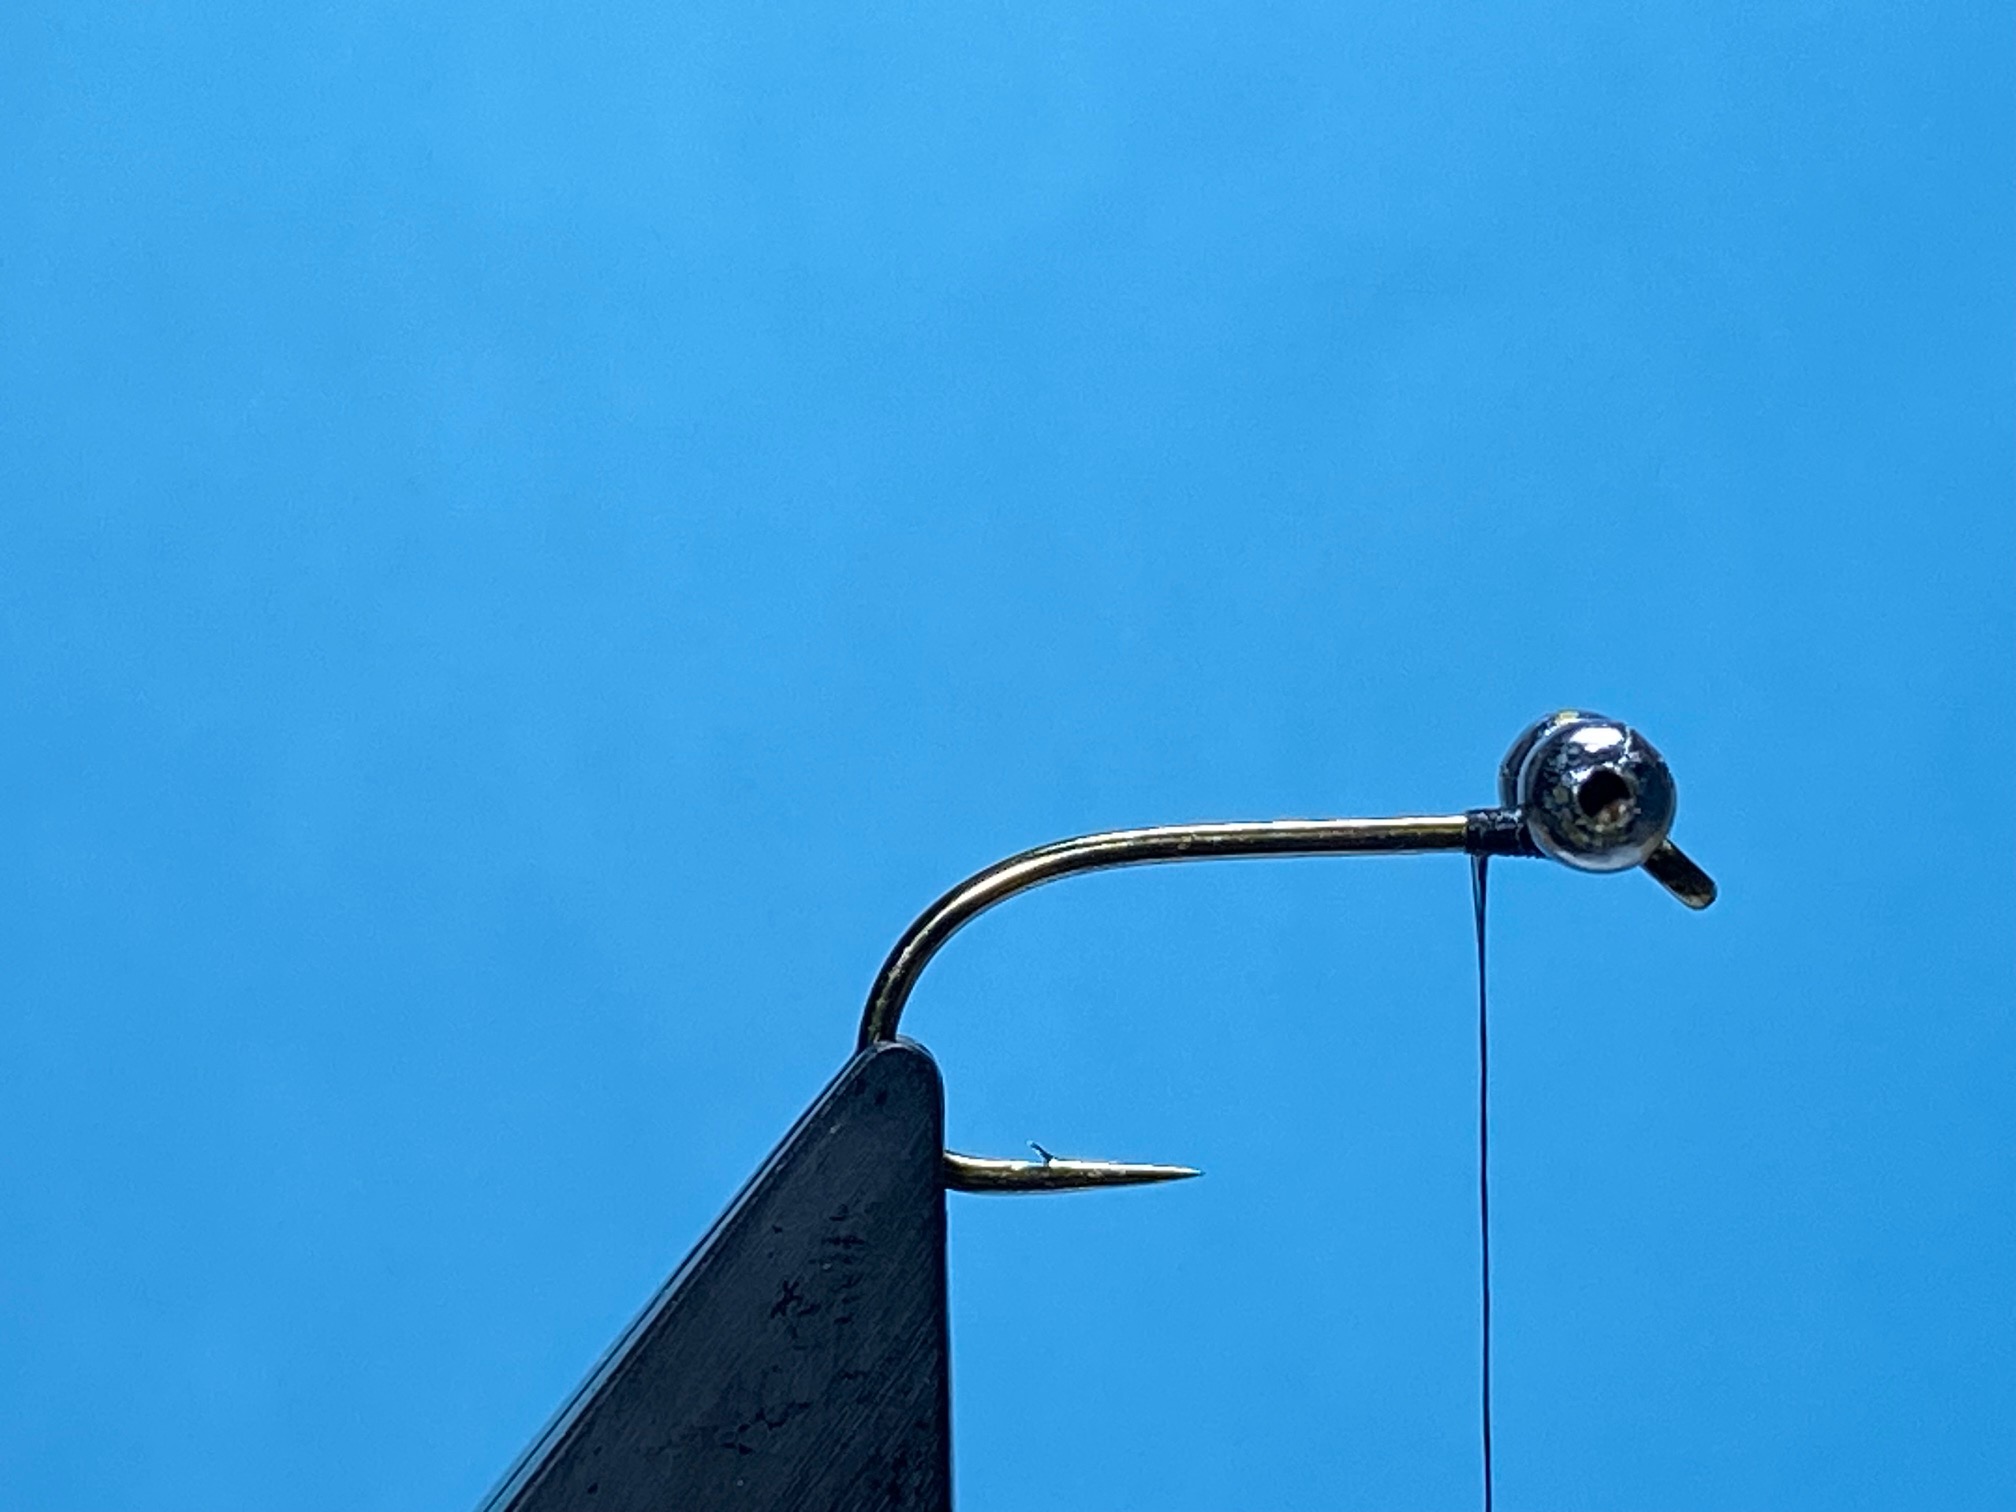
Photo 3. Tie in the strands of Flashabou as a long tail and continue to bind down the strands on top of the shank, stopping just before the hook bend. Trim the Flashabou to at least twice the length of the hook.
Photo 4. Take a bunch of long fibred marabou and using finger and thumb nail, strip away the fluff from the basal ends and trim them square. Tie in the marabou over the Flashabou, bind down the waste ends stopping just before the eyes and return the thread to the tail. Pinch off the ends of the marabou just longer than the Flashabou.


Photo 5. Tie in a length of silver wire with a couple of well waxed turns of thread. Follow this by tying in the bared core of a length of silver metallic Fritz and bind down both the wire and the core with touching turns of thread stopping just before the eyes.
Photo 6. Wind the Fritz to the eyes in close turns, stroking back the fibres after each turn. Secure the Fritz with thread at the eyes and remove the excess Fritz.


Photo 7. Prepare the hackle by stripping away the fluffy fibres from the base of the stem and trim the stem to length. Now using well waxed thread, tie in the hackle by its stem immediately behind the bead chain eyes.
Photo 8. Make two turns of hackle immediately behind the eyes and continue to palmer the hackle in open turns to the tail. Trap the hackle with the wire and continue to wind the wire in open turns through the hackle to the bead chain eyes. Secure the wire with well waxed thread.


Photo 9. Worry off the excess wire and trim away the hackle tip at the tail. Tidy the head with a few turns of thread, whip finish and remove the thread. Varnish the head to complete the fly.
Tying Tips
- This is the silver version of the Humongous, but it can also be tied in gold simply by changing the colour of the flash material in the tail and the metallic Fritz body. Both colours are worth having in your fly box, together with a white tailed, silver version that works well in Autumn when the trout start hitting the fry.
- Many people tie this fly on long shank nymph or lure hooks, but I’m convinced that a standard shank, strong wire, wet fly hook allows more movement in the tail making the fly more effective.
- The eyes can be tied in at the start of the dressing or at the end, whichever is easier for the tyer. I prefer to tie them in first as this sets limits for the length of the body and avoids crowding the eye when the fly is completed. It also allows the eyes to be tied in batches giving the superglue plenty of time to dry. A simpler option is to use a silver tungsten bead, although I have always found the bead chain eyes to be more effective.
- The original dressing calls for a soft and rather nondescript Chinese cock hackle approximating to a poor cree/chinchilla/ barred ginger combination, but to be honest, I have found these difficult to source. As a result, and since this pattern is all about movement, I have resorted to using a genetic grizzle hen hackle, which to my eyes at least suits the silver version of this fly very well without impacting its effectiveness. Whichever hackle is used, it should be longer than normal in order to create maximum movement. This is one pattern where the fly’s action in water is far more important than its proportions as perceived by mere fly tyers.
Les Lockey – Sep ’24
September on Lake Vyrnwy – A game of two halves
Our yearly trip to Lake Vyrnwy, and for a change this year, norain forecast! We arrived at 9am to pick up two batteries and a motor (36lb trust). We were fishing from Whitegates at the far end of the Lake. All looked fine as we set up…that is until Dave dropped all his flies out of his box onto the floor of the boat!
The view on the Lake as we set off….

It didn’t seem that bad!? As we set off the wind started gusting. We wanted to go to the end of the lake, but could not get the power to fight the wind! Tried swopping batteries, but not much difference. At this point Dave’s hat flew off and we spent the next 10 minutes chasing it! We did eventually catch it. Current was sending it towards the end of the lake, the wind was pushing us towards the Hotel…
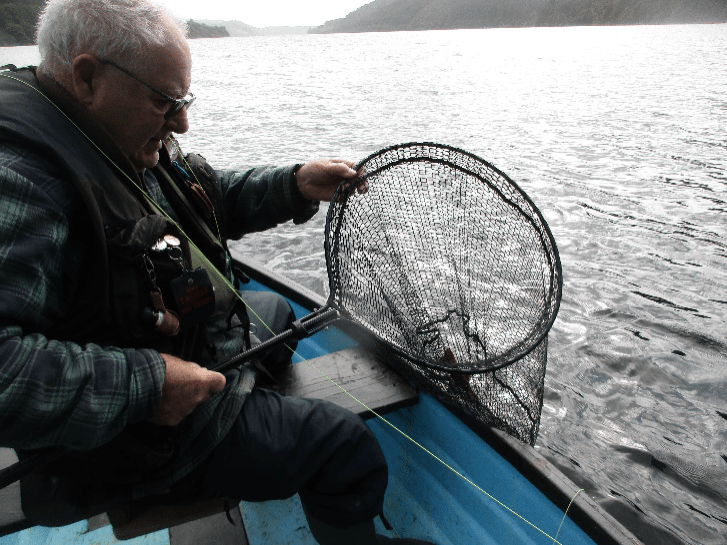
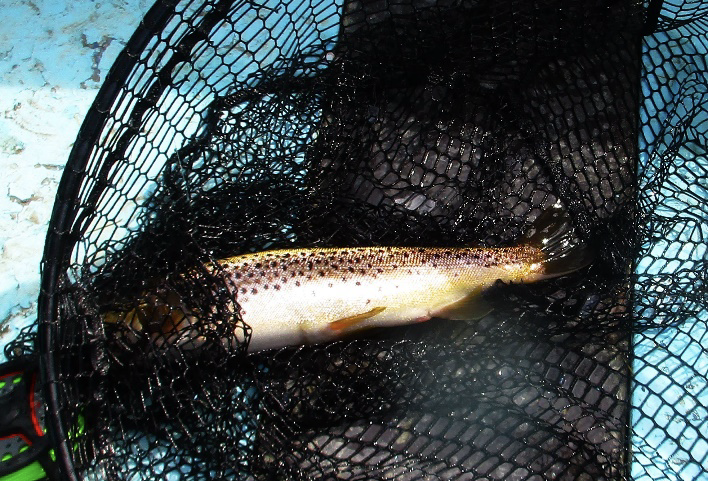
We tried fishing up towards the hotel with the wind. Nothing.We both had dries on. On the opposite bank was another “arm” that looked more sheltered, so we “slowly” motored over. Much better. Dave even caught a fish (1lb+ Brown)!
Note the bare head – hat still very wet!


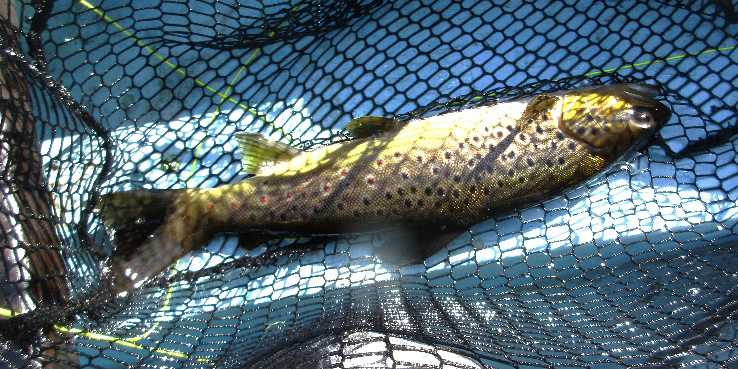
This was on a “Dave’s Daddy” (dry). I struggled, so changed to a drowned daddy and followed Dave with a Brown – but smaller! Dave on the other had replied with the “other” fish!
We seemed to have found fish in this bay, but they were hard work. All very close to the bank and we needed to “motor” in most cases, due to the wind changing direction every few minutes.
To show there were “good” spots with little wind –


Another fish came to Dave’s Daddy, followed by my final fish, which was at least a better one, on a dry Shiney fly

At 3 fish each, we called it a day, as we had still to get back to the boat station, on the opposite side of the lake! Now the trip back – remember the wind!! To cross the lake took 1 hour 15 minutes!! Hard going, totally drained one battery and the other was barely moving us against the wind. Had to run with the wind at times, then run back. When we did reach the other bank, even close in the wind still took its toll.
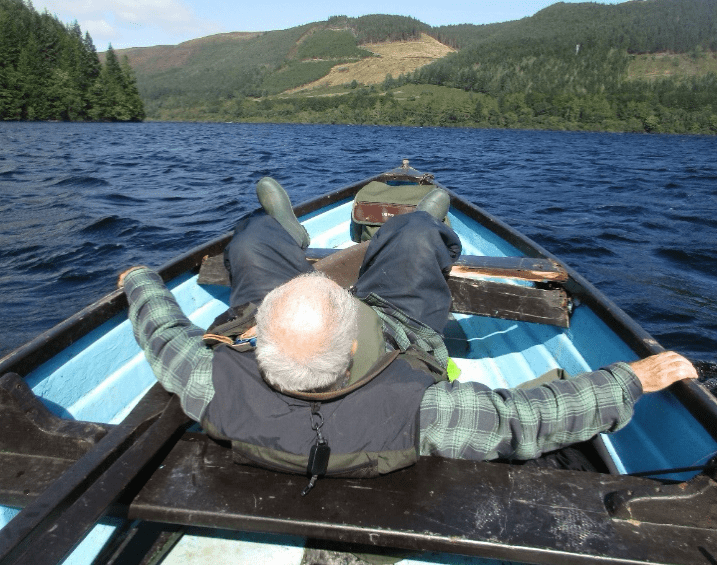
There was one other incident, that took place on the return journey, that forced Dave to lie down – ALL the way back! The things he will do to get out of ROWING.
Yes, the seat broke away from the hull and split the whole length. Dave could not move.
NOW NO DIET sheets are to be sent to him!!
Just back by 15:30 (1/2 day boat).
A good day, but next time, will check the “best” end for wind!Hope the Hotel gets better/more powerful motors for our next visit. Last time I fished, there were a few 56lb trust ones available.
Eddie
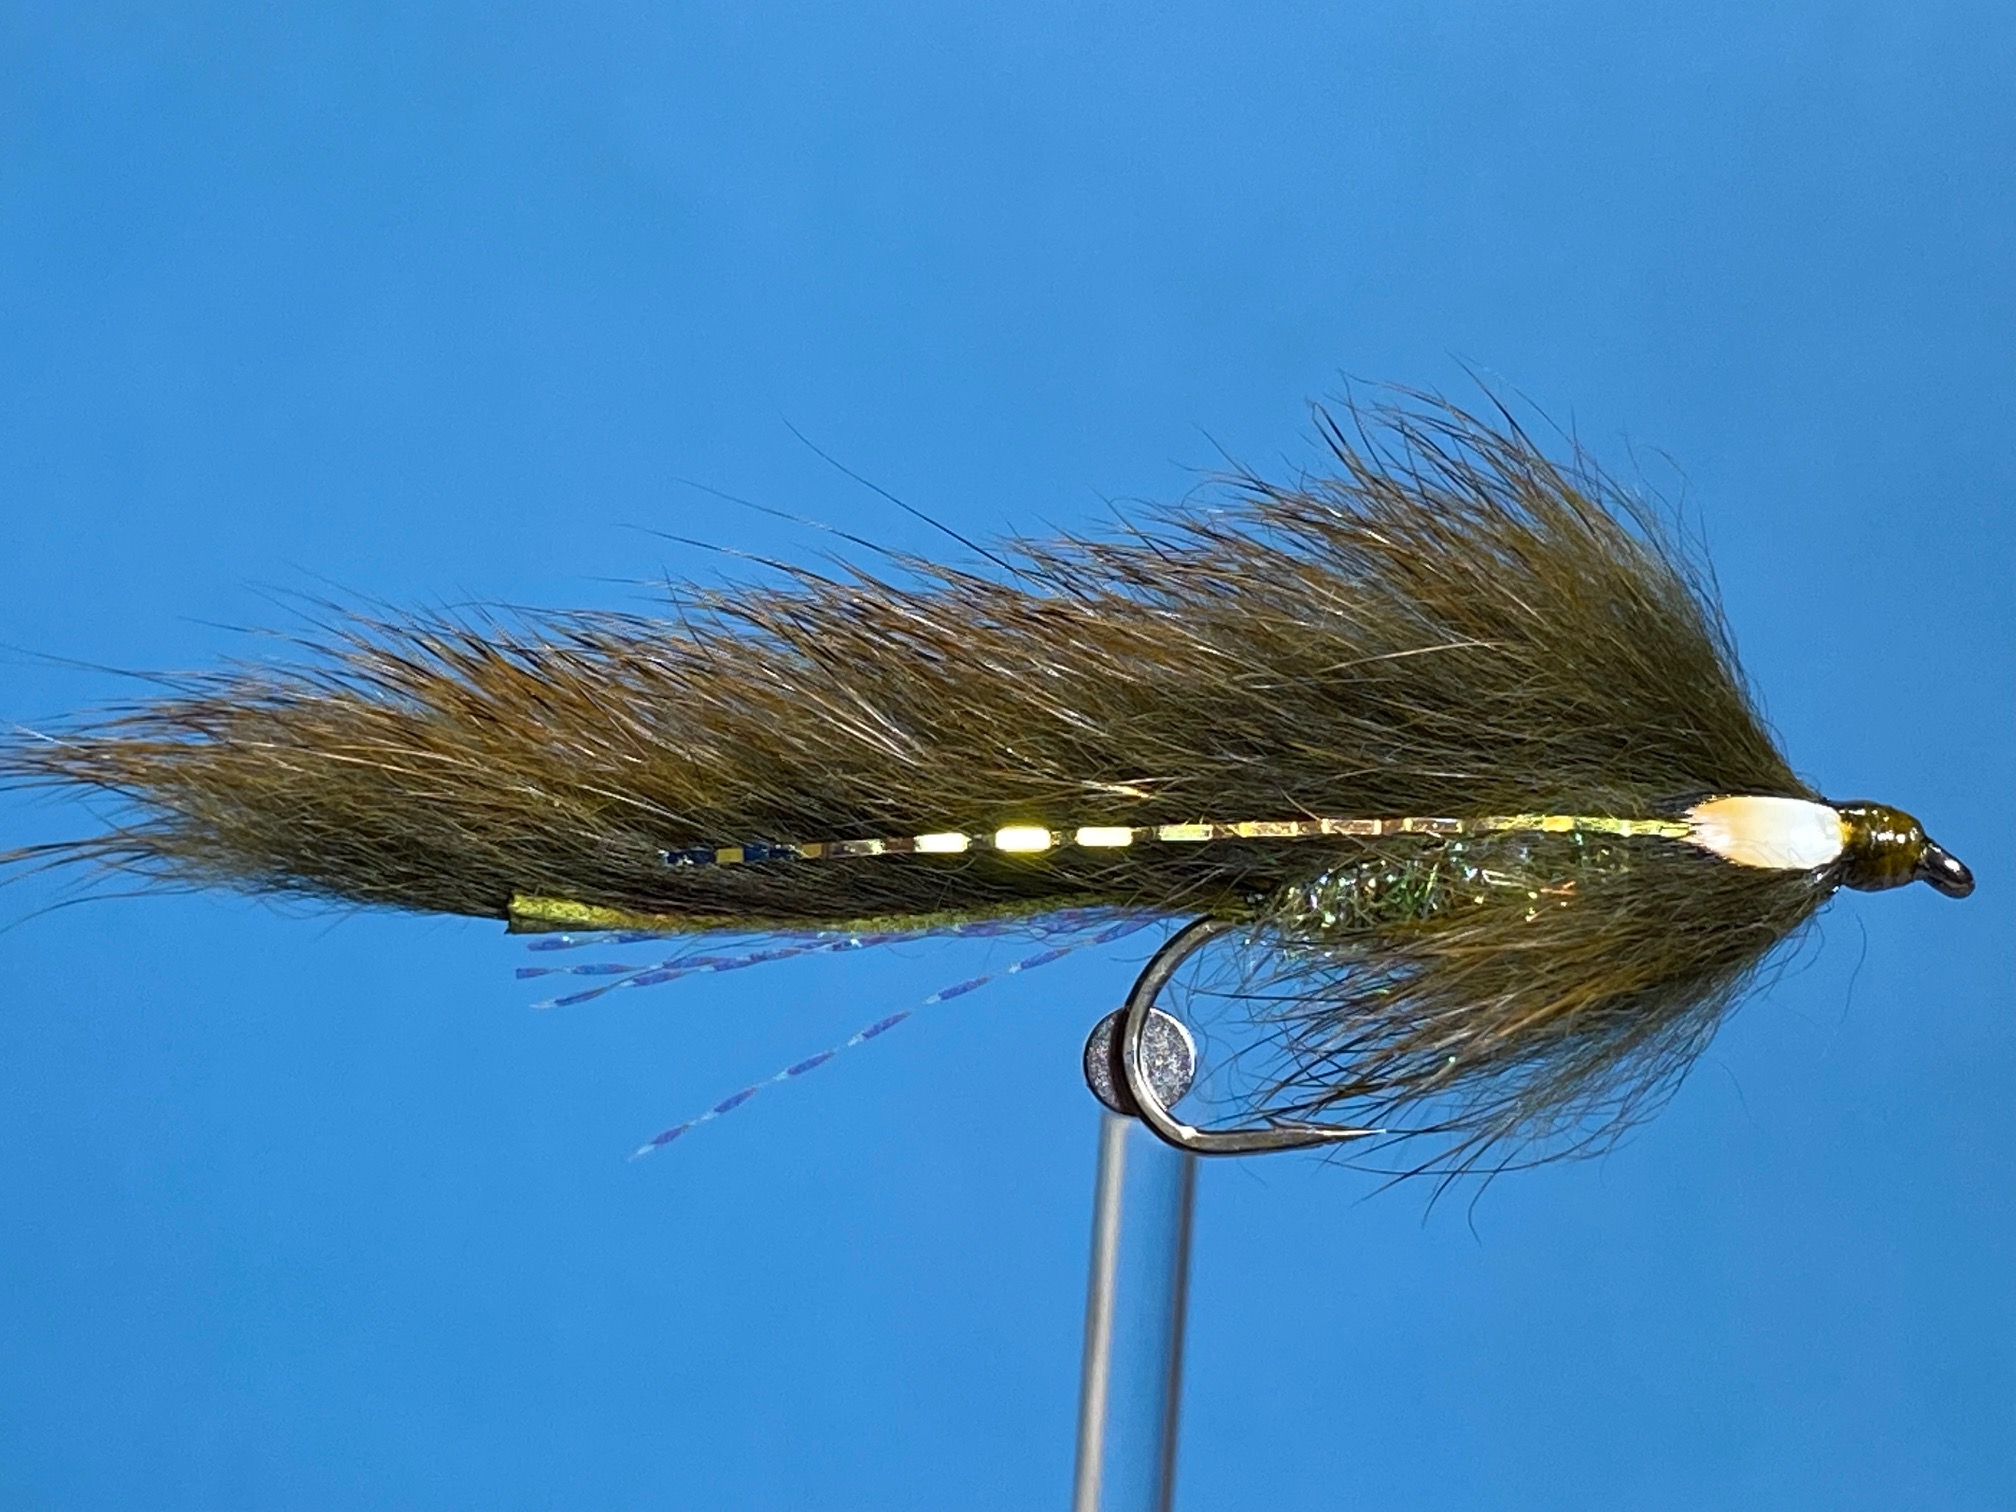
The Pine Squirrel Zonker – A Fly for October
Hook: Kamasan B800 longshank lure hook, size 10.
Underbody: Fine lead wire.
Thread: Olive Roman Moser Powersilk, 10/0.
Tail: Olive Krystal Flash with olive pine squirrel zonker strip over.
Back: Olive pine squirrel zonker strip.
Body: Olive UV Ice Dub and olive Glister mixed .
Collar Hackle: Olive pine squirrel zonker strip.
Side flashes: Peacock Black Krinkle Mirror Flash, (optional).
Eyes: Jungle cock nails or 3mm stick on eyes.
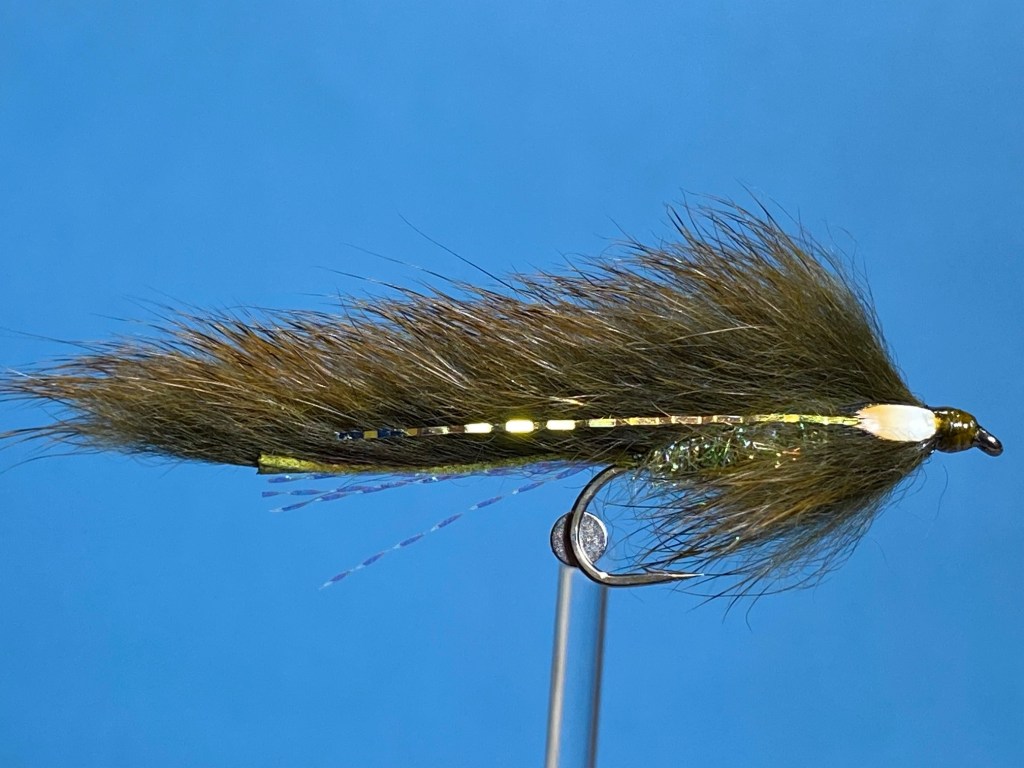
Photo 1. Secure the hook in the vice and starting about 3mm from the eye, wind on a bed of thread to a point opposite the barb and remove the waste thread. Apply a light coat of superglue to the thread wraps from opposite the hook point to the start of the thread, then wind on tight turns of lead wire over the glue, stopping at the thread starting point.
Photo 2. For the under tail, take 3 strands of Krystal Flash, double them over so the tips are aligned and with the tips extending about the same length as the hook shank, tie them in securely on top of the shank, and remove the excess Krystal Flash. Now cover the wire with thread, leaving the thread at the tail. This will take several passes up and down the shank.
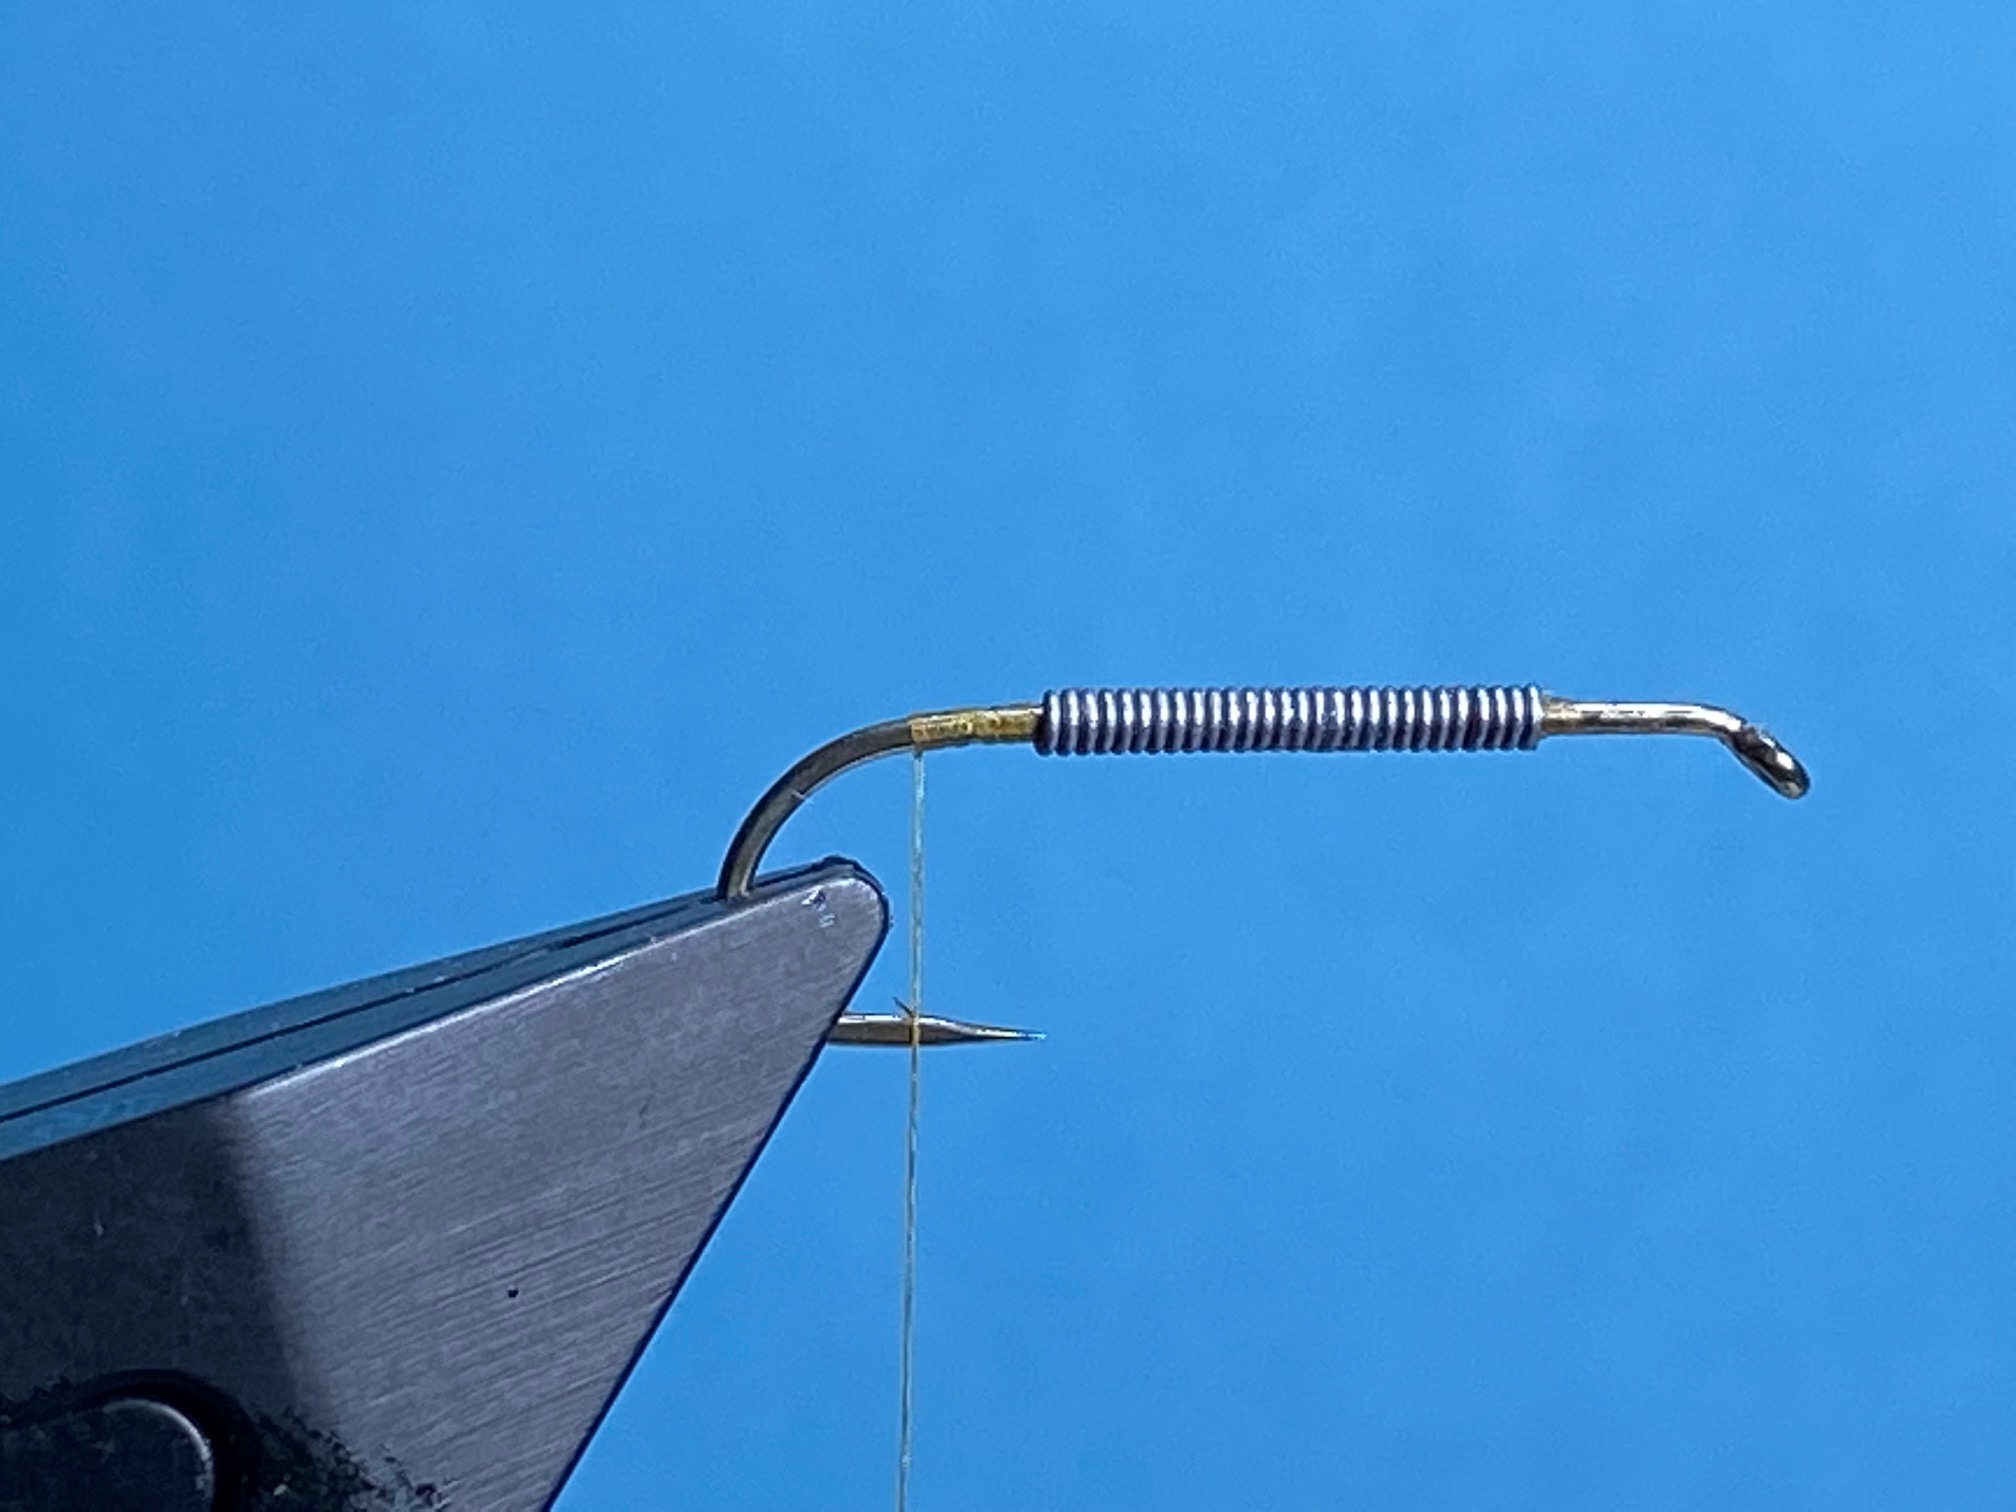

Photo 3. At the bottom end of the squirrel zonker strip and with moistened fingers, part the fur strip equal in length to the under tail. Place the parting on top of the shank and tie it down securely with three tight thread turns, then make two locking thread turns onto the shank immediately in front of the zonker strip tie in point.
Photo 4. Lay the zonker strip back over the tail and dub the ice dub mix onto the thread. Wind the dubbing noodle along the shank forming a tapered fat carrot shape stopping at the thread tie in point.
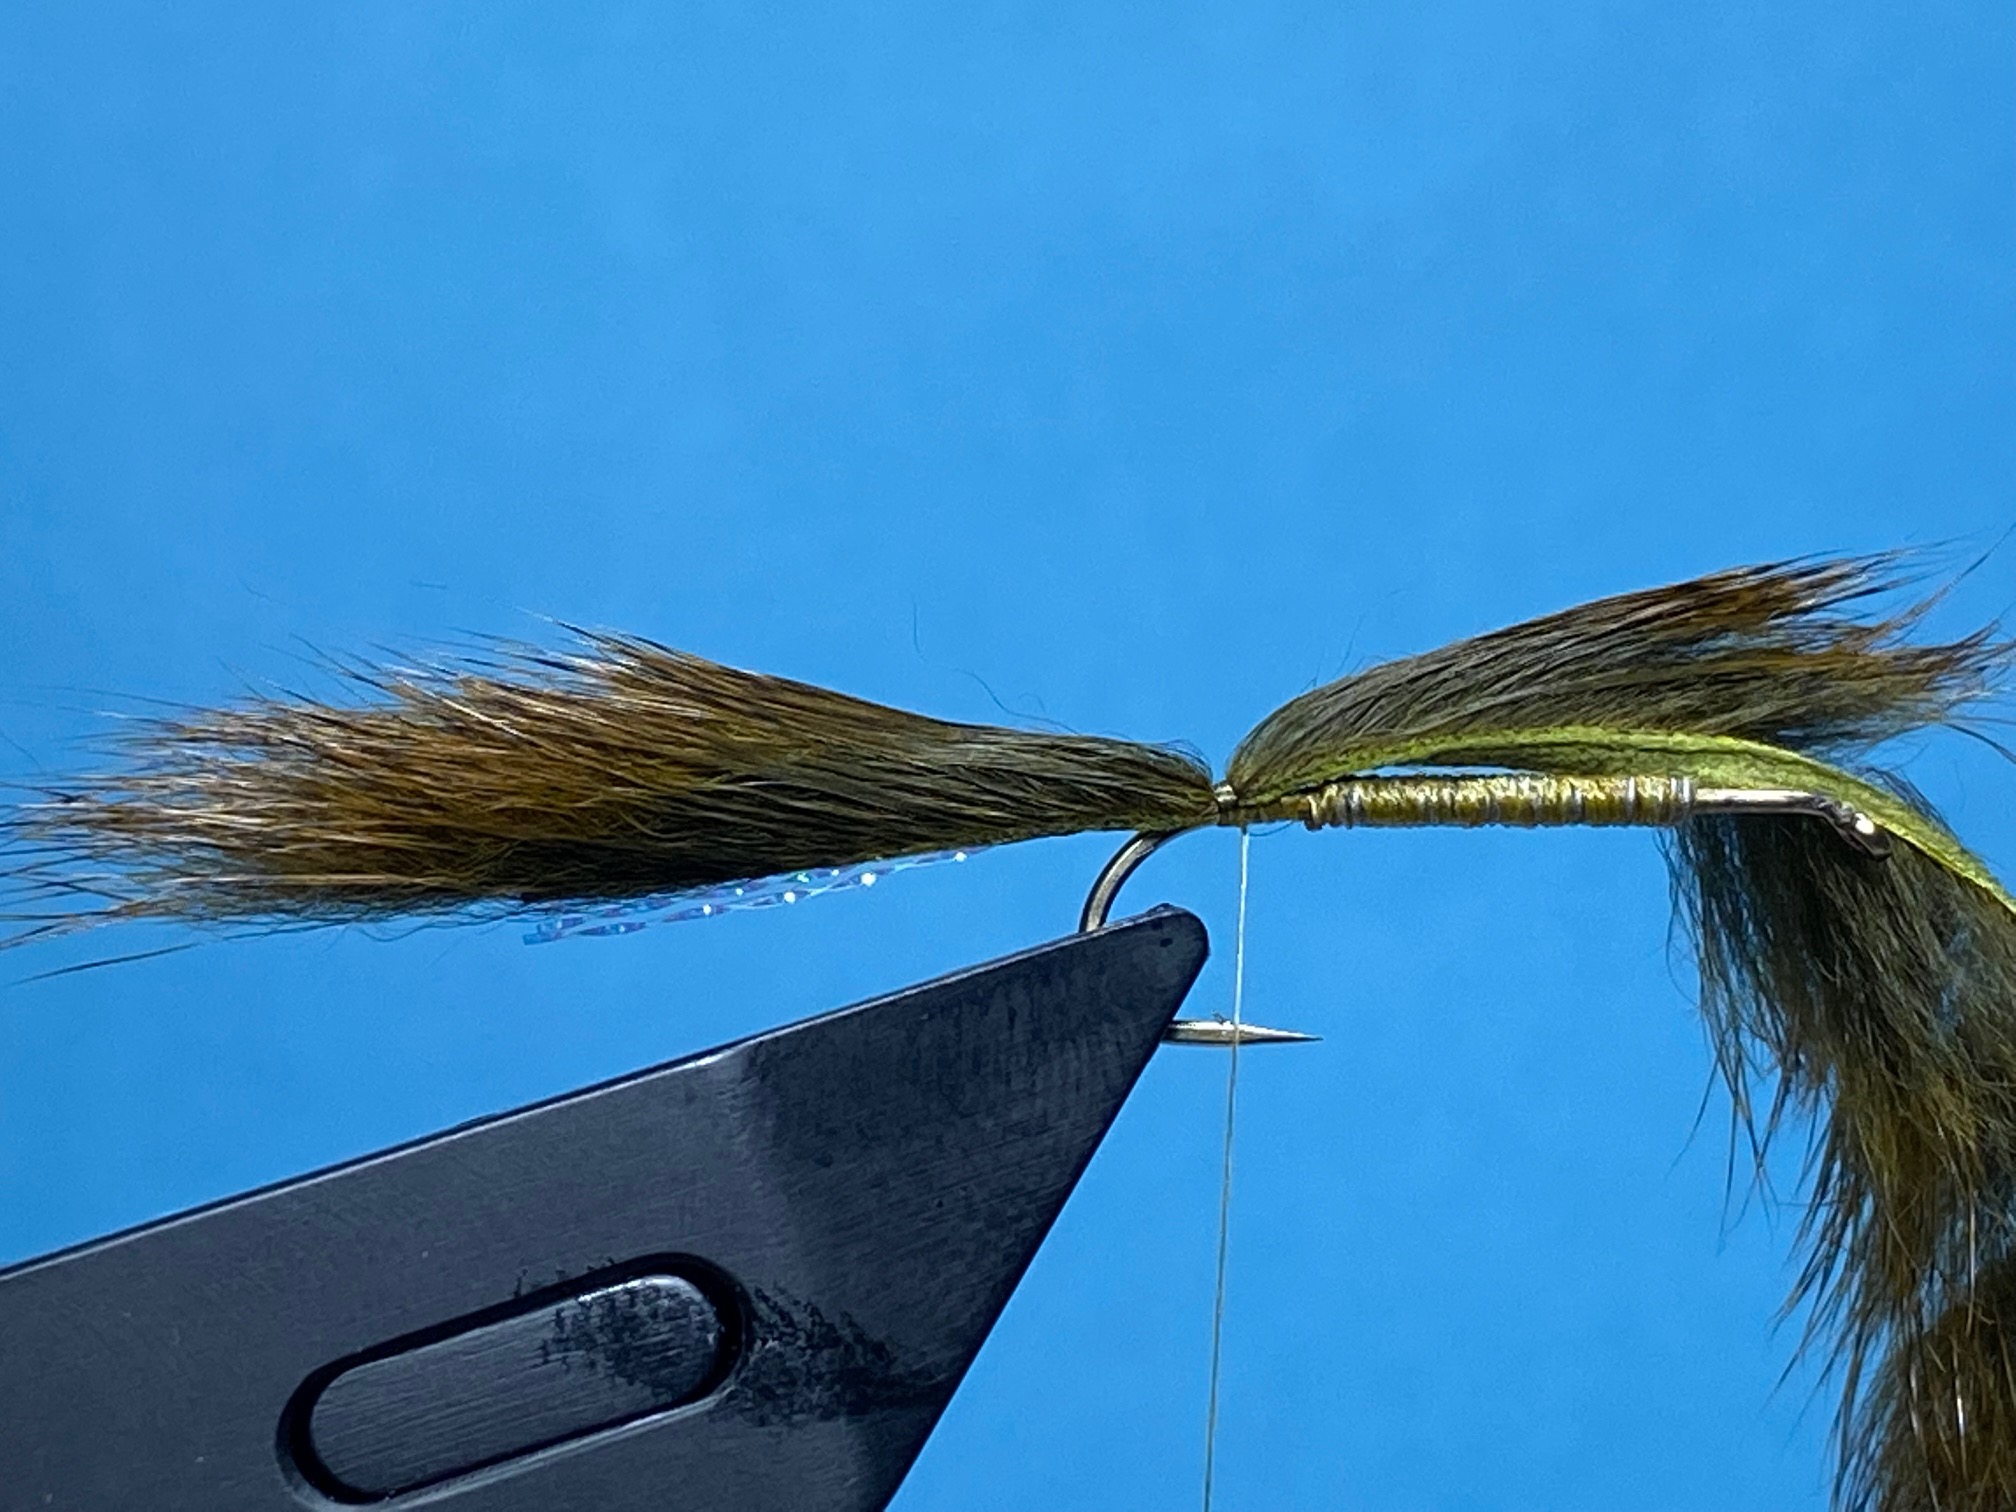

Photo 5. Bring the zonker strip forward over the dubbing, and with moistened fingers, part the fur in line with the end of the body and under tension, tie the strip down securely and centrally onto the bare hook shank and continue to take the thread to the eye.
Photo 6. Keeping the zonker strip taught and square to the shank, rotate it away from the hook through 90 degrees and begin to wind the strip on as a collar for 2 or 3 turns, stroking the fibres rearward after each turn. Secure the strip at the eye with several tight turns of thread. Carefully cut away the excess zonker strip and tidy the area with thread.


Photo 7. With lightly moistened fingers, stroke the collar fibres rearward to help flatten the fibres near the eye, then tie in a length of Mirror Flash along one side of the body to extend the full length of the fly. Now take the excess Mirror Flash and bring it around the head to the other side of the fly and tie it down securely, before trimming the Mirror Flash to length.
Photo 8. Tidy the area with a few turns of thread, and tie in one jungle cock nail feather on each side of the head, so the eyes line up centrally along the shank, then remove the waste jungle cock stems. Form a neat head, whip finish, and remove the thread. Varnish the head to complete the fly.
Tying Tips
- When tying zonker patterns, I like to use a strong GSP type of tying thread such as Roman Moser Powersilk or Semperfli Nanosilk which are both strong but very fine. This allows me to secure the zonker strips to the hook shank with very tight turns of thread without any significant build-up of thread.
- Starting the thread 3mm from the eye acts as a guide to where the body should finish in order to leave enough space for the collar and head.
- When covering the lead wire with thread, use acutely angled turns of thread across the wire wraps. This prevents the thread from slipping down between the turns of wire.
- Pine Squirrel is one of my favourite tying materials. Its thin skin has short dense fibres, making it ideally suited for tying small lures and wet flies, while the fur makes an excellent dubbing.
- Use moistened fingers to part the fur. This keeps the parting open and free from straggly fibres of fur, and also allows the thread to be tied directly on to the skin of the zonker strip which increases the security of the dressing.
- When tying in the zonker strip there is a tendency for the strip to be pushed around the hook as the first turn of thread is made, so to counteract this, I position the skin on the side of the shank and allow the first turn of thread to rotate the strip into position on top of the shank. Further turns of thread can then be cinched down tightly to keep the strip in place.
- When winding fur strips around a hook shank, it is normally suggested that crosscut zonker strips are used, however, pine squirrel zonker strips are so soft and finely cut, they can easily be used to wind collars, so long as the strip is kept taught, square to the hook and held at a 90 degree angle to the shank before winding. For smaller patterns, or if you have difficulty in winding the zonker strip, the fur can be cut from the skin, inserted into a dubbing loop and spun to produce a fur rope which can then be wound as a fur hackle.
- I prefer jungle cock nail feathers for the eyes of this pattern, but as an alternative, 3 or 4mm artificial eyes could also be used. Just stick them in position with superglue, cover with UV resin and cure with a torch.
Les Lockey – Aug ’24
July 24 Gold Award at the Branch
The North West Branch of the Fly Dressers Guild is proud to celebrate its 1st Gold level Award. We (the Branch) have been involved with the Guilds tying programme from the start, with a good number of our members attaining the Bronze level. A few then moved on to the Silver with four completing the syllabus and with two members starting Gold

We are exceptionally pleased to announce that branch member Gary Kirk has now completed all 3 levels of the award.
Bronze awarded 10 July 2018
Silver awarded 19 November 2019
Gold awarded 27 June 2024
The North West Branch, started with just two instructors/assessors – (Certificates issued 01/05/2015) David Palmer (then Club Chairman) and Eddie Wilkinson (then Branch Secretary). The work was split with Eddie doing the Bronze levels and Dave the Silver levels (with a magnifying glass). No one had thought of Gold at this time.
As Dave and Eddie were stepping back from their committee roles, it was thought wise to increase the instructors/assessors, so two new people were added, Ni Rodgers in July 2017 who had attained his Silver and was working with the American Awards Program as well. Unfortunately, Ni passed away just a few years later in 2020.
As mentioned, we had no plans for Gold, so when we did move into this field David took on this “initial” work. As with the Silver, David set high standards. The one thing that worried members was Dave and his magnifying glass. To let members know what our minimum standard is, Ni Rodgers tied up a framed set of the Bronze and Silver Levels, so all could see what was expected. As yet we do not have a Gold set. So this was a “Flying Blind” role for Dave. Advice and a review of each fly was given, there were many re ties and tweaks, but eventually Gary produced his “Gold Set”. As this was a first, we (Dave and Eddie) did a double assessment on Gary’s flies. As “keeper of the paperwork” Eddie reviewed each section after Dave in a separate meeting with Gary, going through the good points and the difficult areas. There were development areas identified and I am happy to say followed up on.
Once we were satisfied with the work and the paperwork Eddie contacted Bob Lomax (the Guilds Awards Manager) to submit everything for external judgement (Gold cannot be awarded without this process). First job was to send pictures of the flies to Bob, along with the “dreaded” paperwork. After the initial check and following some questions (on hook type and size) the flies were posted off to Bob. A suitable independent assessor was appointed, and the flies were passed on. An email to me on 27th June informed me that Badge and Certificate were on their way to Gary!
The Future for Gary? Demonstrating (more) at shows, leading tying nights, perhaps even becoming an instructor /assessor himself? After all he is now the most qualified Flytying person in the North West!
Further information about the Fly-tying awards scheme can be found below.
Guild Fly-Tying Awards Scheme | Fly Dresser’s Guild (flydressersguild.org)
Gary has kindly written a really nice piece about his journey to the Gold award:
After successfully gaining the silver award, I explored the requirements to achieve the gold award and decided that I was up for a challenge! I discussed my intentions to aim for the gold award with Eddie and Dave at the Fly Tying Club and they both kindly agreed to mentor me through the process.
The journey then began, and I started to gather and sort through all the materials required. Rather naively, I thought this would be fairly easy, but trying to obtain good quality materials is very hard, especially if by mail order – you have to totally trust that the suppliers will send out ‘fit for purpose’ materials, because this, I soon found out, was one of the most frustrating obstacles I met with. A tip, I eventually found useful was to reach out to the suppliers by email, explaining why I required certain materials and then asking them for their advice regarding the choice of materials. Some companies were helpful, others simply ignored my request for assistance and of course, it goes without saying, they inevitably do not win my business!
The next problem to overcome was hook size, although it states a size, we are all aware that manufacturers have their own sizing process, which leads to quite significant variation from a fly tier’s perspective. So, I chose the manufacturer’s hook size that I felt happy to use, but obviously also met the requirements of the Guild.
Then came the You Tube searching for videos on how to tie the fly. This also can create confusion, as individuals have their own method on how to tie the flies, but some of the finished flies were, in my opinion, quite poor. So, then it was up to me to utilise the very best of my acquired skills to ensure a high quality finish. Not so easy – you will probably need to tie approximately 50 of each fly to take to Dave for him to appraise and once Dave has finished scrutinising with his magnifying glass, the rejection means you will be cutting 50 flies down to start again! This said, Dave is very keen, super experienced but more importantly fair and he will help you produce 3 flies identical to each other as is the requirement.
When eventually you have all the required flies and Dave has given his seal of approval, it’s then over to Eddie who records and reports the process of each fly’s journey to completion, so that the Guild have an idea of how you achieved the finished fly. Eddie then sends the flies to the Guild, who then forward them onto an independent assessor for impartiality purposes. This assessor makes the overriding decision on whether you have passed or failed.
Overall there is a lot of work and perseverance required and Dave and Eddie, who are a great source of help, can make the laborious parts of the journey light hearted, when you feel like giving up. But my recommendation is remain determined and that tenacity will pay off , as the sense of accomplishment on passing the Gold award is tremendous and I would strongly recommend members to give it a try !
Next on my list – the assessor’s certificate – and why not?
Gary Kirk
18/07/2024
The Wet Daddy (Stan Headley) – A Fly for September
Hook: Kamasan B800 longshank, size 10.
Thread: Brown Semperfli Nanosilk, 50D, or any fine brown or tan thread.
Rib: Small oval gold tinsel.
Body: Natural Raffia.
1st Hackle: Ginger or barred dark ginger cock hackle wound 2/3rds down the body.
2nd Hackle: Golden pheasant tippet feather.
3rd Hackle: Brown partridge shoulder feather.

Photo 1. Secure the hook in the vice, and starting at the eye, wind on a short bed of thread and remove the waste thread.
Photo 2. Tie in a length of small oval gold tinsel and bind it down with touching turns of thread to a point opposite the barb.


Photo 3. Cut a length of natural Raffia about 2 – 3mm wide and moisten it well with wet fingers until the Raffia becomes flat and pliable. With the waste end of the raffia stopping at the oval tinsel tie in point, tie in the raffia and bind it down with touching turns of thread.
Photo 4. Under tension, carefully wind the damp Raffia in overlapping turns up the shank to the thread, then back to the barb, and finally back to the thread, before tying it down securely and removing the excess Raffia.


Photo 5. Prepare the cock hackle by removing all the fluff from the bottom of the feather and trimming the bare stalk to about 2 mm. in length. Tie in the short hackle stalk with well waxed thread, then wind on two close turns of hackle at the tie in point and continue to palmer the hackle in open turns down the body until the 2/3rds point is reached. Leave the hackle to dangle in the hackle pliers.
Photo 6. Wind the oval tinsel in an open spiral rib until it meets the hackle, then trap the hackle with the tinsel and continue to rib the body through the hackle. Tie down the tinsel rib at the end of the body, remove the excess tinsel, tidy the area with thread ready for the next hackle and carefully cut off the excess hackle tip.
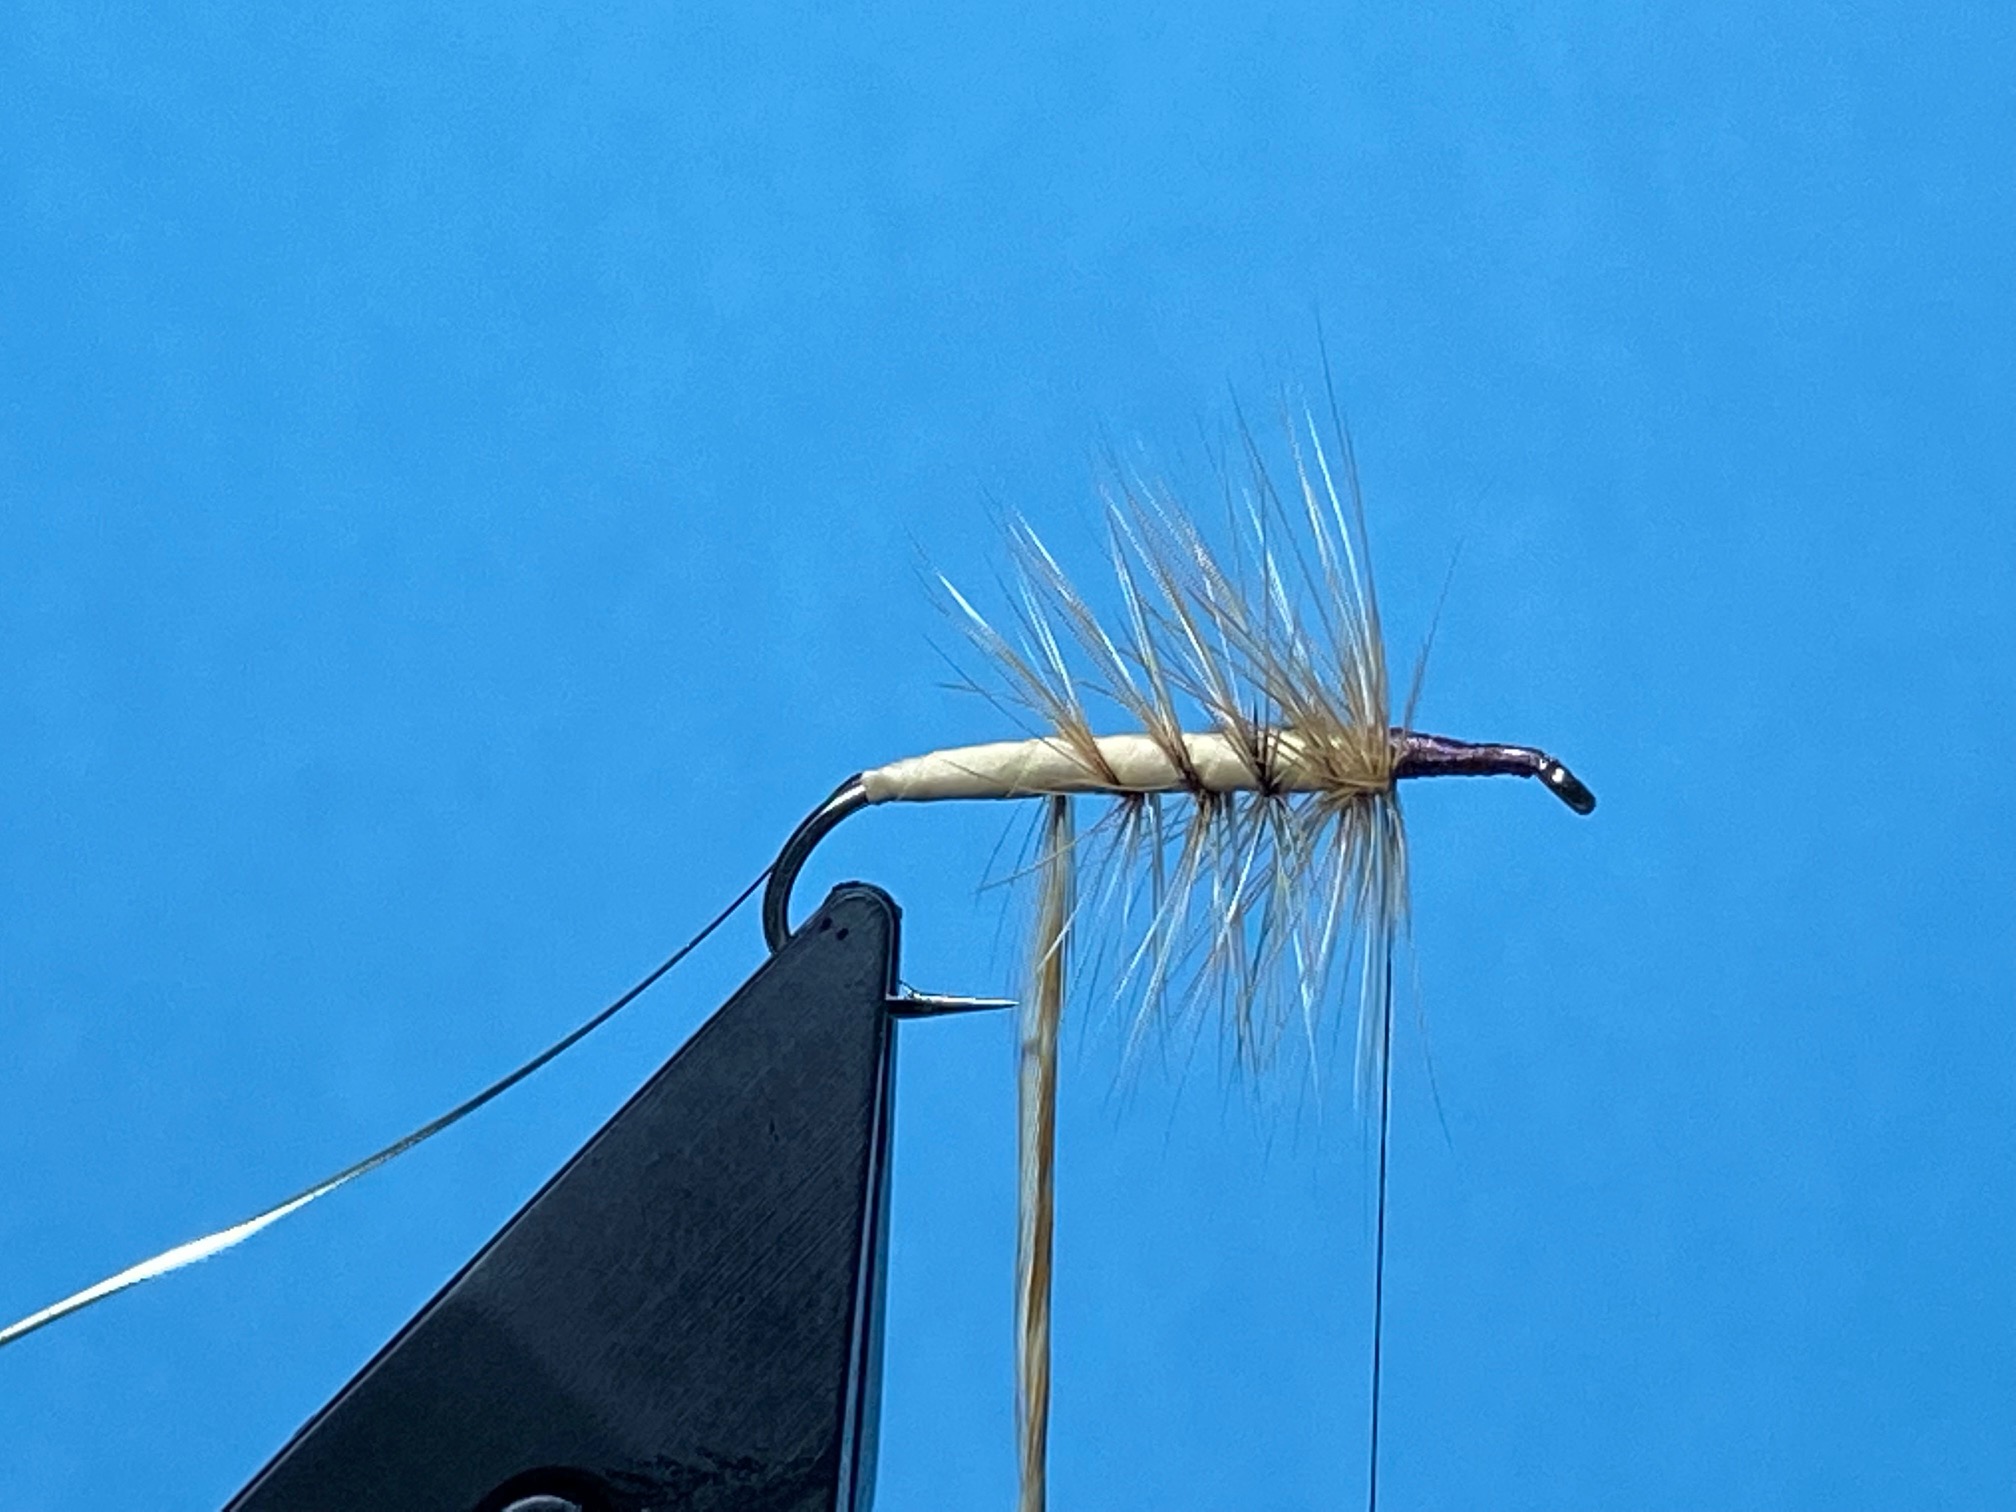

Photo 7. Take a golden pheasant tippet feather, remove the poorly marked outside fibres from each side of the stem and isolate the tip. Secure the feather by the tip fibres using well waxed thread and remove the excess tip. Carefully wind on the tippet feather, gently stroking the fibres rearward after each turn. Secure the hackle with several tight turns of thread and remove the excess feather. Tidy the area with thread ready for the final hackle.
Photo 8. Take a well-marked brown partridge shoulder feather and isolate the tip. Trim off the excess tip to leave a small triangular stub and using well waxed thread, tie in the feather by the triangular stub.


Photo 9. Wind on the partridge hackle, stroking back the fibres after each turn. Secure the hackle with several turns of waxed thread and remove the waste hackle.
Photo 10. Form a neat head, whip finish, and remove the thread. Varnish the head to complete the fly.
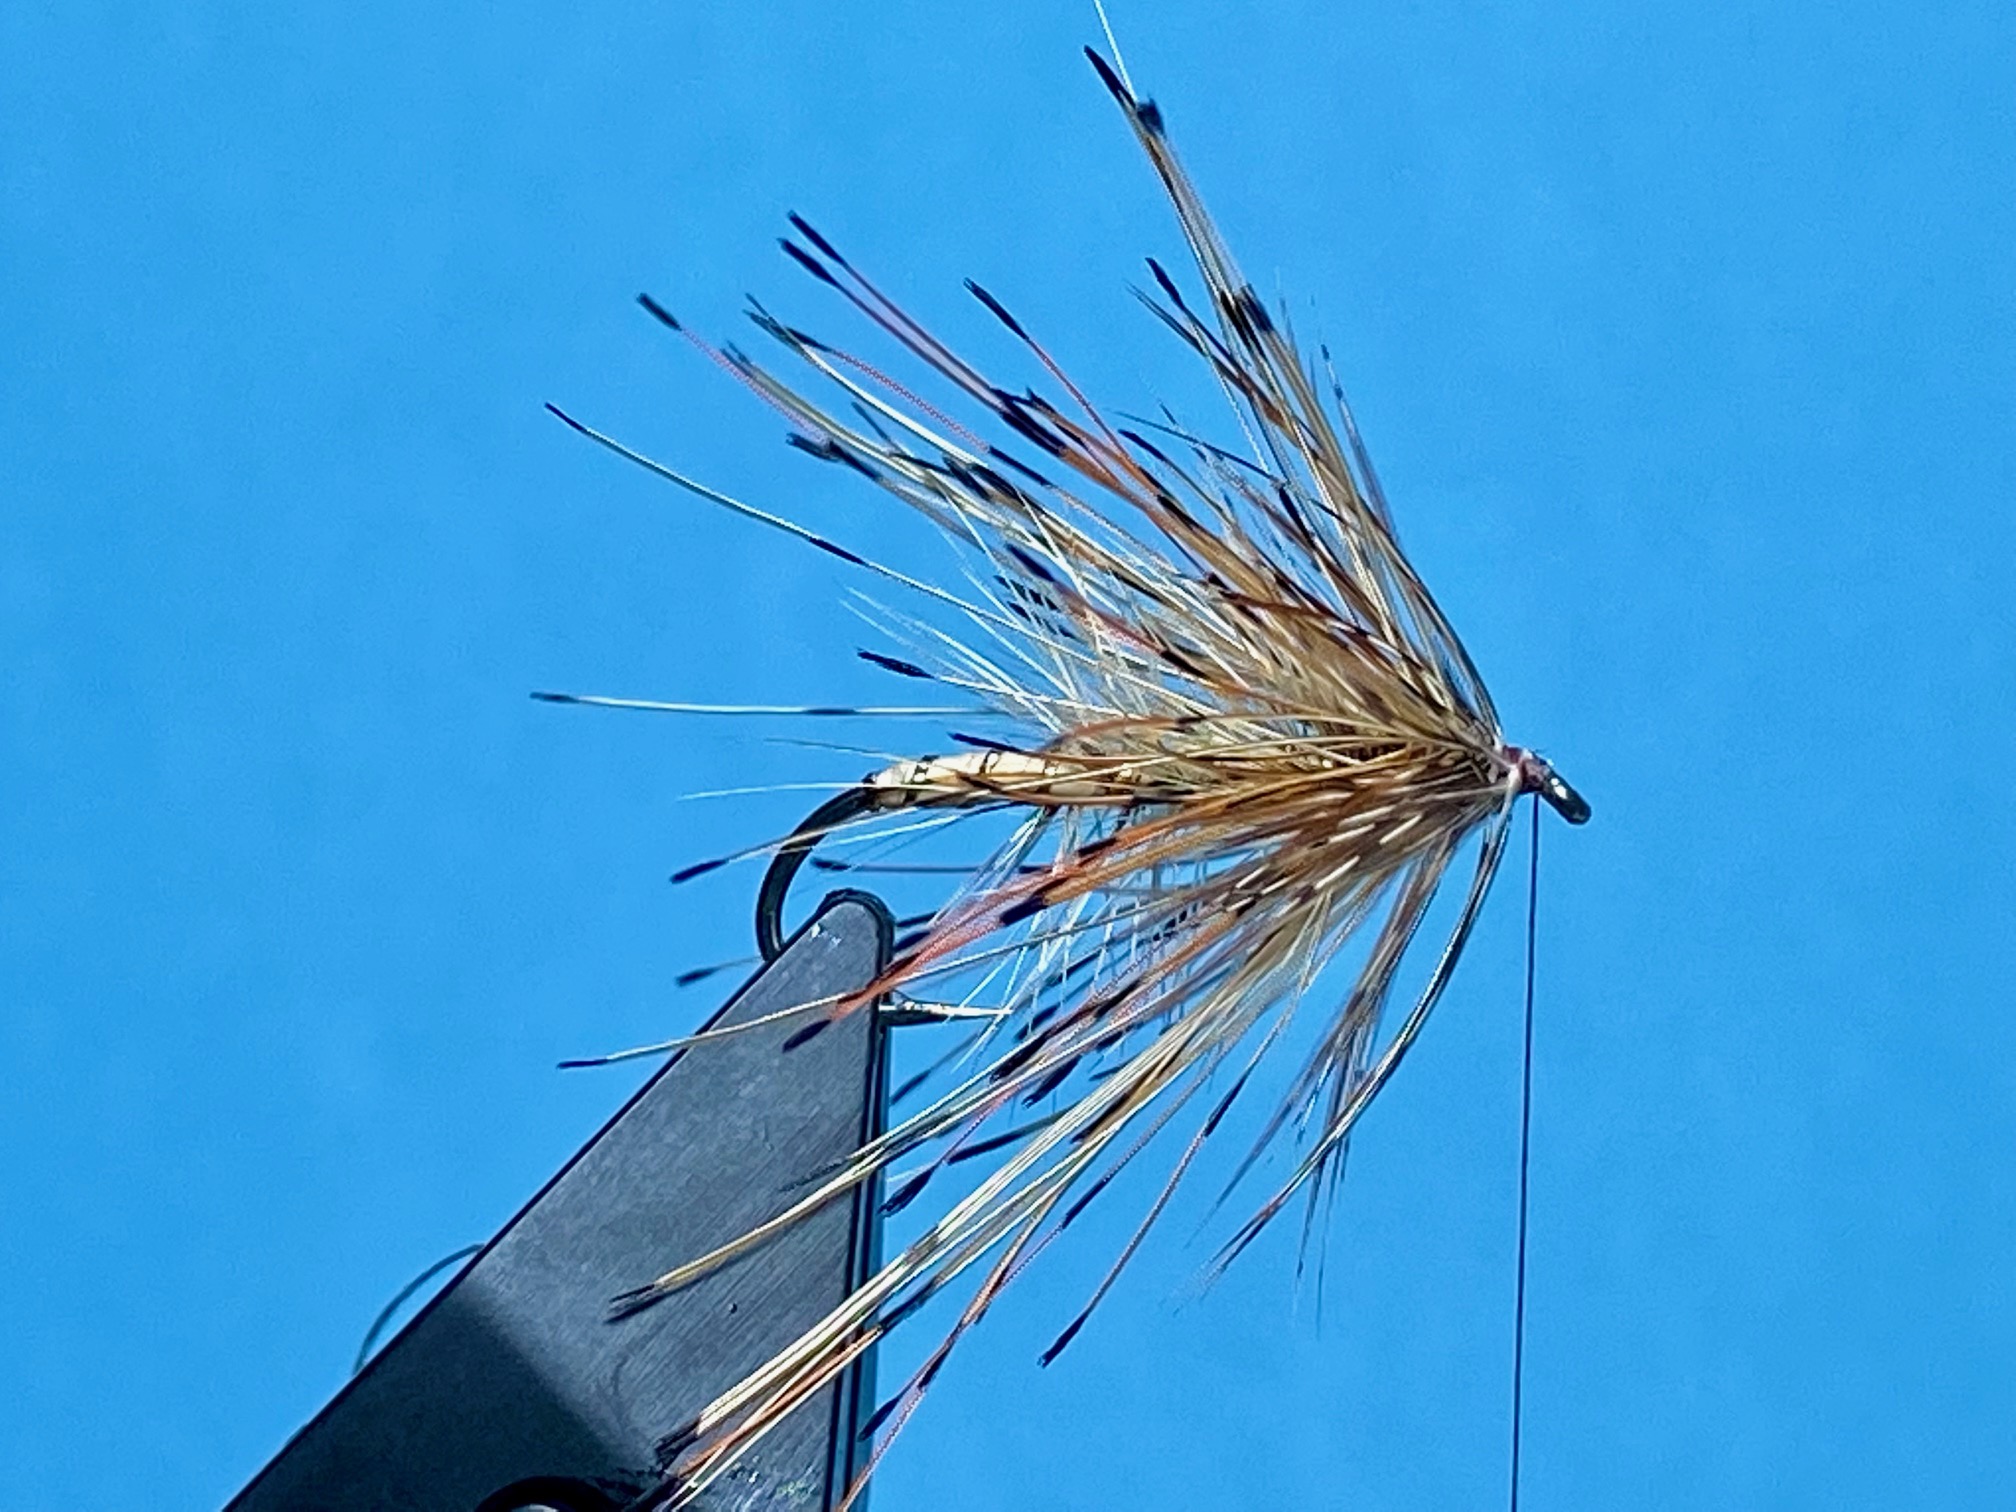
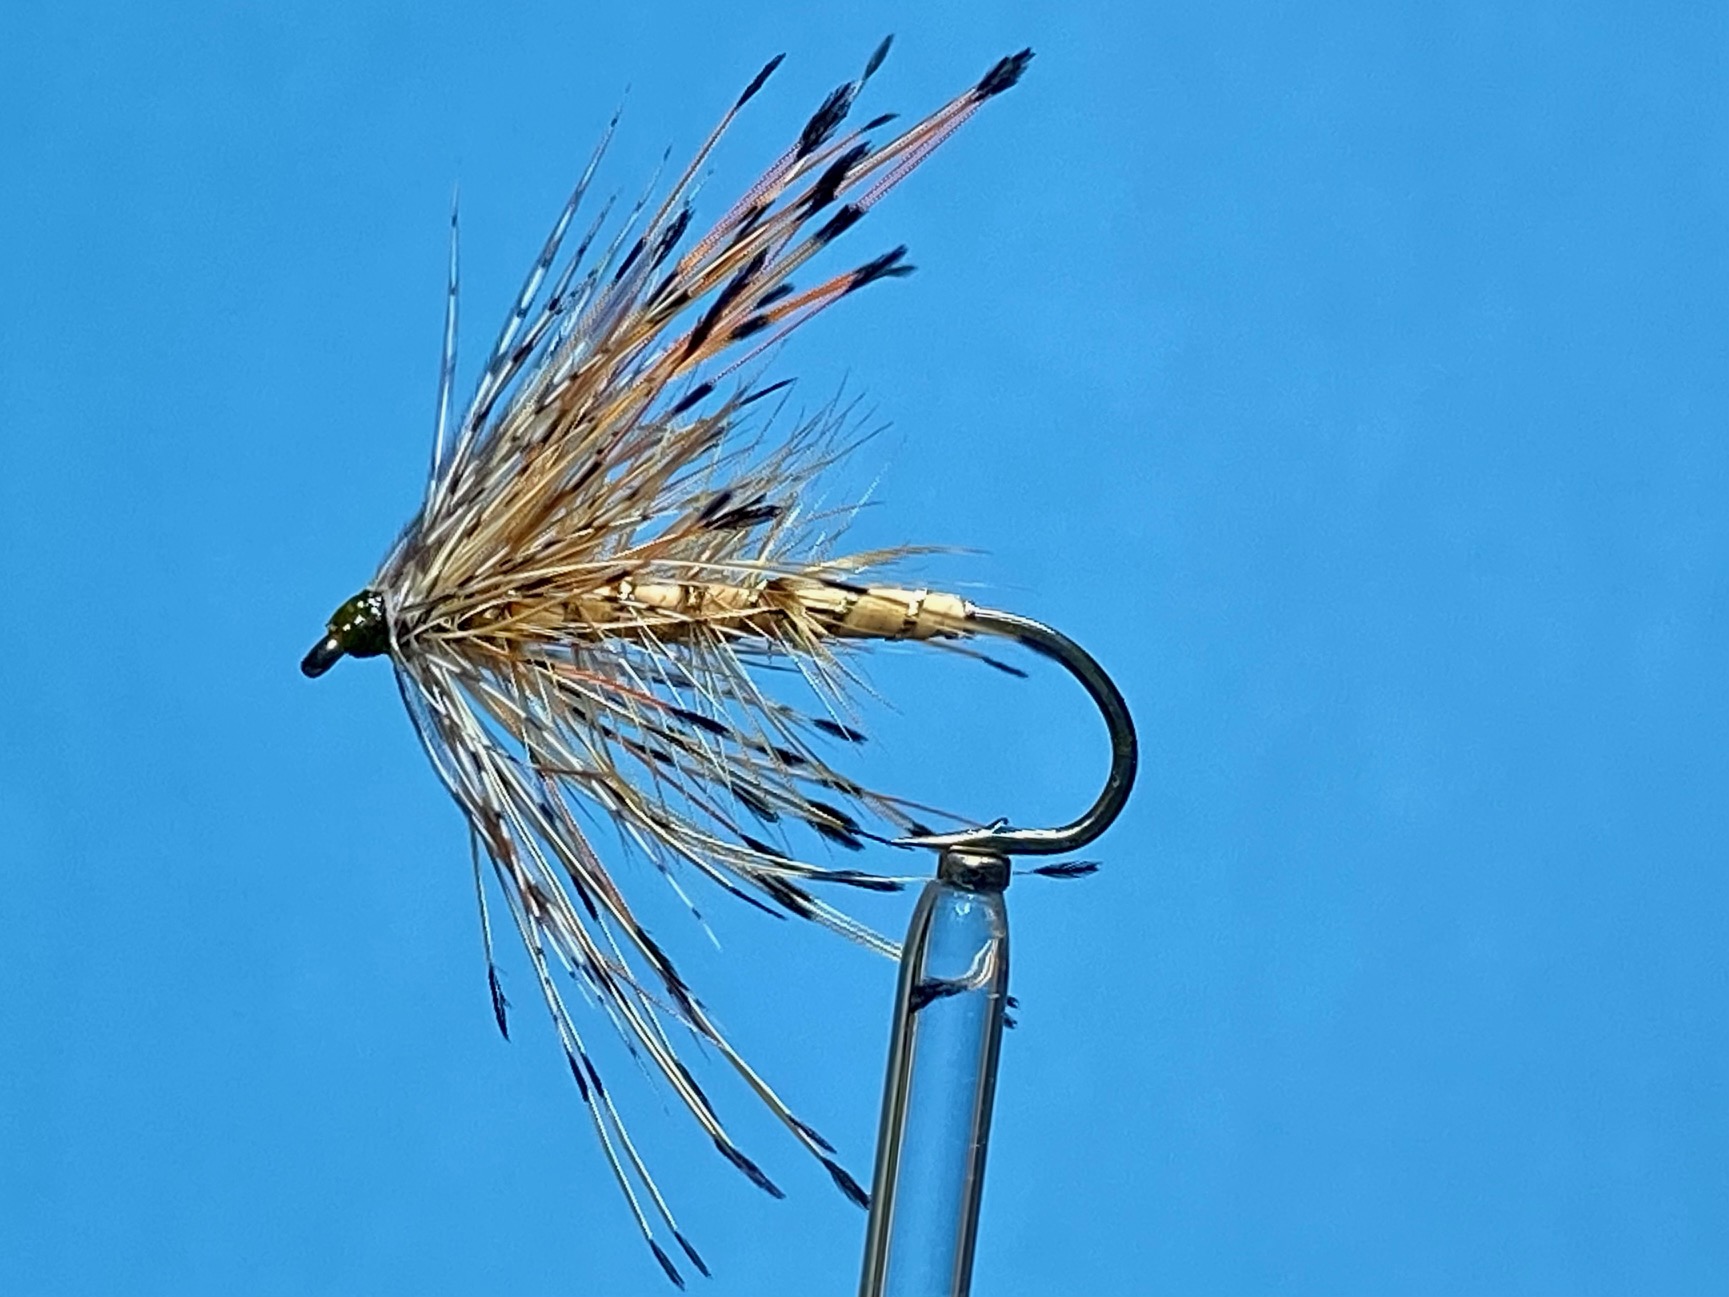
Tying Tips
- Raffia comes from the dried leaf veins of Raffia Palm trees which are found mainly in tropical Africa, with the best quality coming from Madagascar. 50g bundles (a lifetime’s supply) can be bought in craft shops such as Hobbycraft for just a couple of pounds. Raffene, or Swiss Straw, is a synthetic version of natural Raffia and is available in a wide variety of colours. Natural Raffia needs to be moistened prior to use to make it pliable, but Swiss Straw can be used either moist or dry depending on the application.
- Prepare the Raffia by selecting a 15cm length that is relatively flat and not curled tight at the edges, then make a small cut in one end approximately 2-3 mm from one edge and simply strip away the selected width. Once a suitable strip has been separated, moisten it along its length between wet fingers, pressing the raffia flat as you go. When forming the body, keep the Raffia damp and wind it under tension ensuring it remains flat and untwisted.
- This pattern requires three hackles to be wound after the formation of the body, so remember to leave sufficient space between the end of the body and the hook eye. At least 3mm is recommended.
- Since the cock hackle is only palmered 2/3rds of the way down the body, reasonably heavy hackle pliers can be attached to the hackle in order to maintain hackle tension and keep the hackle in position until it can be secured by the oval tinsel rib.
- This pattern is a minor variant of Stan Headley’s original dressing which uses the golden pheasant tippet hackle as the front hackle next to the head, but I prefer the more muted tones created by winding the partridge feather in front of the orange tippet hackle.
- When wound, the golden pheasant tippet fibres should extend beyond the hook bend, so check the fibre length against the hook shank before tying in the tippet feather. Experience has shown that suitably sized feathers tend to be found just below the middle of the tippet neck but this can vary depending on the quality of the tippet neck.
- It is important that the tippet hackle forms a nice umbrella shape that does not collapse along the shank which would negate the seductive pulsating action of the fibres. To this end, when winding the tippet hackle, try to keep the turns very slightly apart and only gently stroke the fibres rearward after each turn of hackle.
Les Lockey – Aug ’24
The Little Black – A Fly for August
Hook: Kamasan B170, sizes 14, tied short.
Thread: Pearsall’s Gossamer Silk, purple.
Body: Thread as above.
Rib: Magpie centre tail fibres.
Hackle: White tipped, dark and shiny cock starling feather.

Photo 1. Place the hook in the vice, wax the thread, and leaving a long thread tag, start the thread about 2mm. from the eye and in touching turns wind on a bed of thread stopping just before the hook point. Do not cut off the thread tag as this will be used when ribbing the fly.
Photo 2.Pull two fibres from a magpie centre tail feather and tie them in by their tips, using just two turns of thread wound towards the hook point. Return the thread in touching turns back to the start point, binding down the magpie feather tips as you go.


Photo 3.Lightly twist the thread tag around the magpie tail fibres to form a fine herl rope.
Photo 4.Wind the herl rope as a rib in open spirals up the shank and secure it at the start point using two turns of waxed thread, then remove the waste rope.
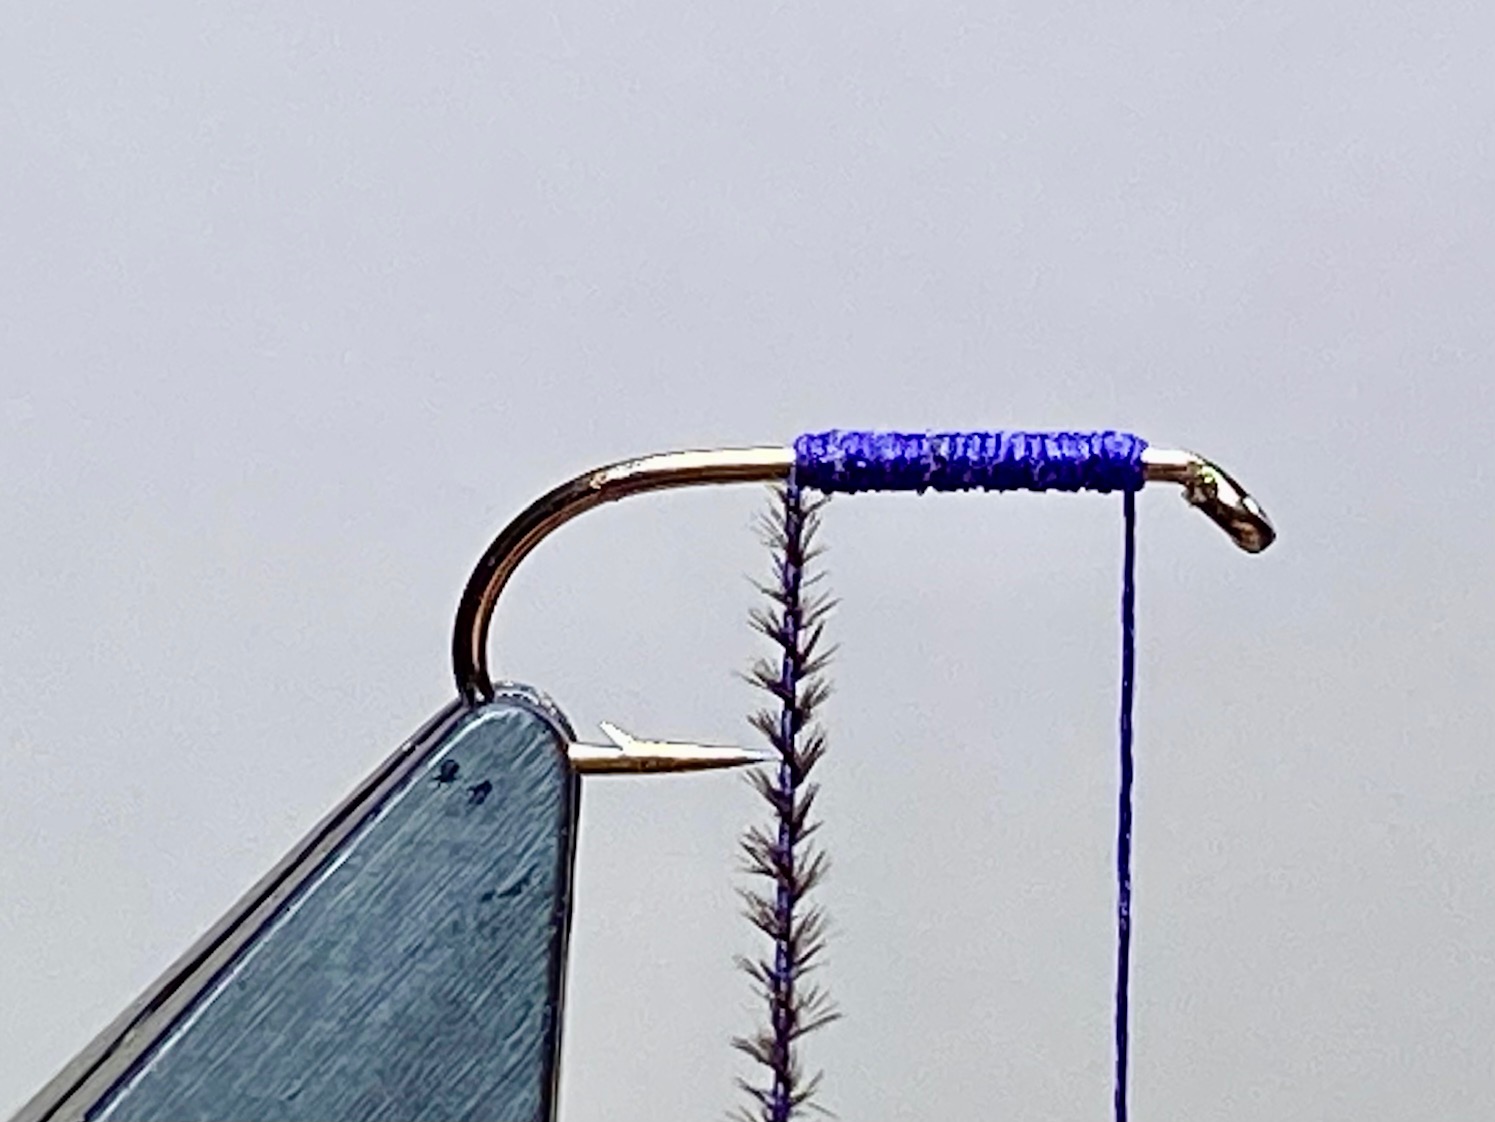
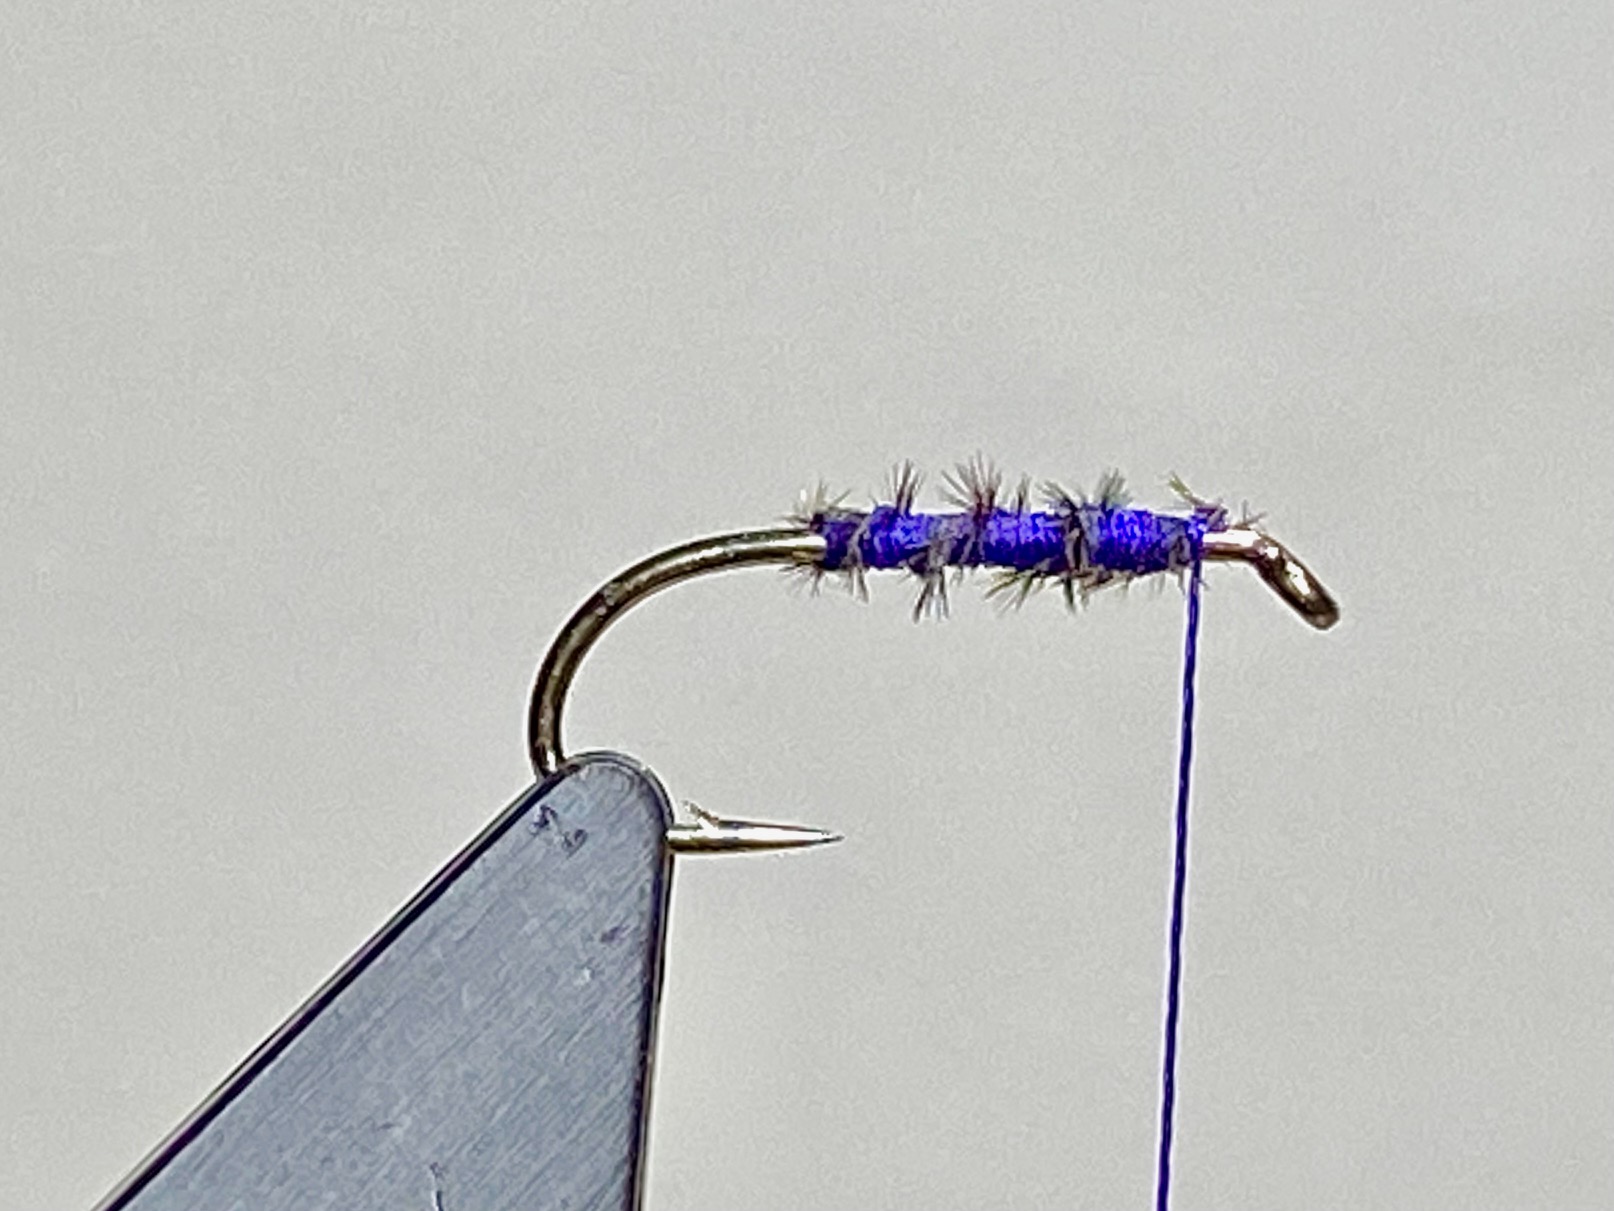
Photo 5. Take a dark, white tipped starling feather and remove the fluff from the base. Hold the feather by the white tip and stroke all the other fibres back to isolate the feather tip. Trim away the tip to leave a small triangular stub about 1mm. in length, and with well waxed thread, tie in the feather by the stub using no more than three turns of thread, winding towards the eye.
Photo 6. Using hackle pliers, wind on one turn of hackle while stroking the fibres rearward. Continue to wind the hackle towards the eye ensuring the feather does not twist and secure the hackle stalk with no more than two turns of well waxed thread and remove the excess hackle.


Photo 7. Whip finish, remove the thread and if required, add a drop of varnish to the head to complete the fly.
Tying Tips
- This old traditional spider pattern dates back to 1885 when it was first published in a book called Yorkshire Trout Flies by T.E.Pritt, who at the time, was the angling editor for the Yorkshire Post. The book was republished the following year as North Country Flies, presumably in an attempt to appeal to a much wider fishing audience.
- As a nod to the traditions of this fly, I have used Pearsall’s Gossamer Silk, which, being much thicker than modern threads, requires the number of thread turns to be kept to a minimum while still providing security of materials. To this end, waxing the thread helps greatly and also helps to protect the silk from degradation. For those tyers less interested in tradition, any standard purple 8/0 thread can be used.
- When tying in the magpie fibres, start by trapping in the fibres near their base with a lightly tensioned turn of thread and pull the fibres through until just the very tips are visible, then increase the tension and secure the fibres with two rearward turns of thread.
- When twisting the magpie tail fibres around the thread tag, keep the twists light and only twist enough herl to complete the ribbing.
- Ideally, the best starling hackles are obtained from mature male birds, however the sexes are very similar, making it hard to differentiate between them unless comparing the skins side by side, when the slightly darker, shinier, and more iridescent plumage of the male can be appreciated. That said, the vast majority of starling skins in the UK are imported from Europe, and in my experience, they seem to be mostly from immature birds lacking the desired richness and depth of colour.
- This pattern was originally devised as a midge imitation, to be fished on overcast days during March and April on Ullswater, where it soon gained a reputation as an excellent brown trout pattern. That said, I find the fly works really well as a smut imitation during July and August, when the fish have wised up and are wary of larger flies.
Les Lockey – Jul ’24
The CDC and Elk Sedge (Dry Fly) – A Fly for July
Hook: Kamasan B170, or similar, in sizes 12 to 16.
Thread: Uni 8/0, in Camel.
Body and Legs: Small to medium natural CDC feather.
Wing: Coastal deer hair.
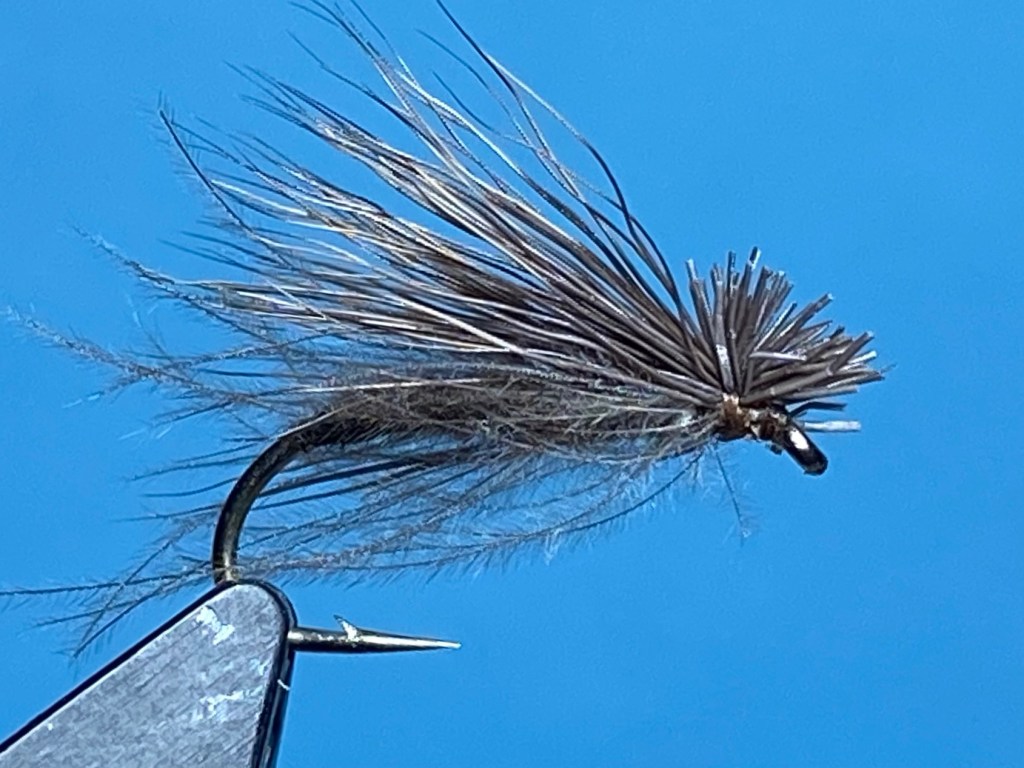
Photo 1. Secure the hook in the vice and starting at the eye, wind on a bed of thread to a point opposite the barb and remove the waste thread.
Photo 2. Take a CDC feather, stroke the fibres towards the tip and with well waxed thread, tie in the feather by the tip.
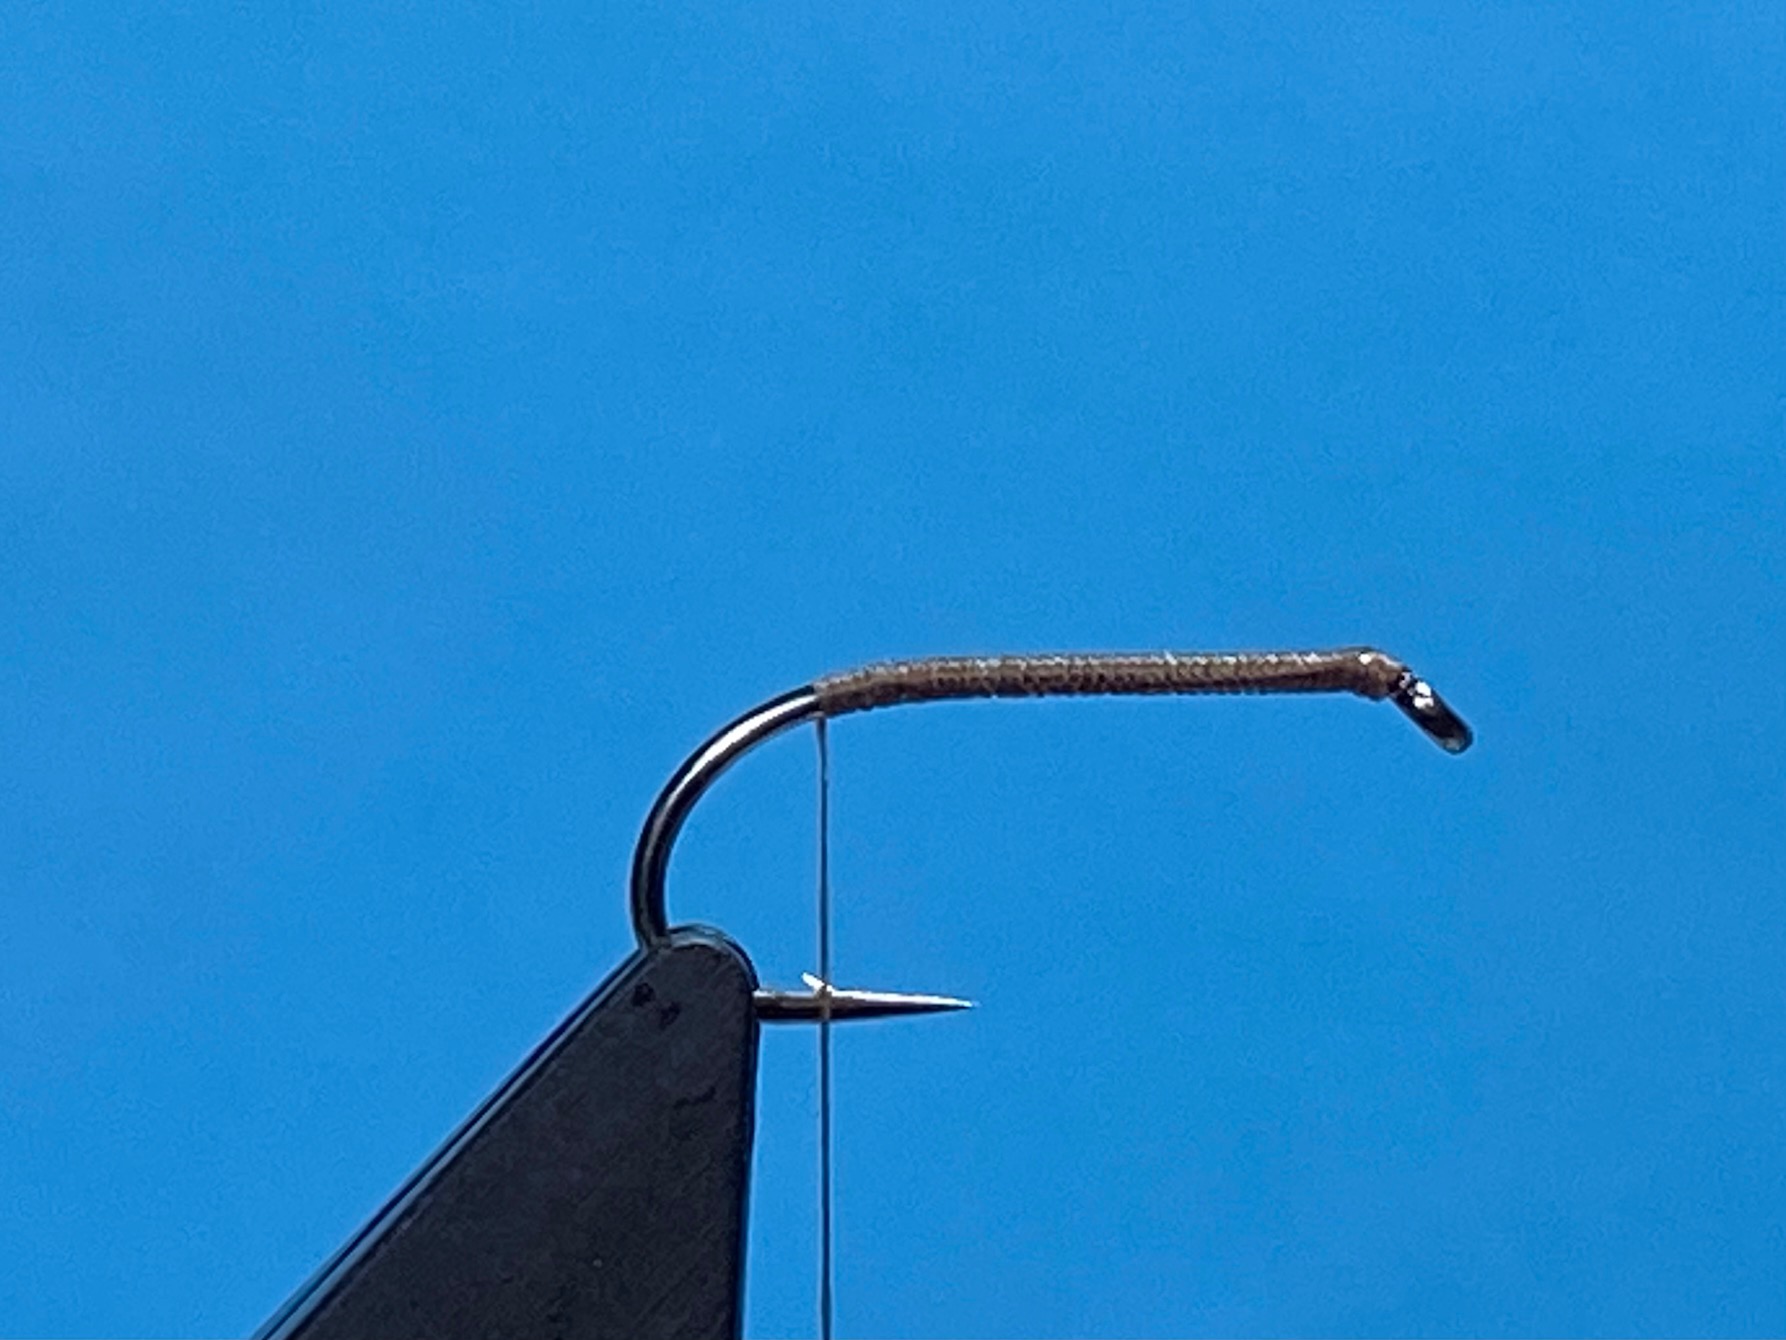

Photo 3. Bind down the tip of the CDC fibres with thread and continue to wind the thread in touching turns to just before the eye.
Photo 4. Keeping the CDC feather flat and untwisted, carefully wind it up the shank forming a CDC herl body. As the feather passes the mid-point of the shank, the longer feather fibers will begin to flair outwards, but continue to wind the feather like a hackle, stroking back the longer fibres after each turn until the eye is reached. Secure the feather with thread and remove the waste feather stem.


Photo 5. Cut away a small bunch of coastal deer hair from the skin, remove the underfur and align the tips in a hair stacker. Carefully remove the aligned hair from the stacker, gauge the bunch for length against the hook allowing for a small stub of hair at the head, and squarely trim the butt ends of hair to length. Using well waxed thread, and with the stub ends level with the front of the hook eye, tie in the hair as a wing with two overlapping thread turns. Make a third turn angled at about 45 degrees through the middle of the flared hair stub and make the next thread turn onto the hook shank directly under and in front of the hair.
Photo 6. Carefully form a neat head under the hair stub, apply some varnish to the thread, whip finish through it and remove the thread. If necessary, pinch any overly long straggly CDC fibres to length, to complete the fly.


Tying Tips
- This is a fairly straightforward fly to tie, although selecting a suitably sized CDC feather for any given hook size and tying in the deer hair wing correctly can be a little tricky at first. If the CDC feather is too small, it will not reach the hook eye and if it is too large, there will be no space for the legs, so a bit of trial and error might initially be required. Start with a small feather about an inch long and take it from there.
• Try to select a CDC feather without any broken barbs as this will maximise the fibres at the tip, which in turn helps to secure the feather to the shank. It will also avoid loose fibres forming in the wrong part of the body. I also like to remove the extra-long fibres from the base of the feather which makes for a neater finish at the head.
• A simple way to align the CDC fibres is to hold the base of the feather stem at the tie in point and make one lightly tensioned turn of thread over the stem, then gently pull the feather rearward until just the very tips of the feather are exposed, at which point the fibre tips can be secured with well waxed thread.
• I use fine hackle pliers to wind the feather up the shank, but keep the feather kept flat and untwisted. The longer loose barbs that were not tied in at the tip will become evident from about halfway up the shank, but just continue to wind the feather as you would a hackle, carefully stroking back the fibres after each turn, before tying down at the eye.
• As the name suggests, Elk Hair was originally used for the wing, but I much prefer fine coastal deer hair, particularly on smaller flies.
• Always cut away the deer hair from as close to the skin as possible. This keeps the skin free of lumps and bumps which makes cutting further bunches much more straightforward.
• Keep the bunch of deer hair relatively slim. Twice the thickness of a pencil lead is about right.
• To allow the deer hair to stack and align the tips correctly, it is important to remove any underfur and broken ends from the bunch, prior to putting the hair in the stacker. This can be done using your fingers, but I find it better to comb out the unwanted fibres with a fine nit comb. After stacking, remove the hair from the stacker and gauge for length against the hook shank allowing for a stub head equal in length to the hook eye and with the wing not much longer than the hook bend. Now while holding the deer hair in position ready for tying in, trim off the excess hair level with the end of the hook eye.
• Just three turns of well waxed thread are all that is required to secure the deer hair wing. The first two thread turns secures the bunch of hair in position, while the third angled turn made through the flared head fibres, helps anchor the hair to the shank. To start the process, hold the bunch of hair tightly between finger and thumb on top of the shank with the cut stub ends level with the end of the eye and take one loose thread turn over the hair but only tighten the thread as the thread loop is pulled vertically up, rather like making an upward pinch and loop, then repeat the process with a second turn of thread. The third turn of thread is angled through the flared head fibres with further thread turns being made onto the shank under the flared head and behind the hook eye. This technique helps to keep the wing on top of the shank and allows the formation of a neat, flared head.
• If required, the colour of the CDC feather and the deer hair can be matched to the hatch, but the natural colours used here
have served me well enough that I don’t bother changing colours.
Les Lockey – Jun ’24
The Foam Hatching Buzzer – A Fly for June
Hook: Kamasan B400, light wire hook, or similar, in sizes 12 to 16.
Thread: White Semperfli Nanosilk, 30D, or any very fine white thread.
1st Rib: Tag end of white thread.
2nd Rib: Clear UNI mylar, size 14 – 16.
Underbody: Mirage pearl tinsel, medium
Thorax: Black with a touch of redseal’s fur at the rear.
Shuck, Abdomen & Thorax cover: Grey 3.5mm Plastazote foam cylinder, cut in half lengthways.
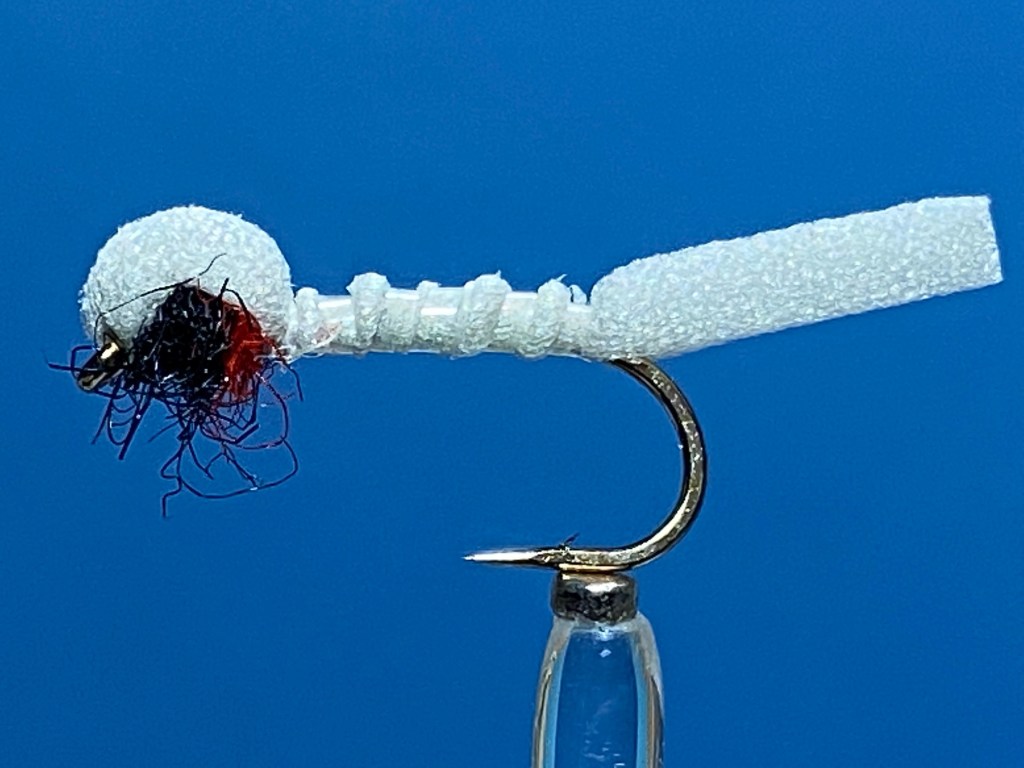
Photo 1. Secure the hook in the vice, and leaving a long thread tag, wind on a bed of thread from the eye to just before the bend. Do not remove the thread tag as this will be used later as a rib.
Photo 2. Tie in a length of clear mylar with the waste end the same length as the abdomen. In similar fashion, tie in a length of Mirage tinsel and bind down both waste ends with thread, leaving the thread at the thorax position.

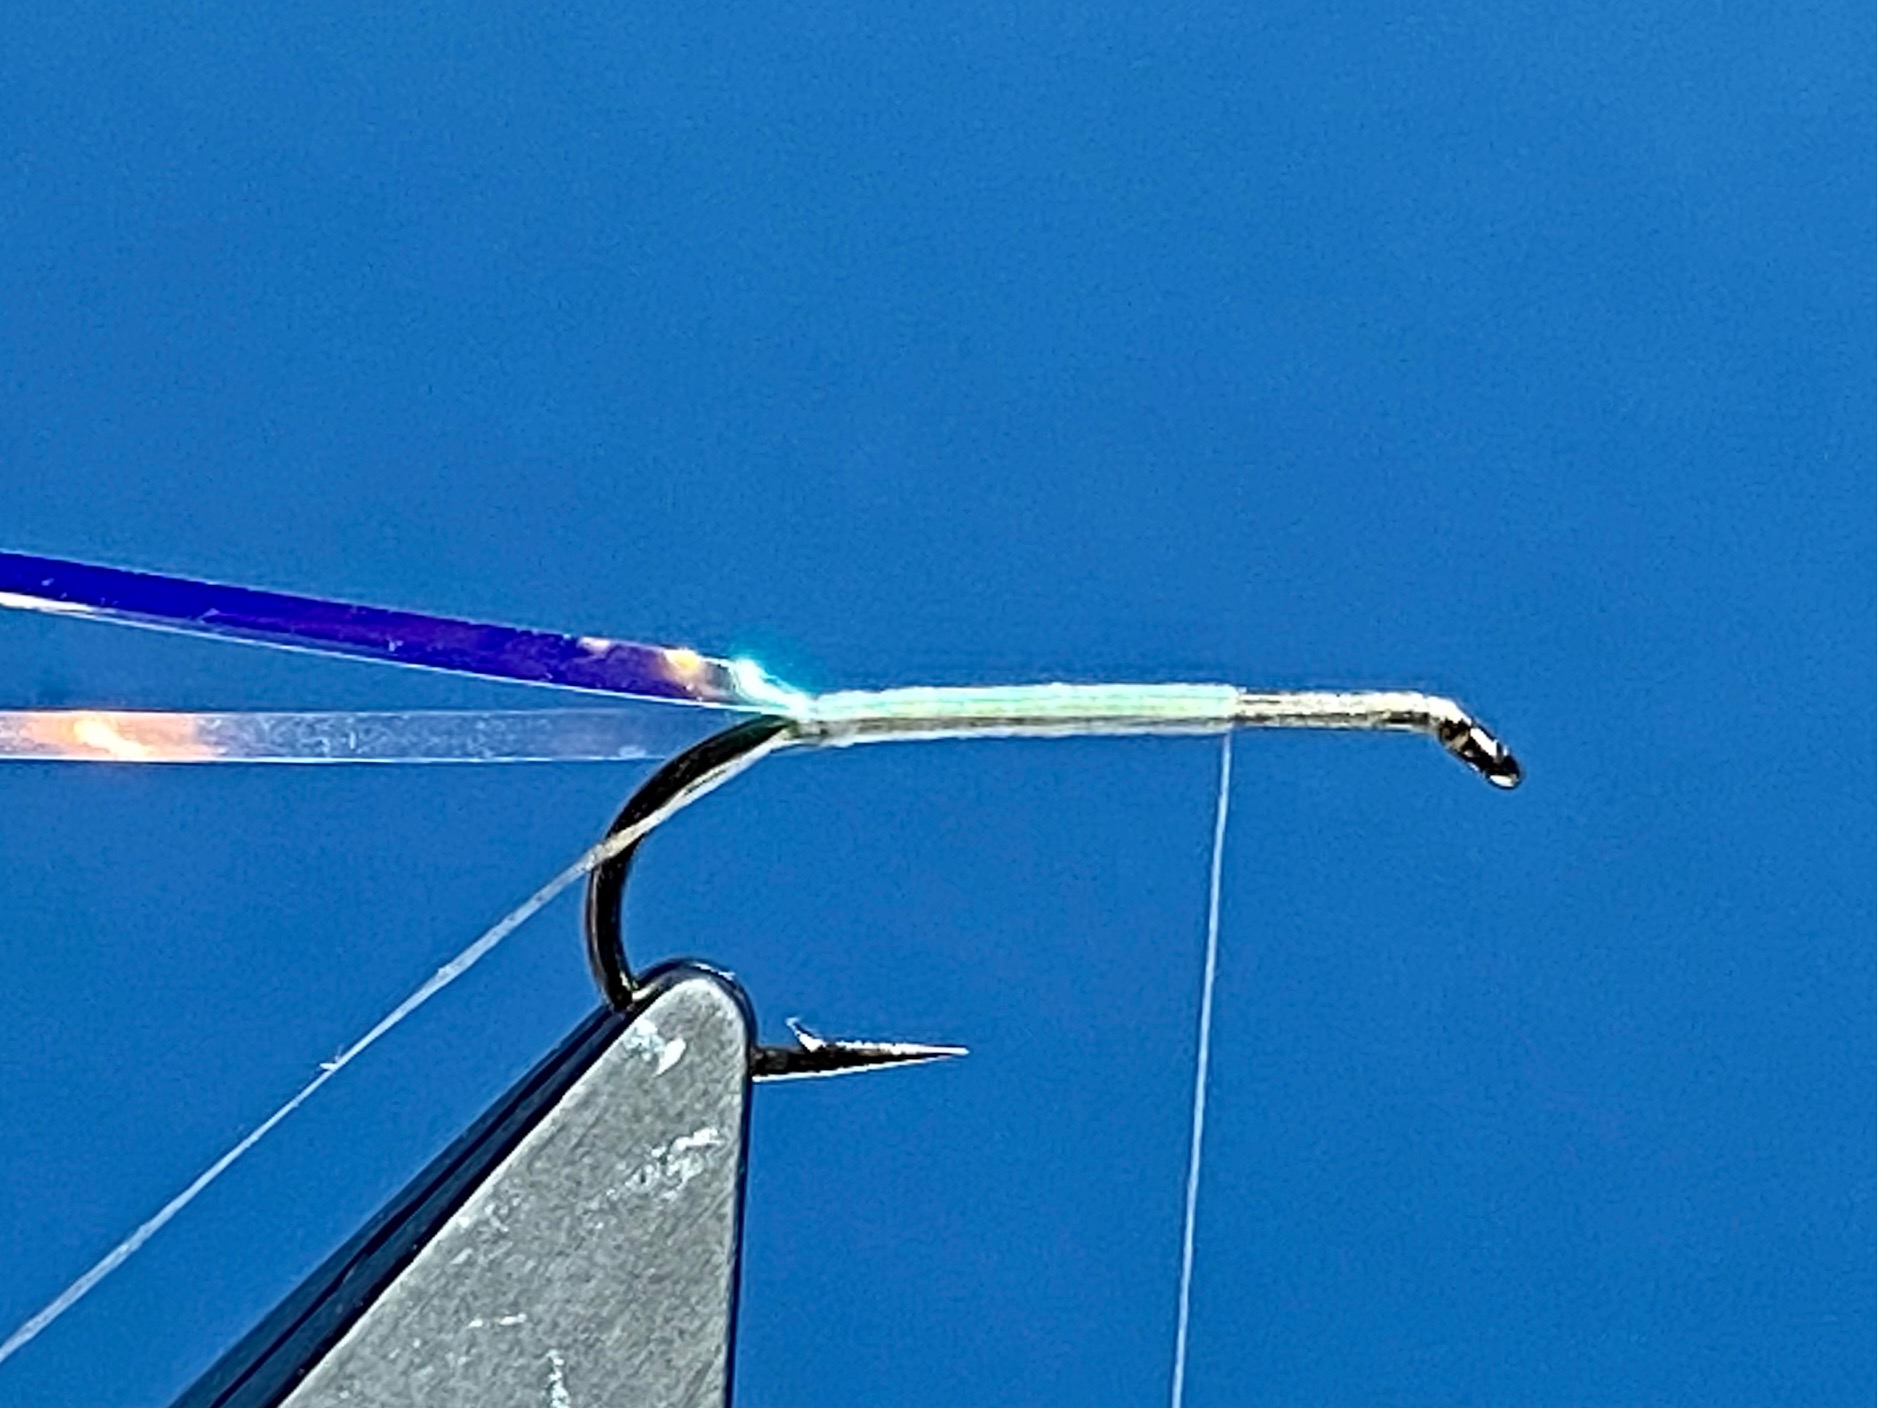
Photo 3. Wind the Mirage tinsel up the shank in slightly overlapping turns and tie it down at the thorax. Remove the excess tinsel and take the thread to the hook eye.
Photo 4. Cut a 3.5 mm foam cylinder in half, lengthways. Take one of the halves and with the flat, cut side uppermost, tie it down immediately behind the eye, leaving the foam over the eye. Tidy the thorax area with more thread wraps leaving the thread at the eye.


Photo 5. Use a black felt pen to colour about 2-3cm. of thread, then tightly dub a pinch of black seal’s fur onto the coloured thread followed by a tiny pinch of red seal’s fur at the bottom of the dubbing noodle. Working from the eye towards the rear of the thorax, wind on the dubbing, leaving the thread at the rear of the thorax.
Photo 6. Bring the foam lightly back over the top of the thorax and tie it down at the rear of the thorax with just two thread wraps.
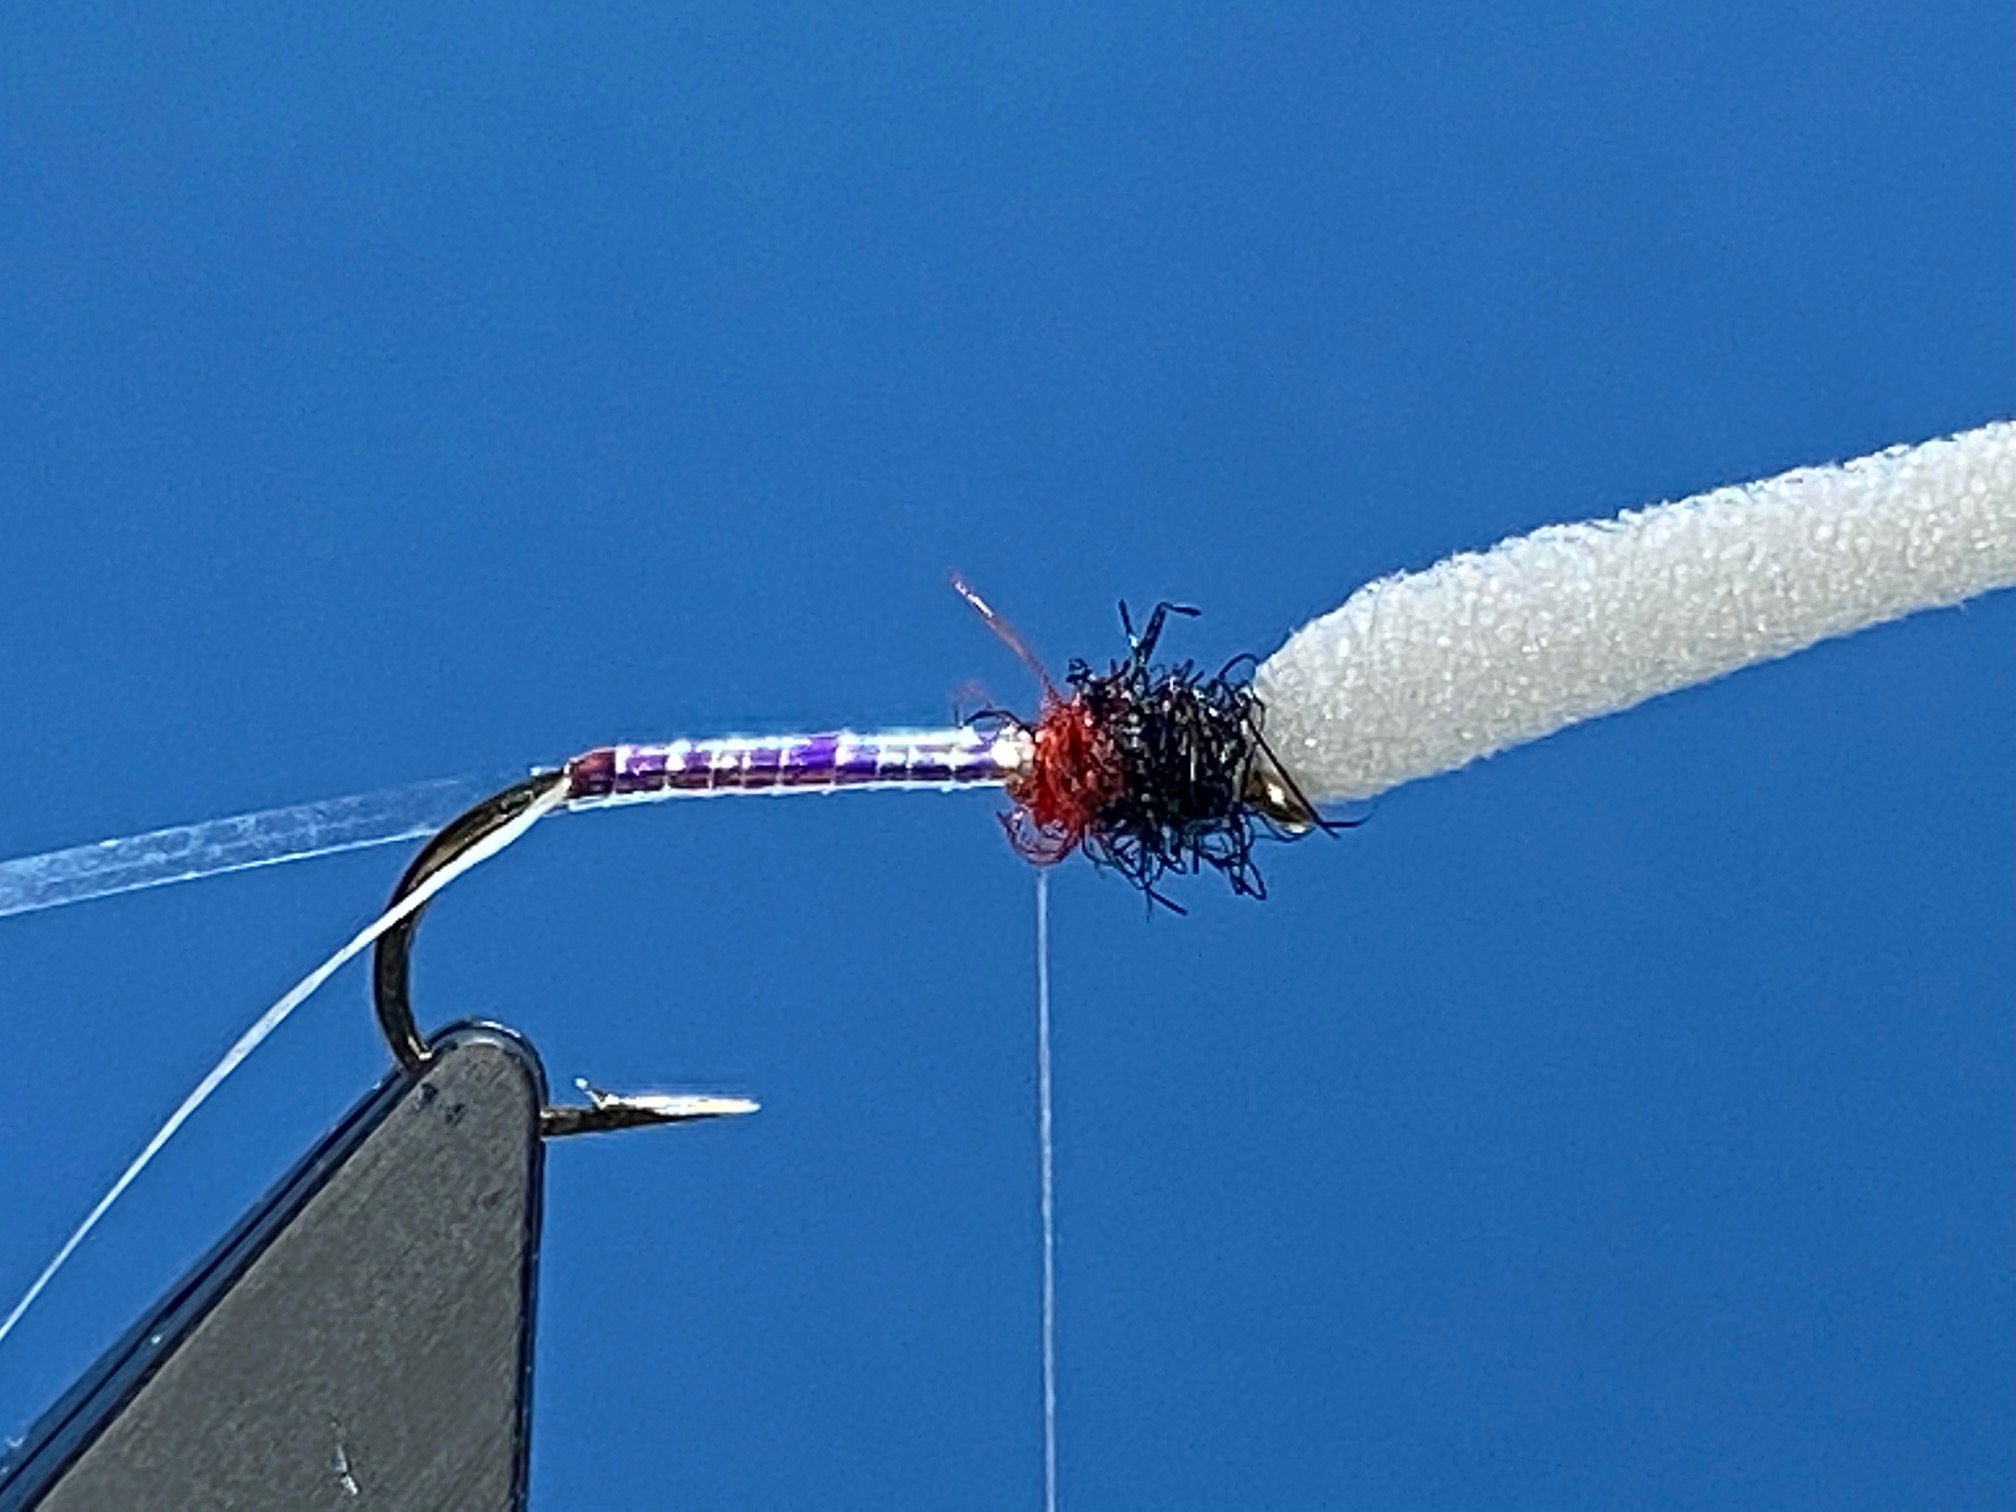

Photo 7. While holding the end of the foam on top of the hook shank, secure the foam centrally over the Mirage tinsel underbody using the thread tag as a rib. Tie the thread rib down at the thorax, again with just two turns of waxed thread and remove the waste thread tag.
Photo 8. In similar fashion, bring the clear Mylar up the body in the same spiral as the thread rib and tie it down at the thorax with two more turns of waxed thread. Remove the waste Mylar.


Photo 9. Apply some varnish to the thread and make a three turn whip finish through it at the rear of the thorax and remove the thread. Trim the tail/shuck to a narrow V shape and lightly brush out some of the seal’s fur thorax to complete the fly.
Photo 10. When viewed from below, the Mirage underbody should just shine through the gaps in the foam, creating the illusion of a transparent shuck.
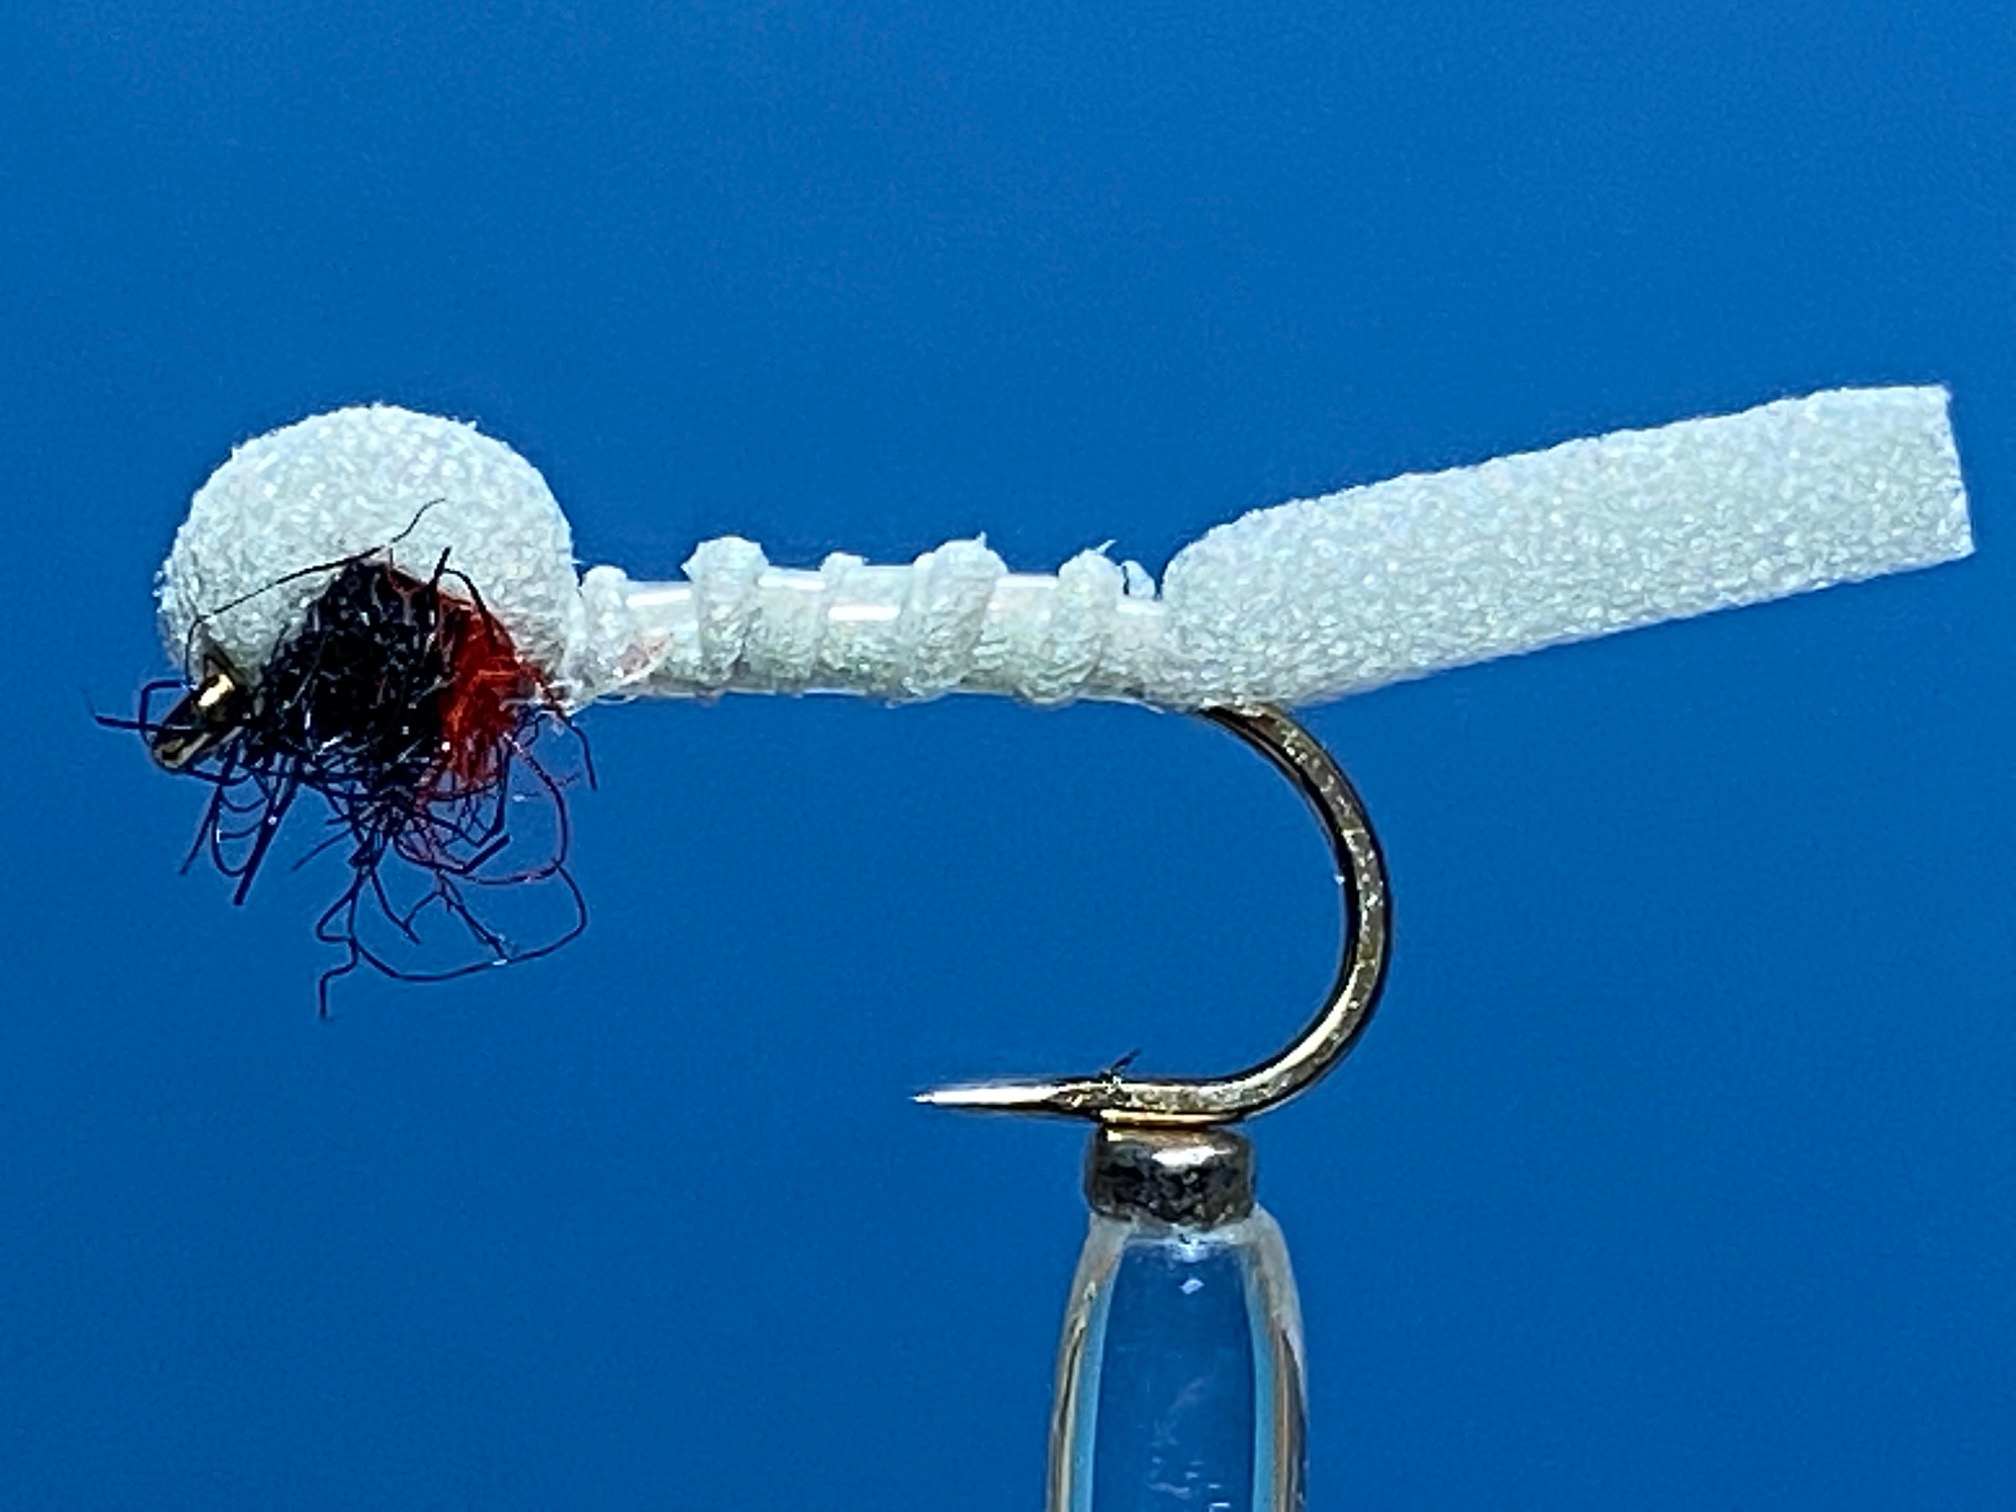

Tying Tips
- This pattern tries to create the moment when the insect first begins to emerge from its diffused, semi-transparent shuck, so the dressing should be as light as possible and only tied on light wire hooks. Use the thinnest thread possible and keep thread turns to an absolute minimum to avoid any unsightly build-up of thread at the rear of the thorax. Veevus 16/0 or Sheer 14/0 are reasonable alternatives to the Nanosilk 30D used here.
- Although the foam appears almost white in the photos, it is in fact pale grey which is more in keeping with the colour of the natural shuck. However, grey Plastazote foam cylinders are difficult to find, although I believe grey Plastazote foam is now available from Upavon Flytying. I cut my own from blocks of heron grey Plastazote foam which I obtained many years ago from Ian Christie at Flybox. If grey foam is not available, use white and darken it down slightly with a waterproof black felt pen.
- When winding on the seal’s fur dubbing, try to keep it as tight as possible. This will avoid straggly fibres getting trapped when tying down the thorax cover. After the tying is complete, the seal’s fur can be lightly teased out with a piece of Velcro.
- Don’t be tempted to pull the foam thorax cover tight, as this will only reduce the fly’s buoyancy.
- This is not a hugely robust fly, but its effectiveness makes it a very useful fly to have in your box. It can, however, be made more durable by smearing the underside of the mylar rib with superglue prior to winding the rib.
- The colour of the seal’s fur thorax can be changed to match the colour of the hatching insects. Other good colours are orange, olive, and claret. Hare’s ear fur is also a useful option when buff buzzers are hatching off.
- Les Lockey – May ’24
Peacock Eye Quill Diawl Bach- A Fly for May
Hook: Kamasan B110, heavy grub hook, size 10 to 14.
Thread: Roman Moser Power Silk, 10/0, in olive, or any flat olive thread.
Tail: Partridge hackle fibres dyed yellow.
Body: Peacock eye herl quill dyed fluorescent yellow.
Beard hackle: Partridge hackle fibres dyed yellow.
Cheeks: Split jungle cock nail feather.
Head: Fox squirrel or hare’s ear fur, dubbed.
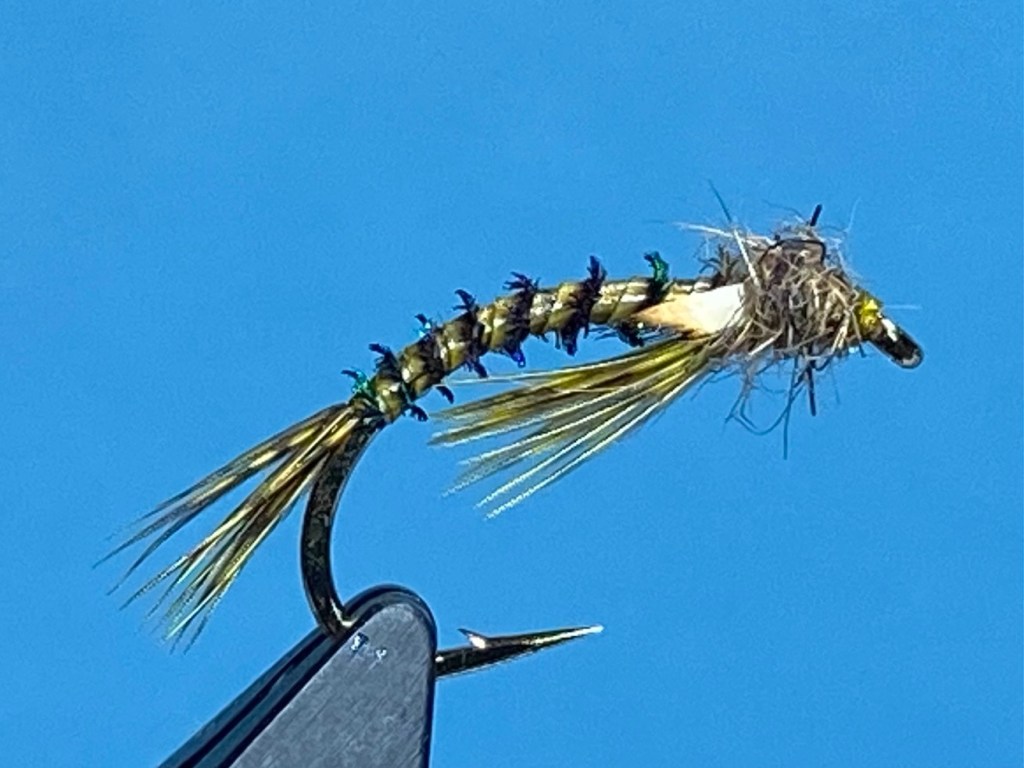
Photo 1. With the hook secured in the vice, catch on the thread behind the eye and wind on a smooth bed of thread round the bend to just past the barb and remove the waste thread.
Photo 2. Align the tips of a small bunch of partridge hackle fibres, remove them from the feather and tie them in on top of the shank as a tail with two turns of thread, leaving the waste ends the same length as the body. From the eye section of a peacock eye feather, remove one eye herl quill and tie it onto the shank by the thin end and with the dark flue section at the bottom. Bind the tag endsdown with touching thread turns stopping about 3mm. from the eye and remove the waste quill tip.

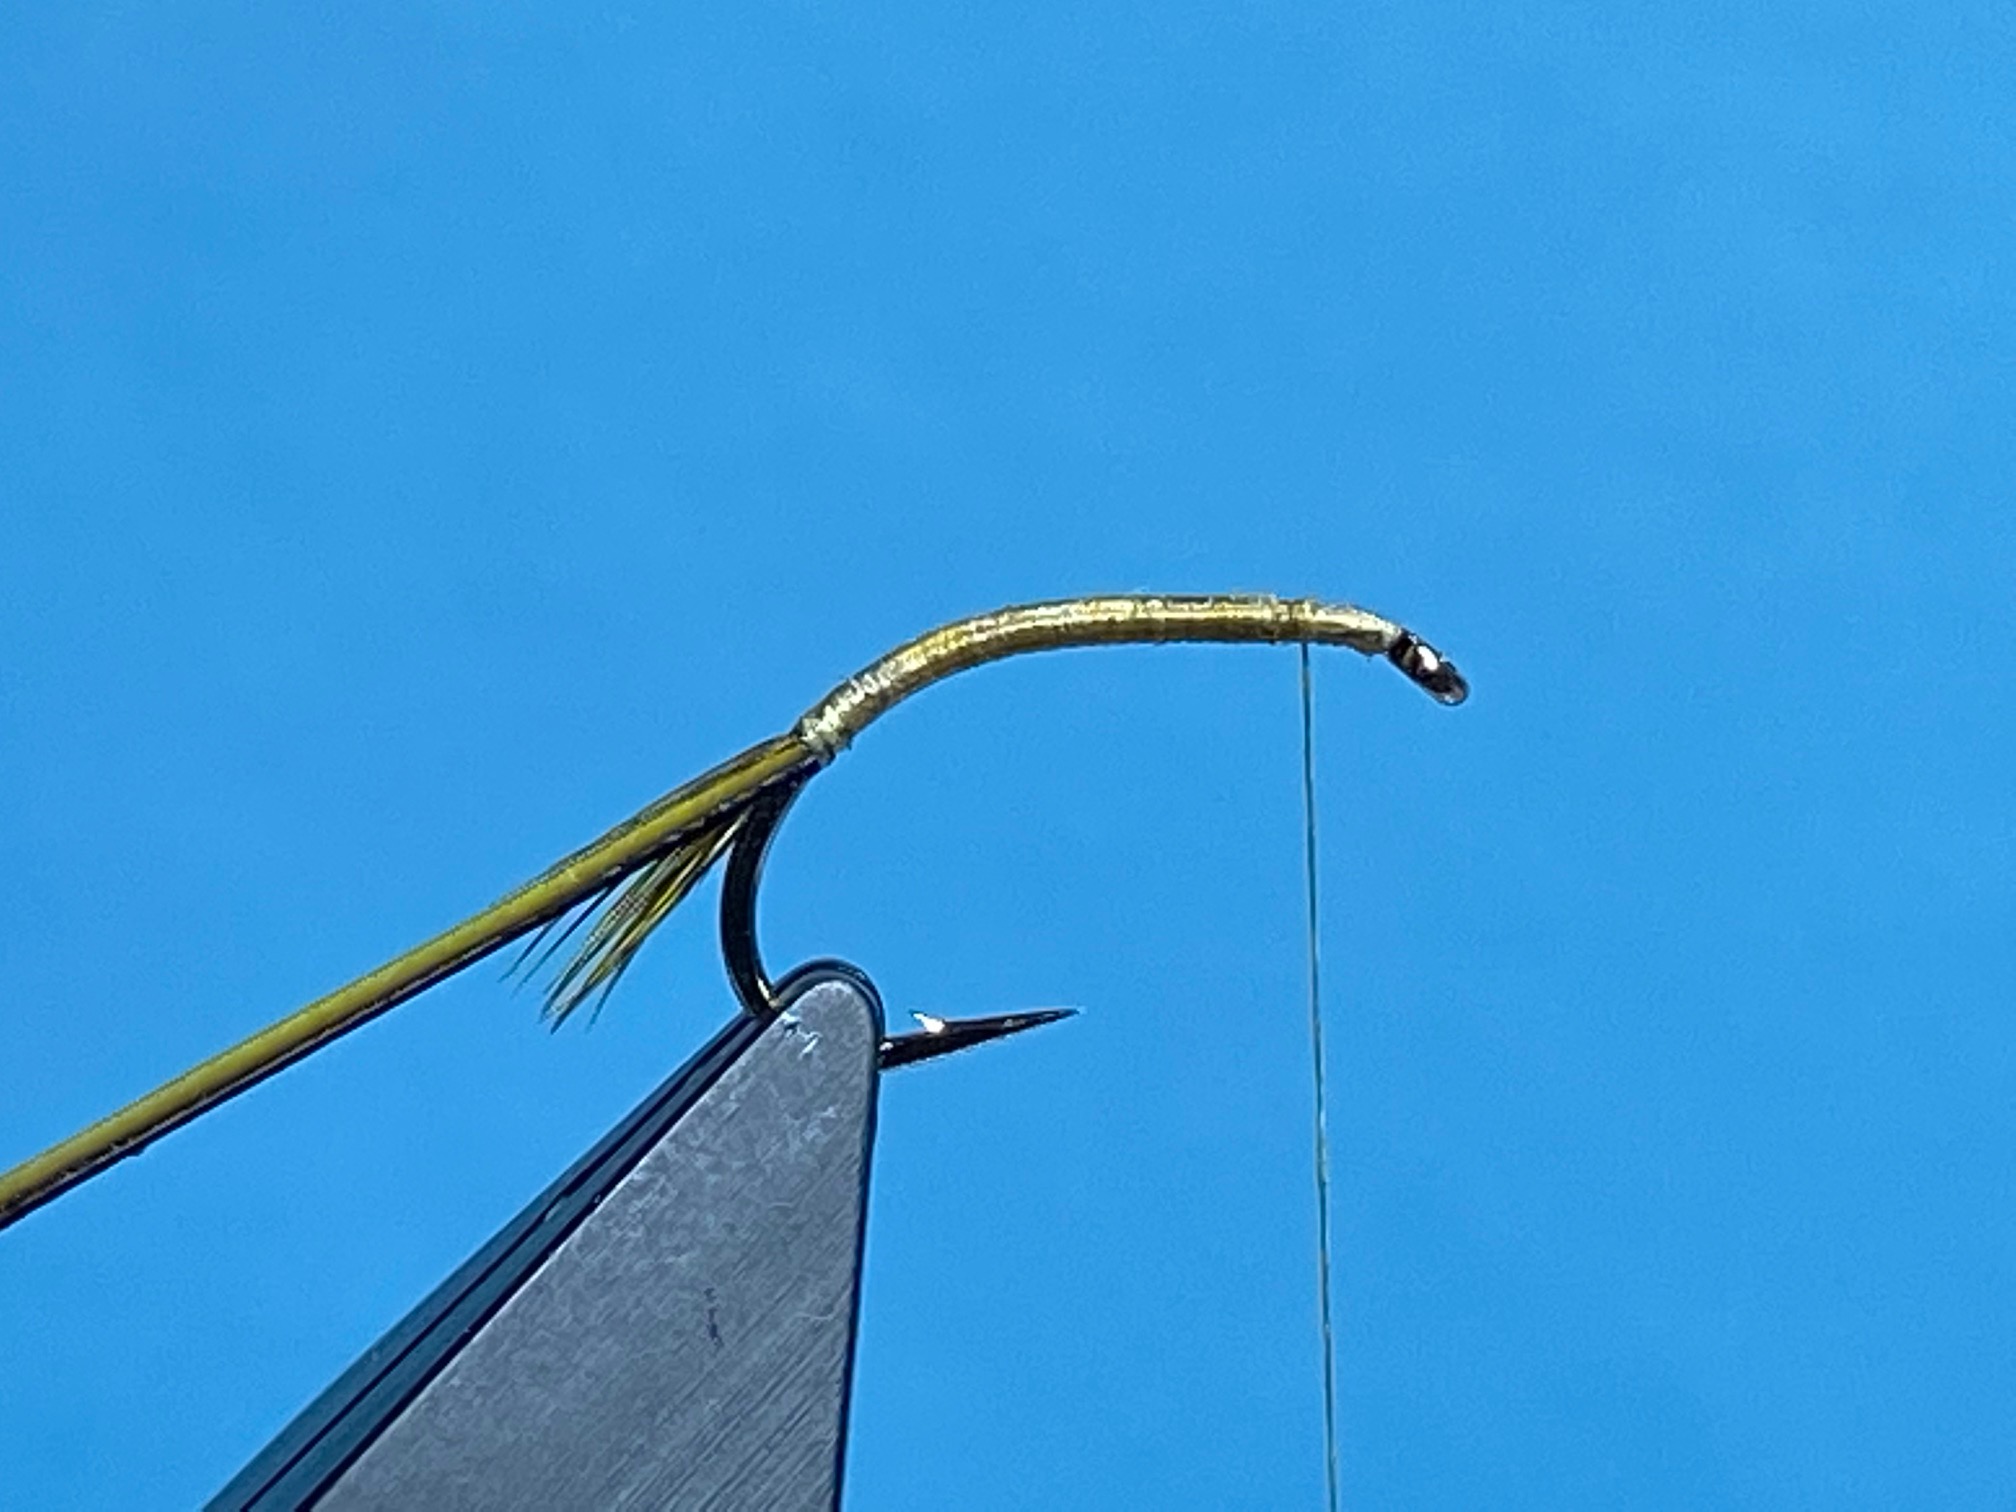
Photo 3. Carefully add a light coating of superglue to the thread underbody, and then wind the quill in almost touching turns up the shank to about 3mm. from the eye. Secure the quill with a few turns of thread, remove the excess quill and allow the glue to dry before continuing.
Photo 4. As for the tail, align the tips of a small bunch of partridge hackle fibres, remove them from the feather and tie them in under the shank as a beard hackle, about the same length as the tail, then carefully cut away the waste ends.

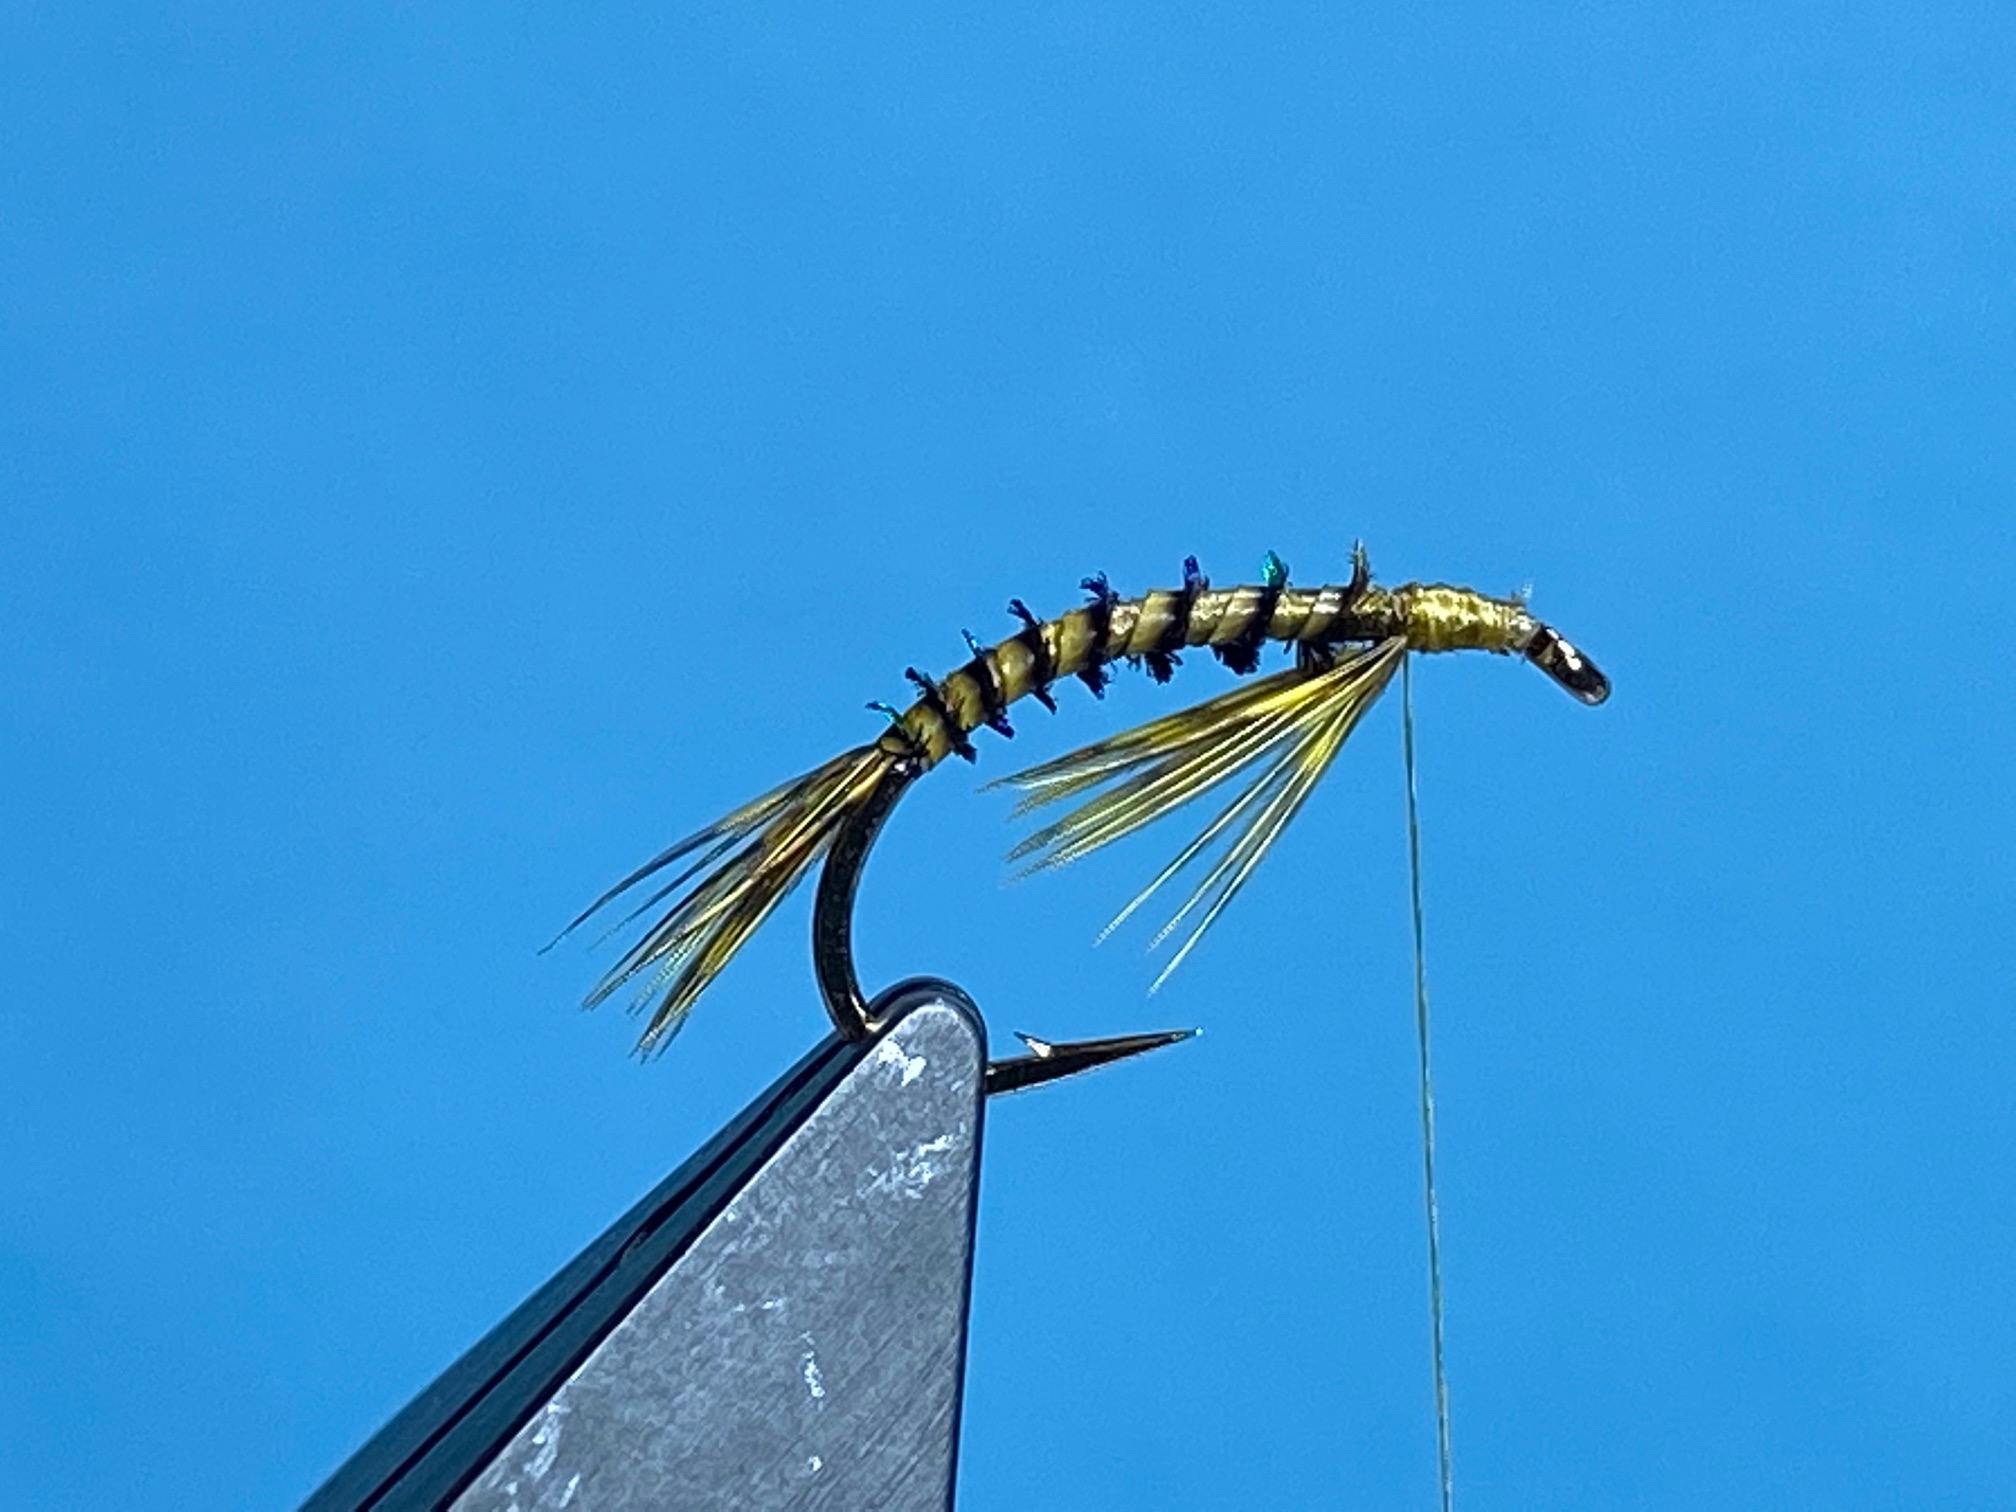
Photo 5. Tie in a split jungle cock eye so it sits equally on either side of the body and remove the waste feather.
Photo 6. Dub a small pinch of fox squirrel fur onto the thread and wind on the dubbing noodle to form a small thorax. Add some varnish to the thread, whip finish through it and remove the thread to complete the fly.
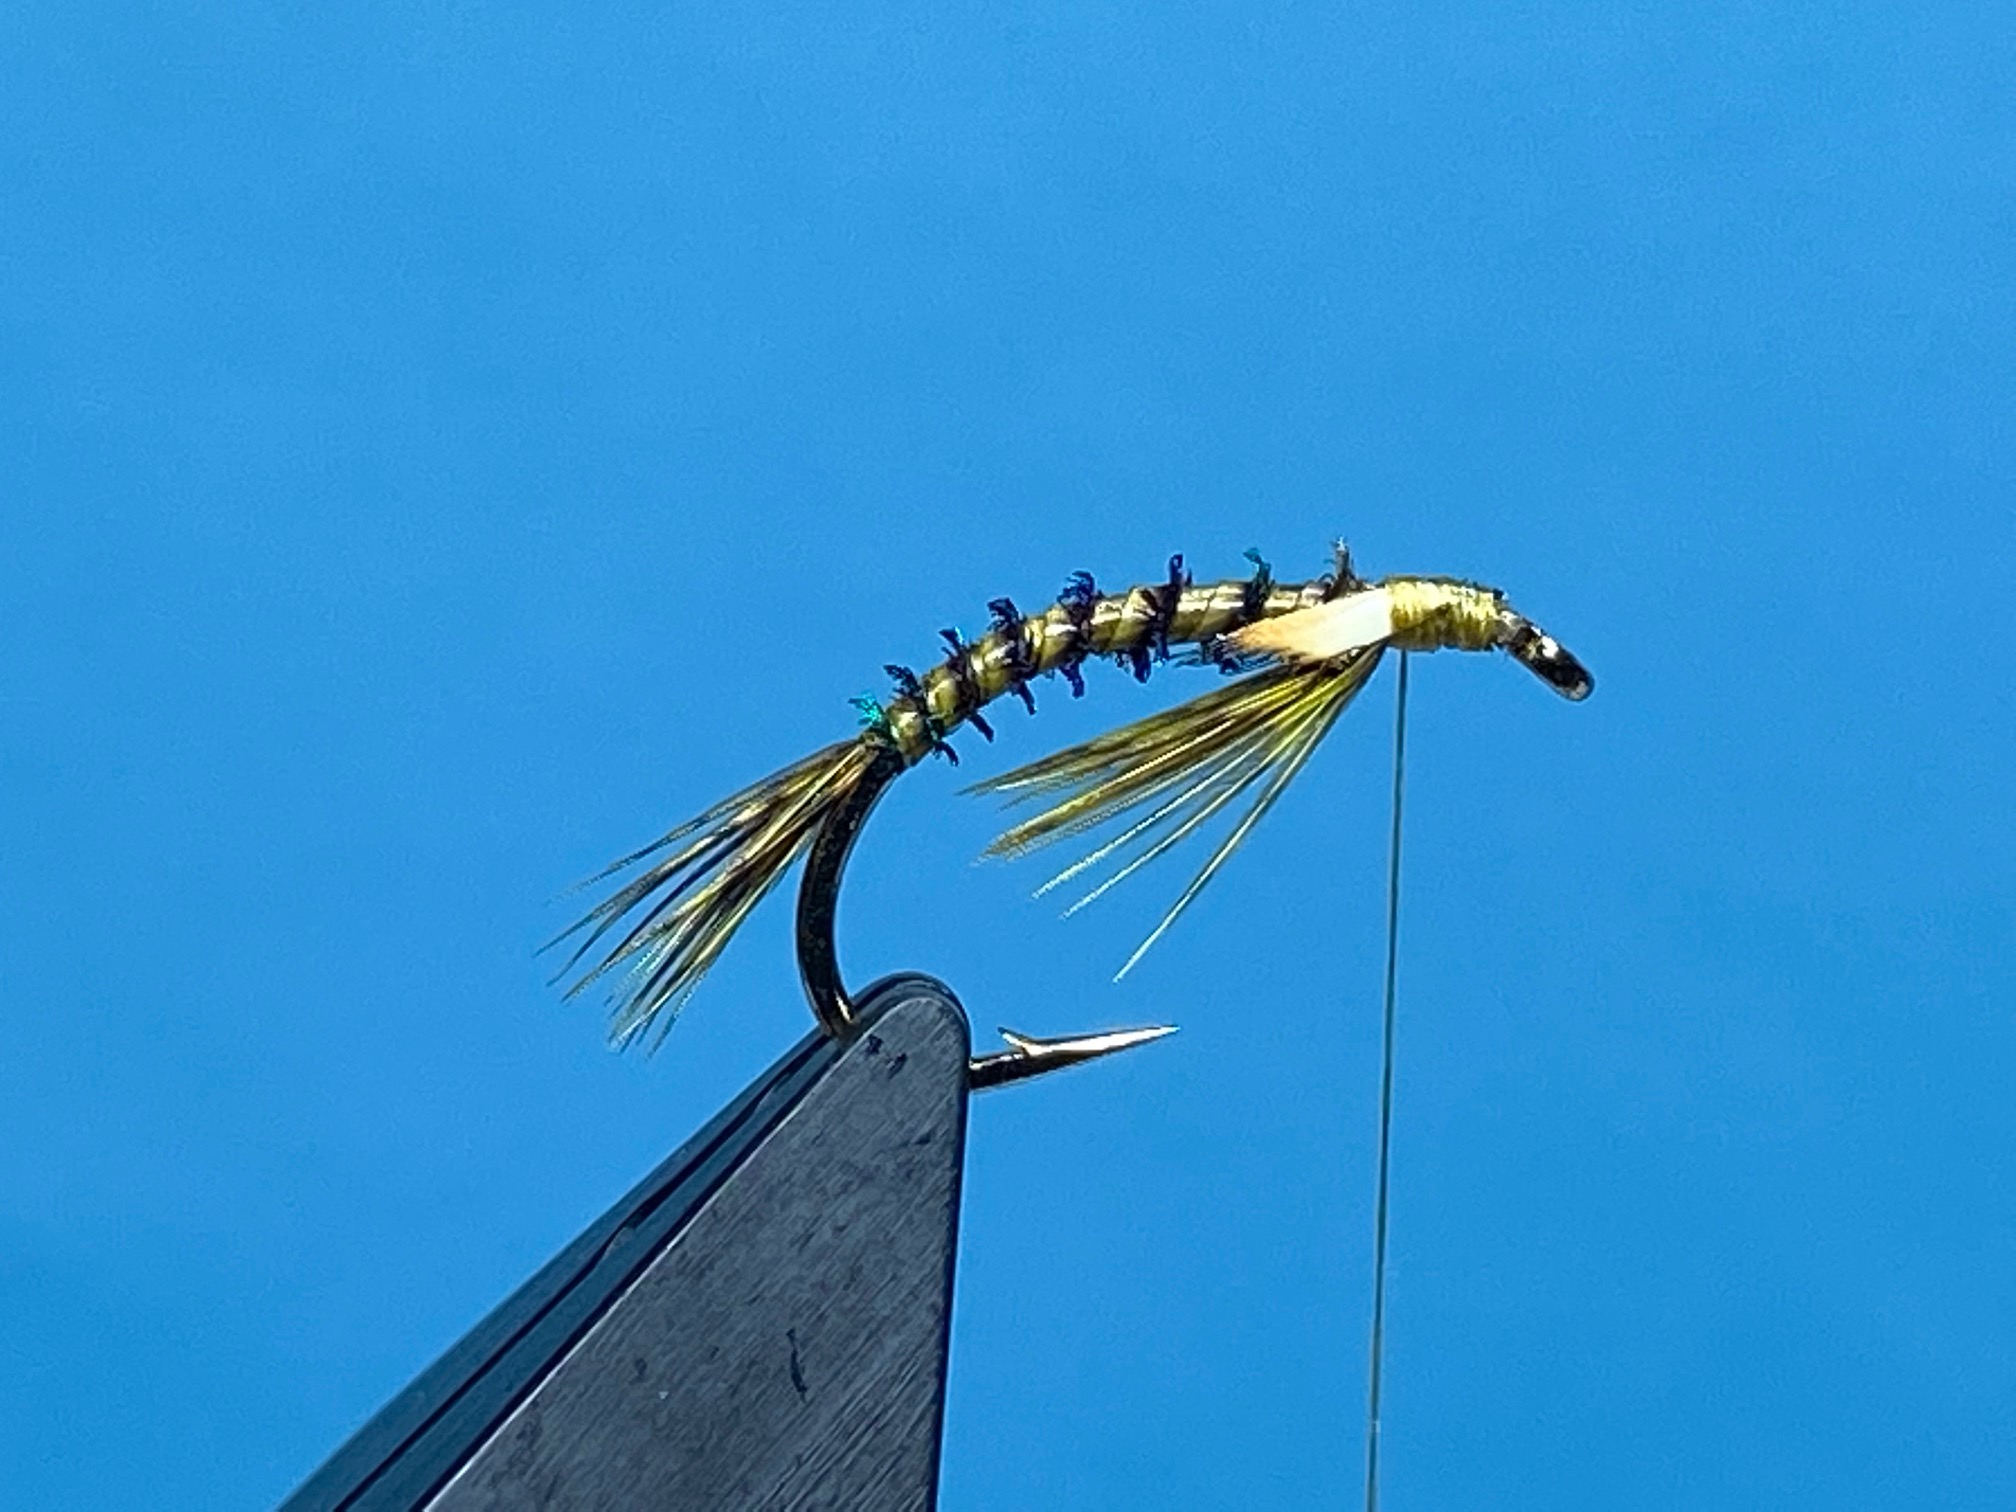

Tying Tips
- A flat tying thread helps to produce a nice smooth underbody on which to wind the peacock eye herl quill.
- Peacock eye feathers come in a wide range of dyed colours with orange, olive, claret, and black being very useful alternatives.
- Unlike most peacock eye quill patterns, the herl quills used here are not stripped and are used straight from the peacock eye feather, with the best herl quills coming from those quills that pass directly through the eye part of the feather. On these quills, the flue is quite short and aligned along just one edge, which makes them ideal for creating the segmented body. It is worth noting that the longest quills come from the largest eyes, which not only allows easier manipulation, but it also means larger hook sizes can be used.
- Be careful when using superglue. A light coating is all that is needed, and always allow the glue to dry before continuing to complete the fly.
- When winding the quill, instead of using fingers, or hackle pliers, I use a lightweight plastic electrical clip. This allows the quill to be held by the very end which maximises the useful part of the quill, prevents damage to the herl and gives greater feel when winding the quill.
- If jungle cock nail feathers are not available, try using fluorescent yellow or chartreuse goose biots, or for a more natural look similar to that of jungle cock, try caramel coloured biots from Flybox.
Les Lockey – April ’24
Report for the River Alyn, 7th March 2024
5 Grayling caught. Fished 13:45 to 15:00 All on the Pink Wasp which worked well in the coloured water. Fished Worms Wood (after Tom) and had just over the hour fishing. All the Grayling were of a good size, best 1 1/2lb, others about 3/4lb. Forgot to take the camera, but did have my Head Cam !
I did find out I had a leak in my waders – the crutch area, the water is COLD.!!! YouTube clip can be seen here: youtu.be/l2f1LnTynPw
The Pink Wasp.
You may need “Shades”. Those who came to the tying nights will have seen the “Luminous” material – it is bright !

Hook – Kamasan B110 grubber size 10
Bead – UV glass bead in Pink
Underbody – Fine Lead Wire
Tag – Lureflash “Luminous” strip in orange
Body – UV Pink straggle string
Shellback – Mirage Pear Tinsel (Large)
Rib – Fine gold wire and Lureflash “Luminous” strip in orange, the remaining strip was folded back in loops (2 sets + 1 single) Loops cut to produce legs / wings.
Eddie Wilkinson – March ’24
The Twisted F.A.B (Foam Assisted Blob)- A Fly for April
Hook: Kamasan B160, short shank hook, size 8 or 10.
Thread: Black Veevus GSP, 50D.
Tail: 5 or 6mm. diameter, black foam cylinder,
Body: Any fine cored Fritz in black and fl. green, such as, Definite Advantage 15mm. translucent Fritz from Dave Downie at flyfishingworld.com or FNF 10mm. Jelly Fritz from fnflyfishing.co.uk

Photo 1. With the hook secured in the vice, wind on a bed of thread from the eye to a point opposite the barb and remove the waste thread. Prepare the foam by taking a 5 or 6 mm. black cylinder and cutting it in half. Take one of the halves and cut it in half along its long axis, producing two useable foam “tails”.
Photo 2. Lightly smear some superglue along the thread base, position one of the foam “tails” flat side down on top of the shank with the tail section proud of the hook bend. Press the foam against the shank and secure in position with the thread. Continue to bind down the foam to form as even an underbody as possible and return the thread to the barb.

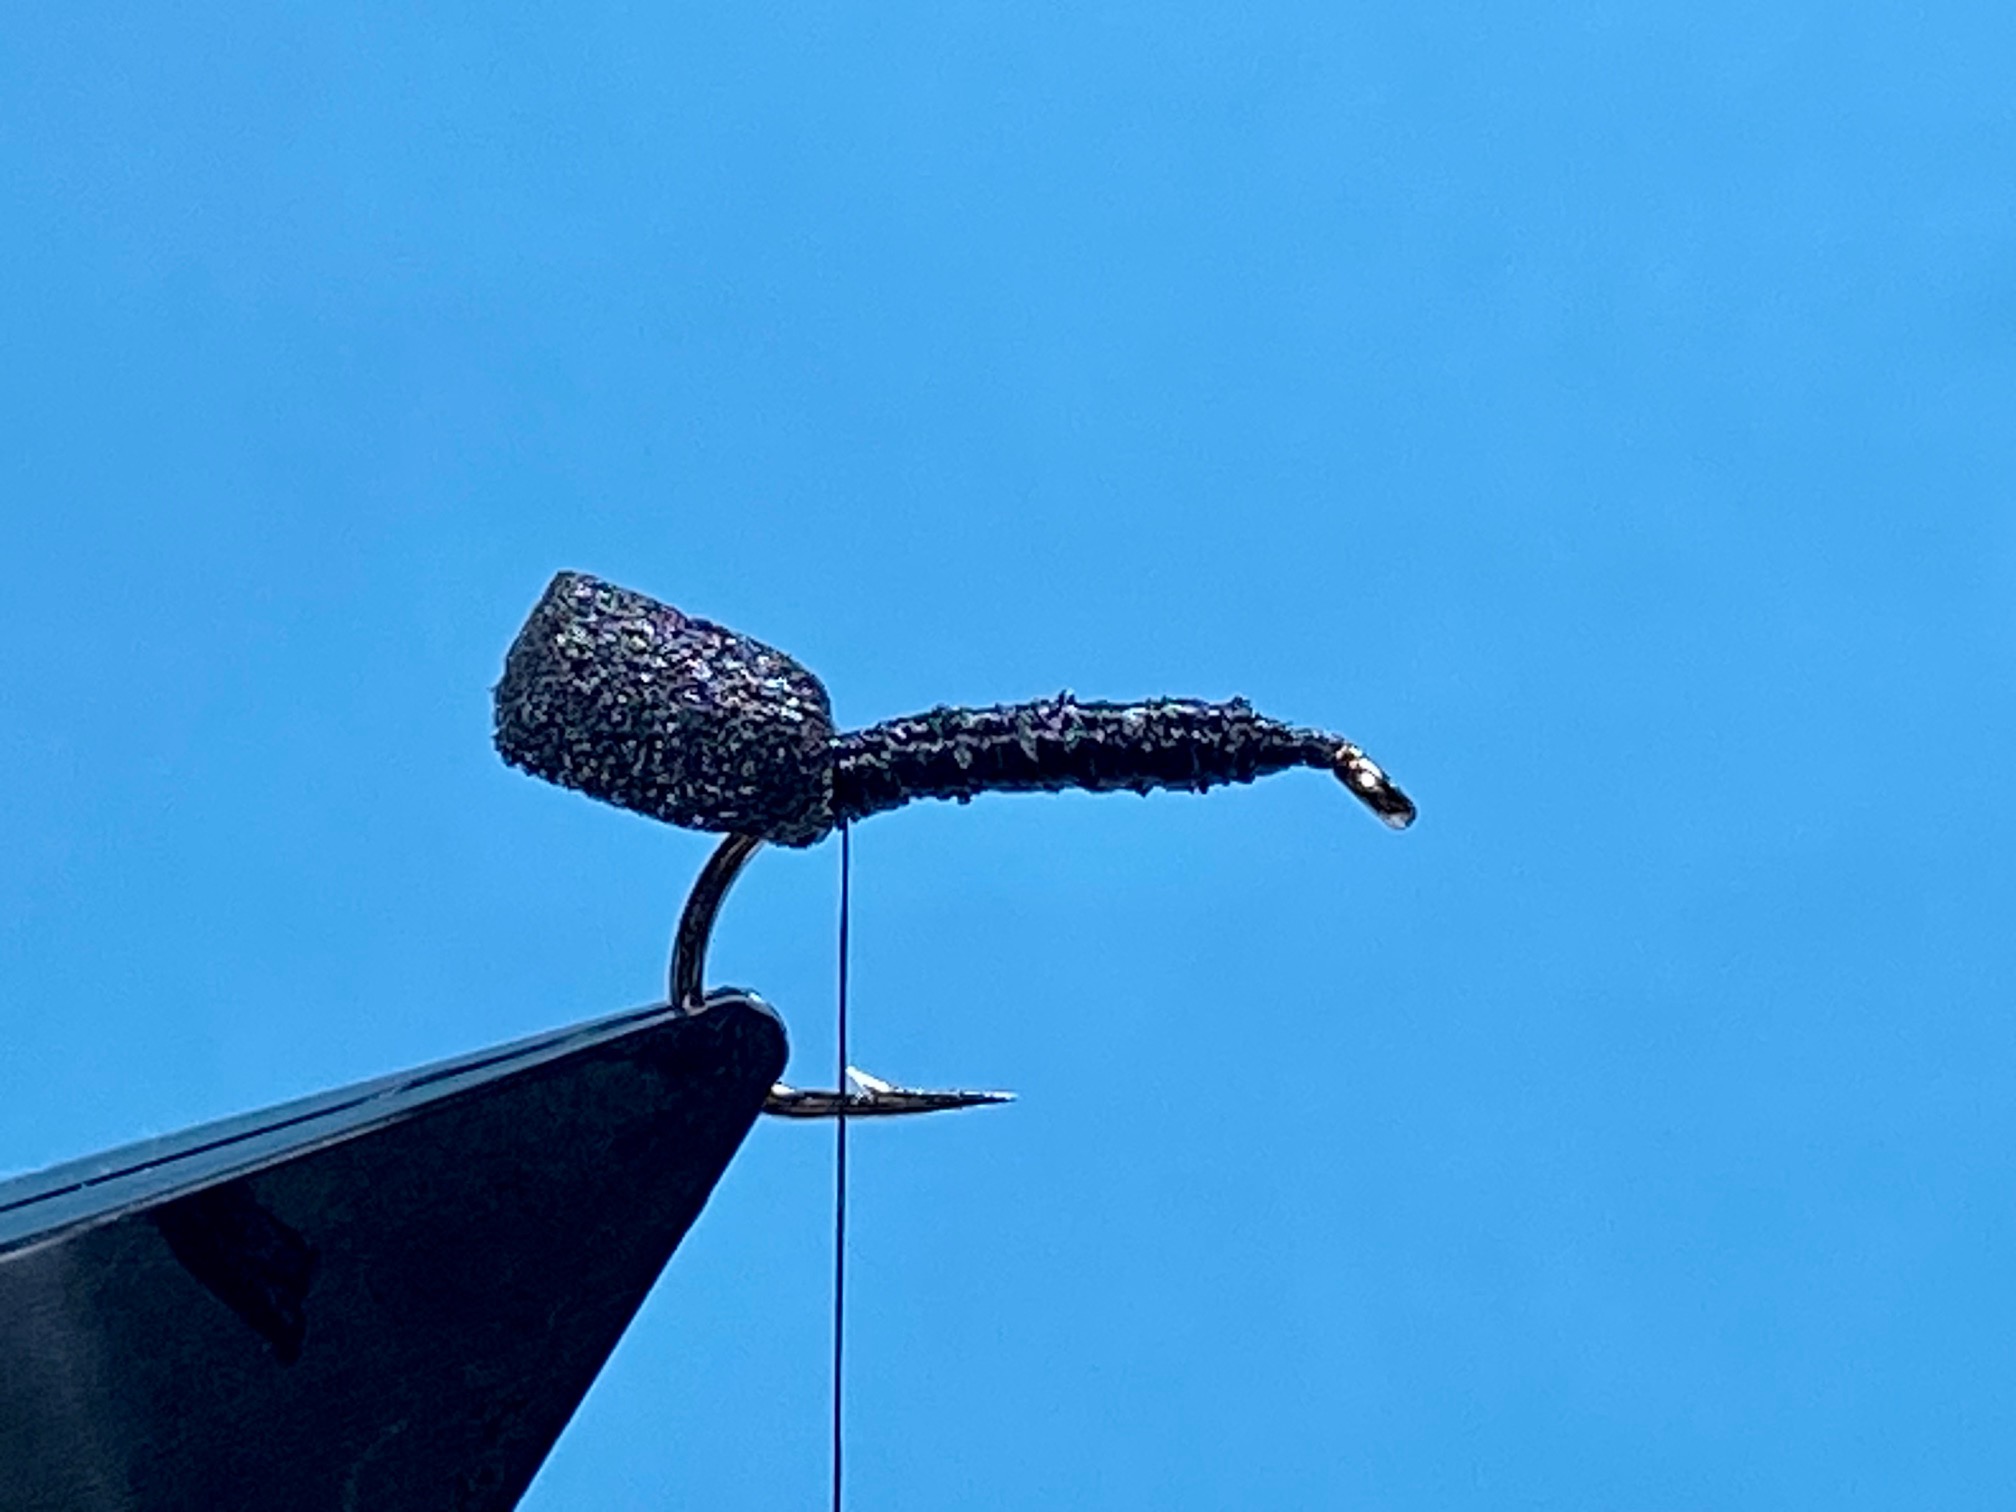
Photo 3. Take a 12cm.length of both black and fl.green Fritz and strip away the flue from one end of each length to expose the cores. Tie in the cores flush against the foam “tail” and bind them down with thread, leaving the thread at the eye.
Photo 4. Twist the two lengths of Fritz together to form a twisted Fritz rope, occasionally pulling the strands away from each other to tighten the twists and push them closer to the shank.


Photo 5. Keeping hold of the twisted Fritz, wind the twisted Fritz rope up the shank to just before the eye. Hold the Fritz body in position and allow the remaining Fritz to untwist, then secure the Fritz with a couple of tight turns of thread and bring the thread to immediately behind the hook eye.
Photo 6. Once secured, gently pull the two strands rearward. At the same time, wind the thread back from the eye to lock the two lengths of Fritz in position, creating a neat head in the process. Carefully remove the excess fritz with a sharp blade.

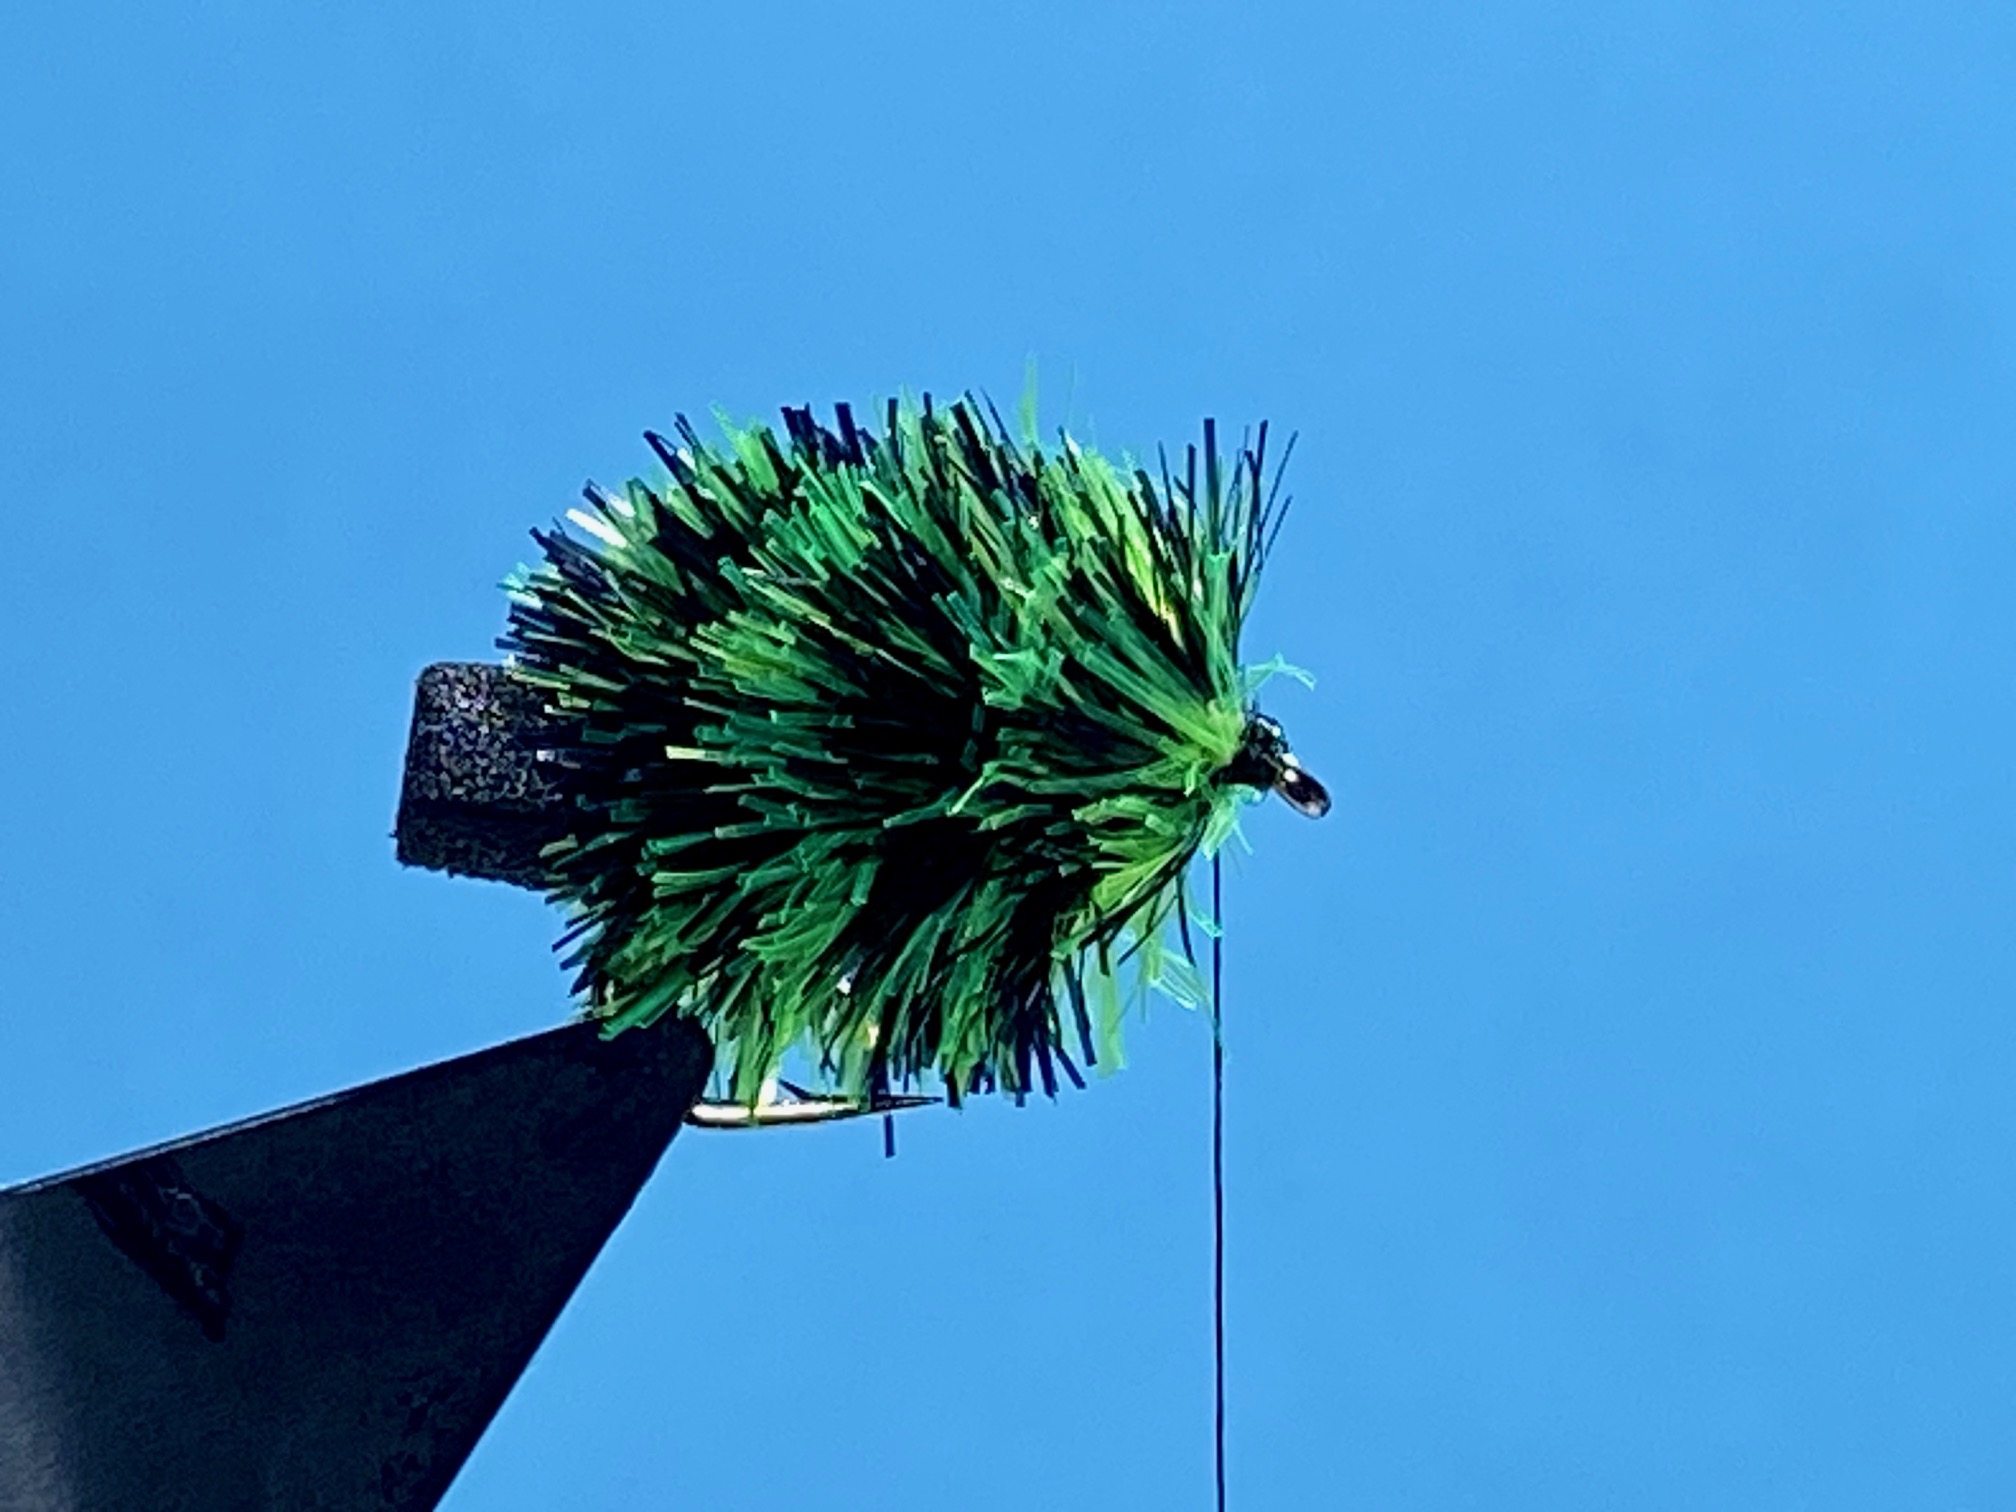

Photo 7. Whip finish, remove the thread and varnish the head and if required, trim the foam “tail” to length to complete the fly.
Tying Tips
- FABs and blobs tend to polarise fly fishing opinion. However, the FAB has been instrumental in the development of the highly effective washing line technique and in so doing, has actually popularised the use of more traditional nymphal patterns, so for this reason as well as its rather unusual tying method, which quite literally has a bit of a twist, I feel its inclusion here is justified.
- A flat tying thread helps to tie down the foam and even out the bumps, but when tying down the Fritz at the head, spin the bobbin clockwise to tighten the thread into a thin and tight rope which makes for a more compact tie in point and a neater head.
- Add a small drop of superglue to the thread base before firmly securing the foam with thread. This will prevent the foam from sliding around the hook shank and provide a solid foundation on which to wind the fritz. Some tiers cut the foam “tail” centrally to increase its surface area, which supposedly increases the fly’s buoyancy, but I have never found this to be necessary.
- If foam cylinders are not available, simply cut a 5mm wide strip of 2mm thick black craft foam, double it over the hook bend to form a foam loop “tail” and with the foam running down either side of the shank, bind it down securely with thread.
- While the weight of the hook and the amount of foam used would seem to dictate the buoyancy of the fly, it is important to realise that when fishing the washing line, over and above the buoyancy of the FAB, the type of leader material used, length of leader, distribution of droppers on the leader, the weight of the dropper flies, and the prevailing weather conditions, will all have an impact on the depth at which the flies will fish, so it is worth tying up FABs with differing amounts of foam so you can adjust the buoyancy of the set up as required.
- There are literally dozens of different kinds of Fritz on the market today and in a vast array of colours, including a few dual coloured options, but these are largely limited to mixes of yellow, green, orange, and pink, however by using fine cored, unboosted Fritz, the variety of different colour combinations is almost endless.
- When twisting the strands of Fritz together, remember to occasionally pull the strands away from each other. This tightens the twists, allowing the fibres to mix more evenly and it pushes the twists further up the core towards the shank. Approximately 10 cm. of twisted Fritz will be required, and it is surprising just how many twists that will take. Once the Fritz is twisted together, give it a gentle brush to ensure the fibres are well mixed and remember to keep hold of the twisted Fritz throughout the winding process to prevent the twists unravelling.
- A quicker and simpler way of twisting the Fritz together is to use the new dubbing twister from Smhaen of Denmark. This clever little tool is primarily concerned with making and controlling dubbing loops, but it can also be used to directly clamp and spin many different kinds of material, including Fritz.
- Once the Fritz body is wound along the shank, use your left thumb to hold the Fritz in position. The remaining Fritz can then be untwisted and secured with thread. It helps here to spin the bobbin clockwise to twist the flat thread into a fine round thread and wax it well before tying down the Fritz. Once secure, and with the thread taken to the eye, the untwisted strands of Fritz are gently pulled rearward while the thread is wound back from the eye. This locks the Fritz in place, pushes the front fibres rearward and forms a neat head all at the same time.
- Use a sharp blade such as a razor, scalpel, or craft knife, to cut away the Fritz.
- To change the fly from a FAB to an early season blob, simply omit the foam. Some tyers like to add a short tail of black or fluorescent green marabou.
- Instead of twisting the two lengths of Fritz together, another option, although tricky to do, is to wind the two lengths of Fritz simultaneously, which produces bands of colour rather than an integrated mix of colours.
Les Lockey – March ’24
The Ephemeroptera Patterns – Les Lockey 20/02/2024

The Foam and CDC Dun (Neil Sinclair)
Hook: Kamasan B170, sizes 12 – 14, or similar.
Thread: Olive UTC 70, or colour to match hatch.
Tail: Coq de Leon fibres.
Wing: 3 or 4 natural CDC feathers.
Body: 2x2mm. strip of brown foam.

The Timmy
Hook: Hayabusa FLY384 curved buzzer hook, sizes 8 to 16.
Thread: Semperfli Nanosilk, Brown, 30D, 18/0.
Tail: 3 Moose body hair fibres.
Abdomen: Fulling Mill Ultra Nymph Dub in Cowdung, or colour to match hatch.
Wing: Silver, black and khaki polypropylene macrame yarn, mixed to give a grey dun colour.
Thorax: As for abdomen.
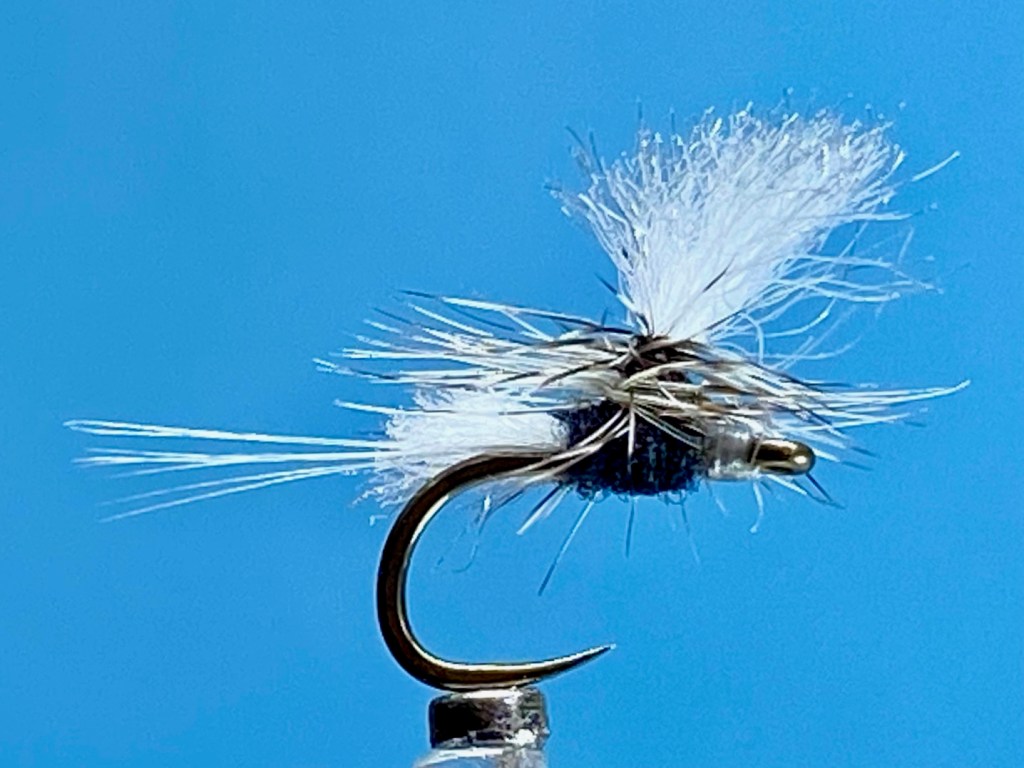
The Caenis Dynamite Harry (Variant)
Hook: Guru MWG barbless carp hook, size 20.
Thread: Veevus GSP, white, 30D, 18/0.
Tail: White cock hackle fibres.
Body and Wing: White macrame polypropylene yarn or Tiemco Aero Dry Wing.
Thorax: Black superfine dubbing.
Hackle: Grizzle cock hackle, tied as a parachute.
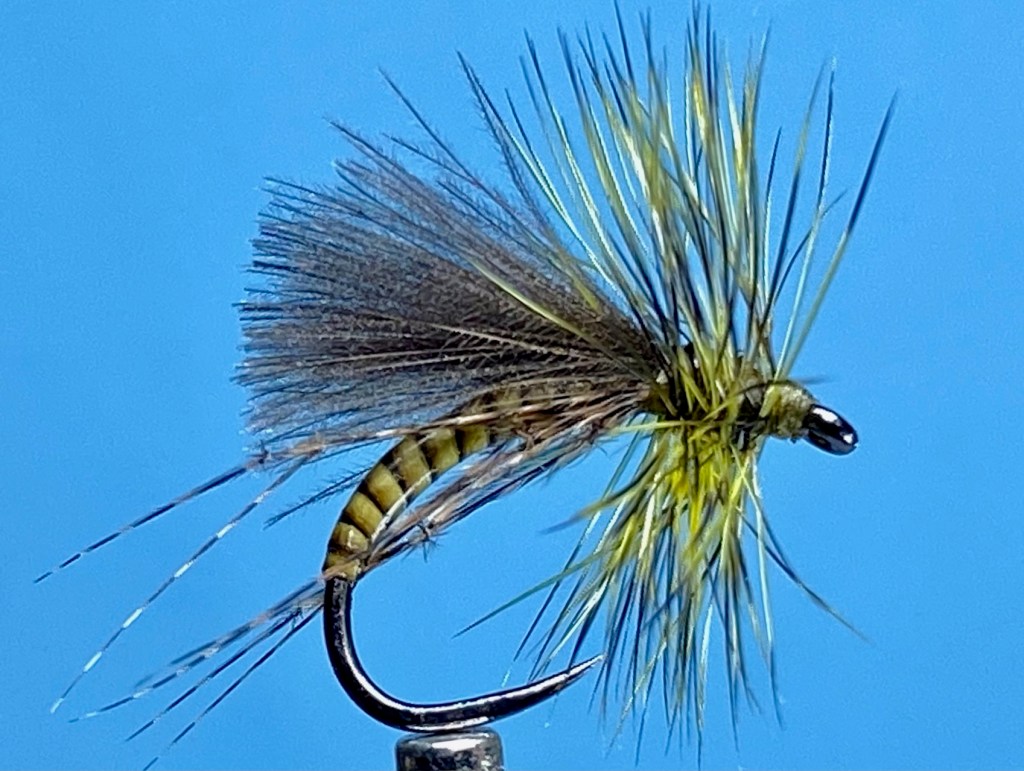
The Olive Hopper
Hook: Fulling Mill FM50 65, Czech nymph hook, size 16.
Thread: Olive Roman Moser Power Silk, 10/0, or any fine olive flat thread.
Body: Dyed golden olive stripped peacock eye quill coated with UV resin.
Legs: Six knotted bronze mallard feather fibres.
Wing:Tips of 2 or 3 small CDC feathers.
Hackle: Olive grizzle cock hackle.

The Hacklestacker Olive Emerger or Midden Fly
Hook: Fulling Mill FM50 60, Bronze Czech Nymph hook, size 14.
Thread: Veevus 8/0, yellow, shade E09, or UNI 8/0, Lt. Cahill.
Rib: Semperfli Magic Quill.
Abdomen: Thread as above.
Hot Spot: Glo Brite floss no 5, hot orange.
Hackle: Genetic grizzle cock hackle tied paraloop style around its own stalk.
Thorax: Grey squirrel fur, dubbed.
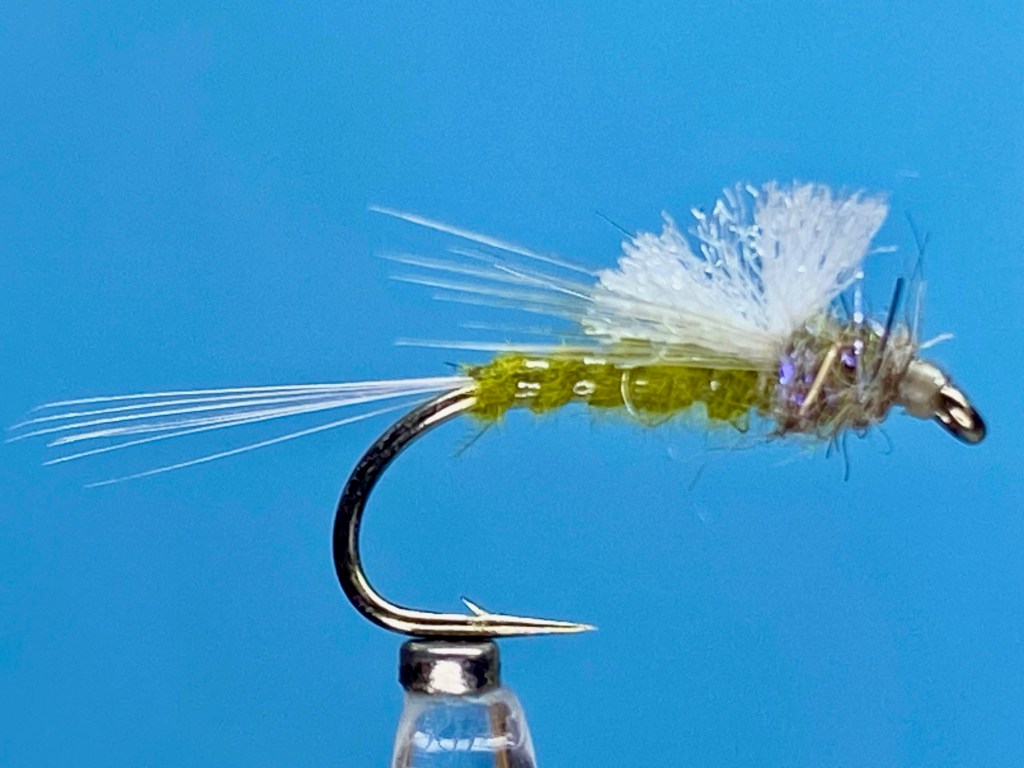
Emerging Floating Olive Nymph
Hook: Kamasan B170, sizes 12 – 14.
Thread: Sheer 14/0, Dun.
Tail: Grey or Blue Dun cock hackle fibres.
Rib: Clear Buzzer Wrap, stretched.
Abdomen: Olive CDC feather.
Wing stub: White Aero Dry Wing.
Legs: Grey or Blue Dun cock hackle fibres, tied in as a V.
Thorax: Hare’s body fur & UV Lite Brite, mixed.
The Split Cormorant – A Fly for November
Hook: Competition Barbless, sizes 10 or 12, (from Flybox), or similar.
Thread: Black Semperfli Nanosilk, 50D, or any black 8/0 thread..
Body: 2 Strands peacock herl.
Rib: Fine silver wire.
Thorax Cover: Mirage tinsel, wide.
Wing: Black marabou.
Cheeks: Glo Brite Floss, No. 4, scarlet.

Photo 1. Leaving a long thread tag, wind on the thread at the eye and lay down a short bed of thread. Do not cut off the thread tag.
Photo 2. Tie in the silver wire followed by 2 strands of short fibred peacock herl leaving the waste ends the same length as the body. Continue to bind down the materials to a point just past the hook point and return the thread to the head.
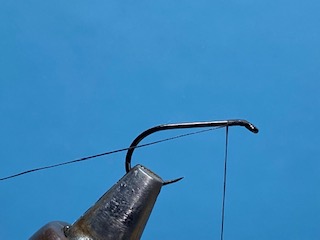
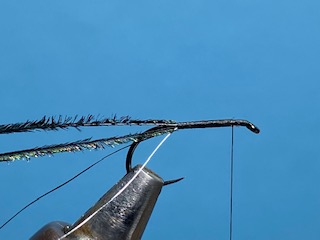
Photo 3. Carefully twist the herl around the thread tag to form a herl rope. Once formed, wind the rope up the shank, tie it down at the head and remove the excess herl rope. Now bring the silver wire up the body in open spirals as a rib, tie down at the head and worry off the wire.
Photo 4. Tie in a length of Mirage tinsel squarely on top of the hook shank and bind it down to the eye.


Photo 5. Take a bunch of marabou fibres and strip away the flue from the basal ends to expose the bare stems. Trim the bare stems to length and tie them in securely as a wing with well waxed thread, then pinch the marabou wing to length.
Photo 6. Double a length of Glo-brite floss and tie it in as cheeks on each side of the body. Once secure, pull the ends of the floss tight and trim off the excess to create short floss stubs of about 2mm. in length on either side of the body.
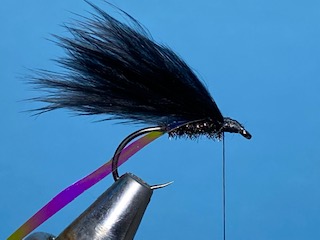

Photo 7. Divide and separate the marabou wing into two equal bunches, bring the tinsel forward between the two bunches and tie it down tight at the eye and remove the excess tinsel.
Photo 8. Form a neat head, whip finish, remove the thread and varnish the head to complete the fly. Note – The final photo shows the wing damp to aid photography.
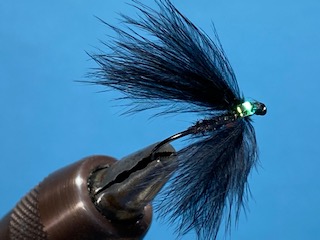

Tying Tips
- Keep the tag end of thread long as this helps when forming the herl rope.
- Peacock herl is particularly fragile near the tip, so always trim off the tips before tying in the herl.
- Twisting the herl around the tying thread to form a herl rope results in a dense and more durable body. Coating the thread underbody with a light smear of superglue prior to winding the herl rope will make the body even more robust, but let the glue dry before continuing with the tying.
- I find it easier to pinch the marabou to an approximate length before tying it in and to then strip away the flue from the basal ends with my finger and thumb nail to expose the bare stems which are then trimmed to length and tied in securely with well waxed thread. This reduces bulk and avoids cutting the marabou on the hook which helps to neaten the head.
- When dividing the marabou wing into 2 equal bunches, it helps to use moistened fingers to dampen the marabou and then use a dubbing needle to divide the fibres. This also makes it easier to tweak the marabou and the tinsel into the correct position.
- Make sure the tinsel is pulled tight before securing with thread at the eye. I make two light thread wraps to locate the tinsel, then while making a tighter third wrap, I gently pull on the tinsel and make a further tight thread wrap to lock the tinsel in place which ensures the tinsel remains flat between the bunches of marabou.
- Glo Brite floss in orange, yellow, chartreuse, and amber make good alternatives for the cheeks.
Les Lockey – Oct ’23
The Mohican – A Fly for October
Hook: Partridge Patriot Grub and Buzzer, or similar, size 8 or 10.
Thread: Pearl Fusion thread, (from Flybox) and black Semperfli Nanosilk, 50D.
Body: Pearl Fusion thread.
Rib: Pearl Fusion thread.
Thorax: UV red micro Straggle.
Wing: Natural Pine Squirrel zonker strip.
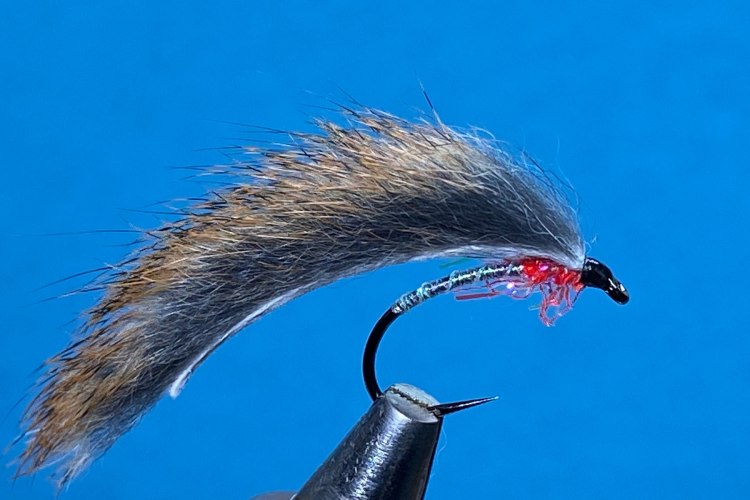
Photo 1.Secure the hook in the vice and starting about 2 mm. back from the eye, wind on a short bed of fusion thread and remove the waste.
Photo 2.Continue to wind the thread in touching turns to part way round the bend, then spin the bobbin holder clockwise to tighten the thread, and wind it back up the shank in open spirals as a rib, stopping at the thorax.

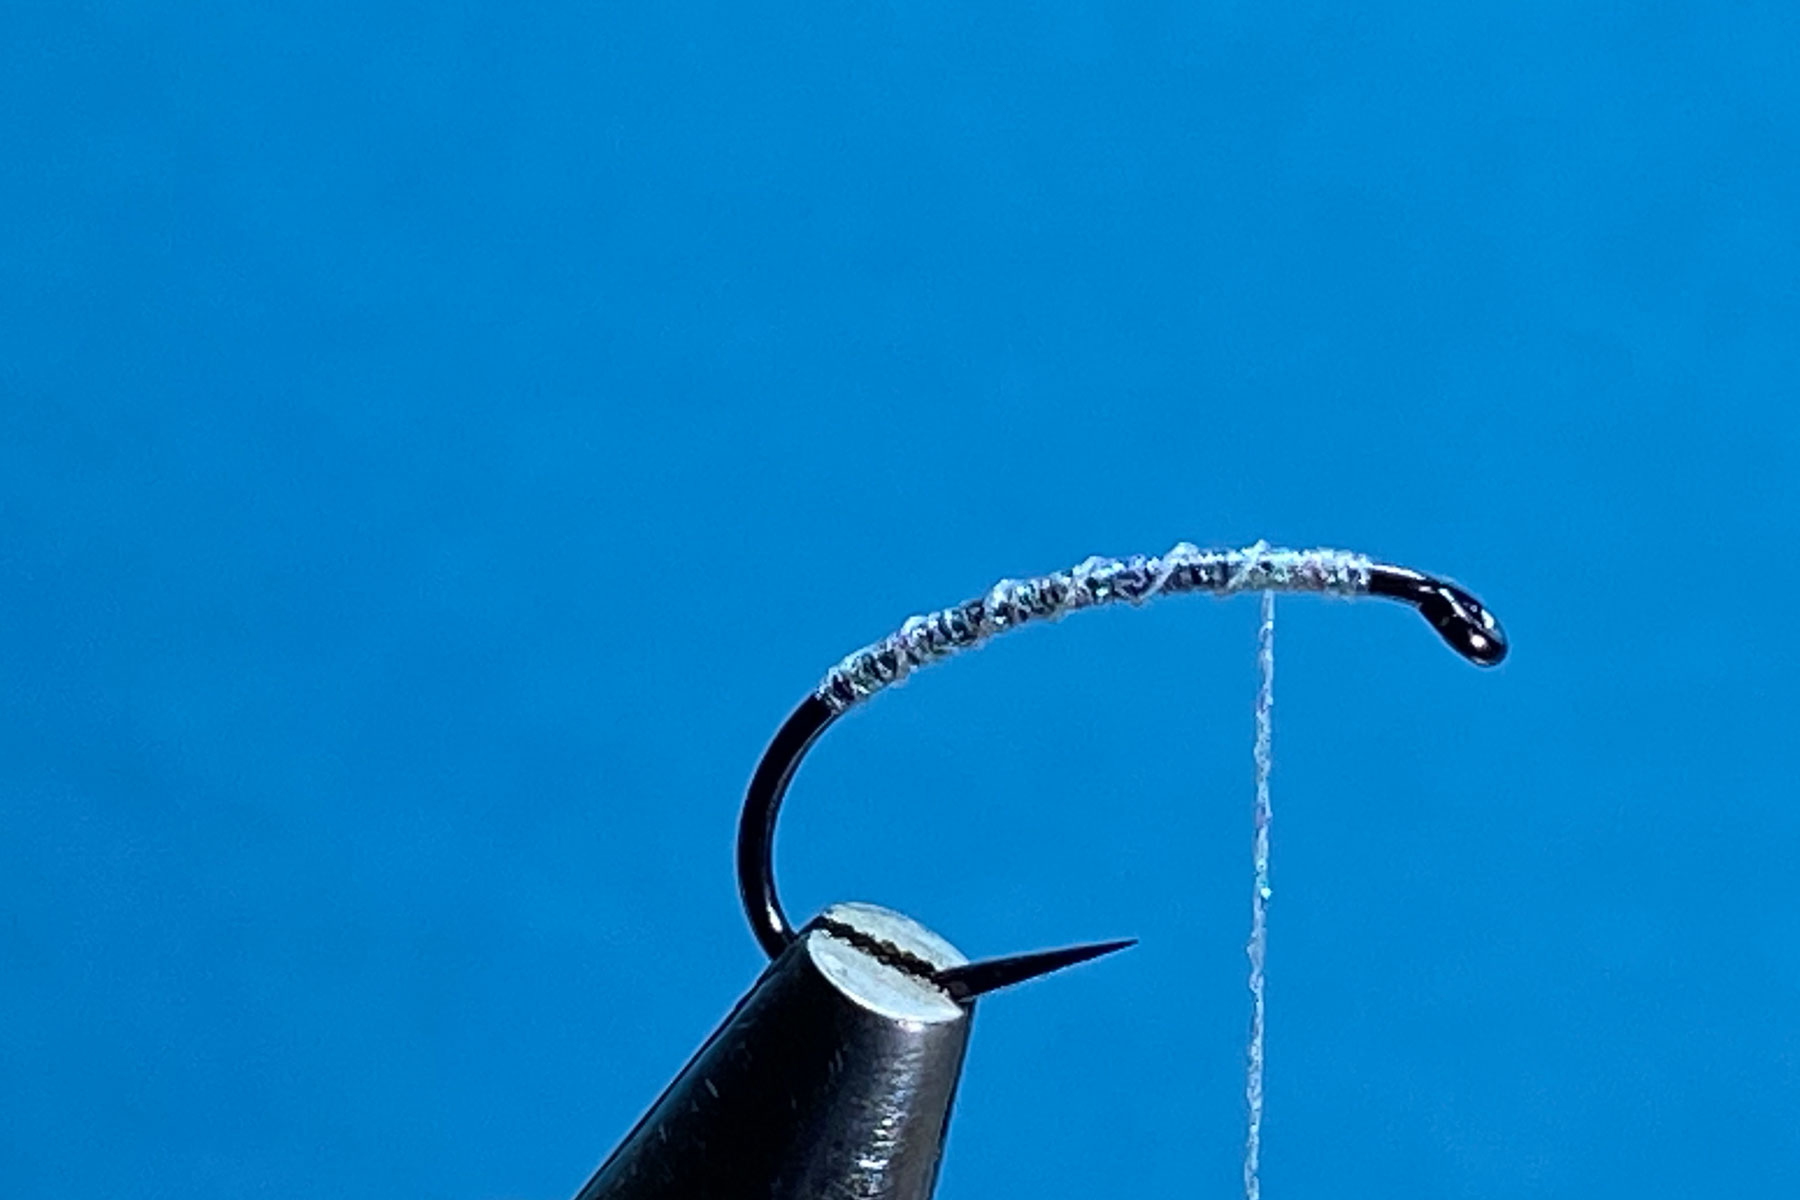
Photo 3.Tie in a length of red straggle and remove any waste.
Photo 4.Attach the black thread behind the eye and run it on to anchor the pearl thread, then remove the pearl thread. Now wind on a few turns of straggle to form the thorax, secure with thread and remove the waste straggle.
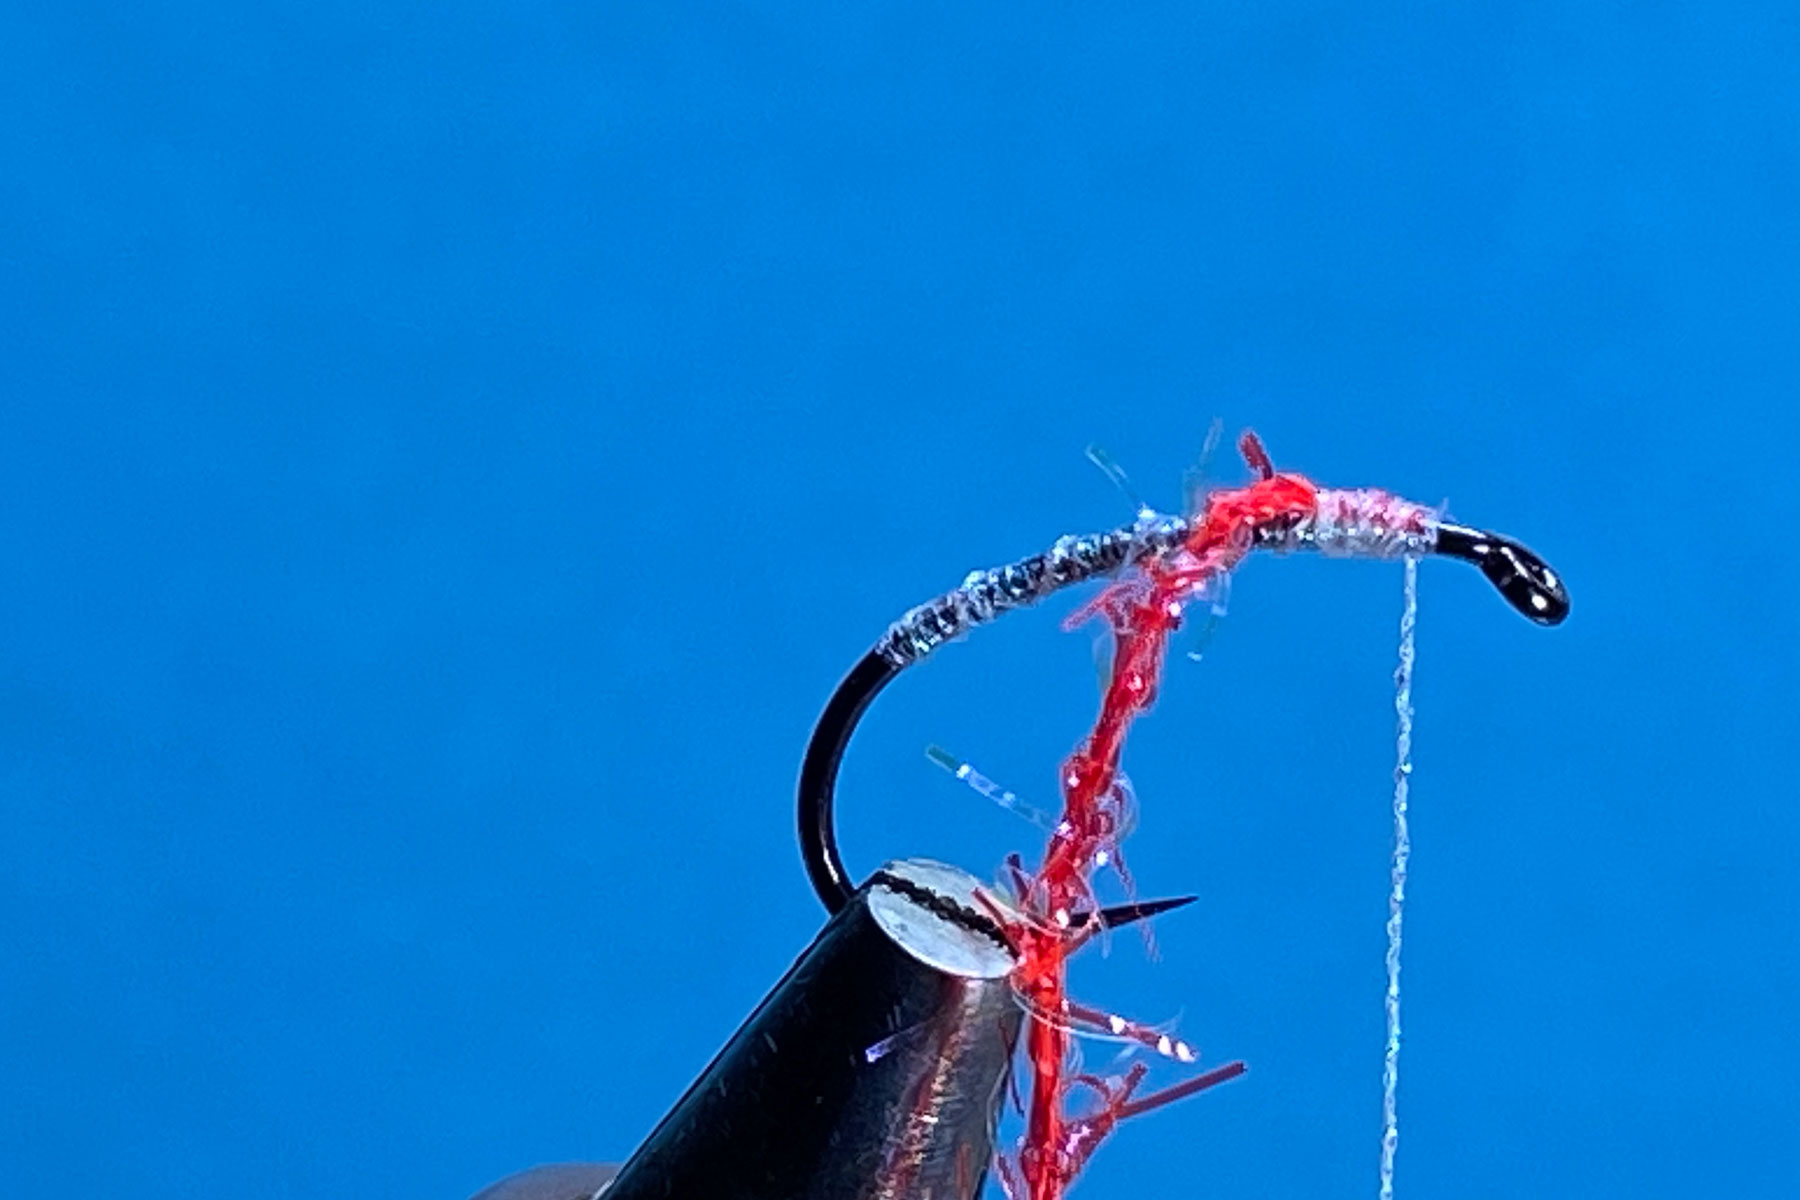

Photo 5.Cut a piece of zonker strip to about twice the length of the hook and trim away the fur from the head end. Using well waxed thread, tie in the zonker strip securely on top of the shank immediately in front of the thorax and cut away any excess skin.
Photo 6. Tidy the head with thread, whip finish and remove the thread. Varnish the head to complete the fly.
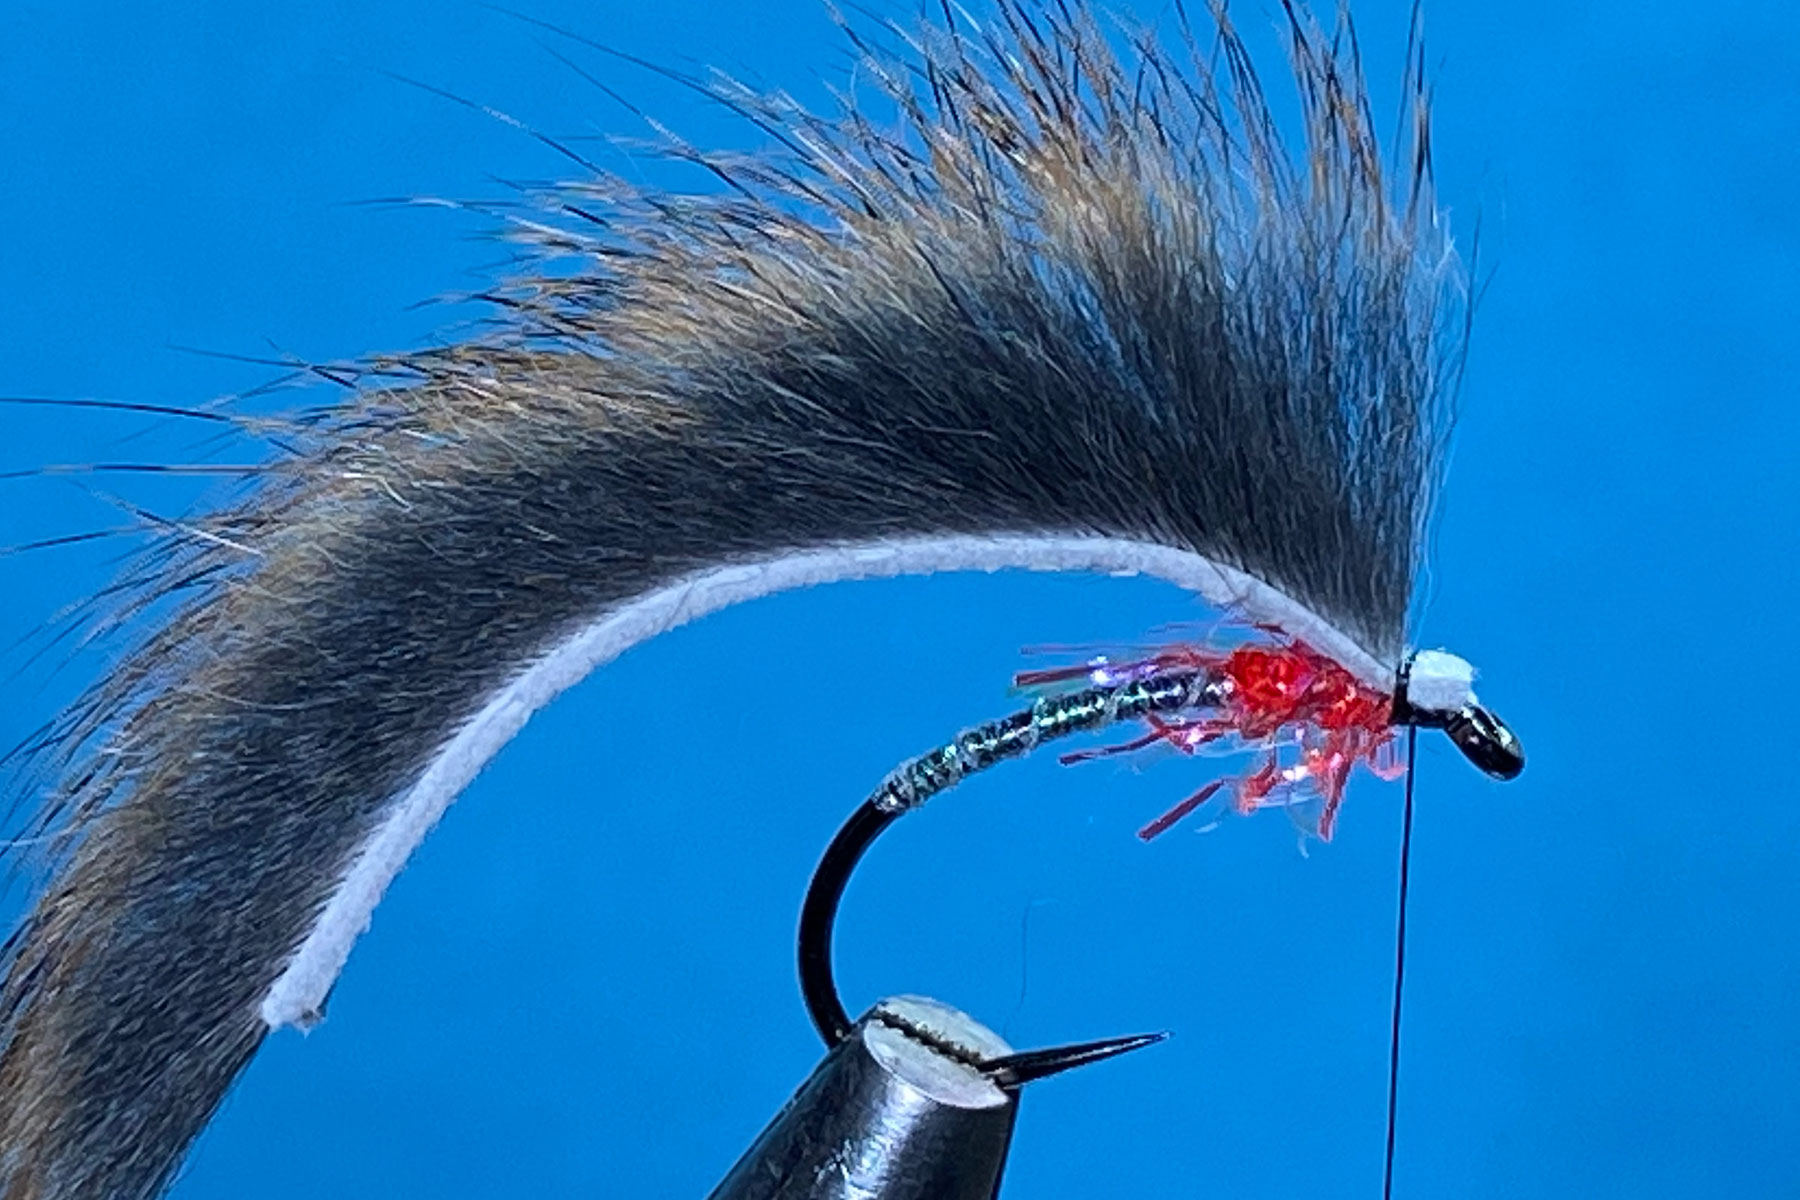

Tying Tips
- This is a very simple pattern to tie and several variations can be created simply by altering the colour of the materials. A black body and wing with a red or green thorax, or an olive body and wing with a chartreuse thorax are very effective alternative combinations.
- As the name suggests, Fusion thread is a combination of standard thread and fine metallic tinsel and as such, it speeds up the tying process, but standard thread along with tinsel bodies can also be used.
- The straggle thorax should be substantial enough to kick the squirrel wing upwards away from the hook allowing maximum movement in the wing.
- Pine squirrel micro zonker strips are used for the wing to maintain proportion in the fly and to provide maximum mobility. They can be bought either as pre-cut zonker strips, or as whole zonkered skins, which is my preferred option, but they are expensive to buy and are only available in natural, black, olive, chartreuse and orange. That said, it is one of my favourite fly tying materials. It makes great dubbing and is ideal for wings on mini lures and larger wet flies.
- Before tying in the zonker strip, I cut it to length and strip away some fur at the front end so the bare skin can be trimmed to fit neatly at the head. This avoids cutting the strip in situ and allows a small, neat head to be formed.
- Nanosilk GSP thread is arguably the strongest and thinnest thread on the market. Its use here allows the thread to be pull down really tightly onto the fur strip to produce a very robust fly.
Les Lockey – Sep ’23
The Foam Daddy – A Fly for September
Hook: Kamasan B110 heavy grub hook, size 10.
Thread: Veevus, 12/0, shade C12, (tan).
Abdomen & Thorax Cover: 2.8mm. orange or tan foam cylinder, trimmed to a point at one end.
Legs: 6 Cock pheasant centre tail fibres, knotted twice.
Wing: 2 Cree cock hackle points.
Hackle: Ginger cock, trimmed below the hook shank, if required.
Thorax: Hare’s Ear Plus dubbing, gold.
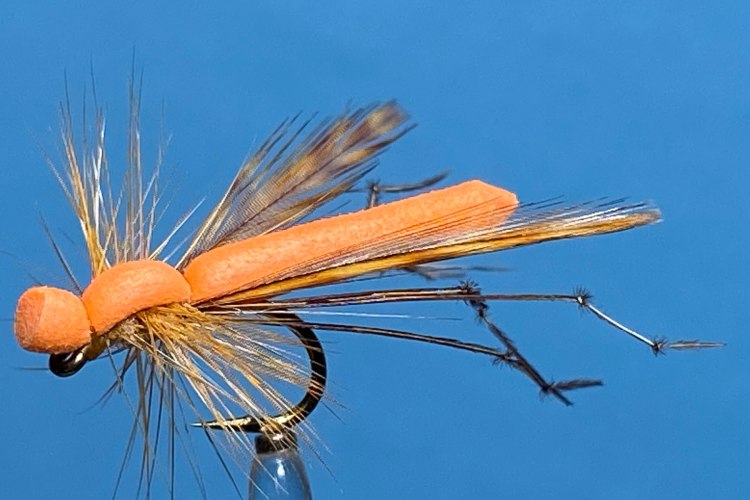
Photo 1. Secure the hook in the vice and starting at the eye, wind on the thread in touching turns to opposite the hook point and remove the excess thread. Trim one end of the foam cylinder to a point.
Photo 2.With the pointed end of the foam cylinder extending rearwards for about an inch, tie in the foam cylinder on top of the shank and make a couple of locking thread turns onto the hook shank in front of the foam. Follow this by dubbing a small amount of the hare’s ear fur onto the thread and wind it on immediately in front and tight up against the foam cylinder to create a small pad. This should cover the thread wraps under the foam and push the remaining foam into an upright position.

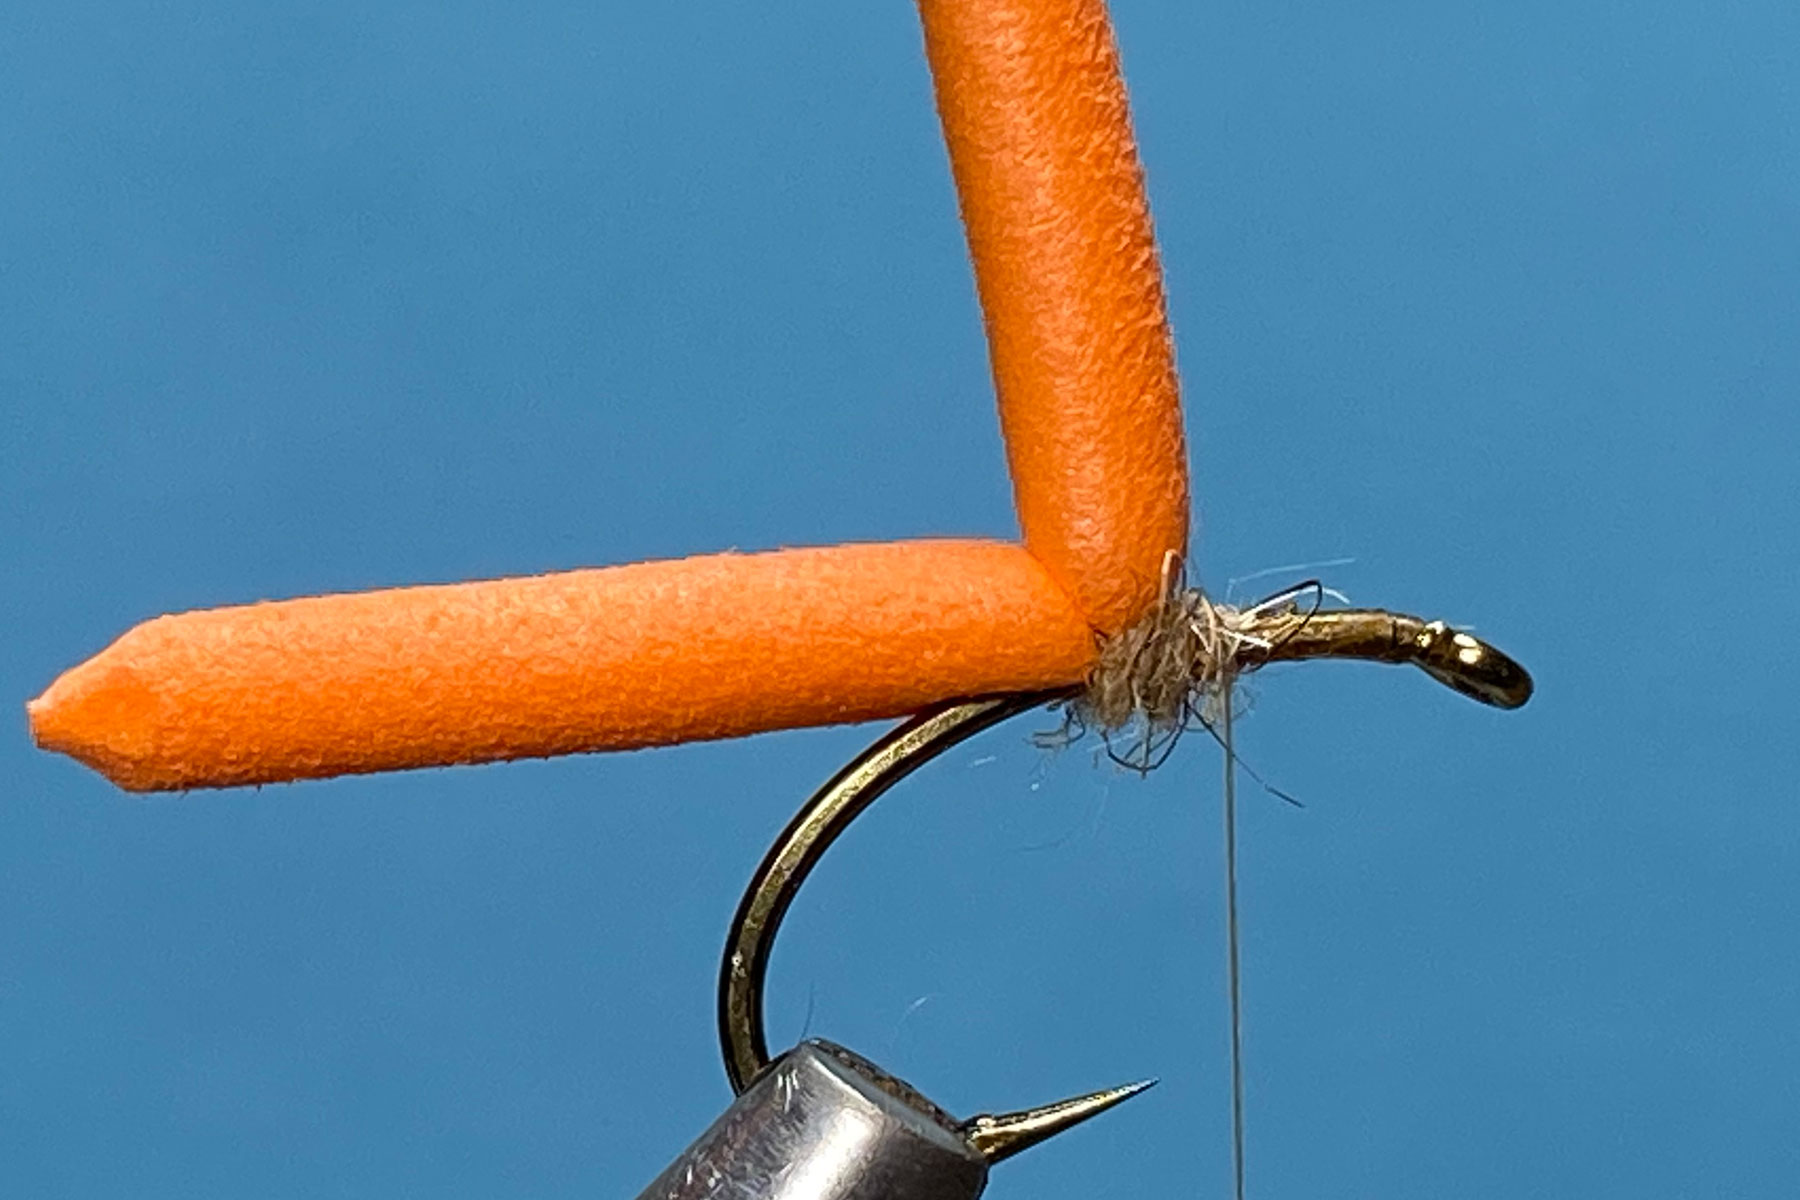
Photo 3.Align the tips of 6 knotted pheasant tail fibres and with the fibres equally divided along each side of the abdomen and extending well past the end of the foam body, tie them in securely and remove the waste fibre stubs.
Photo 4.Align the tips of two Cree hackle points and tie them in approximately the same length as the body. Manipulate the hackle points so they splay outwards in a wide V shape and lock in position with figure of eight thread wraps, then remove the excess feathers.


Photo 5. Using well waxed thread, tie in the cock hackle by its stalk and return the thread to the rear of the thorax.
Photo 6. Dub more dubbing onto the thread and wind on a fairly substantial thorax, stopping about 1mm. from the eye.


Photo 7. Wind the hackle in open turns over the thorax, tie it down securely at the eye, and remove the waste hackle.
Photo 8. Part the hackle fibres on top of the thorax and bring the upright foam forward over the top of the thorax and tie it down securely, finishing off with a couple of locking thread turns in front of the foam and immediately behind the eye.


Photo 9. Apply some varnish to the thread, whip finish through it and cut off the thread. To complete the fly, cut off the excess foam leaving a small stub over the eye.
Tying Tips
- A flat tying thread is less likely to cut through the foam, but always make a couple of locking thread turns onto the hook shank in front of the foam to avoid excess pressure being applied to the foam. If using Veevus thread as in the specification, spin the bobbin holder anticlockwise to flatten the thread whenever tying down onto the foam.
- A small dab of superglue can be applied to the hook shank at the tie in point for the foam body which will help to secure the foam and prevent it slipping round the shank.
- Foam cylinders are widely available from good material suppliers, but I prefer to cut my own using a set of Gunville foam cutters (from Upavon Fly Fishing) and deep blocks of Wapsi high density foam.
- I am convinced that the long legs in this pattern is an important trigger point, so don’t be shy with the length of legs.
- When tying in the wings, I simply align the hackle point tips one on top of the other and tie them straight onto the hook. Once secure on the shank, I separate the points either side of the foam and wind figure of eight thread wraps between the hackle points trapping the wings in place.
- In calm conditions, I trim away the hackle fibres below the shank, so the fly sits right in the surface film.
Les Lockey – Aug ’23
The Threadless Green Diawl Bach – A Fly for August
Hook: Competition Medium, sizes 10 or 12, (from Flybox), or similar.
No Thread: Use Hends 0.69 green holographic tinsel.
Tail: Red game cock hackle fibres.
Rib: Hends 0.69 green holographic tinsel.
Body: Single green peacock herl.
Head: Hends 0.69 green holographic tinsel.

Photo 1. With the hook secured in the vice, leave a 3 inch long tag end of tinsel, and start winding the tinsel from the eye to halfway down the shank. Do not cut off the tinsel tag as this will be used for the rib.
Photo 2. Align the tips of a bunch of cock hackle fibres and use the tinsel to tie them down on top of the shank as a tail. Continue to bind down the fibres to a point just past the hook point and trim the butt ends to the same length as the body.

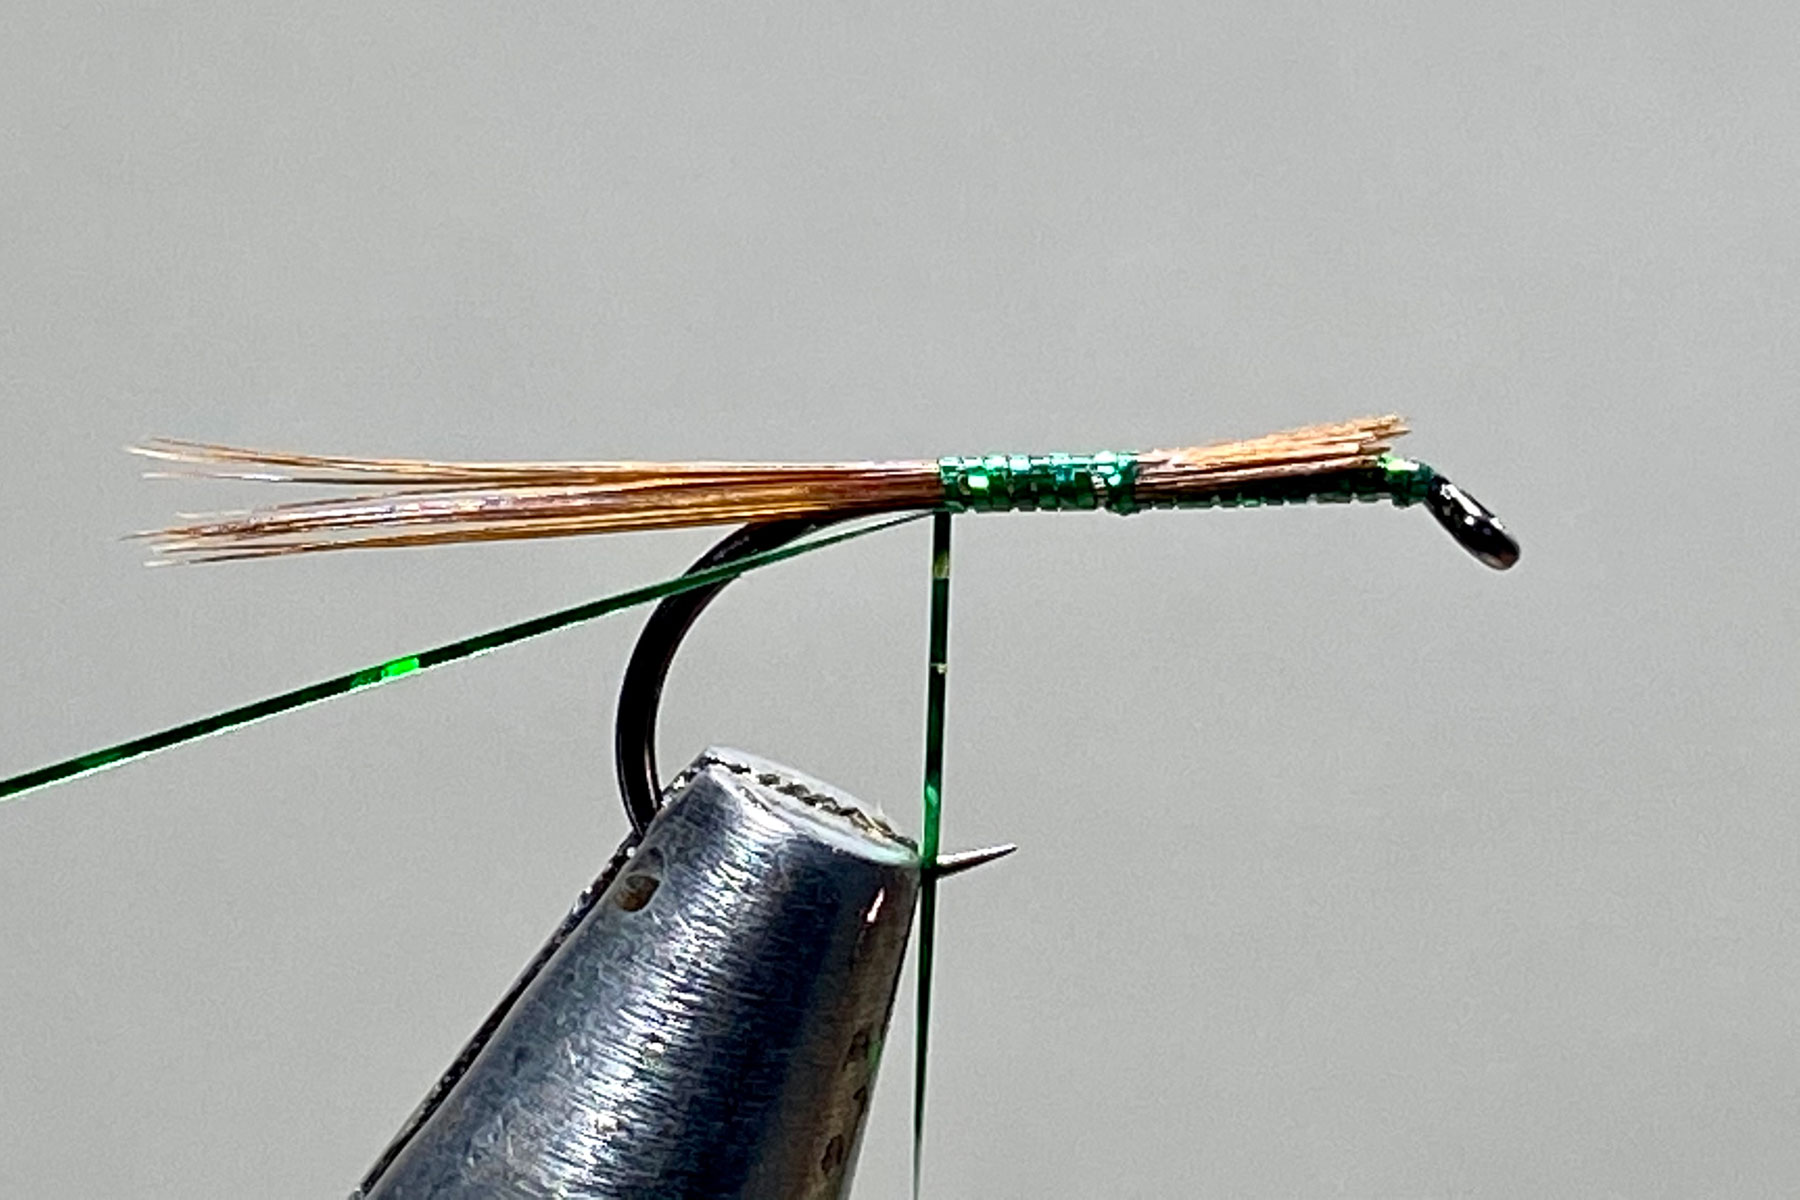
Photo 3. Use the tinsel to tie in a single peacock herl leaving the butt end the same length as the body. Secure the peacock herl by binding down the butt end with tinsel to just before the eye and if necessary, remove any excess herl.
Photo 4. Wind the herl up the shank in touching turns, secure with tinsel at the head and remove the excess herl.


Photo 5. Bring the tag end of tinsel up the body in an open spiral as a rib. Secure the rib with tinsel and remove the excess tinsel rib.
Photo 6. Align the tips of a bunch of cock hackle fibres and using the tinsel, secure them in as a beard hackle, and remove the waste hackle fibres.
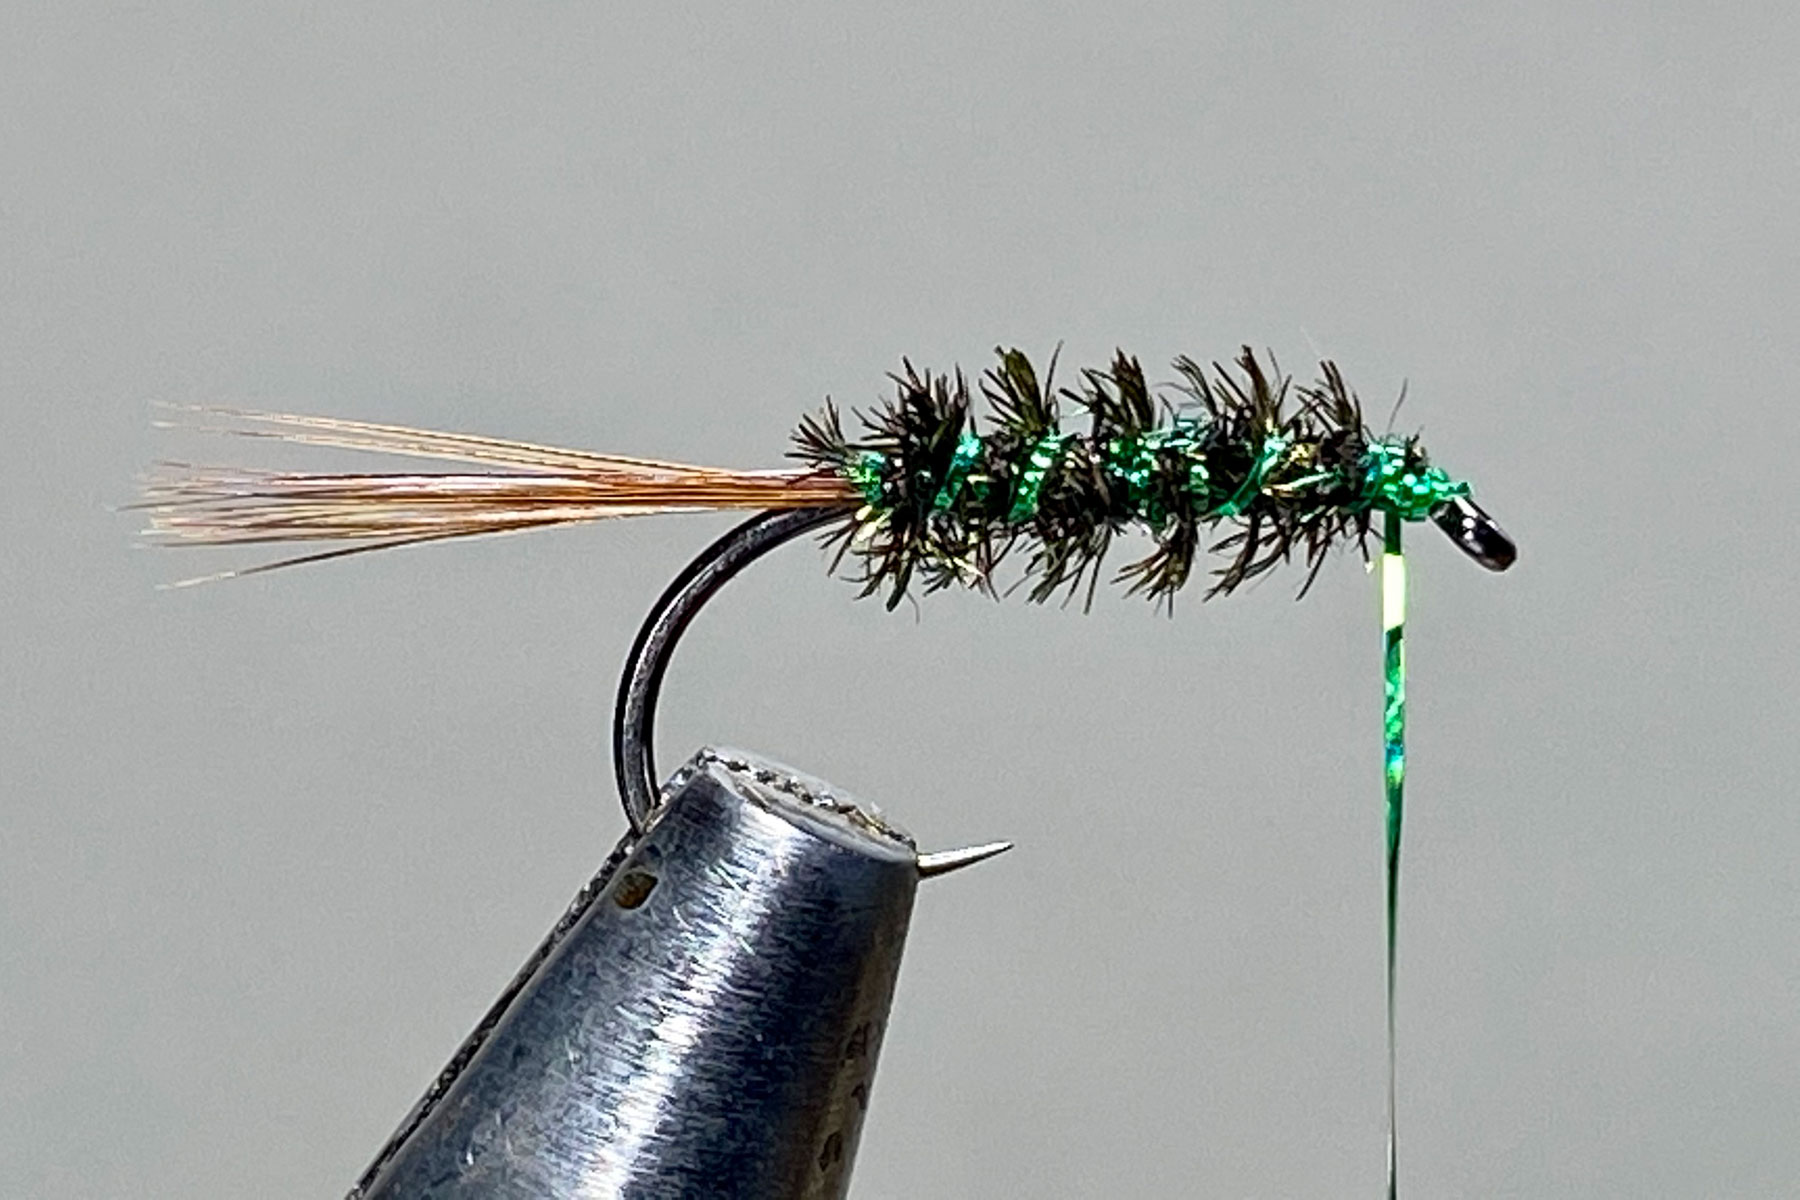

Photo 7. Tidy the head with tight wraps of tinsel, whip finish, cut away the tinsel and varnish the head to complete the fly.
Tying Tips
- The tying method for this fly is rather unusual in that it uses Hends 0.69 holographic tinsel instead of tying thread to construct the fly. As such, it is likely to prove a true test of your fly tying skills. However, it is essential to use Hends 0.69 holographic tinsel, as all other tinsels are simply not strong enough for the job.
- I find the best way of tying this pattern is to simply load the spool of tinsel onto a heavy bobbin holder and then use the tinsel as you would a bobbin of thread. However, unlike thread, the tinsel must be kept flat and under tension throughout the whole tying process to avoid any slippage, so always unwind any twists before winding the tinsel. Using a heavy bobbin holder will ensure the tinsel is kept under tension even when the bobbin holder is left to dangle while manipulating the other materials.
- Hends tinsels come in two sizes: the thinnest being 0.100, and 0.69 which is the one used here. They also come in a variety of different colours, so you can ring the changes if desired. Gold and red versions are well worth having in your fly box.
- Despite its fine dimensions, Hends tinsel is remarkably strong, so don’t be frightened to apply pressure where needed. However, do not add more tinsel wraps than necessary, as this will cause the tinsel to slip. You can however wax the underside of the tinsel for additional adhesion if necessary.
- A 3 turn whip finish can be done either by hand or with a whip finish tool in the normal manner, remembering to keep the tinsel under tension at all times during the process and do not be tempted to use more than 3 turns as the tinsel will not pull through.
- Hends holographic tinsels are available online from Tungsten Beads Plus and The Fly Tying Company.
Les Lockey – July ’23
The Elastic Caddis Pupa – A Fly for July
Hook: Fulling Mill Czech Nymph, sizes 14 and 16.
Underbody: Fine copper wire.
Thread: Lt. Cahill Uni 8/0 for the abdomen and dark brown UNI 8/0 for the thorax.
Abdomen: Strong and Stretchy elastic jewellery cord, Amber.
Pre-Thorax: Peacock Ice Dub.
Legs: Brown partridge feather fibres.
Thorax: Dark brown SLF Squirrel Dub.
Horns: 2 Bronze mallard fibres.

Photo 1. Firmly secure the hook in the vice and starting opposite the hook point, wind on a bed of copper wire to part way round the bend and break off the excess wire. Form a tapered wire underbody by winding on 3 or 4 layers of copper wire, each layer being slightly shorter than the one before and when complete, break off the wire at the start point. To avoid any slippage, lightly coat the wire underbody with superglue and allow to dry thoroughly before continuing.
Photo 2. Catch on the Lt. Cahill thread in front of the wire and keeping the tag end tight, wind the thread over the wire and then remove the waste thread. Continue to make a few more thread turns after the end of the wire and then return the thread to the thorax covering as much of the copper wire as possible.

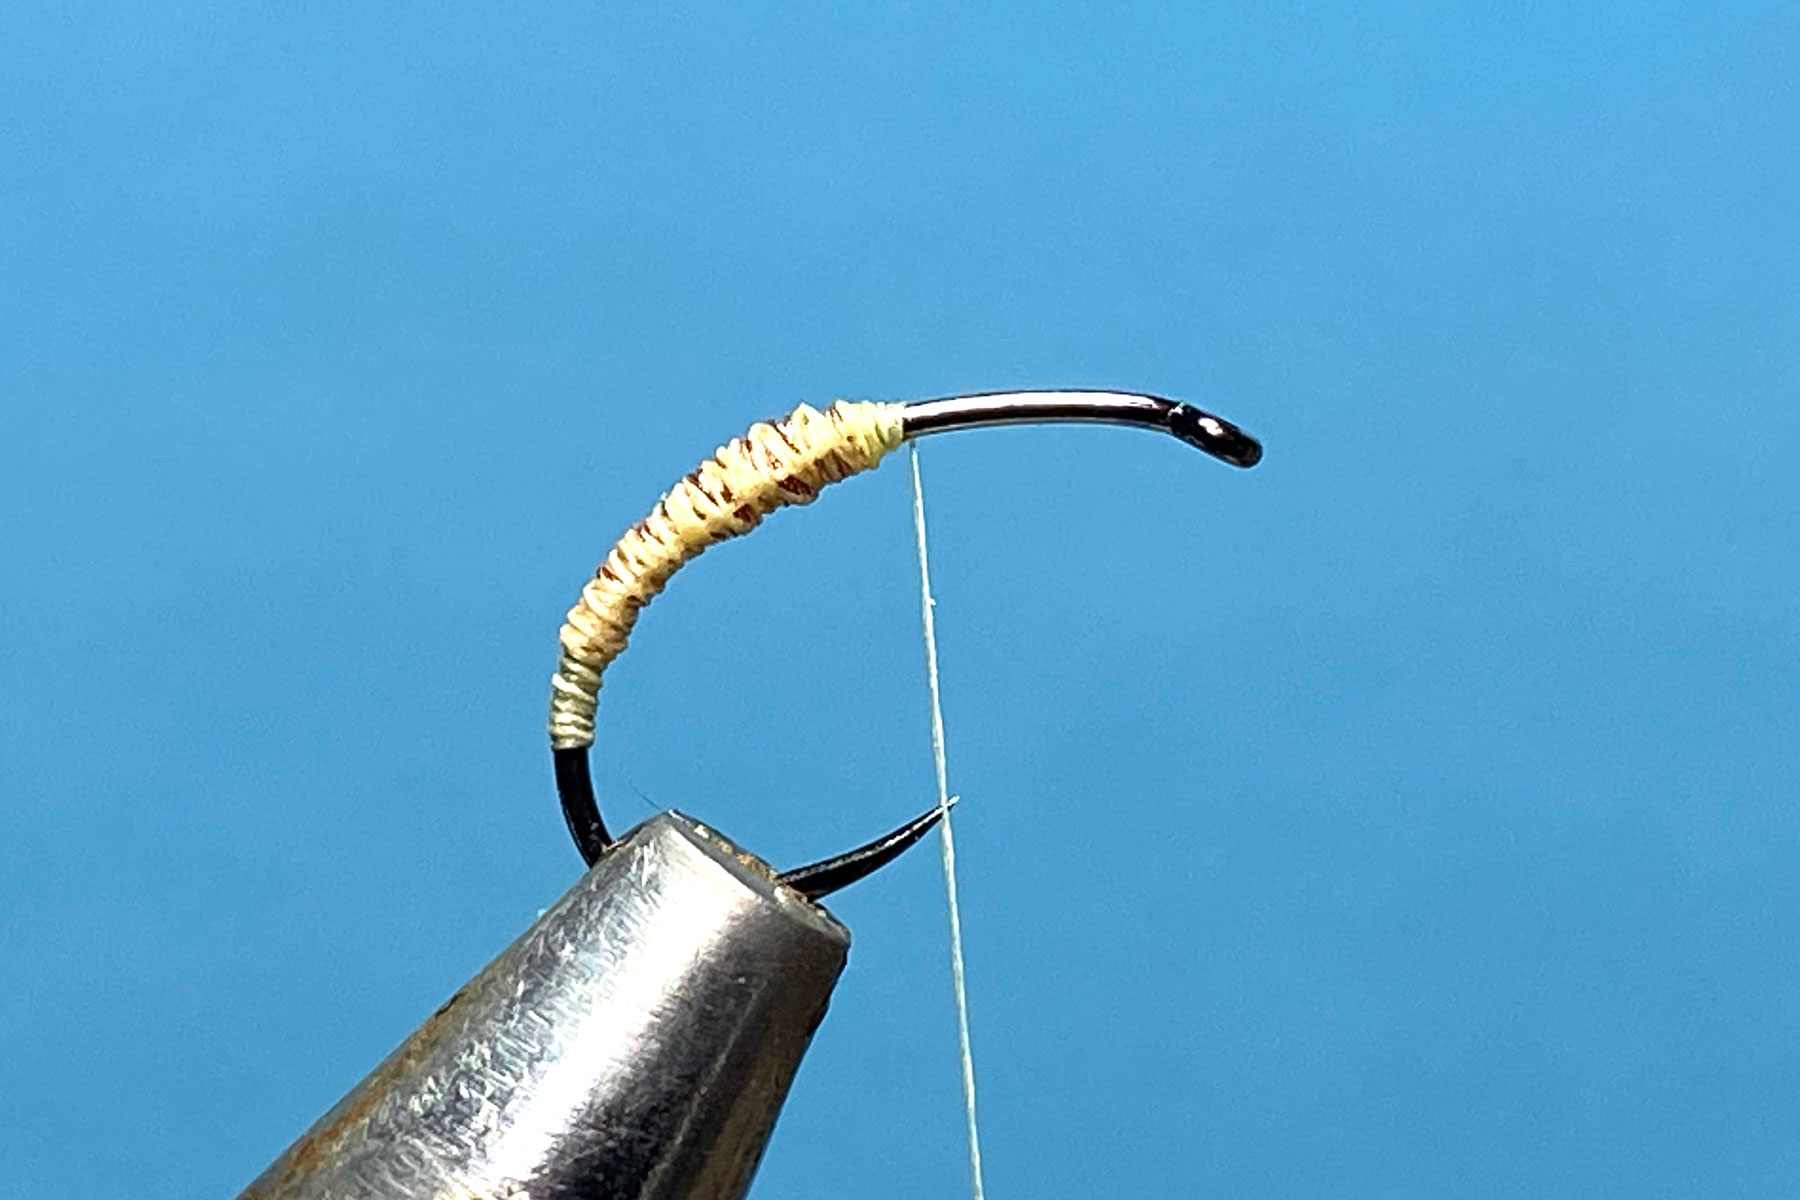
Photo 3. Take a 4 inch length of elastic cord and cut one end to a shallow angled point. Using well waxed thread, securely tie down the point in front of the copper wire and once secure, stretch the cord rearwards and bind it down with tight thread turns, then return the thread to the thorax.
Photo 4. Keeping the elastic cord under tension, wind it tightly up the shank and tie it down securely at the thorax with well waxed thread. Cut off the excess cord at a shallow angle and tidy the area with thread.


Photo 5. Dub a small pinch of Ice Dub onto the thread and wind on the dubbing as a pre-thorax, over and in front of the last turn of cord. Attach the brown thread at the eye and use it to secure the yellow thread. Remove the yellow thread and the brown thread tag and tidy the area with brown thread.
Photo 6. Cut out the tip of a brown partridge feather to form a V shape. Remove all the basal fibres from the stem leaving about 10 fibres on each side of the stem. Angle the V down either side of the shank so the fibres sit equally along each side of the abdomen and are about the same length as the hook, then secure the feather in position with a few thread turns and remove the waste feather, leaving he thread at the head.

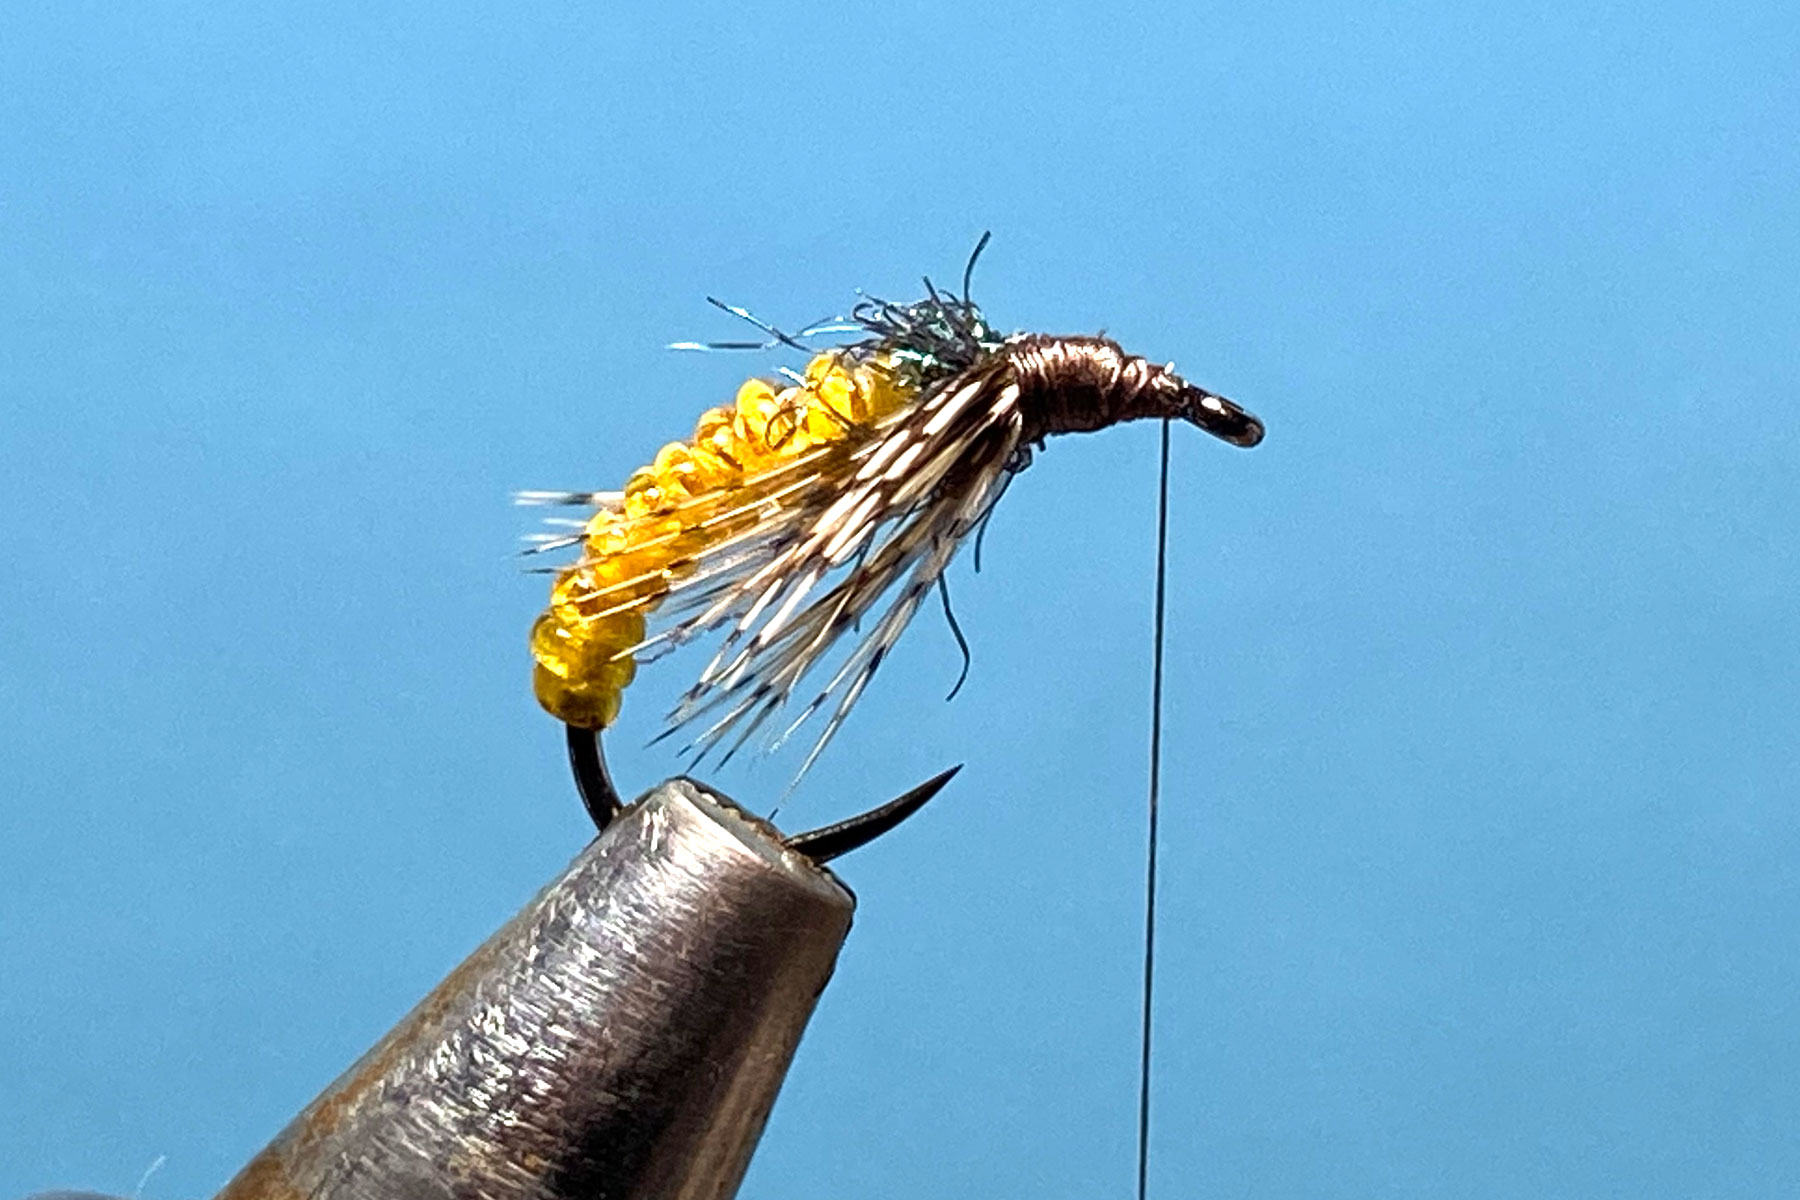
Photo 7. Dub some SLF squirrel dub onto the thread and wind on a tapered thorax, returning the thread to the eye. Use Velcro to lightly brush out some fibres from the sides of the thorax, taking care not to catch the tying thread, then with your fingers, massage the fibres rearwards ensuring any fibres pointing forward of the eye are stroked back and held in position with a few turns of thread.
Photo 8. Align the tips of 2 bronze mallard fibres and tie them in pointing rearward and about twice the length of the hook, then remove the waste ends.

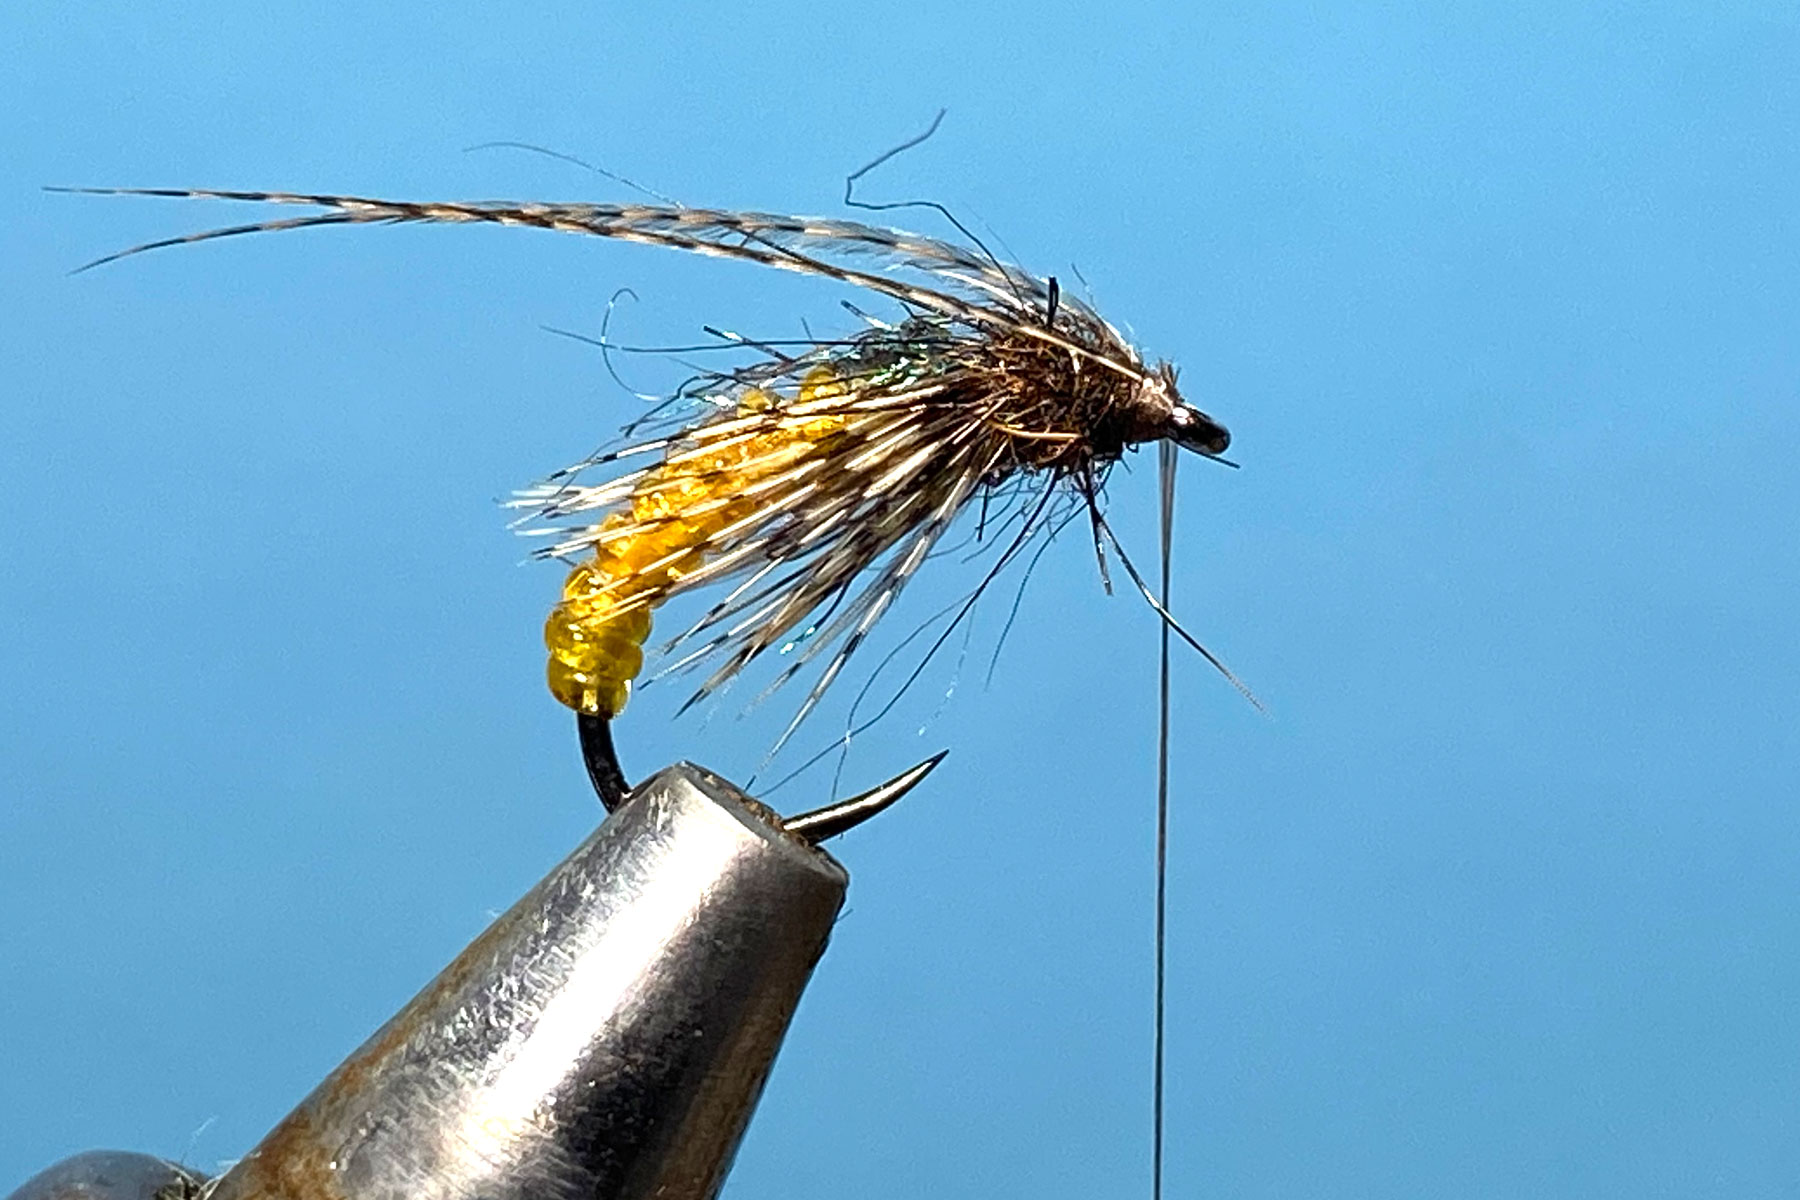
Photo 9. Form a neat head, whip finish, remove thread and varnish the head to complete the fly.
Tying Tips
- Make sure the hook is securely clamped in the vice as it needs to withstand considerable pressure when the elastic cord is stretched.
- To help control the copper wire when winding the underbody, I put the bobbin of copper wire into an old ceramic bobbin holder. For a heavier fly, use thin strips of self- adhesive lead sheet to build the underbody.
- Don’t get too hung up about the neatness of the underbody as the thread and elastic cord will mask any minor imperfections.
- It is a good idea to tie the wire underbodies in batches to give the superglue plenty time to dry thoroughly.
- Strong and Stretchy jewellery cord comes in a variety of colours and 3 different thicknesses – 0.8 is the most useful size for fly tying, but the thinner 0.5 version is good for buzzer bodies so it might be worth buying both sizes. A pack of 8 spools of different colours can be bought very cheaply from eBay.
- The original pattern used yellow jewellery cord, but I find the amber colour works best for me. Green is another good colour to try.
- Fine vinyl D rib from Veniards is perhaps the best alternative to the jewellery cord, but it is much less stretchy and as a result, creates a rather thick body, although soaking the vinyl rib in hot water will improve its stretchability a little.
- An alternative method for tying the legs is to tie in the partridge hackle by its tip and wind on a few turns of hackle in the usual way, and when secure, cut off the top and bottom fibres.
- I find it is easier to create a tapered thorax by winding the dubbing from the hook eye rearwards and then back towards the eye. This helps to avoid the dubbing slipping forward over the eye while maintaining the desired tapered shape.
- For security and neatness, when tying in the horns, fold the stub ends back and tie them down with thread before cutting off the waste ends.
Les Lockey – June ’23
The Quill Cormorant – A Fly for June
Hook: Competition Barbless, size 10, from Flybox, or similar.
Thread: Black GSP 50D, or any fine flat thread.
Body: Black thread as above.
Rib: Natural stripped peacock eye quill, body and rib coated with UV resin and cured.
Throat: A few strands of fluorescent orange marabou.
Wing: Black marabou tip fibres.
Cheeks: Split Jungle Cock nail.
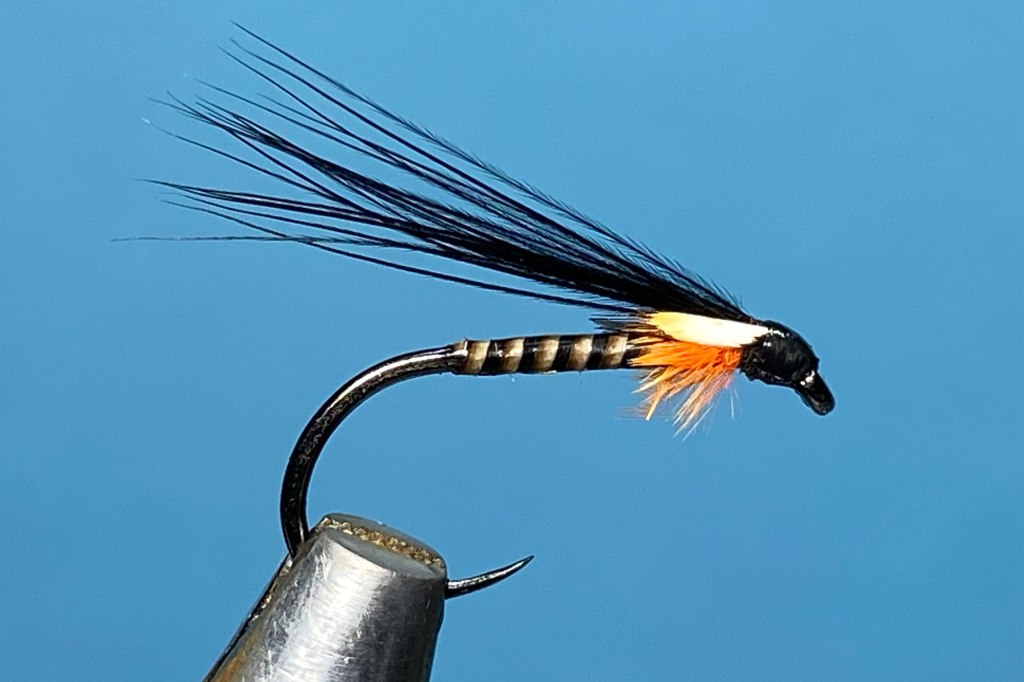
Photo 1. Start the thread at the hook eye and lay down an even bed of thread to just past the hook point then remove the waste thread.
Photo 2. Tie in the peacock quill and bind it down with touching thread turns to the thorax position and remove the waste quill.

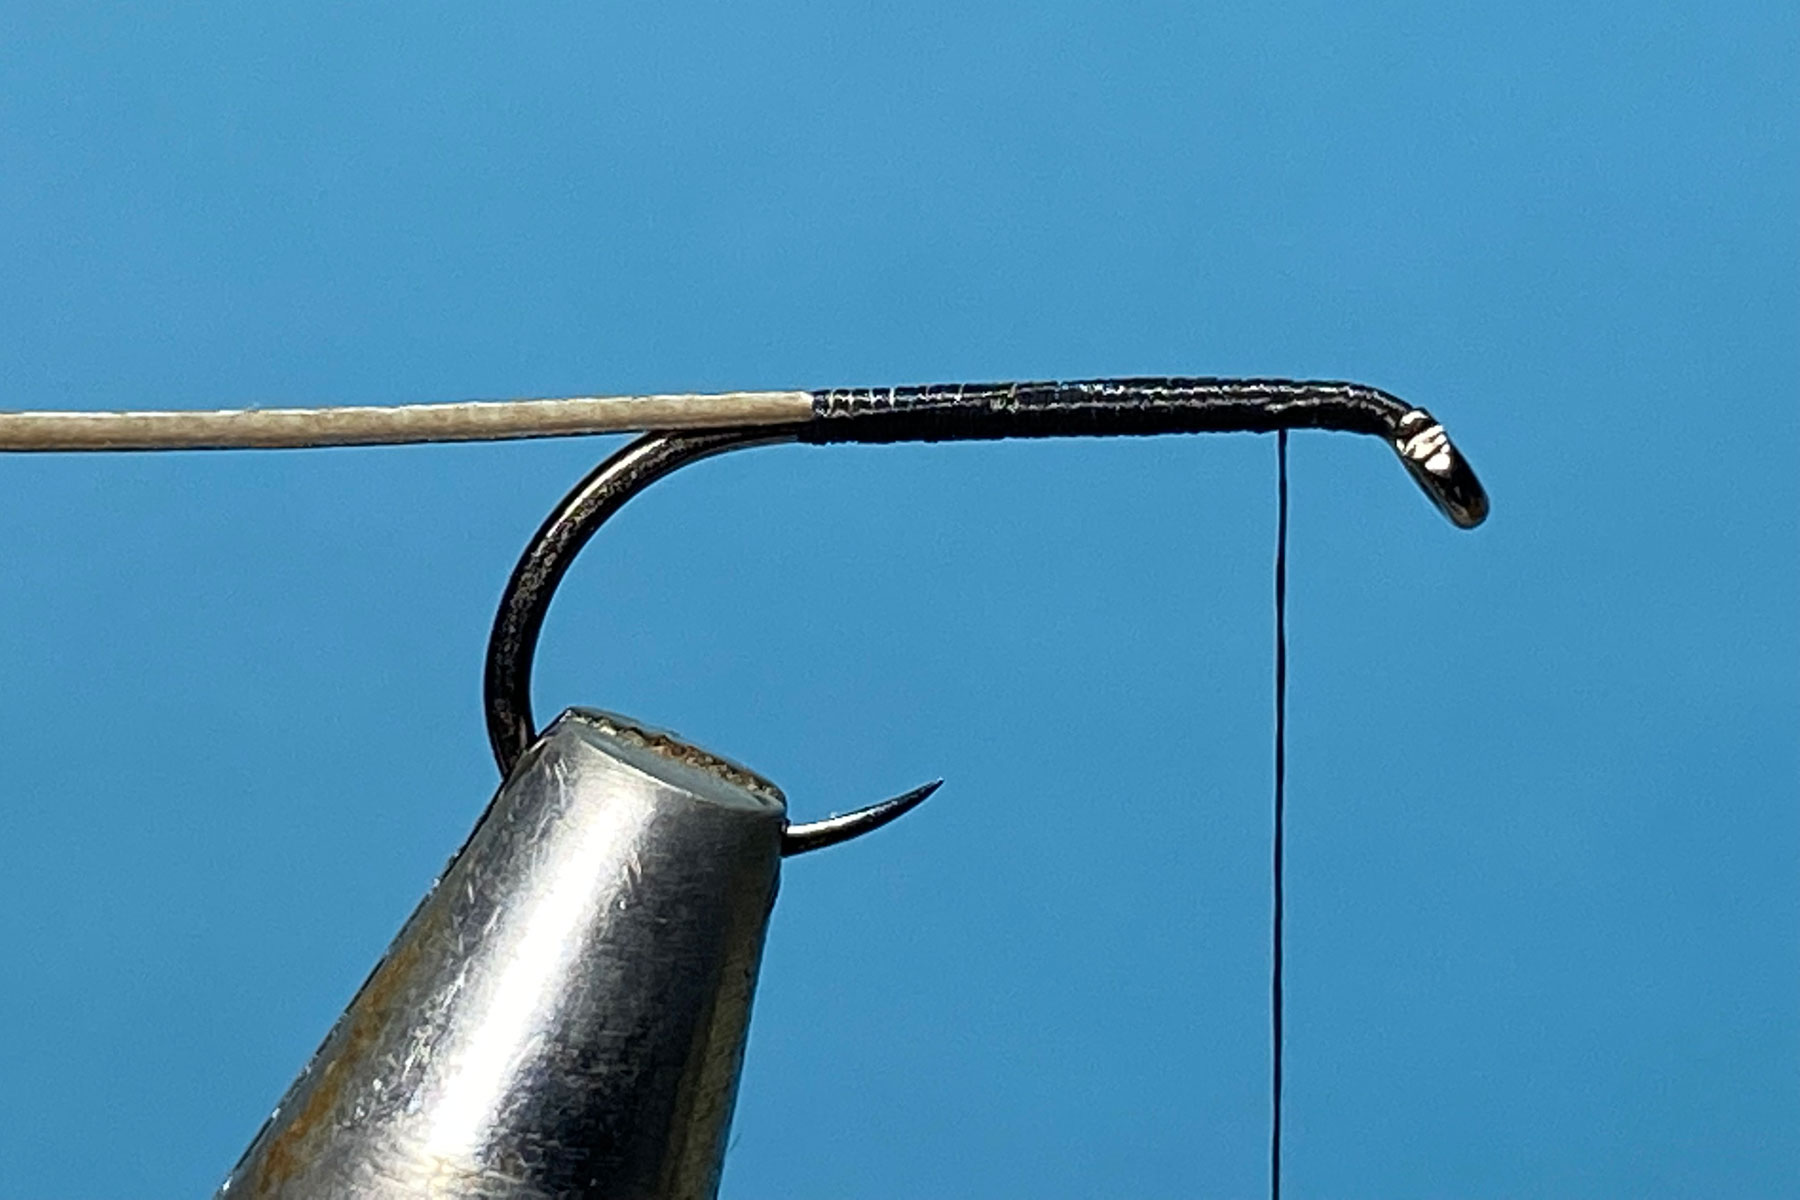
Photo 3. In slightly open turns, wind the quill over the thread body and tie it down at the thorax. Remove the excess quill and lightly coat the whole body with UV resin then cure with a torch.
Photo 4. Take 4 or 5 strands of orange marabou and tie them in by their tips. Add a tiny drop of superglue to the thread bindings and carefully wind the marabou fibres in close touching turns over the glue. Secure with thread at the head, remove the waste marabou and tidy the area with thread.


Photo 5. From the tip of a marabou plume, align the ends of a small bunch of fine marabou fibres and tie them in as a wing. Remove the waste fibres and tidy the head.
Photo 6. Tie in a split jungle cock nail equally on each side of the wing and remove the excess feather.
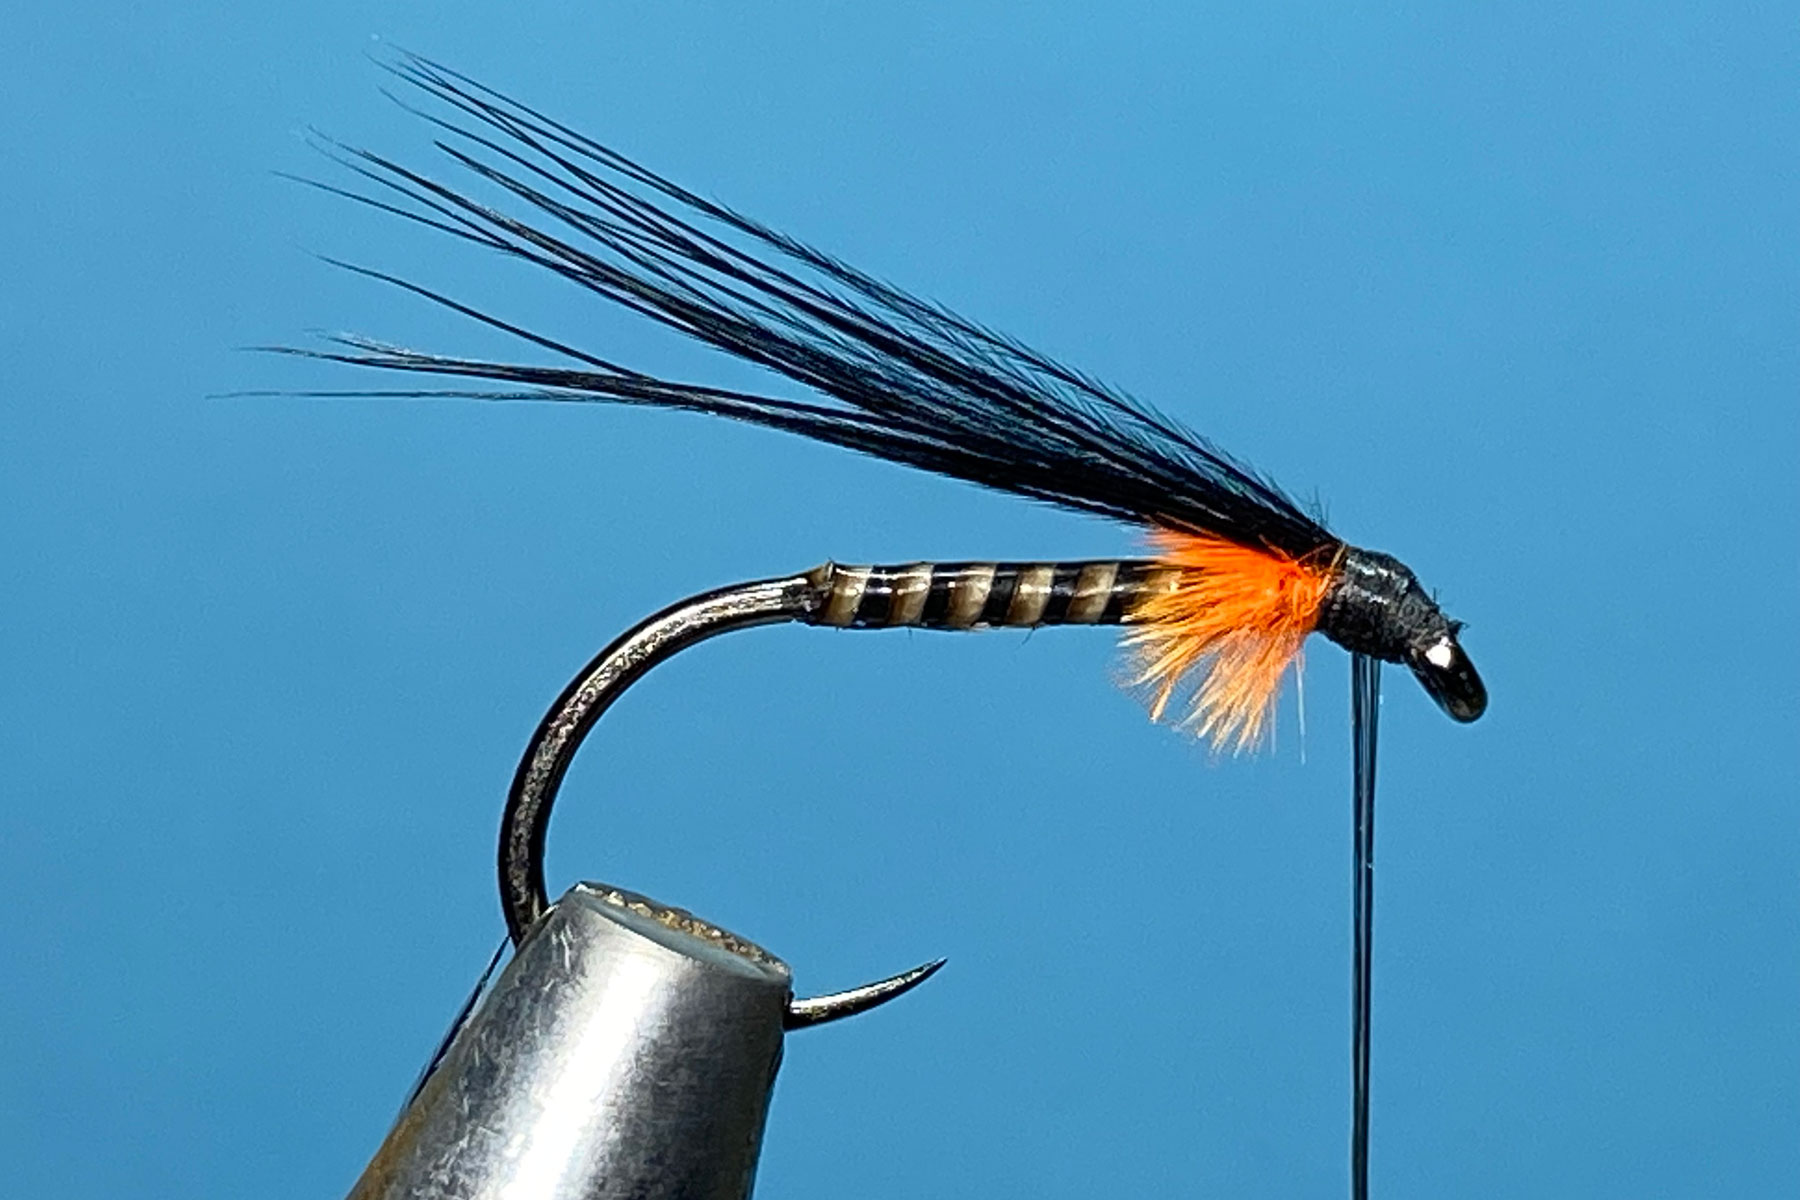

Photo 7. Form a neat head, whip finish and remove the thread. Varnish the head to complete the fly.
Tying Tips
- A flat tying thread helps to produce a smooth and even body onto which the quill can be wound. Remember to spin the bobbin holder anticlockwise to keep the thread flat.
- To keep the quills supple and reduce the risk of breaking, prior to use, soak them for 10 minutes in a mixture of warm water and a few drops of fabric conditioner.
- Before applying the resin, make a couple of half hitches in the thread to avoid any slippage.
- Apply the UV resin sparingly and if possible, rotate the vice to help avoid forming a resin “belly” before curing with the torch.
- Only 4 or 5 marabou fibres are needed for the thorax, but to keep it in proportion, use marabou fibres that are short in the flue. Try not to twist the marabou as you wind it over the merest hint of superglue, and carefully stroke the flue rearwards after each turn ensuring the flue does not get pressed into the wet superglue.
- Try different colours of marabou for the thorax. Red, sunburst, chartreuse, black and white all make useful alternatives.
- To create the wing, rather than just pulling off a bunch of fibres from the marabou feather, I find a much more manageable and neater and method is to snip out the very tip of a marabou plume to form a V, then snip off the top centimetre or so of stem. The fibres from this cut section can then be stroked together to align the tips. This allows the wing to be easily gauged for length and density and adjusted as required, before being tied in. Further sections of stem can be cut from the same feather up to the point where the fibre tips become “fluffy”, and by cutting them all out at the same time, it speeds up tying further flies.
Les Lockey – May ’23
The Foam Bodied Hawthorn- A Fly for May
Hook: Kamasan B160, short shank, size 12.
Thread: Fine black thread, eg. Veevus or Sheer 14/0 or similar.
Detached Body: 1/16” diameter, black foam cylinder and two strands of bronze peacock herl.
Legs: 2 Single black pheasant tail fibres, knotted once.
Wing Post: Aero Dry Wing, white.
Hackle: Black cock saddle.
Thorax: Black seal’s fur, dubbed.
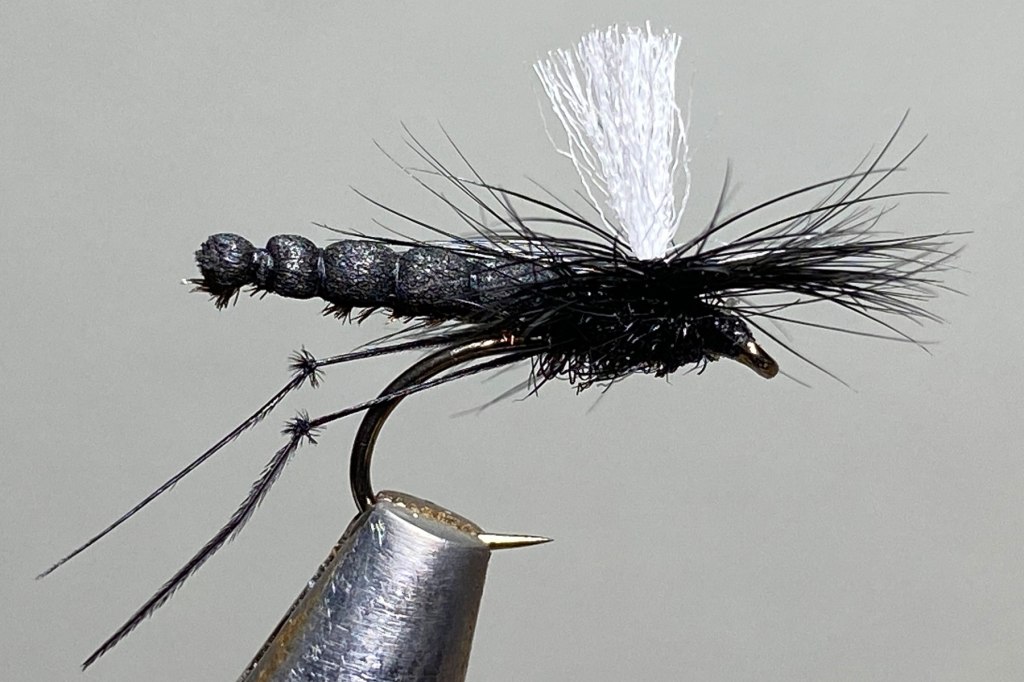
Photo 1. For the detached body, start by securing a fine sewing needle in the vice. Now wax a 3 inch tag end of thread and wind on 3 or 4 turns of thread as close to the needle point as possible. Do not cut off the thread tag as this will be used later to tighten the construct and also to help secure the body to the hook. Pinch off one end of the foam cylinder.
Photo 2. Impale the pinched end of the cylinder onto the point of the needle and secure it in place with 3 or 4 overlapping turns of thread. At the same point, but under the needle, tie in 2 strands of peacock herl using no more than 2 more turns of thread. This forms the first segment of the body.
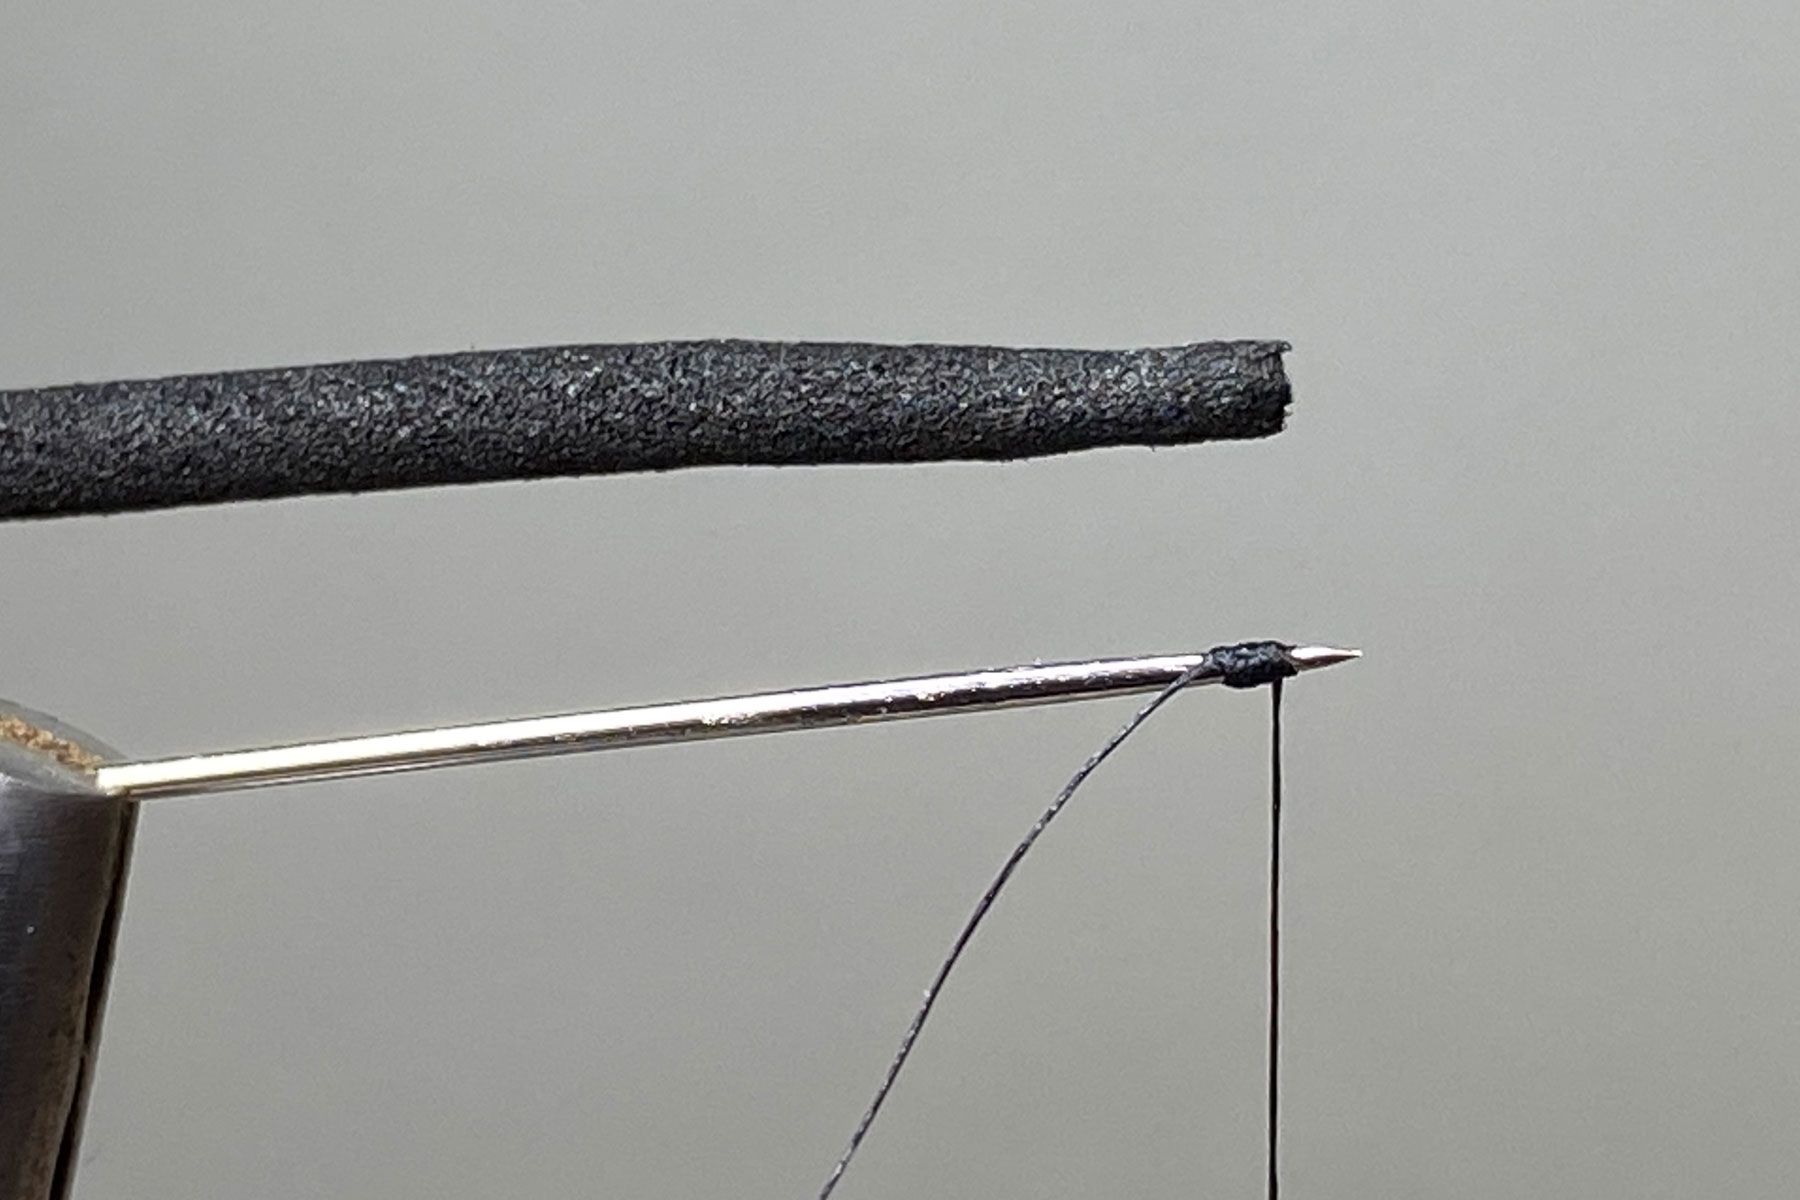

Photo 3. To form the next body segment, lift up the foam, peacock herl and thread tag and wind on 2 or 3 open turns of thread moving a short distance down the needle, then ensuring the herl is under the foam, secure all the materials onto the needle with 2 more thread turns.
Photo 4. Repeat this process, increasing the size of the segments as you move down the needle until 5 or 6 segments have been completed, then whip finish, and leaving thread and herl tags of about 4cm. in length, cut off the excess. Gently but firmly push the foam body off the needle. Tighten the construct by holding the body while gently pulling both tag ends of thread and set aside for later.


Photo 5. To tie the fly, remove the needle from the vice and clamp in the hook. Run on a bed of thread from the eye to opposite the hook point and remove the waste thread. Tie in the 2 knotted pheasant tail legs, one on either side of the shank, trailing backwards. Bind down the fibre ends and remove the excess, leaving the thread mid way between the point and the eye.
Photo 6. Tie in centrally a length of Aero Dry Wing on top of the shank, and while gently pulling both ends upwards, take a couple of horizontal locking thread turns around its base, immediately above the hook shank.

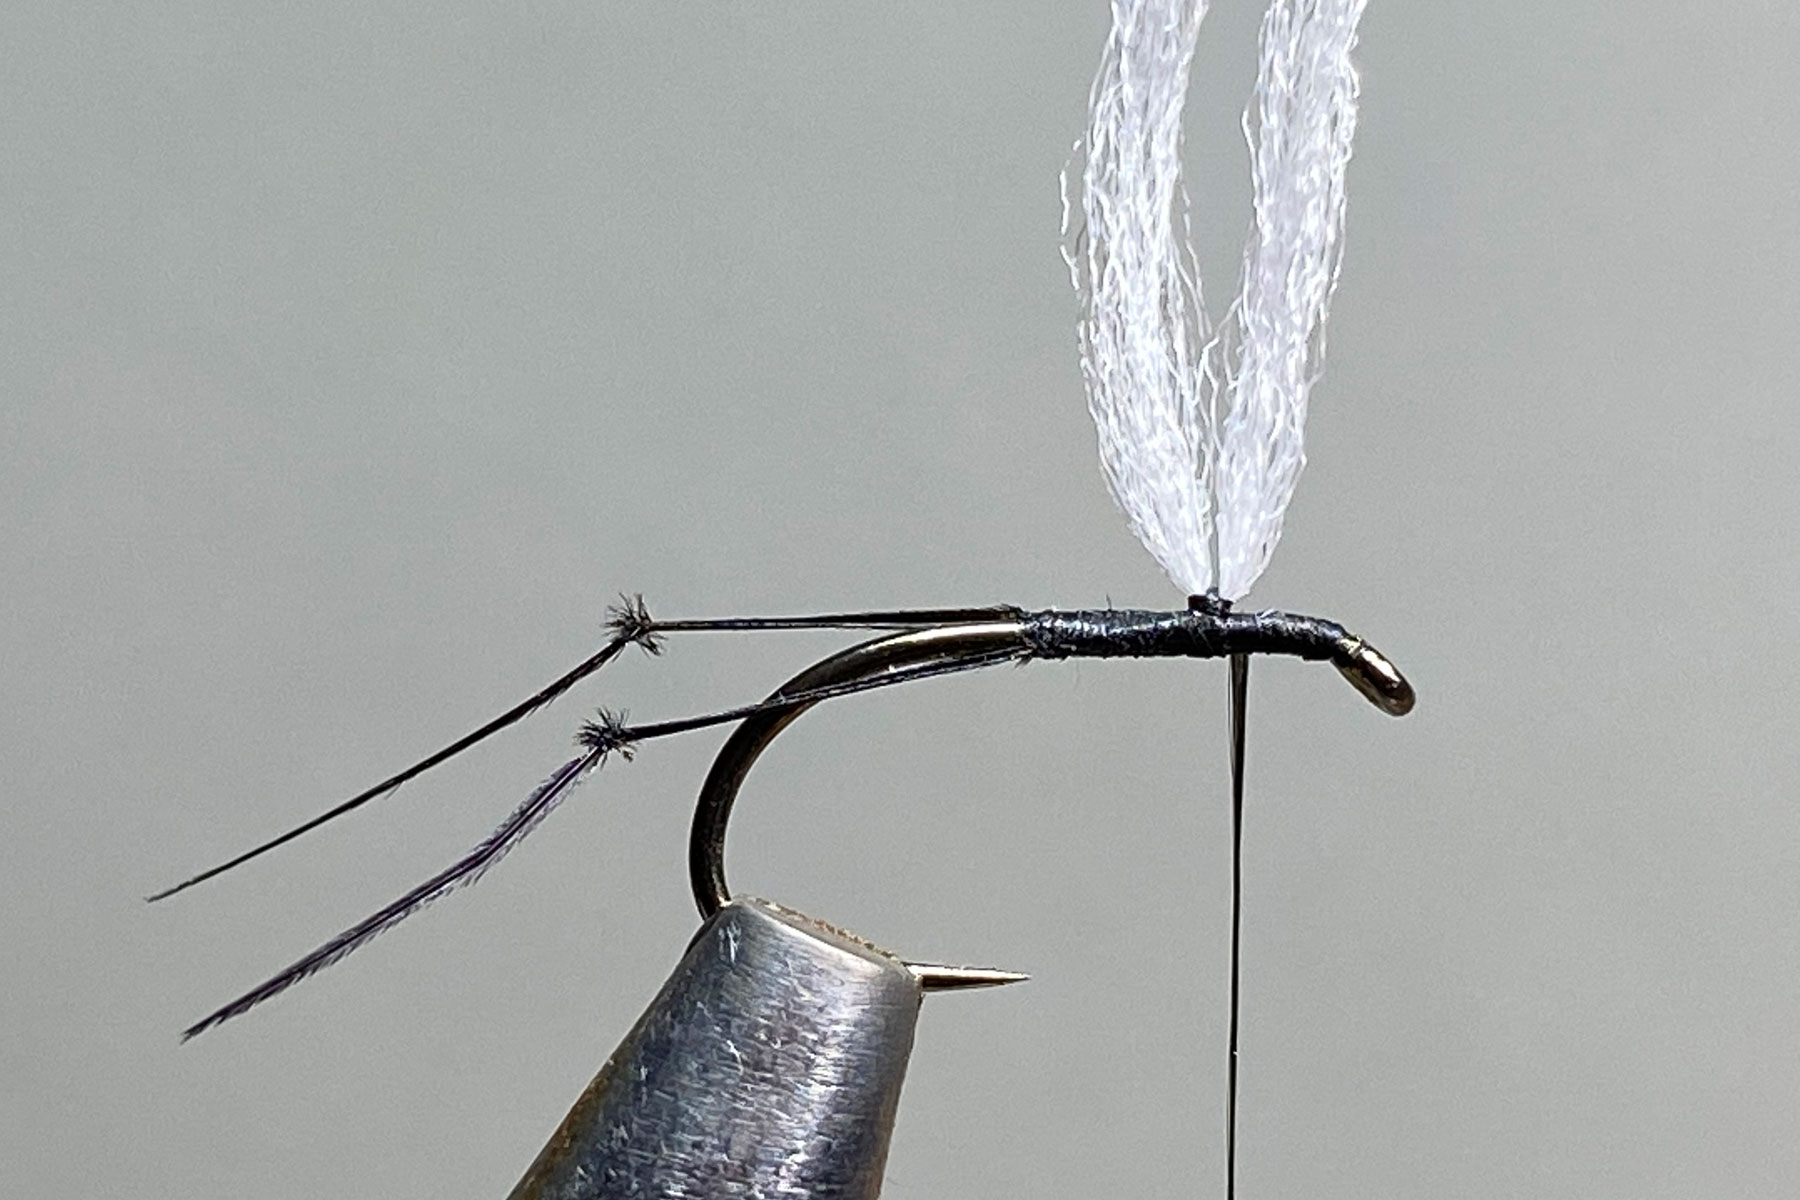
Photo 7. Strip away the fluffy fibres from the bottom of the cock saddle hackle and trim the bare stem to about 3-4 mm in length. Using well waxed thread, tie in the hackle stem at the base of the wing post leaving about 2 mm. of bare stem above the shank. Carefully wind the thread around both the base of the wing post and the bare hackle stem, ensuring each subsequent thread turn winds upwards until the bare hackle stem is covered, then return the thread back down the post to the shank and left at the rear of the wing post. This is called “posting the hackle” which basically creates a support so the parachute hackle can be wound horizontally down the post.
Photo 8. Take the foam body construct and with the herl on the underside, securely tie it in behind the wing post and remove the excess foam. Bring the herl and thread tags in front of the wing post and tie them down securely with a few tight thread wraps, then remove the waste herl and thread tags. Return the thread to the rear of the wing post.

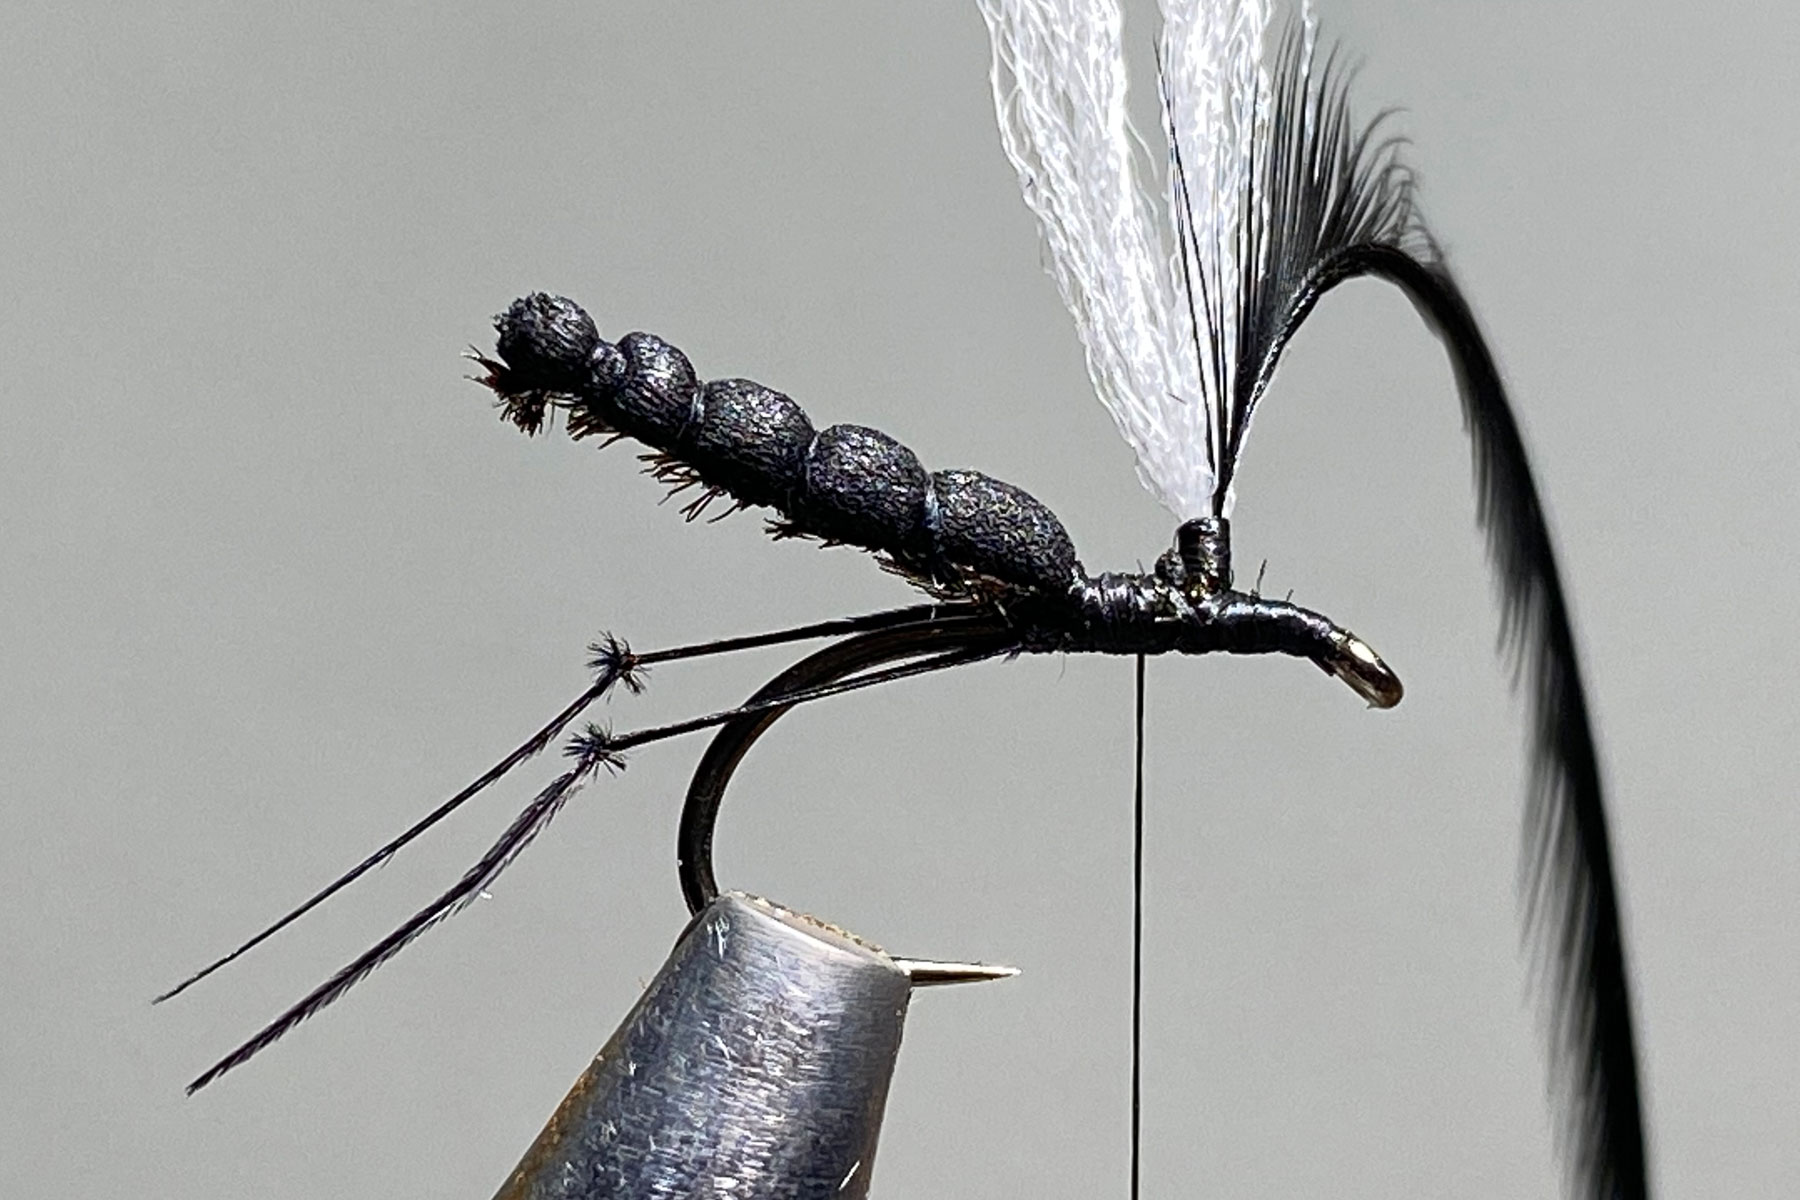
Photo 9. Dub a pinch of seal’s fur onto the thread and wind the dubbing over the cut foam and in front of the wing post to form the thorax.
Photo 10. Carefully wind the hackle horizontally down the support post, ensuring each turn is wound directly beneath the previous turn, then carefully secure the hackle at the eye with a few tight thread wraps. Remove the excess hackle and stroke the hackle fibres back from the eye to form a neat head.


Photo 11. Add a drop of varnish to the thread and whip finish through it, then remove the thread. Manipulate the hackle fibres back to their correct position and trim the wing post to length to complete the fly.
Tying Tips
- This is quite a lengthy tying process, as the detached body must be constructed first before the fly can be completed but catch results have proved the effort is very well worthwhile.
- I find it best to make the detached foam bodies in batches. This not only speeds up the tying process, but it also means I have a stock of bodies ready to use whenever the need arises.
- 2x2mm. strips of foam can be used as an alternative to foam cylinders, although cylinders do produce more natural looking bodies. Pinching off the end of the cylinder continues this theme.
- A fine round tying thread is best for the formation of the foam bodies, as it maximises the segmentation effect in the body.
- In order to keep the finished fly in proportion, the foam body should be about 12 – 14 mm long from tip to whip finish point.
- Cock saddle hackles produce much neater parachute hackles, and their extra overall length allows them to be easily wound by hand without the need for hackle pliers. About 5 or 6 hackle turns is about right, although this will depend on the quality of hackle used.
- When tying in parachute hackles, it is generally accepted that the good shiny side of the feather should be facing the tier, as this results in the fibres pointing slightly upwards, making it easier to wind the next turn of hackle underneath. However, I prefer the hackle to be tied in with the dull underside facing the tier, which results in the fibres pointing slightly downwards. This requires more care to avoid trapping the fibres as you wind the hackle down the post, but I am convinced that downward pointing hackle fibres produce a more realistic footprint on the water surface, and as a result, makes the fly even more effective.
- It can be helpful to hold the wing taught in a gallows tool when winding parachute hackles as this frees up both hands to rotate the hackle around the wing post, but with a little practice, hackles can be wound without this attachment. In this case, hackle tension is key to success. Winding the hackle clockwise, the away turns need to be under light tension, then while holding the wing taught, the hackle is returned under greater tension. In essence, only increase tension when the wing post is being held taught. Applying tension while the wing is unsupported will cause the wing to collapse and the hackle turns to slip off the wing.
- After the parachute hackle has been formed and tied down, I carefully separate the 2 wing post strands and add a small drop of thin varnish at their base which ensures the hackle will not slip off the wing post.
- Trim the wing to your preferred length. A long wing makes spotting the fly easier, while a short one gives better presentation. I usually leave the wing quite long and trim it on the day to suit the prevailing conditions.
- To prolong floatation, I brush the hackle and wing post with liquid silicone and allow to dry thoroughly overnight, before transferring the flies to my box.
- This pattern can be easily adapted to make an excellent Heather Fly imitation to be fished later in the season. Simply change the colour of the legs and the rear part of the thorax from black to red.
Les Lockey – April ’23
The Kate McLaren – A Fly for
April
Hook: Kamasan B170, sizes 10 to 14.
Thread: Black Semperfli Nanosilk, 50D, or any 8/0 black thread.
Tail: Golden pheasant crest feather.
Rib: Oval Silver tinsel, medium..
Body: Black seal’s fur
Body Hackle: Black cock.
Head Hackle: Red game hen.

Photo 1. Secure the hook in the vice, wind on a bed of thread from the eye to just before the bend and remove the waste thread.
Photo 2. Tie in a golden pheasant crest feather on top of the shank as a tail and trim the waste end to the length of the body. Follow this by tying in the oval tinsel and again leave the waste end the same length as the body. Now bind down all the waste ends with thread and return the thread to the tail.


Photo 3. Dub some seal’s fur onto the thread and wind the dubbing up the shank to form a slightly tapered body.
Photo 4. Using well waxed thread, tie in the cock hackle by its stalk. Palmer the hackle by winding on 2 turns of hackle one behind the other, before continuing to wind the hackle in open spirals down the body to the tail. At this point, trap the hackle with a turn of the silver tinsel and continue to wind the tinsel in open spirals up the body and through the hackle fibres, before tying it down securely at the head. Remove the excess hackle tip, trim off the waste tinsel, and tidy the head area with a few wraps of thread ready for the head hackle. If required, lightly brush the body with Velcro to tease out a few fibres into the hackle.


Photo 5. Tie in the hen hackle by its tip, immediately in front of the body hackle and remove any excess tip. Winding towards the eye, wind on 3 or 4 turns of hackle, stroking the fibres back after each turn. Secure the hackle with thread and remove the waste hackle.
Photo 6. Tidy the head with thread, whip finish, remove the thread and varnish the head to complete the fly.

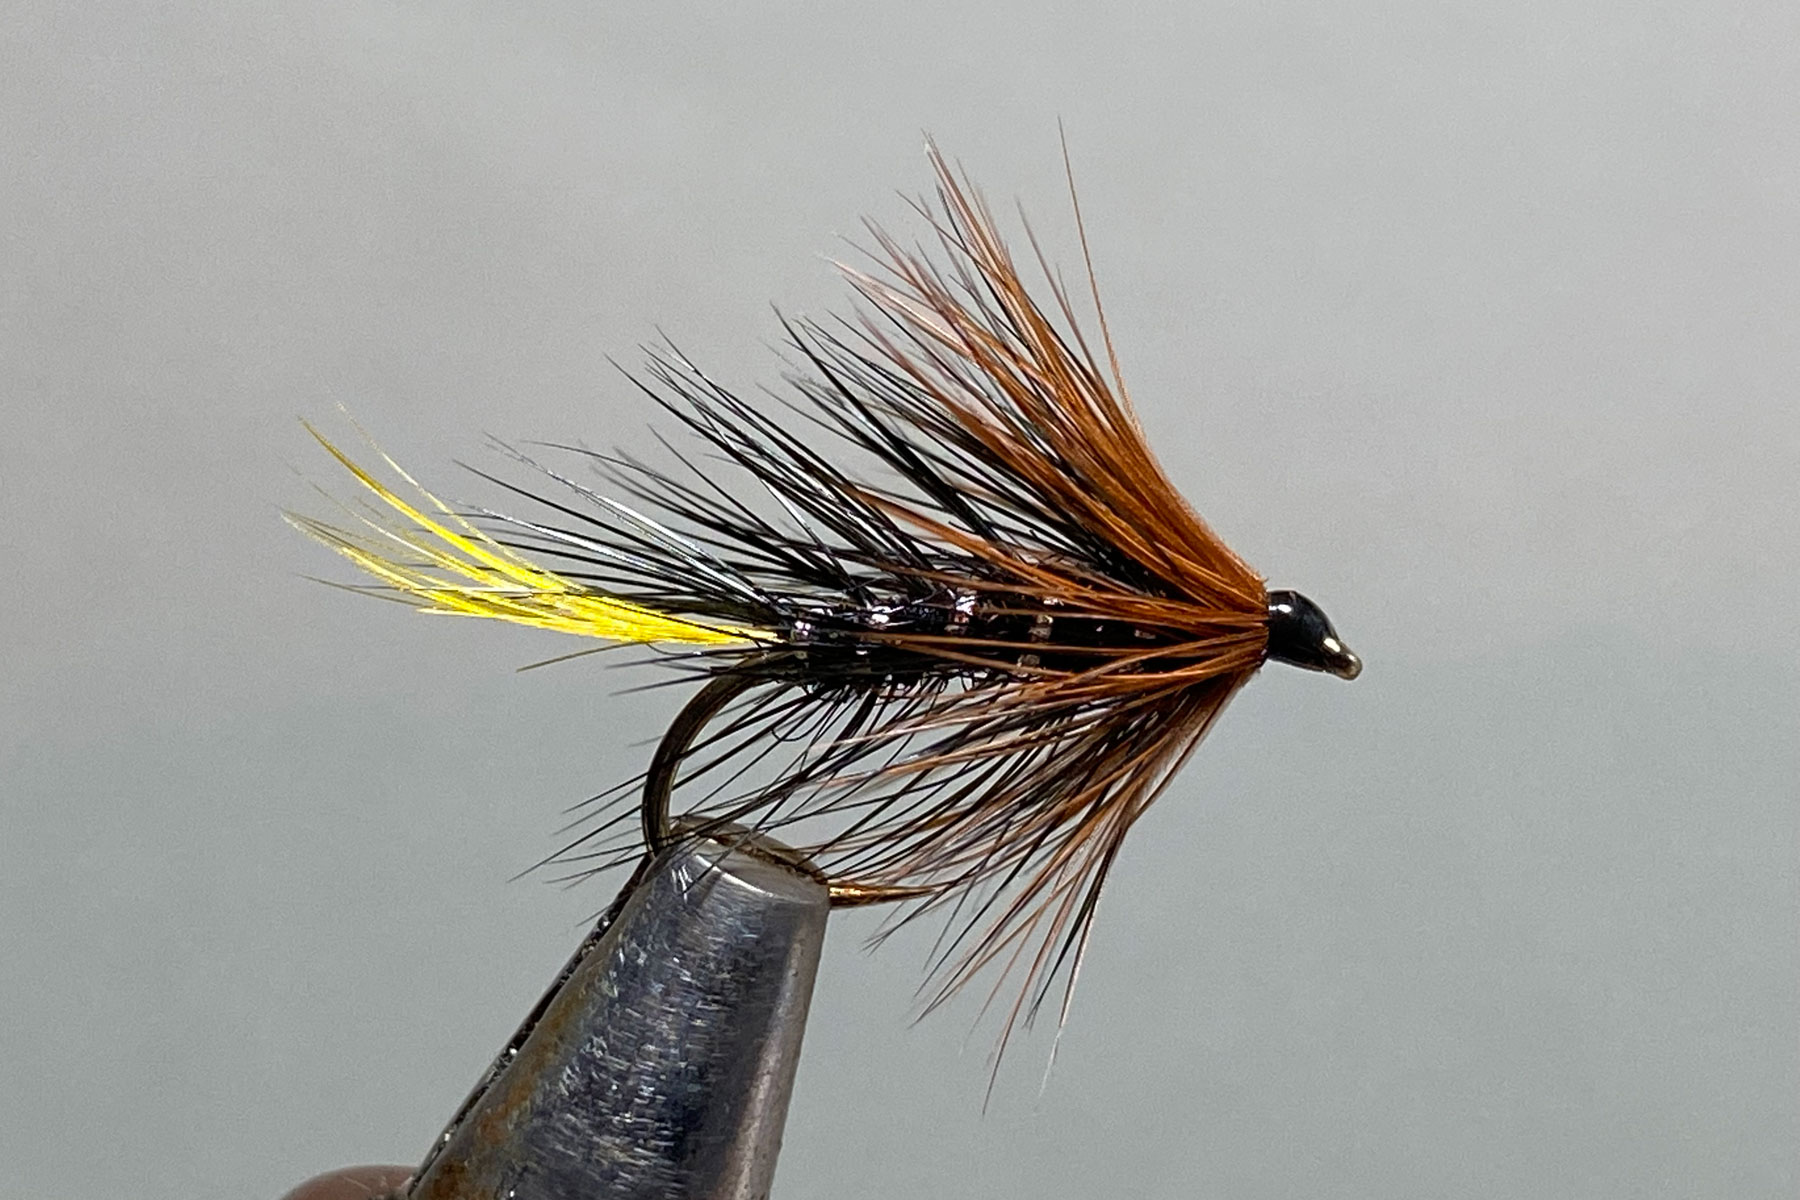
Tying Tips
- Golden pheasant crest feathers often suffer from kinks and twists, which if not too severe, can still be used by simply holding the feather by the tip when tying it in. This should push the twist into the waste part of the feather, leaving the tail straight. For badly twisted feathers, soak them in boiling water for about 30 seconds, before removing them one at a time with a pair of forceps and mould the feathers around a smooth curved surface, such as the neck of a glass bottle or metal rod and leave them to dry. When dry, the feathers will be back to their pristine best, having taken on the curve of whatever substrate they were wrapped around. If the above is too much effort, yellow cock hackle fibres are a reasonable substitute, or for a more modern twist, try using Glo Brite floss, shade No. 11, Phosphor Yellow, or No. 12, Lime Green, or for something a little bit different, try No. 8, Amber.
- Many people find dubbing seal’s fur a tricky task, but in most cases, this is simply down to applying too much fur onto the thread at one time, but the following tips might prove helpful. Apply seal’s fur sparingly and with moistened fingers and always twist the dubbing in the same direction. Pay particular attention to the fibres closest to the shank, as the first turn or two will anchor the dubbing to the shank allowing the remaining fibres to be twisted around the thread in stages as more thread turns are made. Baby seal’s fur is softer and less springy than adult fur making it much easier to use, but unfortunately, it can be quite difficult to obtain. For particularly springy adult fur, mesh the fibres together by rubbing the fur into a ball in the palm of your hand before teasing it out onto the to the thread. Alternatively, try mixing the seal’s fur with a pinch of the same coloured rabbit fur, as this helps the fibres to bind to the thread.
- To prepare the cock hackle, remove the waste fibres from the base of the hackle stem, and trim the stem to a length of 1-2mm. With the good side of the feather facing forward towards the eye, tie in the short stem using well waxed thread. This keeps bulk to a minimum and helps in the formation of a neat head.
- When winding the rib, don’t worry about catching body hackle fibres, just bring the rib briskly through the hackle and the stiff cock hackle fibres will spring out of the way.
- I like the brown hen hackle to be slightly longer than the black body hackle as this helps maintain the tapered proportions of the fly. To prepare the hen hackle, clamp the tip of the feather in a pair of fine hackle pliers and gently stoke back all the other fibres so the tip is clearly exposed. Remove the pliers and cut off the tip to leave a small triangular stub about 1mm. in length and use this stub to tie in the hackle with well waxed thread. This avoids trimming the feather tip after it is tied in, and helps to produce a small, neat head.
- Before winding the hen hackle, “double the hackle” by holding the hackle stalk while gently stroking the fibres together. This leaves the stem as a clean leading edge with the hackle fibres pointing rearwards. Continue to stroke the fibres back as each turn of hackle is made to maintain the shape and neatness of the finished hackle.
Les Lockey – March ’23
The Copper Cruncher – A Fly for November
Hook: Kamasan B175, size 10 or 12.
Thread: Copper Semperfli Nanosilk, 50 Denier.
Tail: Red game cock hackle fibres.
Rib: Fine copper wire.
Abdomen: Natural cock pheasant centre tail fibres.
Cheeks: Medium copper holographic tinsel.
Thorax: 3 strands of peacock herl.
Hackle: Greenwell’s hen hackle.

Photo 1. Start the thread behind the eye and wind on a bed of thread stopping just past the hook point.
Photo 2. For the tail, align the tips of a small bunch of red game cock hackle fibres and tie them in about the same length as the abdomen using two thread wraps wound towards the bend then trim the stub ends the same length as the abdomen. In similar fashion, tie in a length copper wire using two thread wraps wound towards the bend, leaving the stub end the same length as the abdomen.


Photo 3. Align the tips of a small bunch of cock pheasant centre tail fibres and tie them in by the tips. Now bind all the ends down with a single layer of thread, stopping at the thorax.
Photo 4. Reverse wind the pheasant tail fibres up the shank to form a slim, neat abdomen. Tie the fibres down at the thorax and remove the excess fibres.
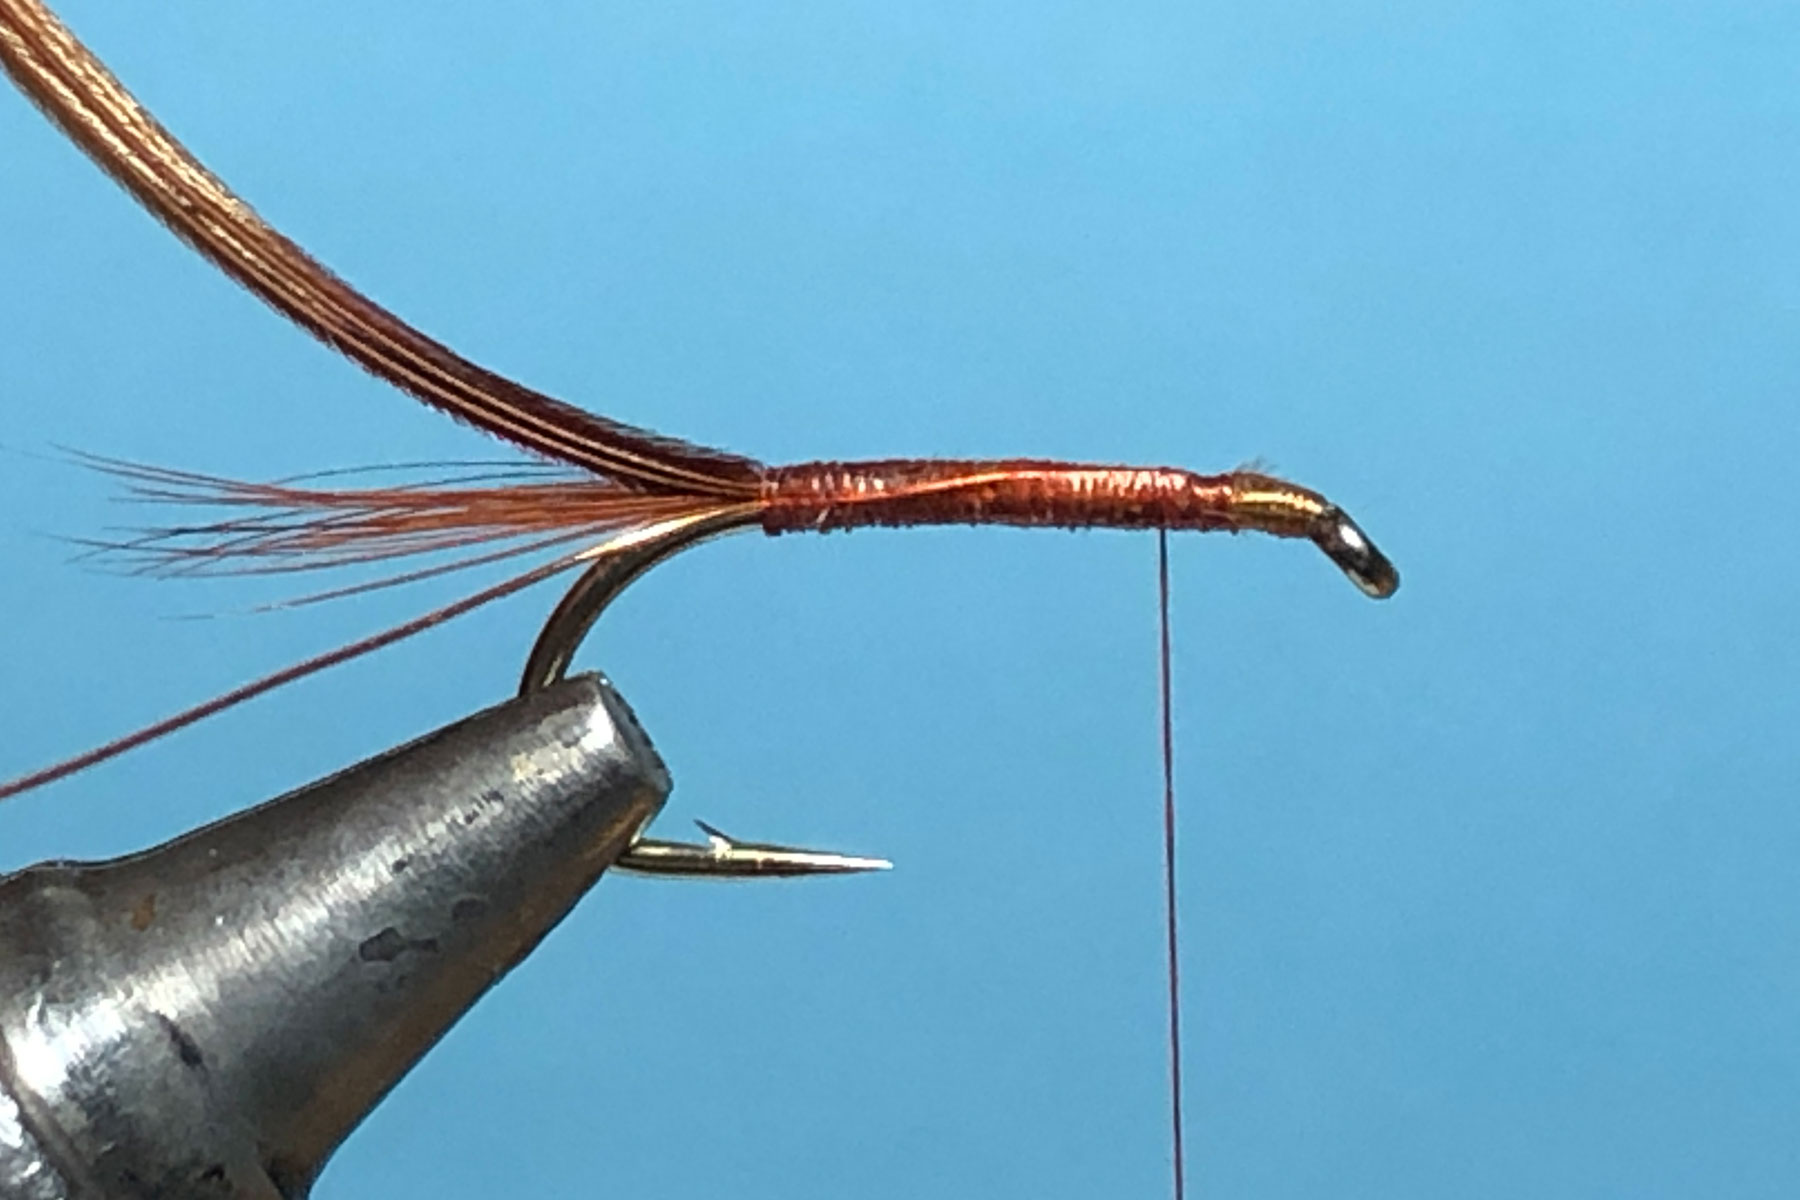

Photo 5. Wind the wire as a rib, in open spirals up the abdomen, tie down at the thorax and continue to bind down the wire with thread to the eye then worry off the wire.
Photo 6. Tie in a length of holographic tinsel on each side of the shank, then tie in the three strands of peacock herl and bind down all the ends down with neat turns of thread.
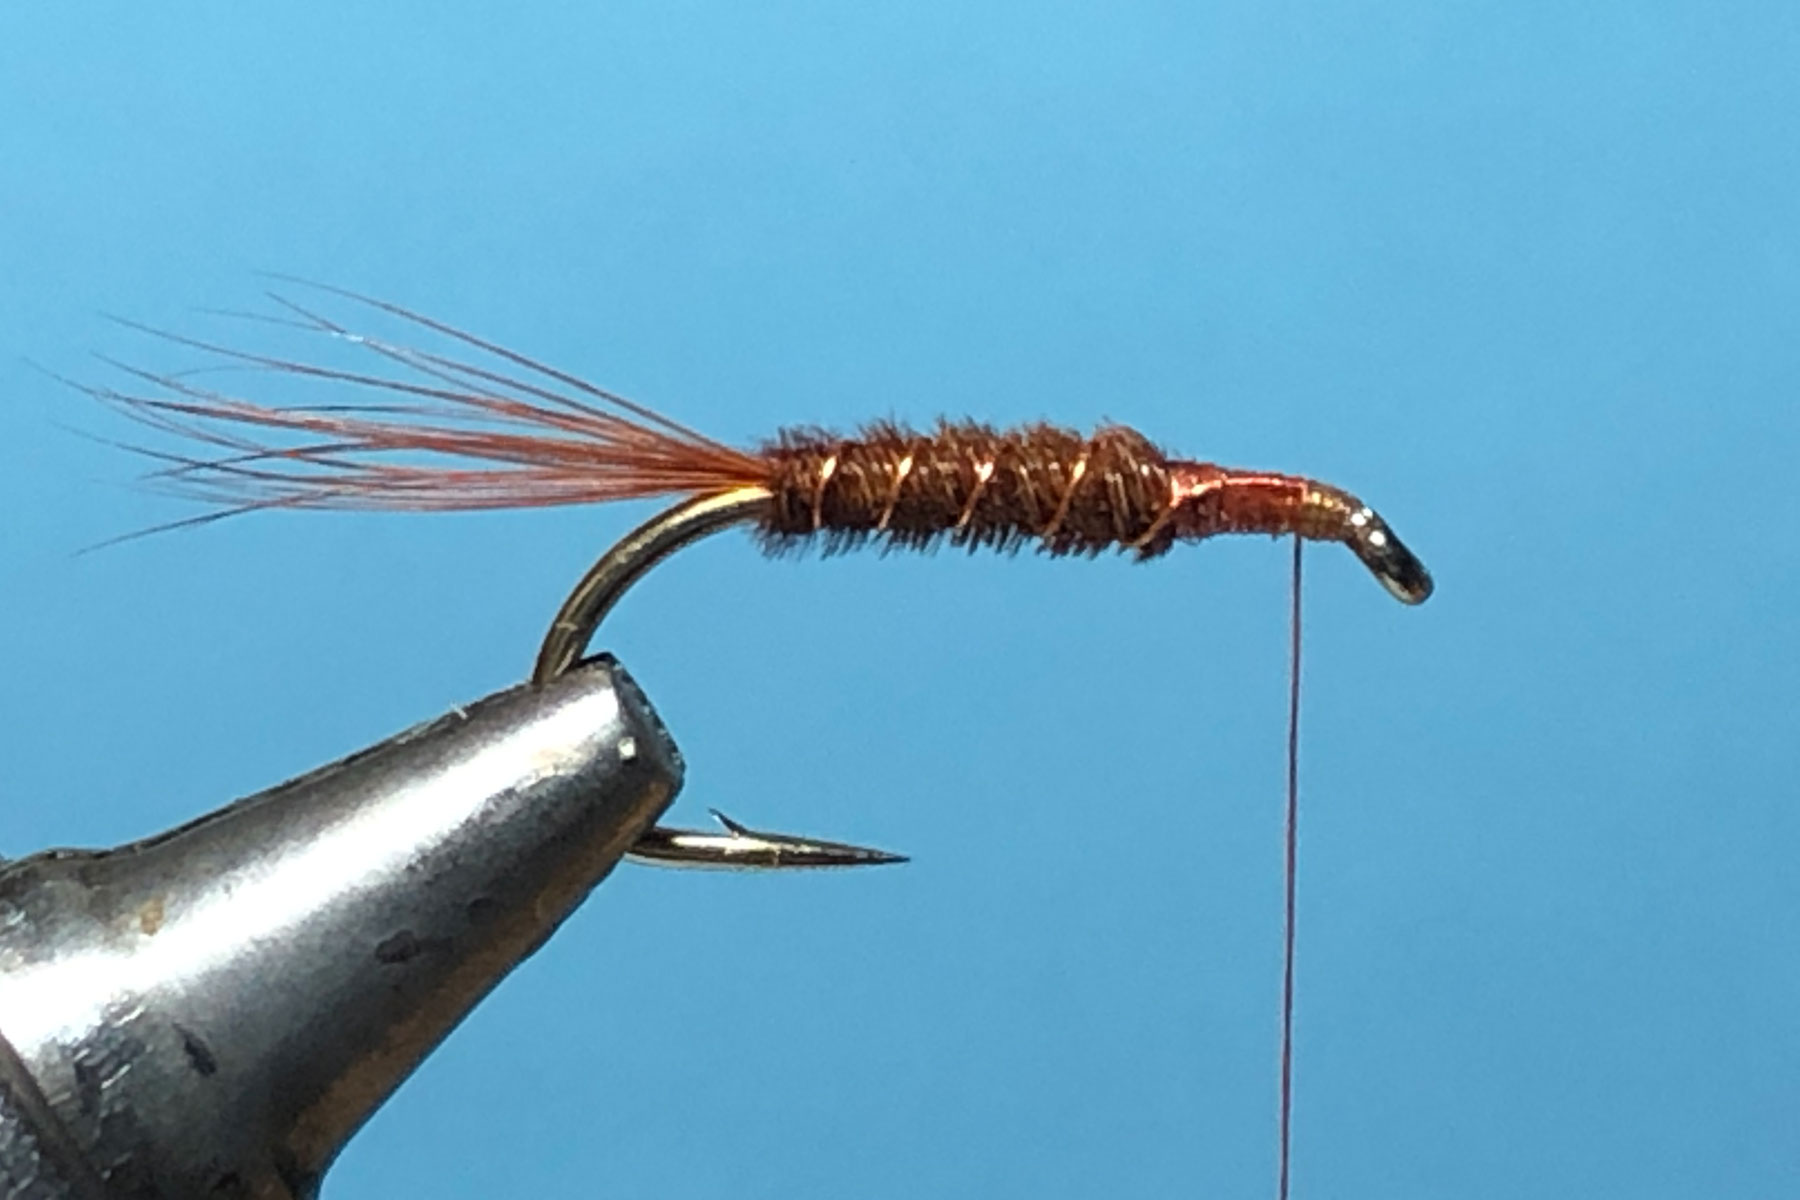

Photo 7. For the thorax, wind on the peacock herl in the reverse spiral, tie down near the eye and remove the excess herl. Now bring both pieces of tinsel forward along the sides of the thorax, secure with thread at the eye and remove excess tinsel.
Photo 8. Tie in a Greenwell’s hen hackle by the tip and wind on 2 or 3 turns of hackle, secure with thread and remove excess hackle.


Photo 9. Form a neat head, whip finish, remove the thread and varnish the head to complete the fly.
Tying Tips
- The fibres for the tail and abdomen are best aligned while still attached to the feather stem – simply stroke the fibres away from the stem until the tips line up, then hold the fibres tight and pull the stem away from the fibres.
- To ensure a slim abdomen, tie in the pheasant tail fibres by their tips. The easiest way to do this is to hold the pheasant tail fibres on top of the hook shank with the tips pointing forward over the eye and make one lightly tensioned thread turn over the base of the fibres and onto the shank. Now while maintaining tension, pull the fibres back towards the bend until just the very tips are caught in. At this point bind down all the butt ends of material with touching turns of thread, stopping at the thorax.
- A more robust abdomen will be formed if the pheasant tail fibres are wound in the opposite direction to the thread and the wire rib wound in the same direction as the thread. This will not only anchor the fibres more securely, but the rib will also be much more visible. Alternatively, the fibres could be wound over a thin coat of varnish or superglue and the rib angled across the pheasant tail fibres.
- Peacock herl is quite a delicate material, particularly at the tip, so trim the tips by about half an inch and tie them in using the same tensioned single thread turn method used above. Wind the herl in reverse spiral back and forth over itself a couple of times before tying down, then take a couple of open thread turns through the herl and back to the eye to strengthen the thorax.
Les Lockey – October ’22
Lake Vyrnwy in August 2022
As promised to myself in June a return visit to the Lake. We originally booked for July when the temperatures reached the high 30’s! So cancelled and rebooked for the 8th of August, that turned out to be nearly as hot! The Lake was well down, normally we would sail from the dock but it was dry! The Lake was down over 30’. The village was not showing, but we did hit a “Wall” on a drift! (Village now showing 15/8/22).
The lake at very low level.

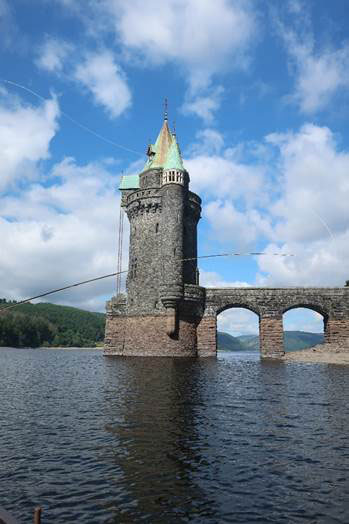
The iconic tower.

The first fish and it’s a Chubb! Only 2 – 3lb!!
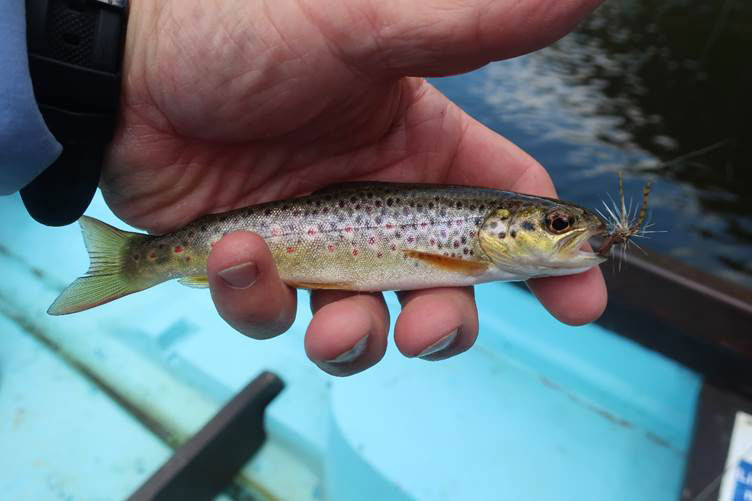
My effort – at least it was a brown.
Two best fish were a Brown of 1 1/2 to 2lb and a Chub of over 6lb. All fish were taken on Dries and on drifts, no anchoring, only light touches with the electric motor to keep the boat on course. We fished from 10:30am to 5pm and still had power in the 1st battery (2 are supplied). Only one other was fishing, he stayed out for just 2 hours (guest at the hotel) and had one Brown of 2lb. He only drifted the bank below the hotel. All fish were returned, the water was very cold, and all swam away strongly. I have fished Lake Vyrnwy since the early 80’s and knew that there were Chub in here, but thought they were at the bottom end (reed beds). Anyone who says they do not put up a fight has NOT caught one of these. They fought deep and hard all the way. Be aware that there is only one boat station at the moment with a limited number of boats. The lower end of the lake is shallower, but the reed bed area is dry. If possible I may even make a 3rd trip this year, it was THAT GOOD !!!
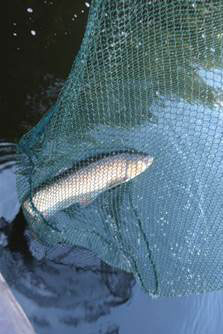
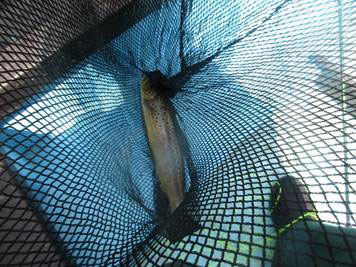


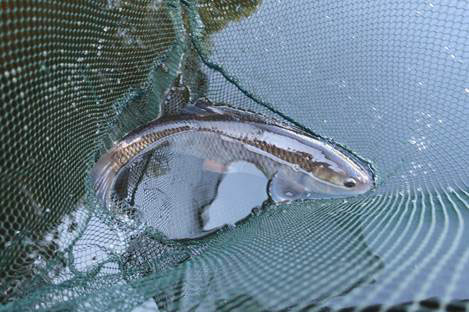
Eddie Wilkinson – September ’22
The Rabbit Perch Fry – A Fly for October
Hook: Kamasan B800, size 10, lure hook.
Thread: White Semperfli Nanosilk, 50 Denier, or any strong white thread.
Underbody: Fine lead wire, wound over superglue and covered with white floss.
Tail and Back: Black barred olive rabbit strip.
Body: Pearl Lite Brite, or similar, dubbed to form a fat carrot shape.
Eyes (Optional): Jungle cock nails.

Photo 1.Place the hook in the vice and lightly coat the shank with superglue from opposite the hook point to about 2mm from the eye. Now wind on the lead wire in touching turns over the superglue then remove any excess wire.
Photo 2.Catch on the floss behind the eye and wind it over the lead underbody until the lead is covered. Continue winding the floss to form a carrot shaped underbody, then wind on the thread over the floss and cut away the floss, leaving the thread at the barb.
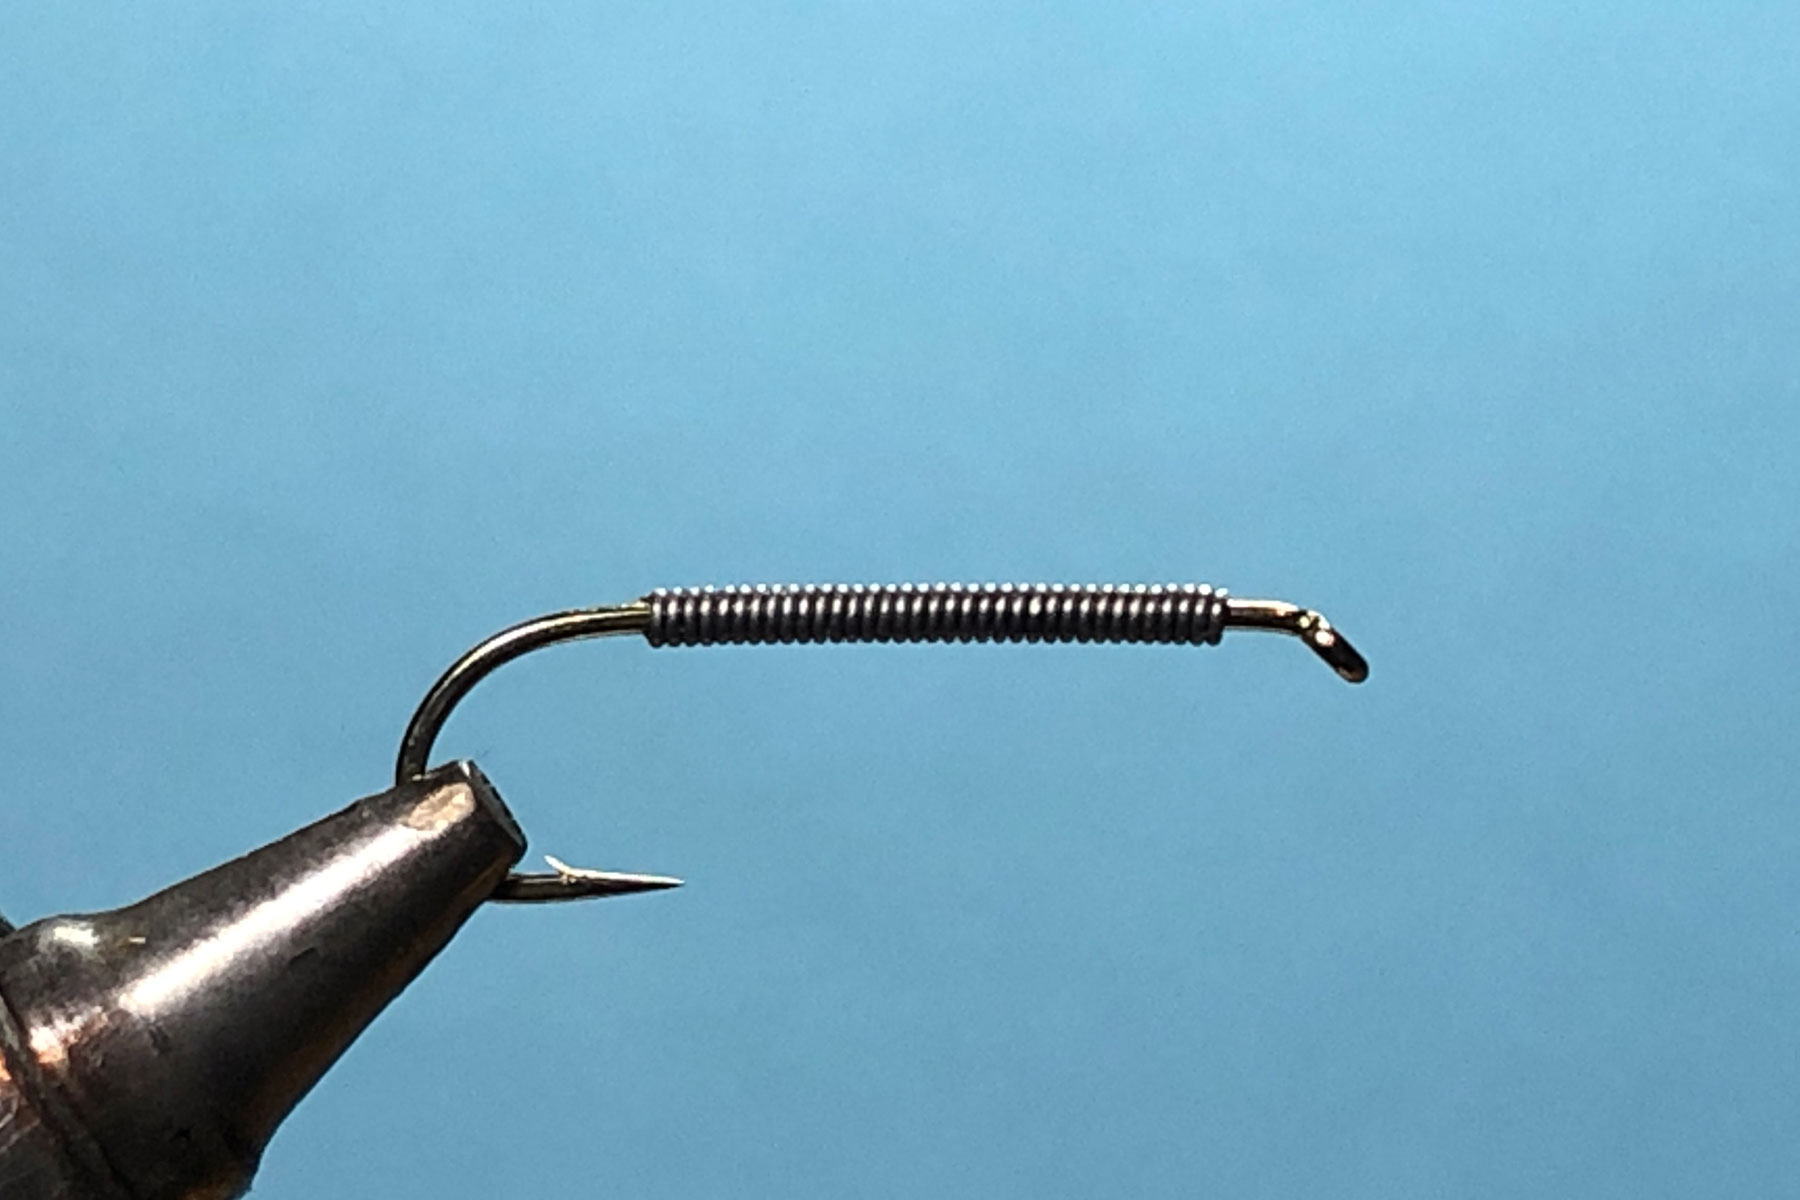
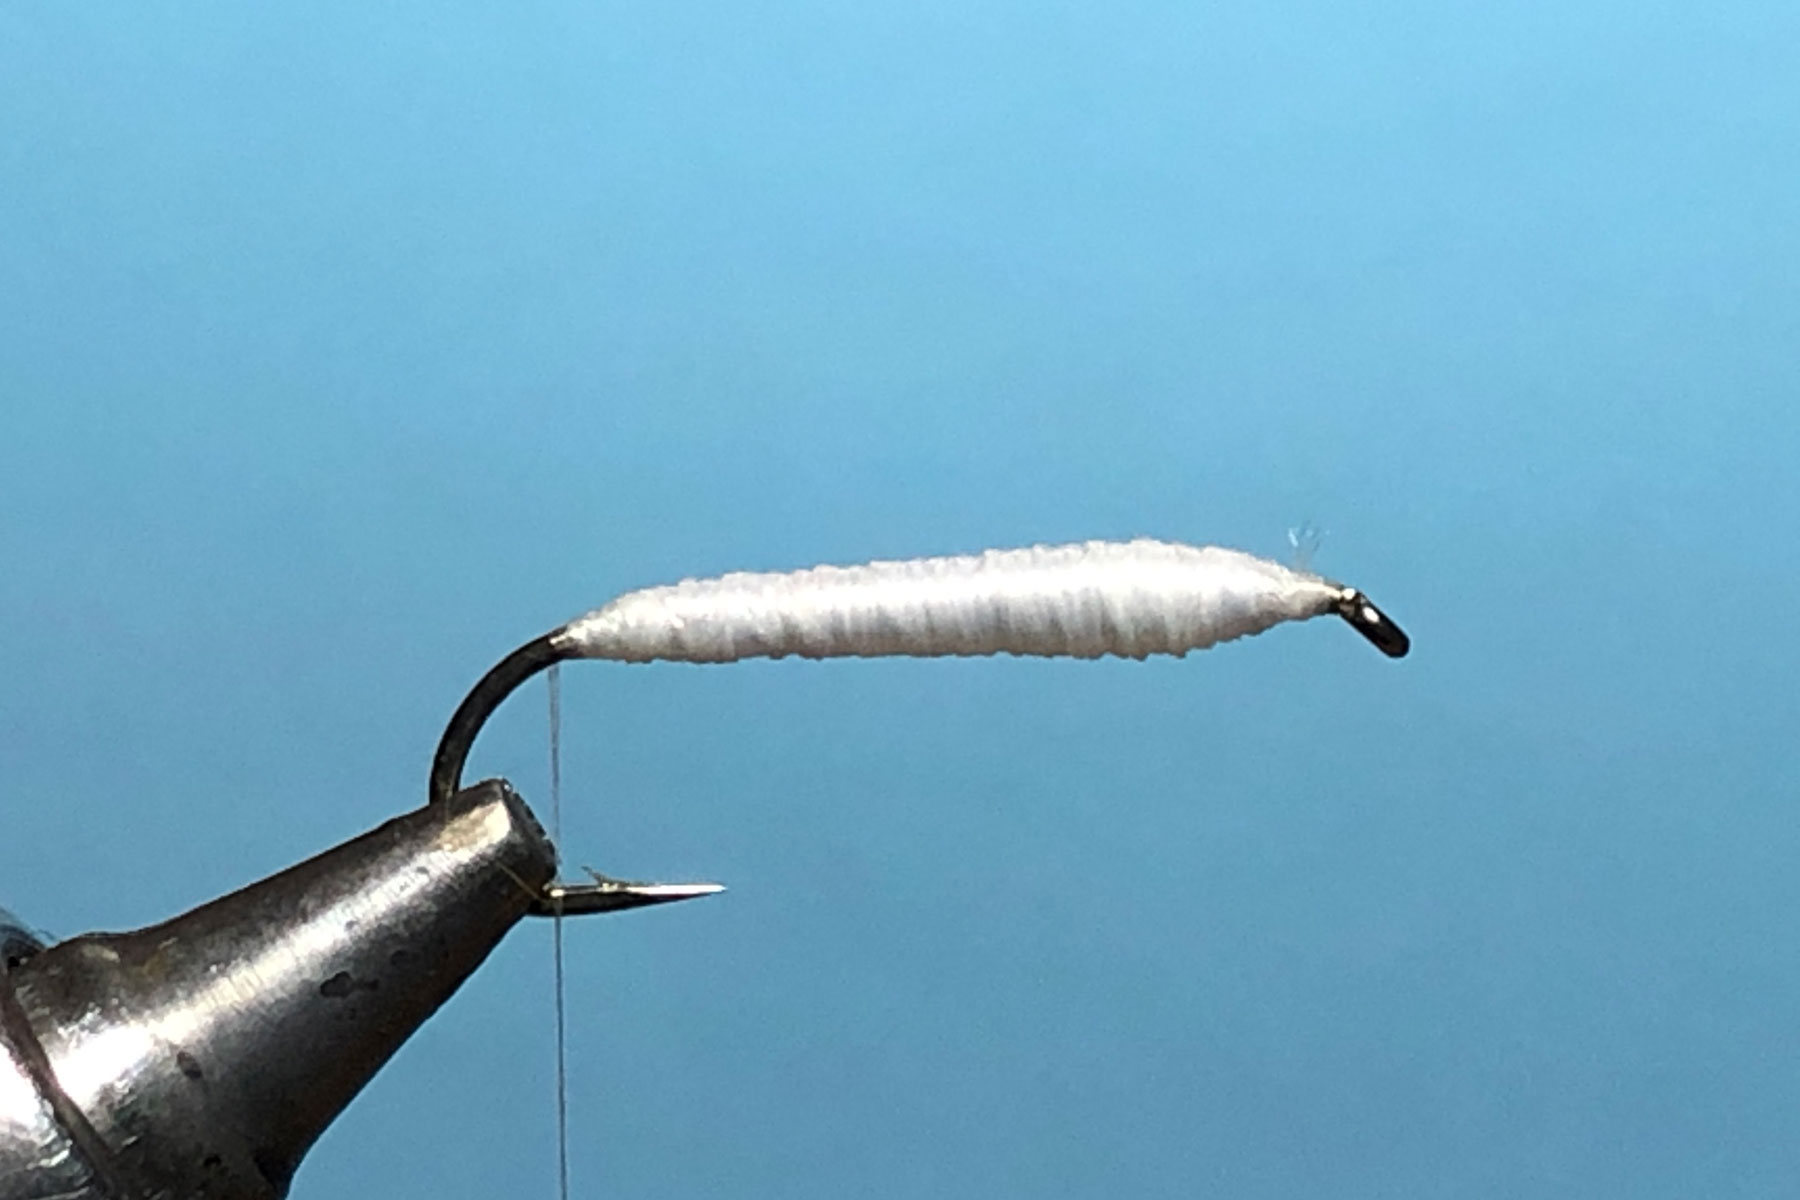
Photo 3.Part the fur about 1cm. back from the end of the rabbit strip and at this point, tie it in securely on top of the shank, then make two locking turns of thread directly in front of the strip.
Photo 4.Dub a generous noodle of pearl Lite Brite onto the thread and wind it up the shank to form a substantial carrot shaped body. Several applications of dubbing will be needed to complete the body.
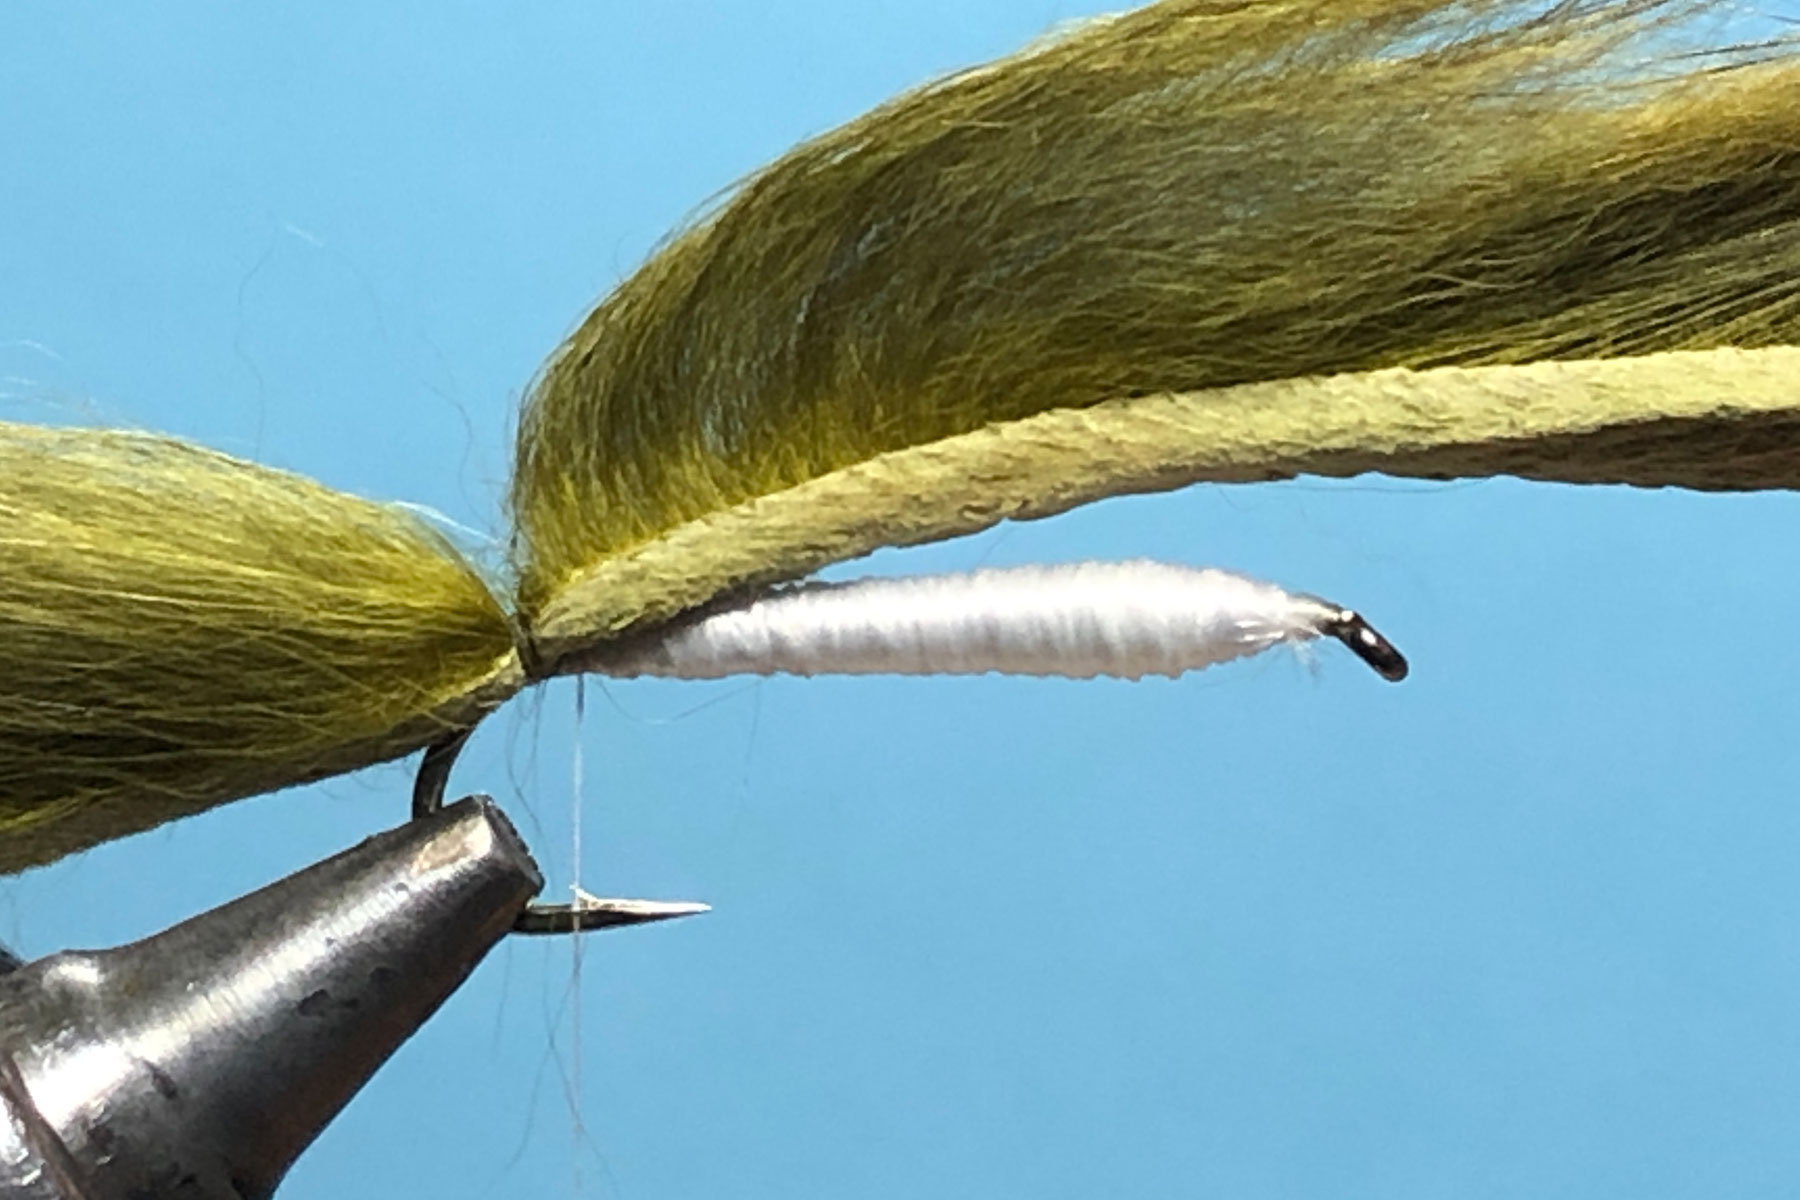

Photo 5.Pull the rabbit strip forward over the top of the body, part the fur near the hook eye and while keeping the rabbit strip tight, tie it down securely.
Photo 6.Cut off the excess rabbit strip leaving as little hide as possible near the eye, then tidy the head area with thread and trim the body to remove any long straggly fibres.


Photo 7.Tie in a jungle cock nail on each side of the fly.
Photo 8.Remove the waste jungle cock stems and form a neat head. Whip finish, remove the thread and varnish the head to complete the fly.
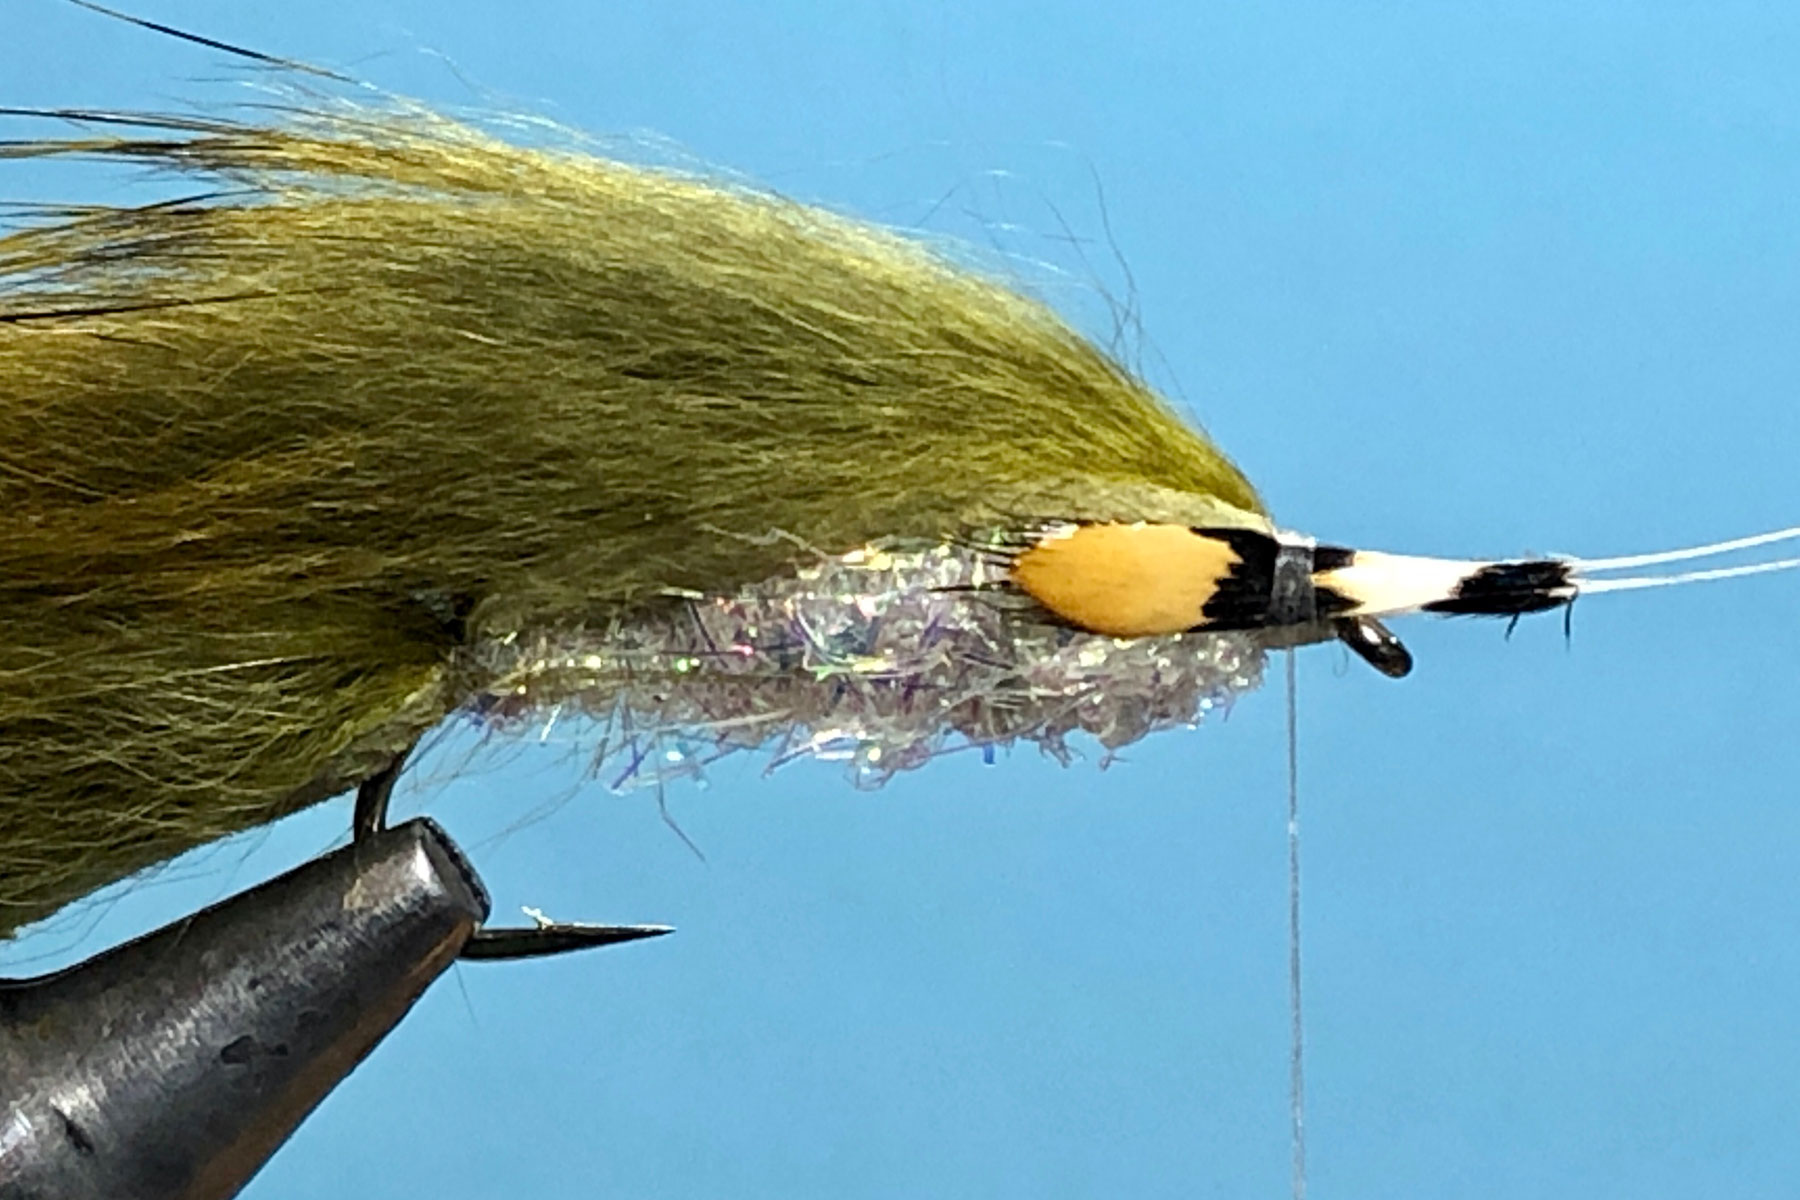
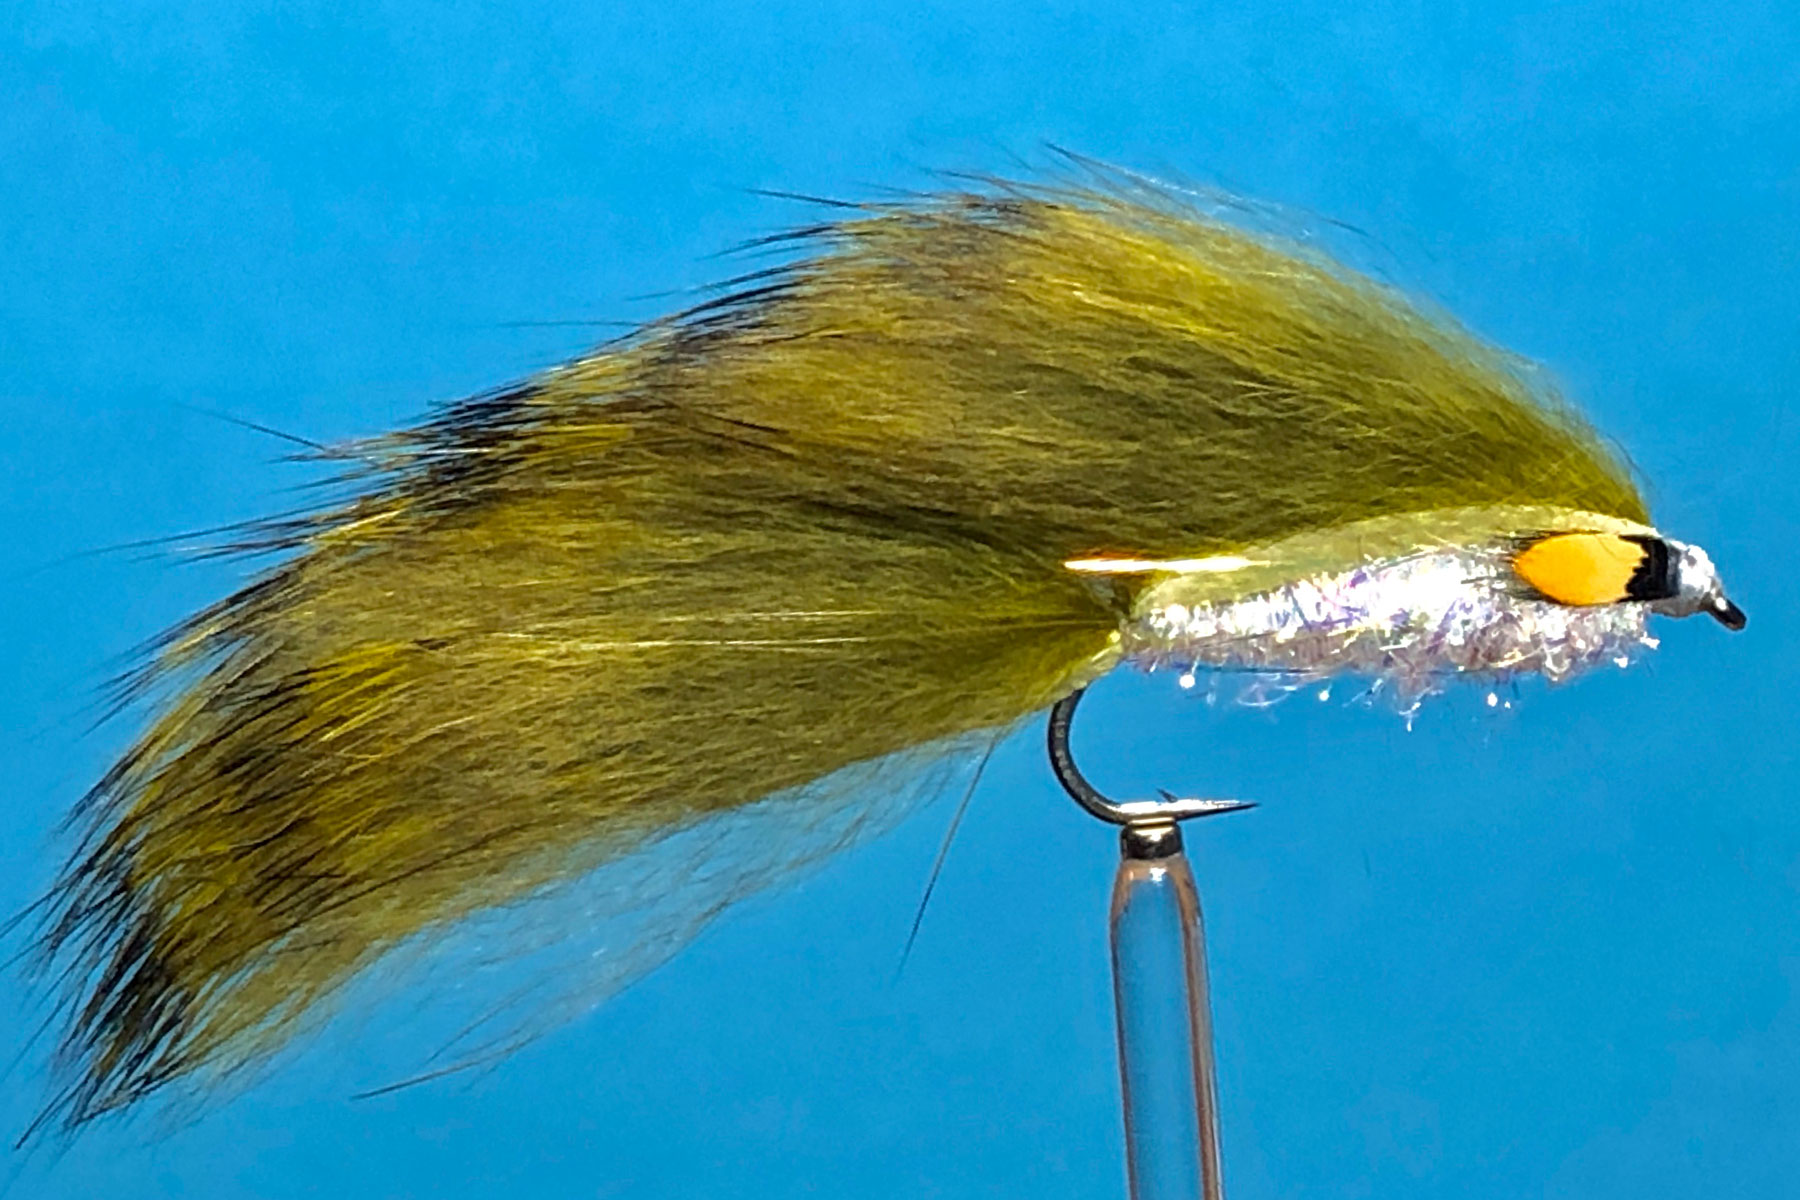
Tying Tips
- Heavy wire hooks are essential for fry patterns, as takes can be very aggressive.
- Leave plenty of space between the hook eye and the start of the lead wire for the head.
- Use a good strong thread to ensure the rabbit strip is securely held in place.
- When starting to cover the lead with floss, hold the floss tag along the side of the lead and wind the floss at an angle onto the tag. This will help stop the floss from slipping between the wraps of lead.
- Comb out any loose under fur from the rabbit strip before use. If the rabbit strip is kinked or the fur misaligned, rinse the strip in warm water, dab dry with a kitchen towel and blow dry with a hair drier. This will straighten any kinks in the hide and produce a lovely fluffy strip with the fur directionally aligned.
- When tying in the rabbit strip, create a parting in the fur and slightly moisten the hair to maintain the parting. Position the rabbit strip on the side of the hook shank, so that the parting is in line with the barb, then make one full turn of thread in the middle of the parting. This will bring the rabbit strip into the correct position on top of the shank where it can be secured in place with several tight thread wraps.
Les Lockey – September ’22
The App’s Bloodworm (Fluorescent Pink) – A Fly for September
Hook: Fulling Mill Heavyweight Champ FM50 05, size 10 or 12 or similar heavy wire hook.
Thread: Glo Brite Floss No. 2, fluorescent pink.
Rib: Medium Black wire.
Body: Glo Brite Floss No. 2, fluorescent pink, coated with UV resin and cured with a torch.
Legs: 2 lengths of fluorescent pink Perfect Rubber.
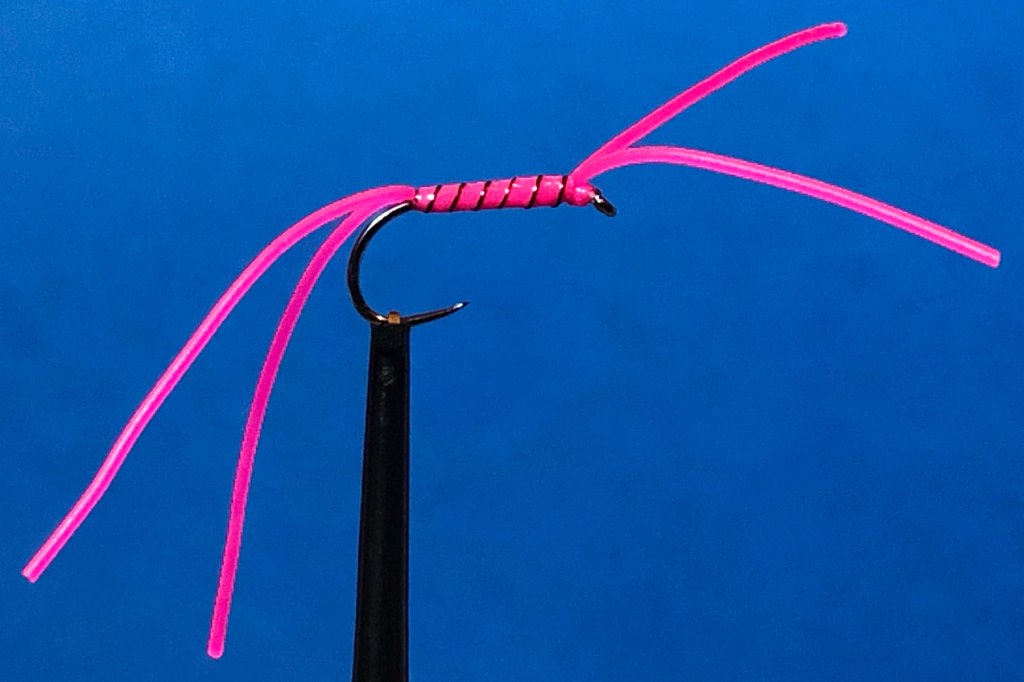
Photo 1. Place the hook in the vice, catch on the floss behind the eye and wind on a few touching turns then remove the excess floss tag.
Photo 2. Catch in the wire rib under the shank and with touching turns of floss, bind it down to just before the bend of the hook and return the floss to about 1 mm. from the hook eye.
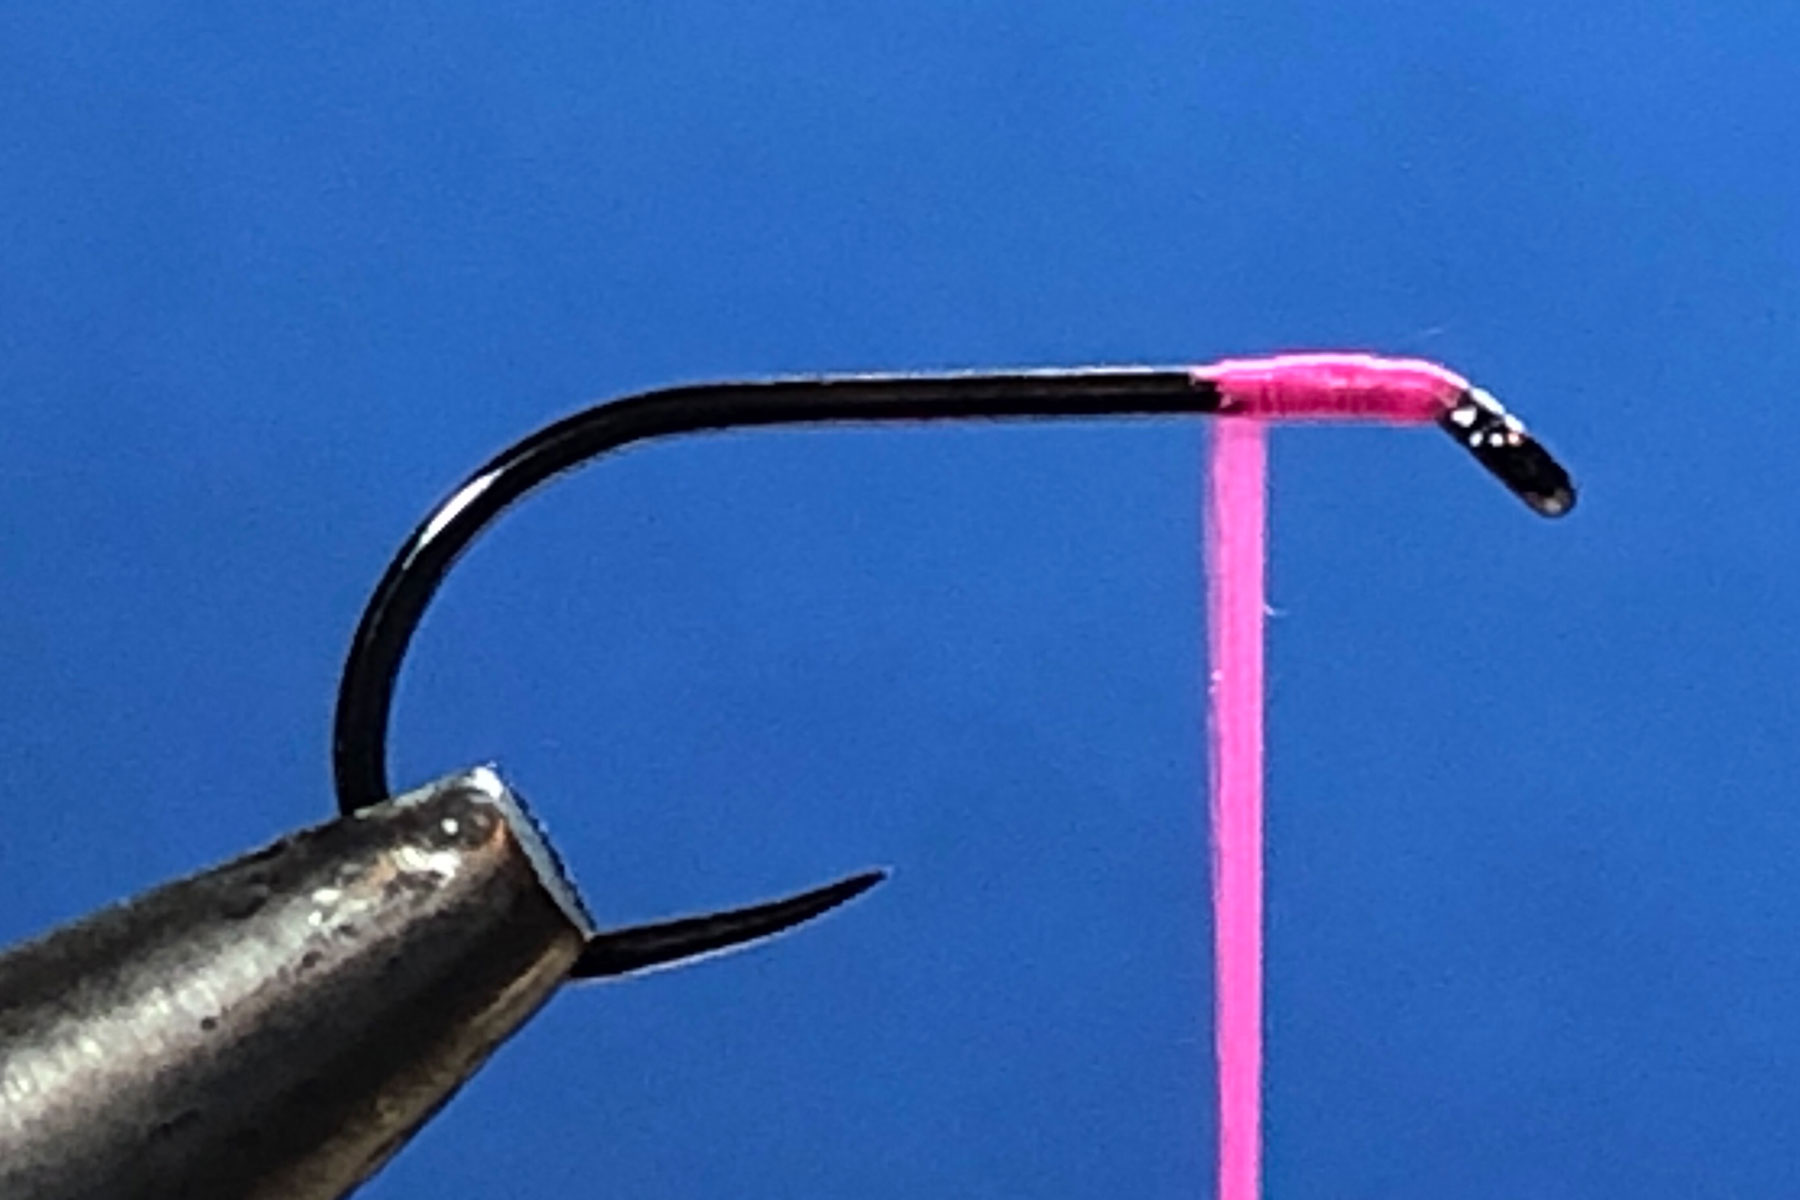

Photo 3. Align 2 strands of Perfect Rubber along the top of the hook shank with about 4cm. forward of the eye, then tie them in securely by winding a few wraps of floss rearwards, leaving two long front legs.
Photo 4. . Stretch the remaining rubber strands rearwards, ensuring they stays on top of the shank and continue to bind them down with touching turns of floss to just before the hook bend. Now return the floss in touching turns to just before the eye.
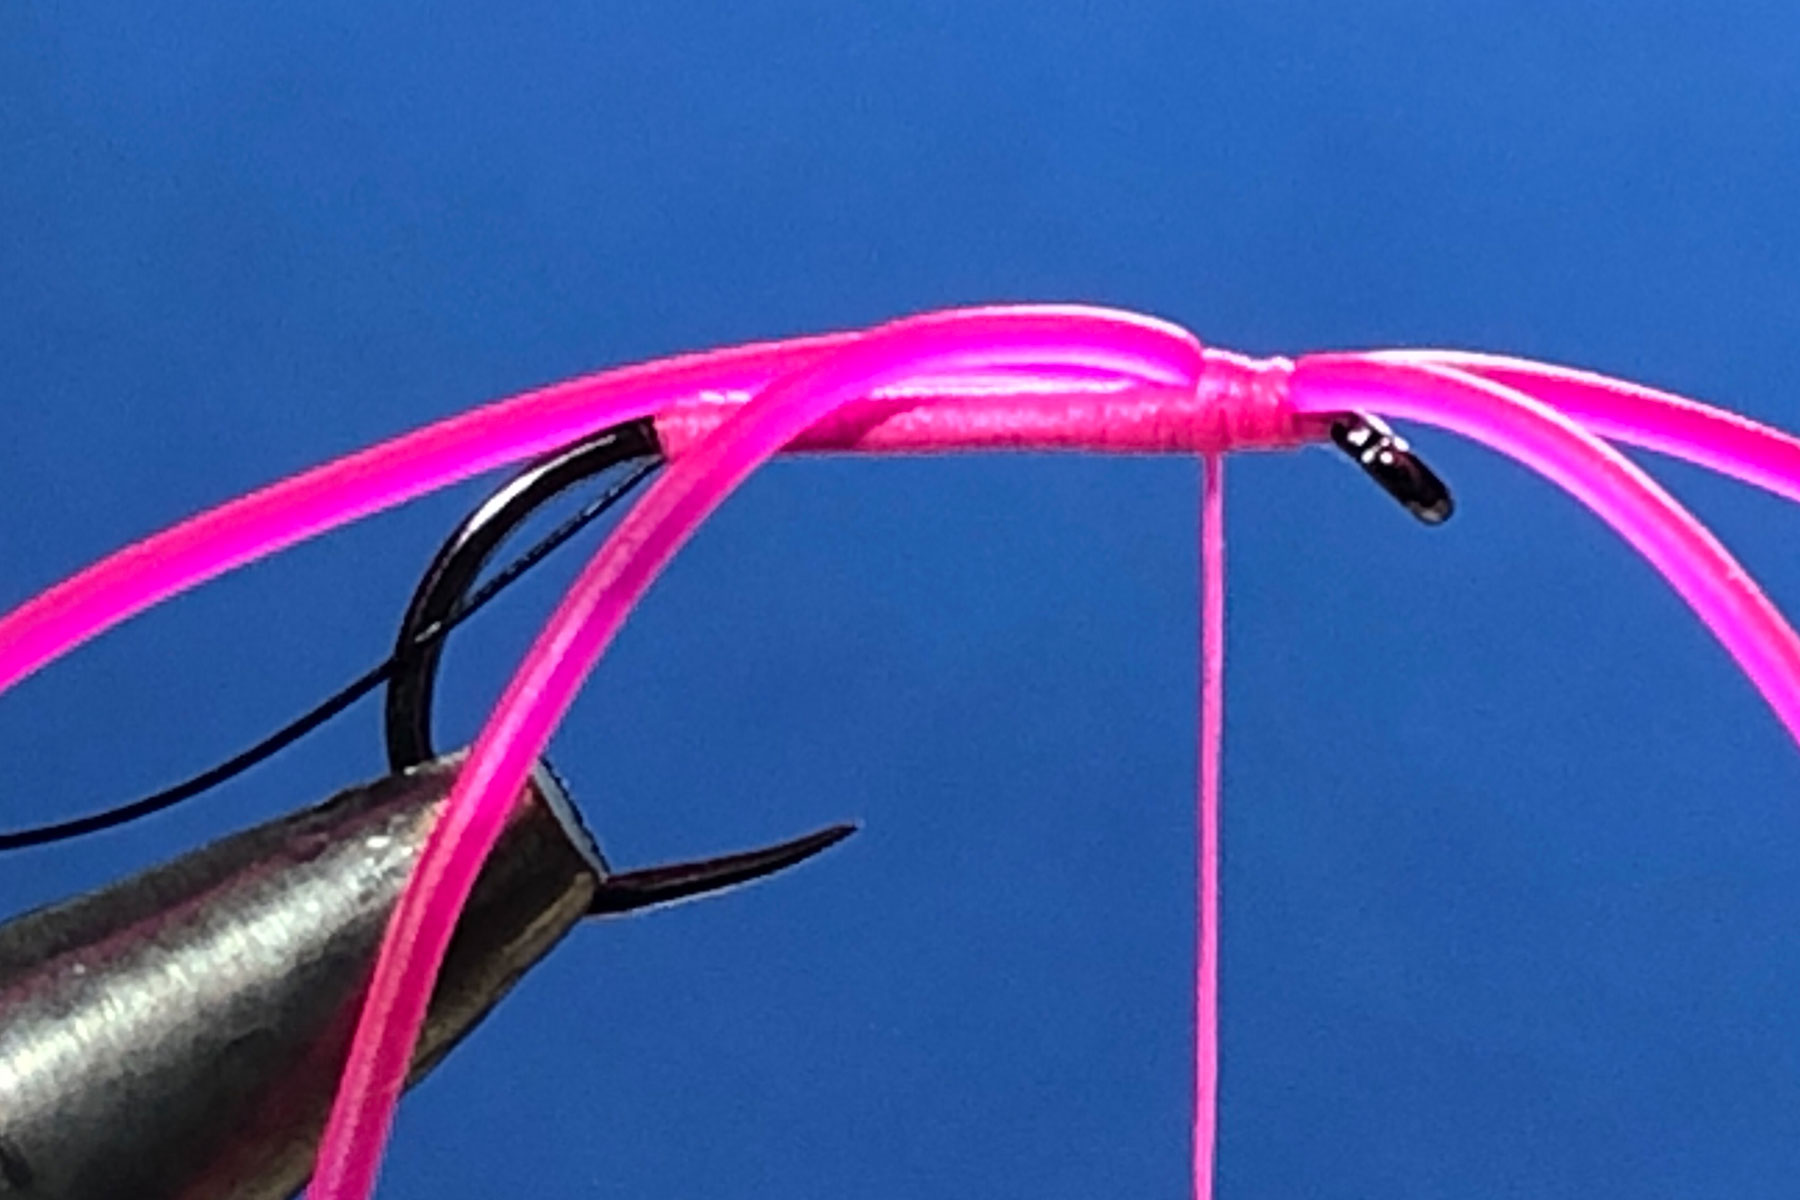

Photo 5.Take one straight turn of wire directly over the top of the rear strands of rubber and then continue to wind the wire as a rib in open spirals up the body. Tie in the wire at the eye in front of the forward-facing legs and worry off the excess wire.
Photo 6. Form a neat head, whip finish and remove the floss.

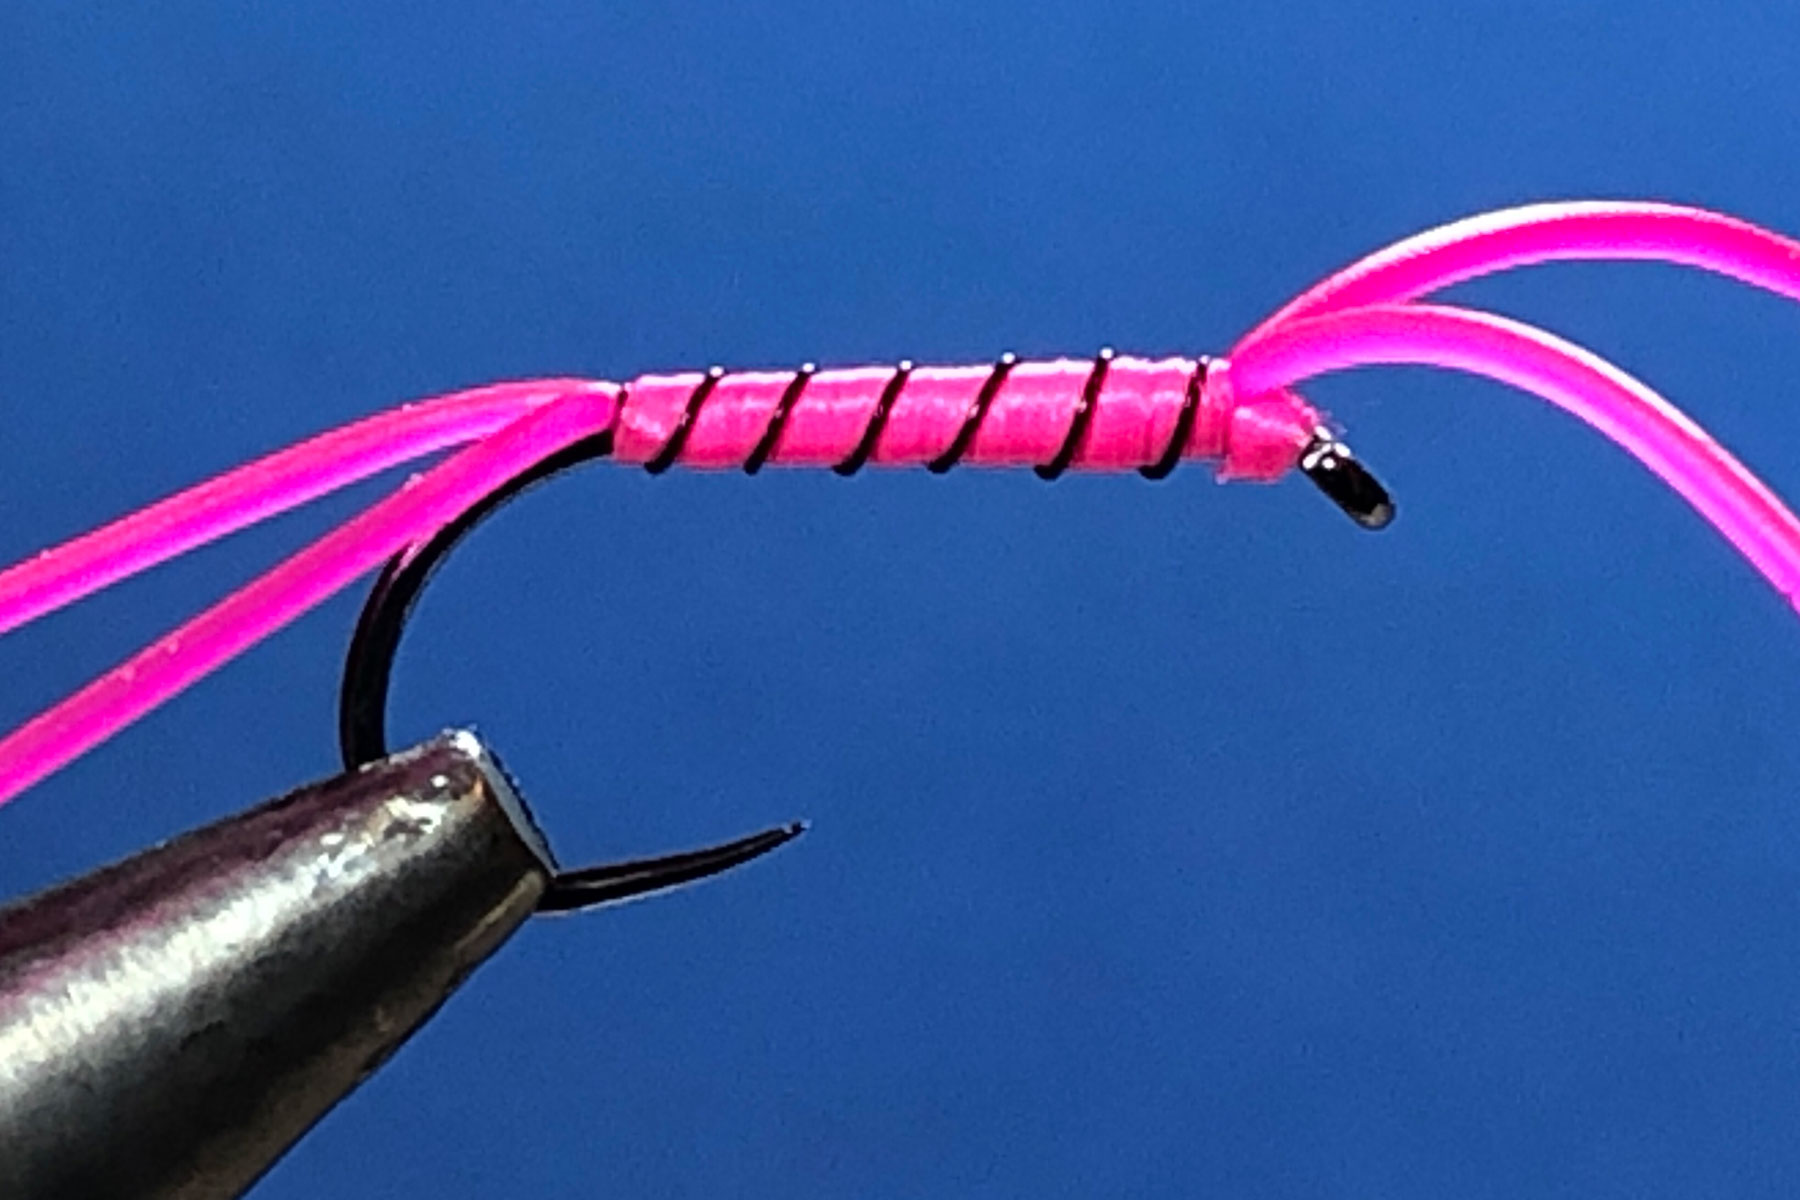
Photo 7.Carefully coat the body with UV resin and cure with a UV torch.
Photo 8.Trim both pairs of rubber legs to the desired length to complete the fly.
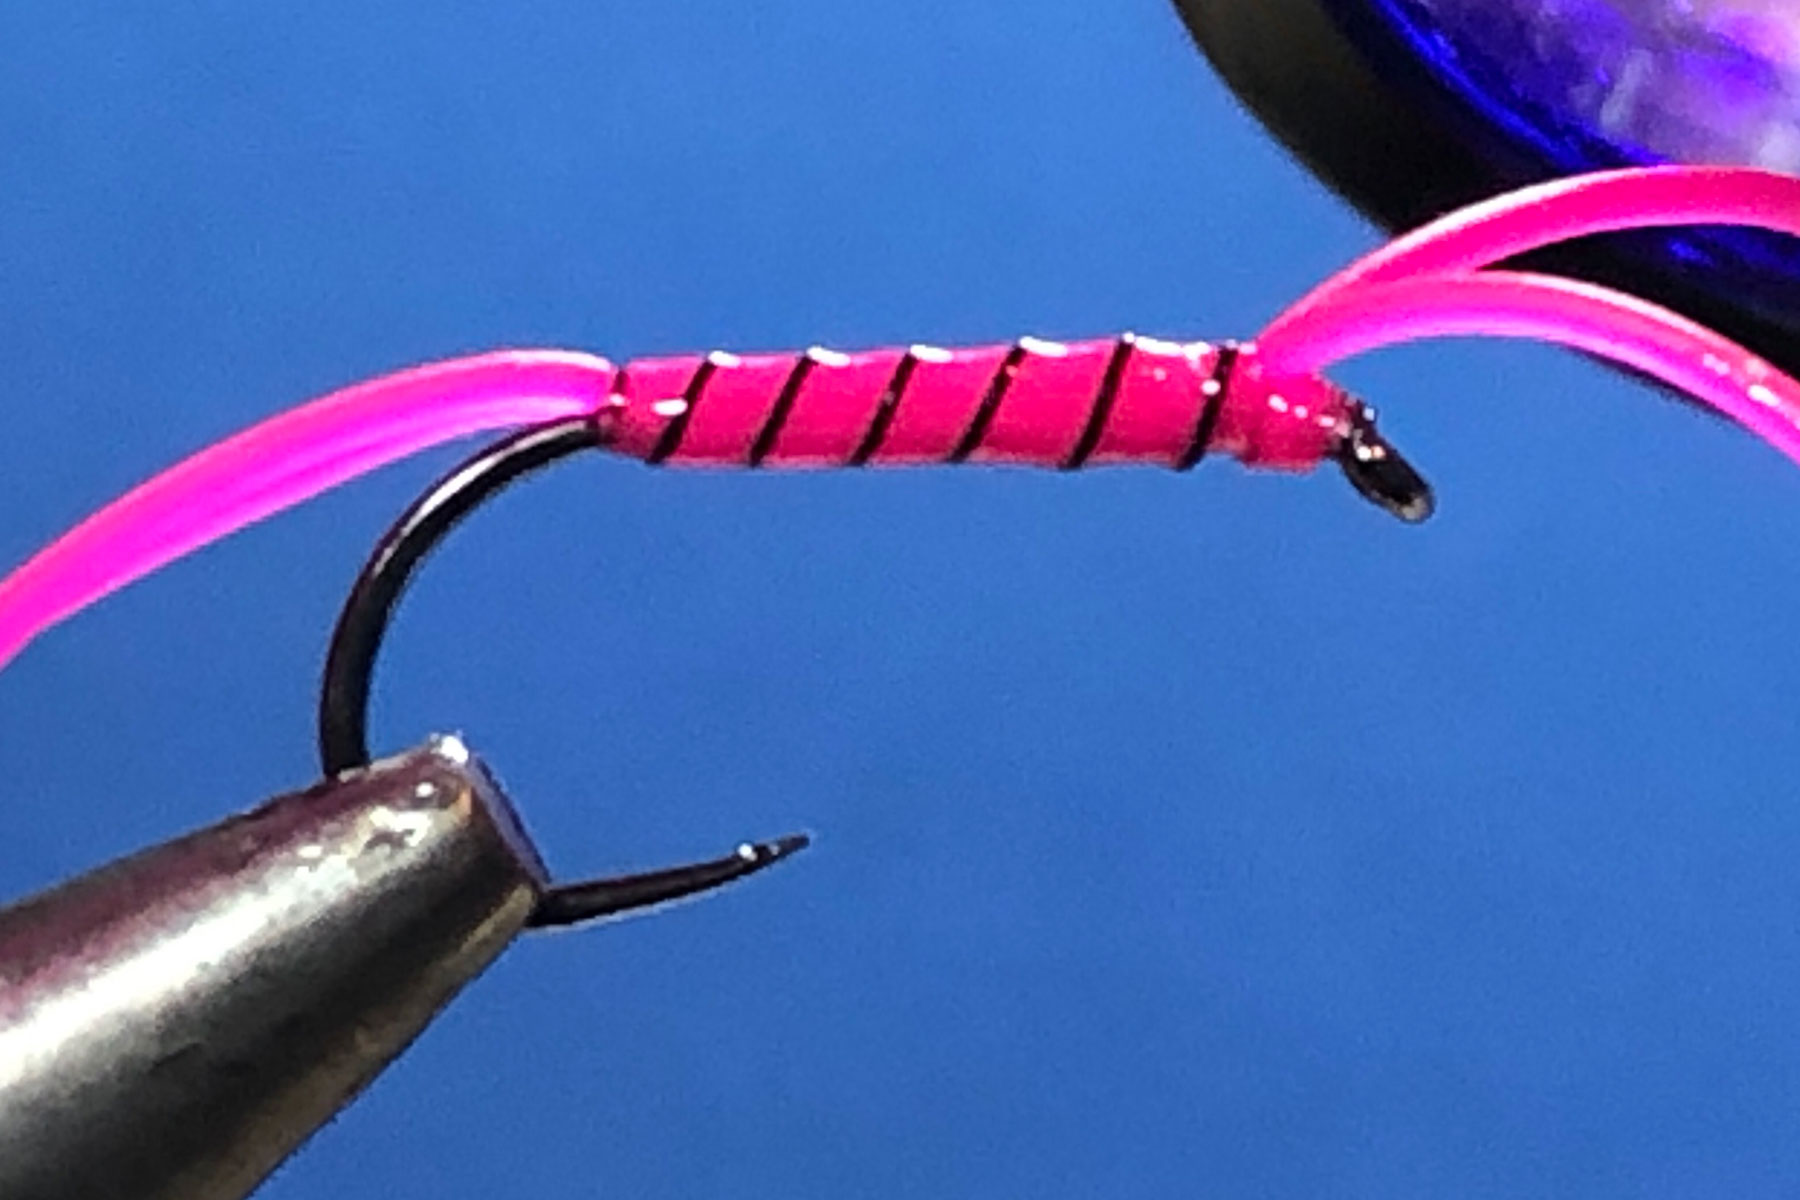
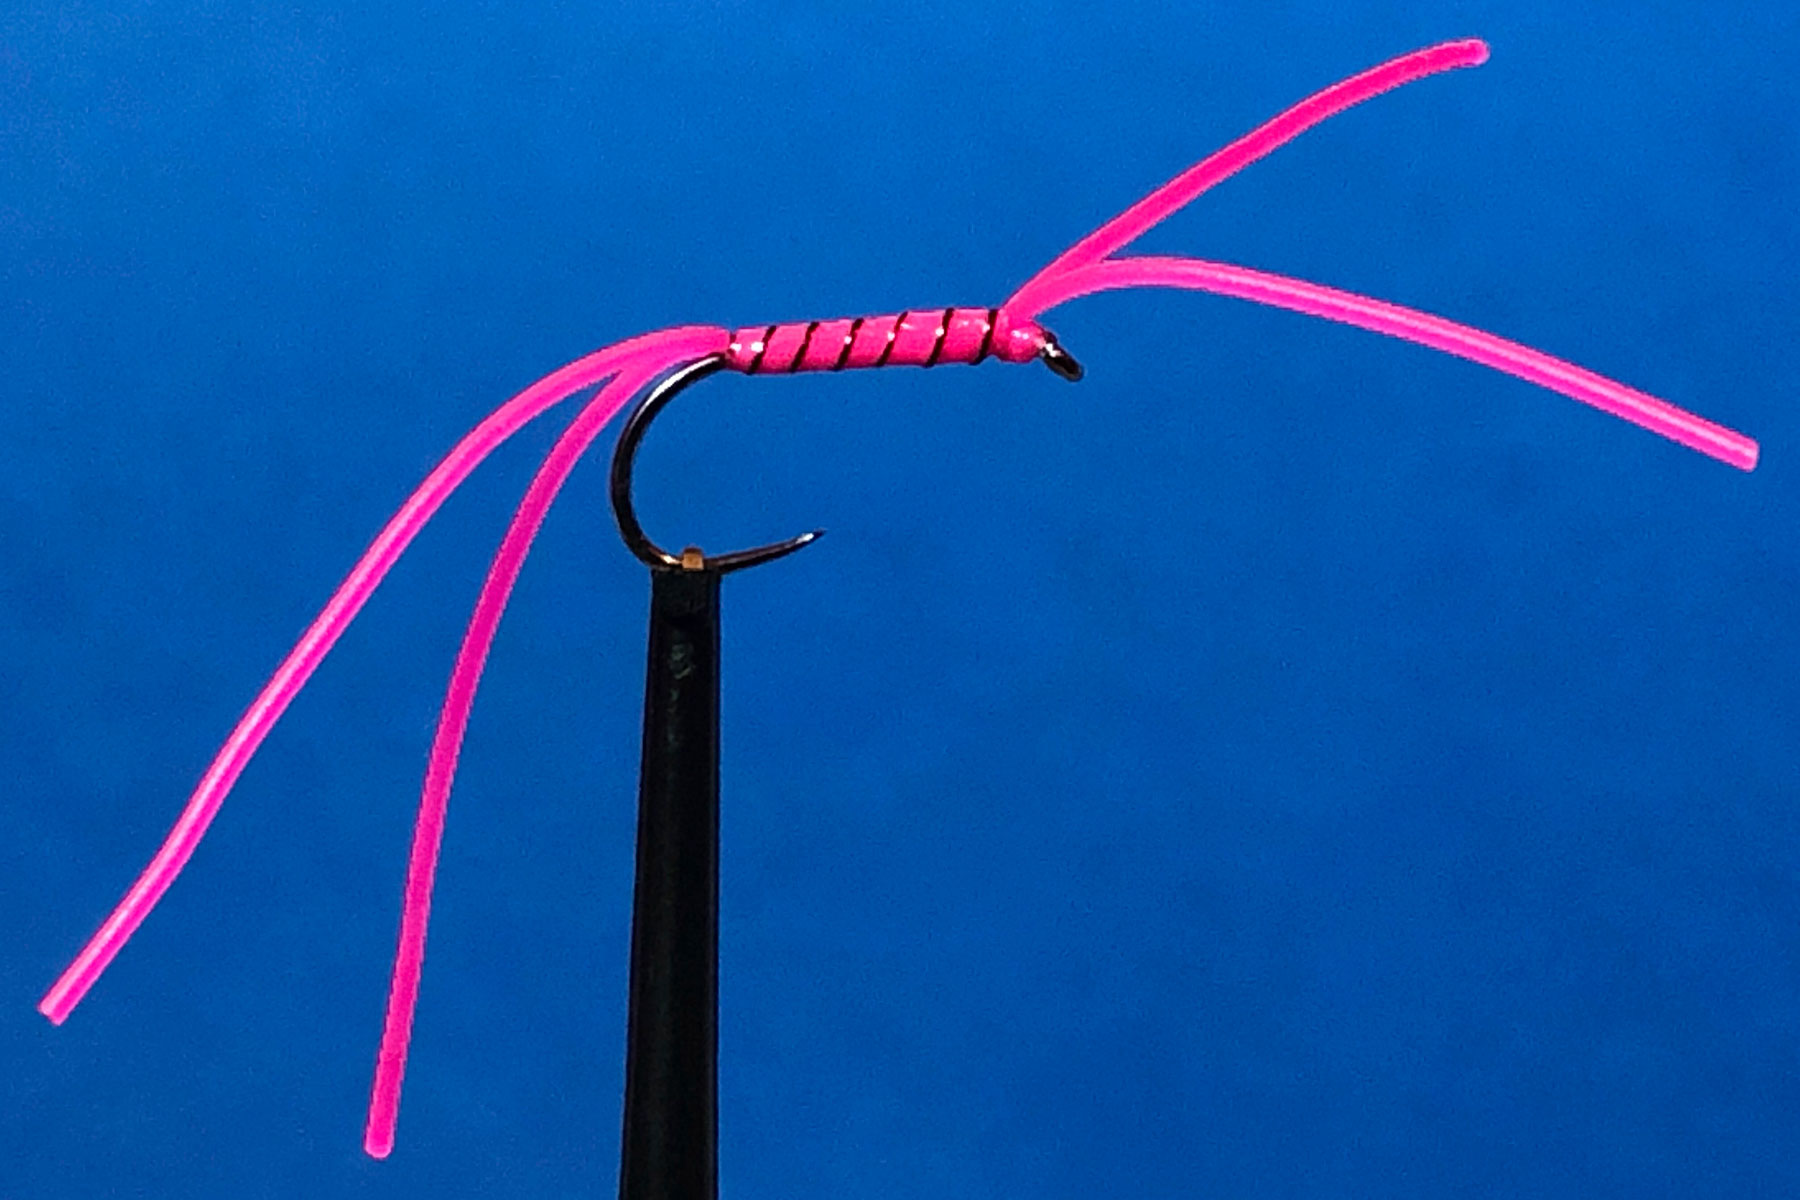
Tying Tips
- This pattern is often tied using Spanflex or Flexifloss type material which I find produces rather curly legs. I much prefer Perfect Rubber, which is round in section and very stretchy, but is also limp and straight and to my eyes at least, produces a gentler and more seductive movement in the water. A cheaper alternative is Veniard’s round rubber which comes in two thicknesses and a variety of colours, but unfortunately, not fluorescent pink.
- I always use a bobbin holder when working with floss as this helps with tension control and avoids snagging the fine filaments.
- This pattern has given rise to many variants with colours ranging from pink to red and on through amber, olive, yellow, green, tan, white and even black, while the body can be thread, floss, or even glass sewing beads and the legs can vary in number from 1 to 8. My preference is for floss bodied patterns in either fluorescent pink, fluorescent red, or amber and with 2 legs front and back.
- Leg length tends to vary from tier to tier, but I like the front legs to be about 3 cm. long with the rear legs very slightly longer. Interestingly, I understand that Peter Appleby, who devised the fly, considers that trout are initially attracted by the body of the fly more than the pulsating legs, although once attracted, the legs help to encourage the trout to take the fly.
- I always protect the floss body by applying a fine coat of UV resin and cure it with a UV torch.
Les Lockey – August ’22
A Week at Coldingham Loch
A beautiful part of the country, Coldingham Loch in the South East Scottish Borders, on the coast, south of Edinburgh. This was the venue for Les and Mike and a whole week fishing from a boat. Six self catering cottages hidden around the Loch provide great accommodation and the superb proprietors, Gareth and Carmel, are totally dedicated to running a fabulous fishing and holiday venue.
We soon settled in after a fine pub meal in the village, then returned to gear up for the following morning. The Loch provides some of the best dry fly fishing I have experienced and Les, with his long term knowledge of the Loch, knew what flies to use. As it was Hawthorn time, that was the first choice. Emergers also worked well, as did foam head buzzers and small black hoppers. Despite some high winds, we still managed to get out every day. The Loch is crystal clear and holds abundant fly life, subsequently, the fish are in superb condition.

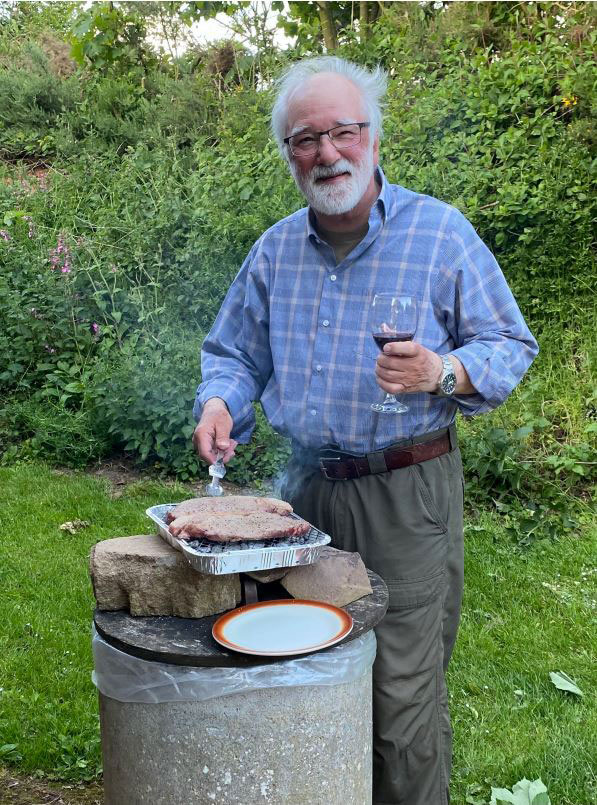
Leader strength had to be on the stronger side, as the fish can and do fight furiously. This lovely brown was caught on the first day and what a thrill to see such a magnificent specimen. More followed each day, with a fair few browns as well.
The fish on this occasion were feeding very specifically and adapting to the current seasonal fly life, hence the Hawthorn fly taking most of the fish. Takes could be confusing, as we discovered that the fish were taking in several different ways, sometimes smashing it, or sipping it, even smashing it and leaving it, sometimes sliding away with the dry fly, without a sign of movement on the water, so several strike actions were called for, which I suppose made things a bit more challenging.
We found some top class eating in local pubs, as Les knew with experience where to go. Good beer and wine and very friendly folk. We also had a BBQ night at the cottage and did it proud with locally produced steaks, fine wine and a few snifters, although we tried very hard to not over indulge….and failed ! Ever tried bananas on a BBQ ? ….. with a sprinkling of Malibu when cooked with added coconut ice cream. Well we didn’t have the Malibu or Ice Cream, so tried Botanical Gin and believe me, it was fabulous !!
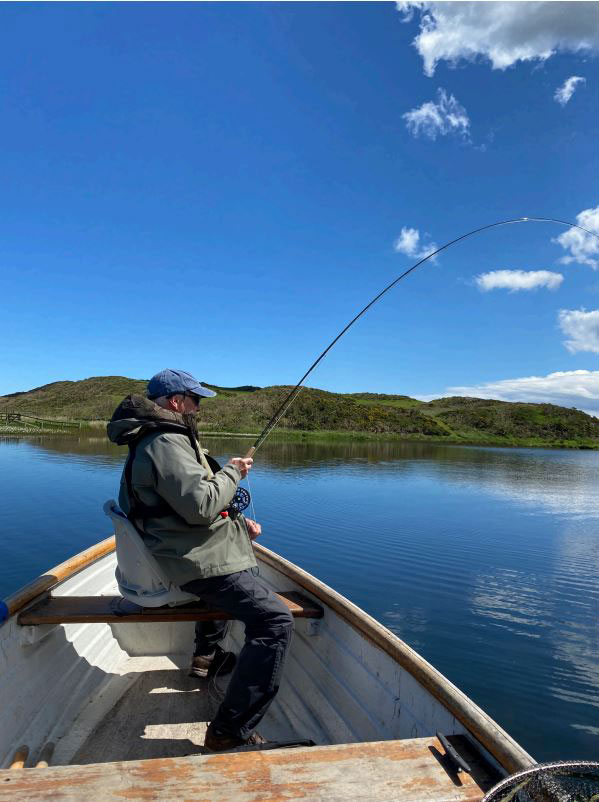
Well I guess we had it all…. Great place, great food, great fishing… what more could you ask for. The Coldingham set up is for club members, or if you are hiring one of the cottages you can fish the Loch from boat or bank.

The season is from the middle of March to the end of November and the web site is….. http://www.coldinghamloch.co.uk A seventh heaven for fly fishers, with a very relaxing atmosphere and surroundings. The cottages get booked very quickly, as it is becoming a very popular holiday and fishing venue
Mike Warburton – July ’22
The Black Foam Beetle (Dry) – A Fly for August
Hook: Kamasan B160, short shank hook, size 10 or 12.
Thread: Black Semperfli Nanosilk, 50 Denier GSP thread, or any flat black thread.
Back and Head: A strip of black Evazote foam (from The Flytying Boutique) cut 5mm. wide for size 10, or 3mm. wide for size 12 hooks.
Body: A mix of black rabbit underfur and black Senyo’s Shaggy Dub.

Photo 1. Place the hook in the vice, catch on the thread behind the eye and wind it in touching turns to slightly round the hook bend, then remove the excess thread tag. Cut a strip of foam to the appropriate width for the hook being used and trim one end to a long point about the same length as the hook.
Photo 2. With the point of the foam strip just short of the eye, lay it on top of the hook shank and carefully tie it down, ensuring the foam remains central and on top of the shank. Initial thread turns should be firm, but not tight and widely spaced, progressing to the eye. Spin the bobbin holder anticlockwise to ensure the thread is flat and carefully flatten down any bulges with tighter thread wraps as you return the thread to the hook bend, although this might require several passes along the shank to achieve a smooth underbody.
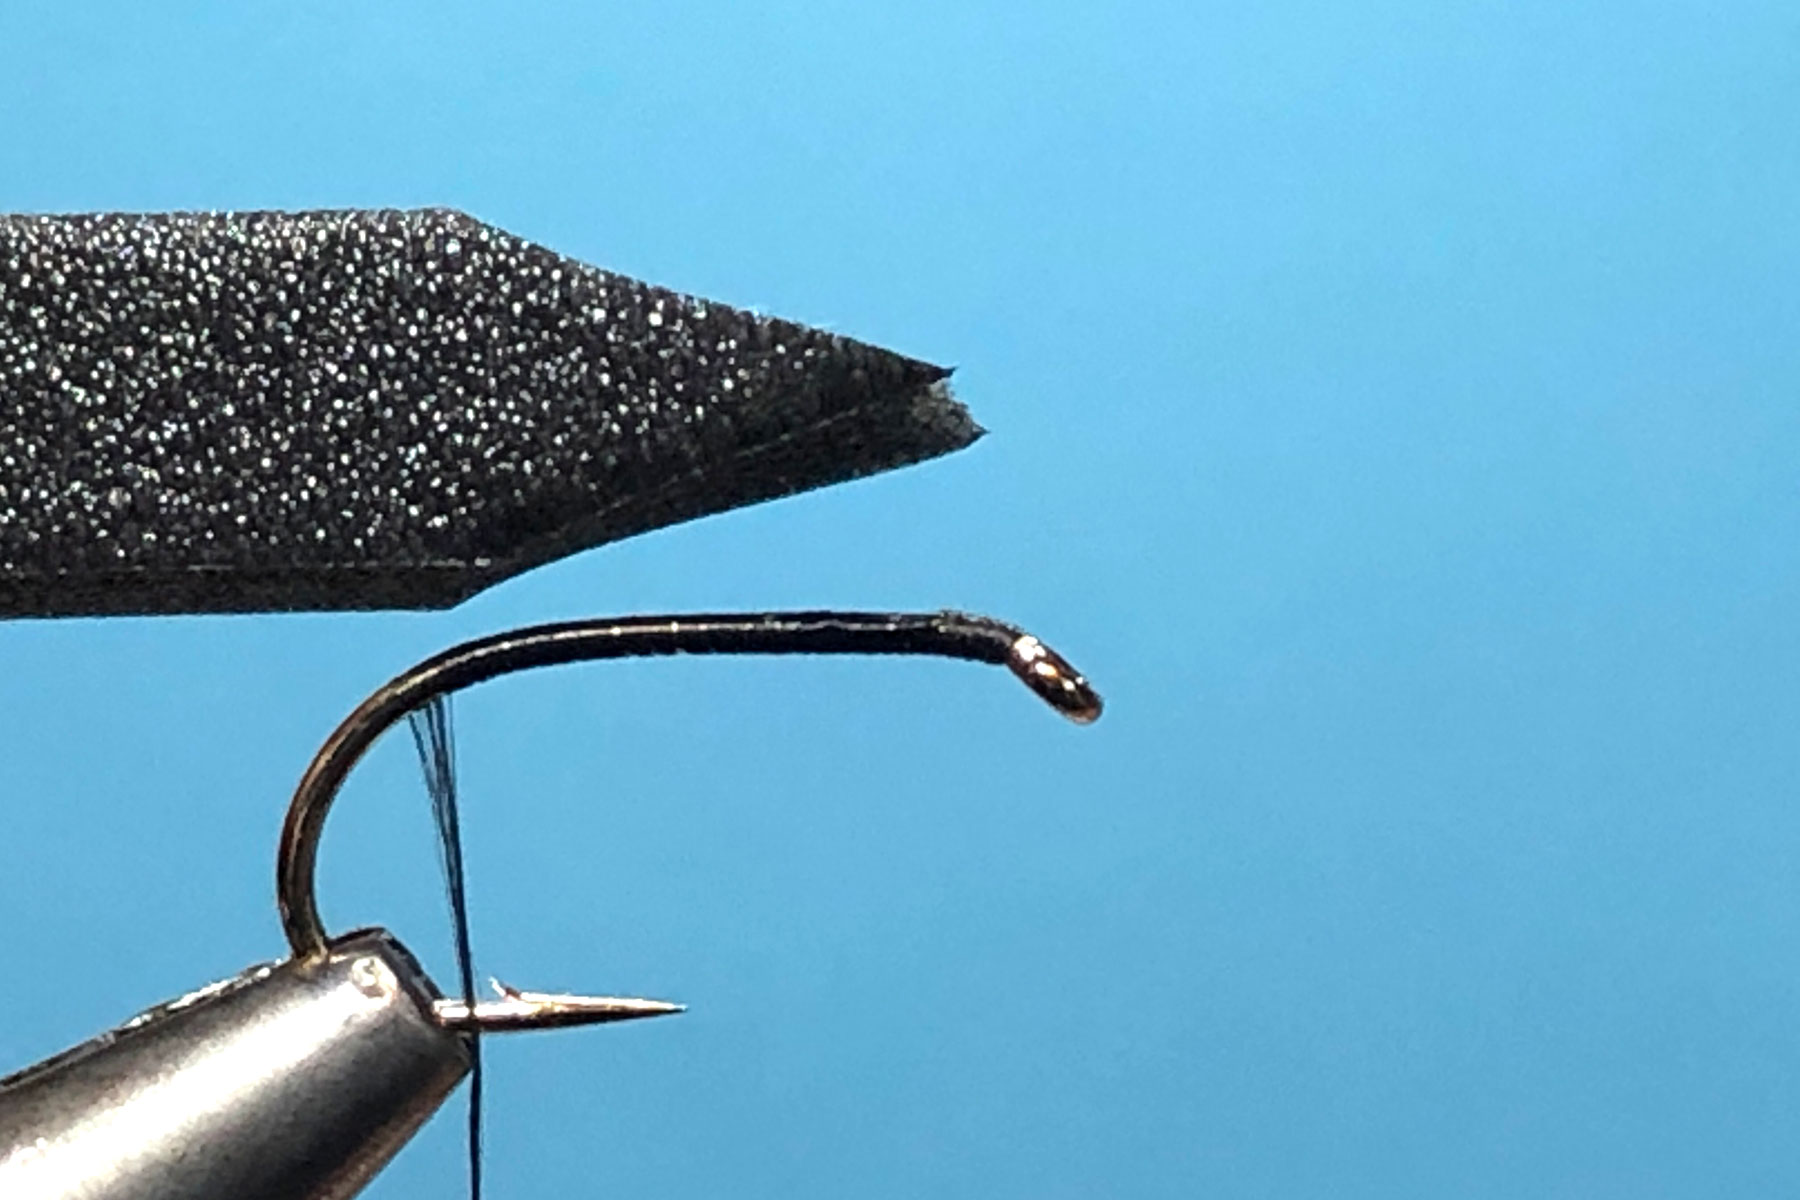

Photo 3. Take a pinch of dubbing mix containing about 3 or 4 rubber strands and loosely dub it on to the thread, then wind it onto the shank. Repeat the process until the body is complete, just before the eye. (Usually about 3 or 4 applications).
Photo 4. Using a piece of Velcro, brush out any trapped rubber strands and try to direct them downwards.
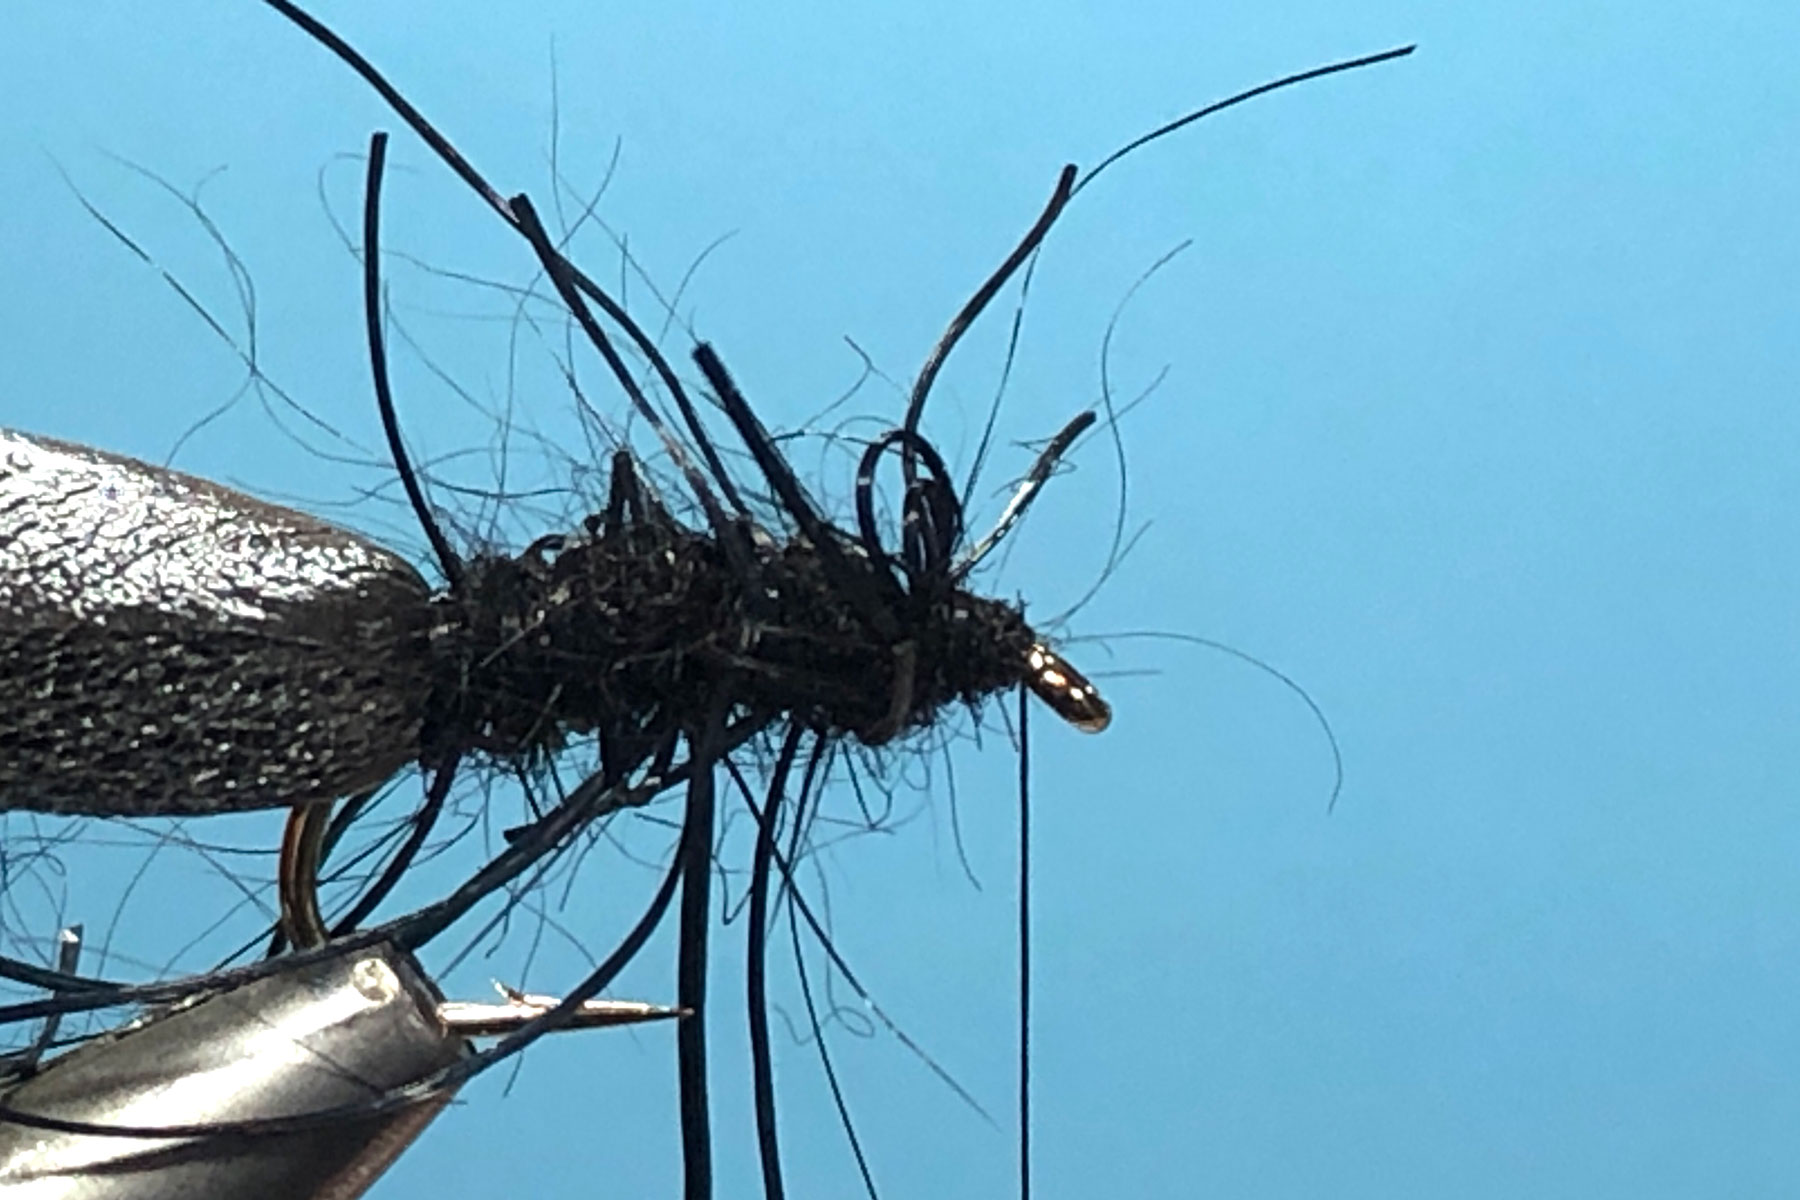

Photo 5.Spin the bobbin holder anticlockwise to ensure the thread is flat, then gently pull the foam strip over the top of the body and carefully tie it down at the eye followed by a couple of locking turns in front of the foam.
Photo 6. Add a spot of varnish or superglue to the thread, lift the foam strip away from the eye, whip finish and remove the thread. To form the head of the beetle, gently pull the foam strip in line with the shank and while under tension, cut the foam just in front of the hook eye, using a single straight cut. Finally, trim the rubber strands level with the keel of the hook to complete the fly.
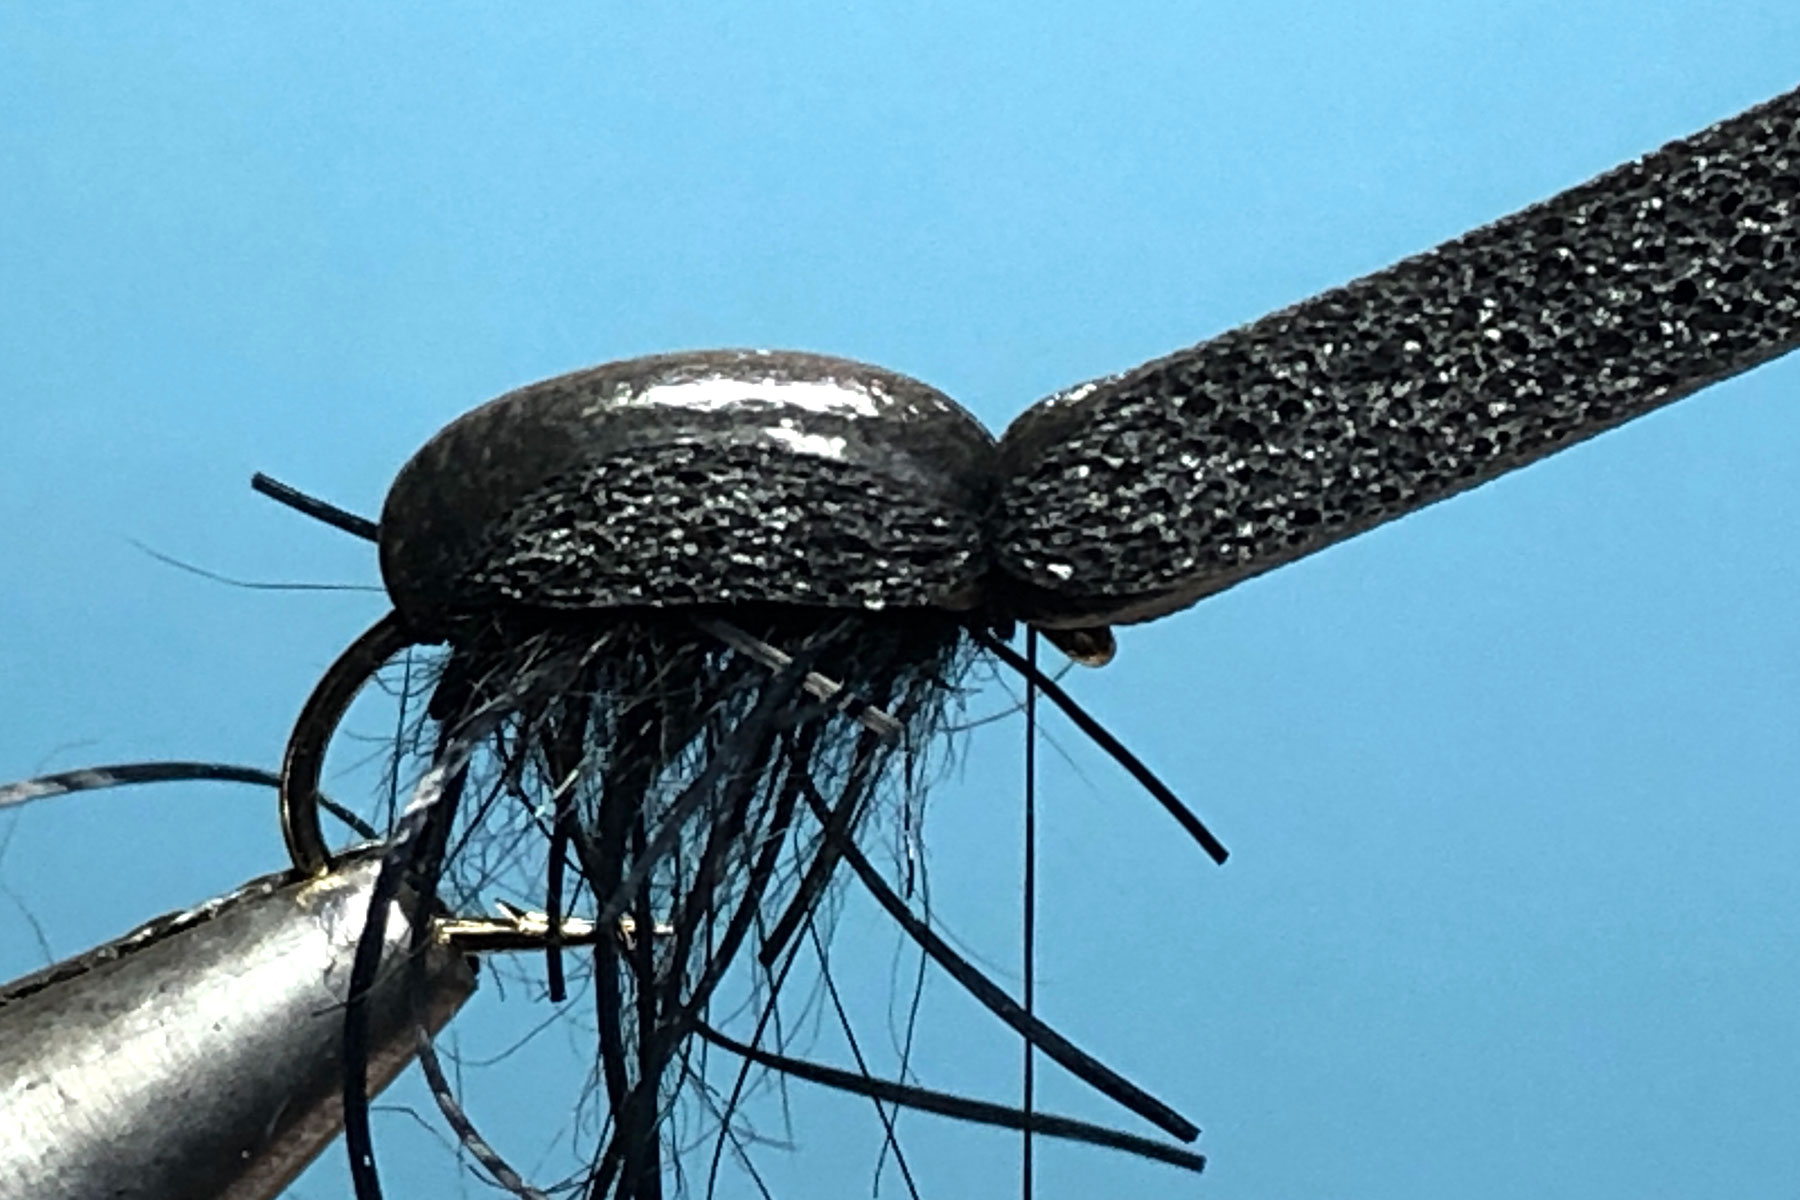

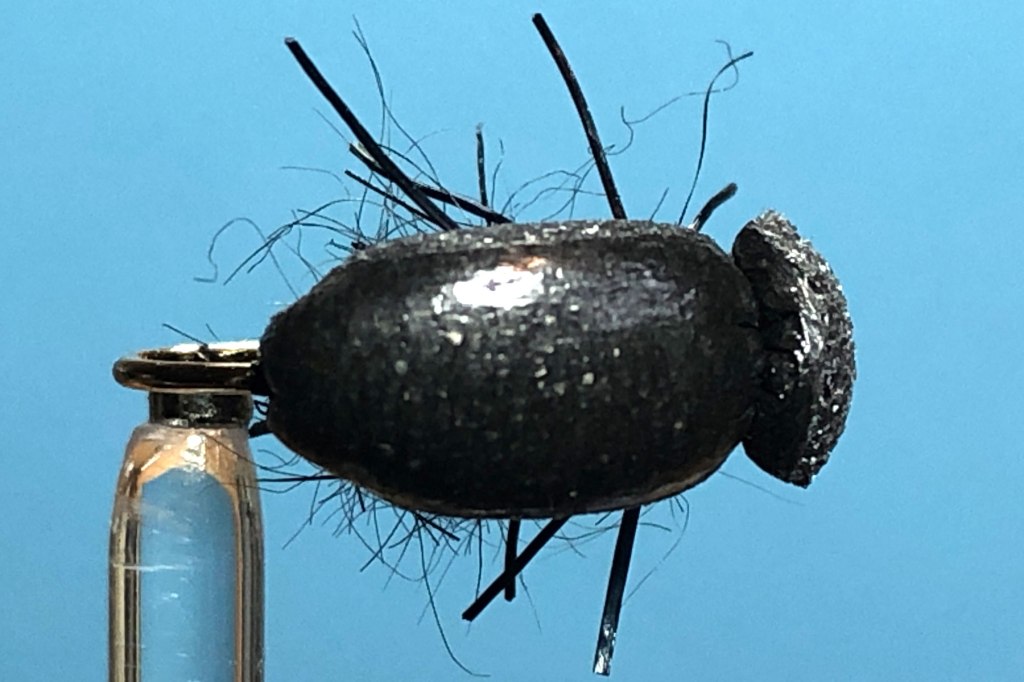
Photo 7. The pattern from above.
Tying Tips
- This pattern is a good test of thread tension control and using a flat thread will certainly help to lessen the chance of cutting through the foam. It also helps if initial thread turns are quite light with tension gradually increasing with each turn of thread. Wherever possible, try to make securing turns directly in front of the foam as this will take any further pressure away from the foam.
- Evazote foam is a closed cell, cross linked, copolymer foam with a sheen that makes it ideal for beetle patterns. It is slightly thicker and more resilient than other fly tying foams, but it should not be over stretched as this will reduce its buoyancy.
- For better accuracy and straighter edges, I cut the foam into strips using a scalpel and a metal ruler.
- The original dubbing for my beetle pattern was Rub-a-Dub dubbing from Doug Swisher in the USA, which had lots of rubber fibres ready mixed into the rabbit fur but sadly, this is now unavailable. I now make a very similar substitute dubbing by mixing rabbit under fur with Senyo’s Shaggy Dub (a silicone based, rubber like material) in an electric coffee grinder.
- An alternative tying method for the body is to create a dubbing loop after initially tying in the foam strip, dub the body with rabbit fur, insert some Shaggy Dub fibres into the loop and spin using a dubbing twister to form a leggy rope that can then be wound like a rib over the fur and tied off at the eye.
Les Lockey – July ’22
At Last – The return to Lake Vyrnwy
It has been 3 years since my last visit but June 10th 2022 was the day. The day before, my wife and I were on a Mazda MX5 meeting with Michel Mazda (the dealership we bought the car from). This is a “ride out”, in Thursdays case 67 MX5’s, starting at Ellesmere Port.


Our morning stop was at the Rogan Estate on the banks of the River Dee at the back of Bala. Apparently, Mortimer and Whitehouse are due to fish this beat for their next series. Just over 150m from the manor house. Very neat and tidy, with a nice “hut” with BBQ. Apparently the river here hold a lot of “good” Grayling and the wading looks excellent.


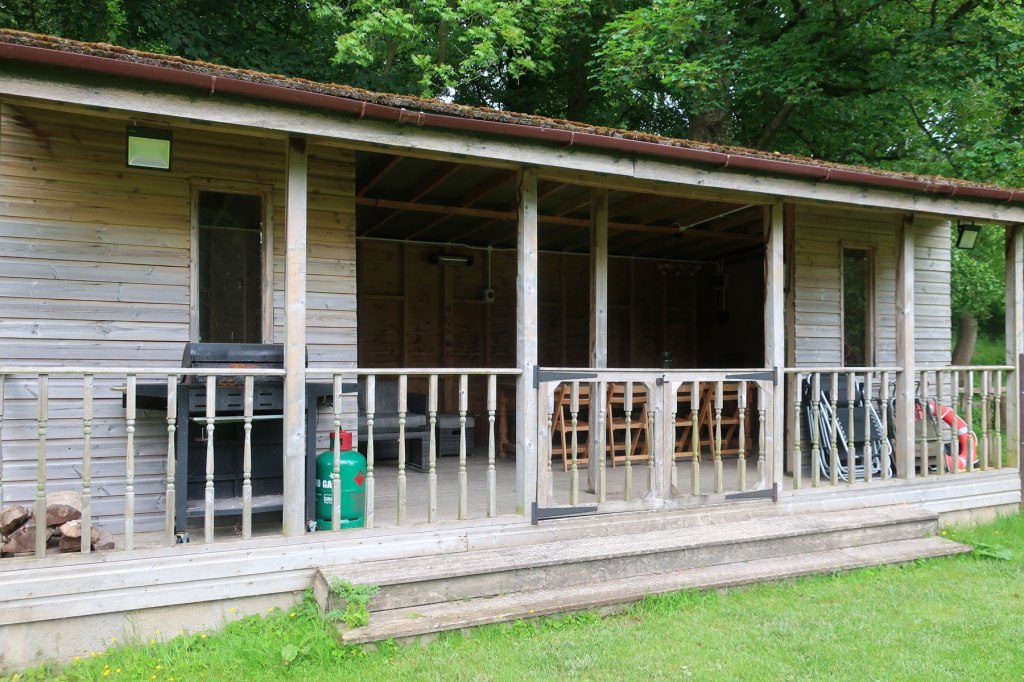
The 2nd stop was Lake Vyrnwy for Lunch. I had carefully booked an overnight stay!


After lunch most of the other drivers went home. We had a walk to the village and on the way out of the hotel met Paul Morgan (Coch-y-Bonddu books at Machynllerth) He had been fishing, but had struggled to catch, using the same method that I was planning ! – not looking good for me. Friday started with a very nice breakfast, before my wife and I parted company, me to the boat and her to the Spa. I chose the the bottom end of the lake that I haven’t fished for at least 20 years ! This was on the recommendation of the staff, who thought it the best option for a poor day ??? The Lake was well down and the staff expected the “Village” to be in view by July. This did give a major problem, in that the trees would not be overhanging the water in many places. The water at the opposite end from the Dam is shallow and does have a weed bed, so insect life will be better in June (I hope). My plan was to “work” this area and the far bank, hoping for a rise or two, but failing that try under the far bank, hoping for a fall of terrestrials. Unfortunately Lake Vyrnwy has some very “Interesting” winds and wind lanes, so much so that at the far end of the lake, the wind can be in “Any” direction at any given time ? i.e. within 10m you can be drifting the near shore, then be blown out into the middle, then reverse back down the lake and carried to the far bank ? Not good for planning a drift ! This problem was taken away from me
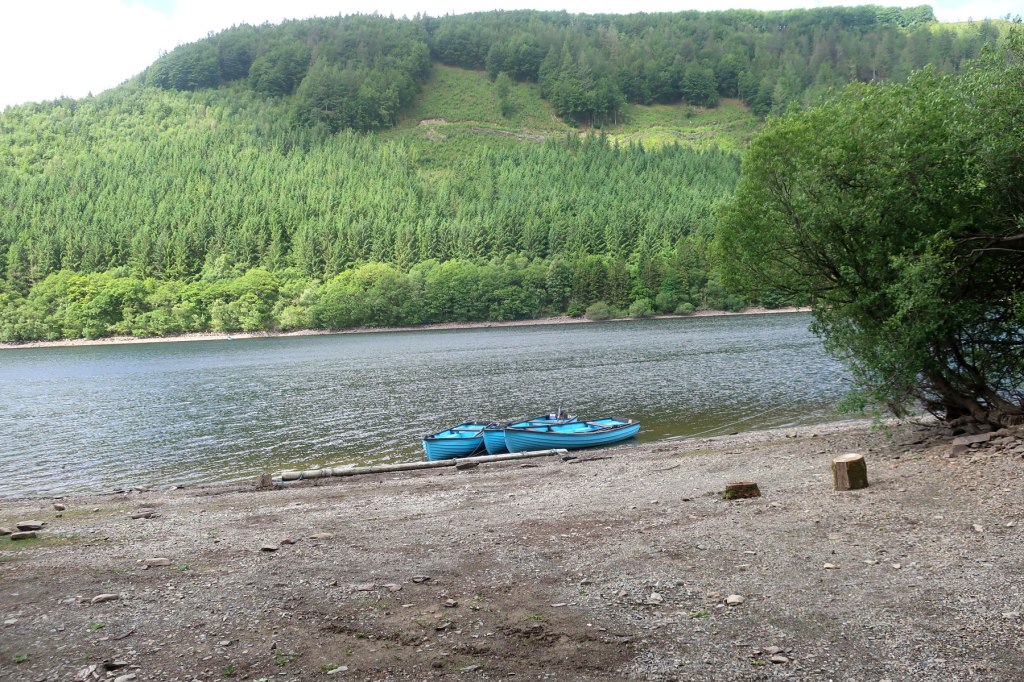
By the time I had loaded up (two batteries and an electric motor) and driven the 41/2 miles to the boat station two other boats were already fishing the lower end of the lake. My only option was to fish back towards the dam ! I set up with a dry size 12 “Shiney” fly with a bright green nymph tied NZ style. I was fishing drogueless just using the electric engine to correct the drift.

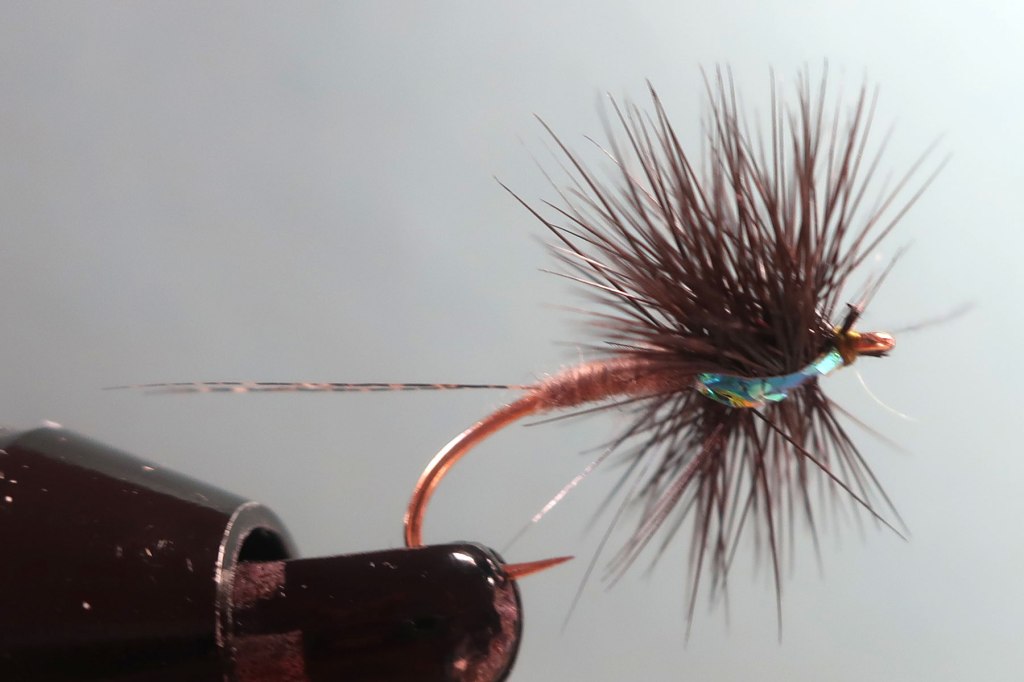
Hook – Fulling Mill FM12 70 Living Larva size 12
Thread – Ultra 70 in white (whip finish coloured green with pen !)
Tail – Coc-de-Leon 3 or 4 fibres.
Rear half of body – dirty grey Poly yarn.
Front body – CDC split thread wound forward to eye in black.
Hackle – Black genetic cock, wound dense.
Thorax ? – Split the hackle underneath with “Large” Mirage Tinsel.
It took a while but I did get into my 1st Brown within 200m. After a couple more it was apparent that the nymph was not needed. The only problem I had was being in the boat alone as I missed opportunities by drifting out or past fish holding areas. Although no fish were rising, casting the dry within a few feet of the shore brought fish up. If I missed a fish, due to the wind, I struggled to repeat the area. It did not matter the fish kept coming. The “fun” started when I tried to go back ? The little electric motors (37lb thrust) did not make much headway against the wind, but it did get me back to some areas that “required” a second attempt.

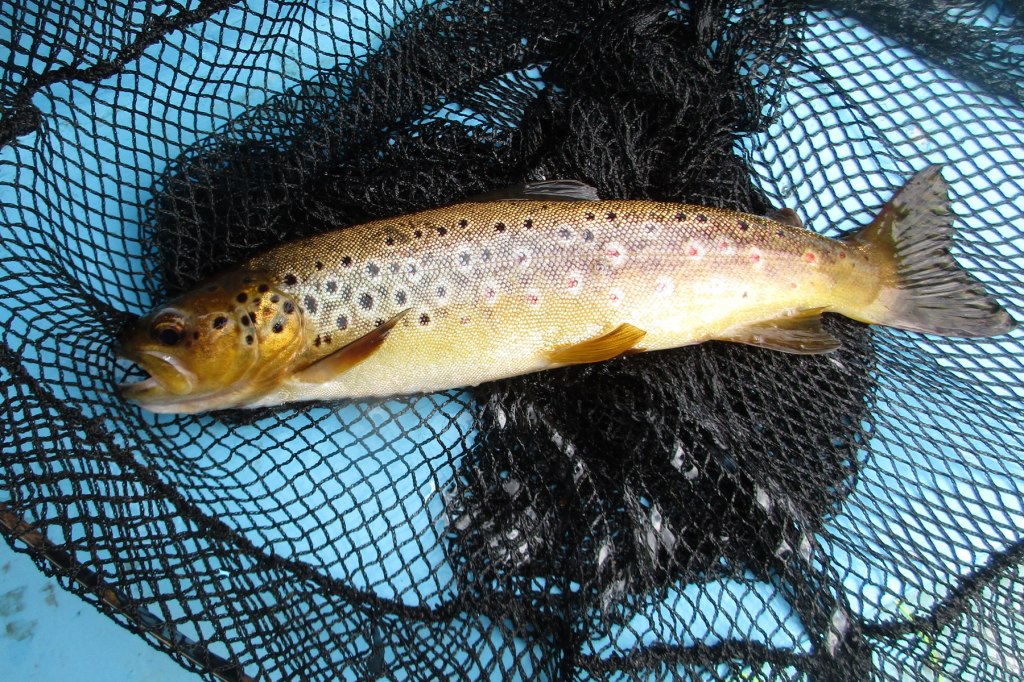

By 3pm I had just managed the return to the boat station (all on one battery). I had done well with 16 Browns from a small 6” to an excellent 11/2lb. Most were in the 10oz size but fought well above their size.All the fish were caught on the “Shiney Fly”, including the 6” one. Only used 2 flies, the 1st lasted 10 fish , the second was “ragged” after just 6 ? – Note to self, Tie up some more !!! As room in an MX5 is limited I chose to fish my 7’ 6” ATFM 3 weight river rod with a small collapsible net, all worked well. In previous trips I had gone for my 10’ ATFM 4 weight. I found the change better as I was doing what I normally do on rivers, casting into tight spaces under bushes or close to stones, just felt right. As I write this my plan is to return soon, as I enjoyed the day so much. This happens everytime I go, but I never seem to make it back for the rest of the season, however this year ? Definitely ? Maybe ?
Eddie Wilkinson – June ’22
The Damsel fly Nymph – A Fly for July
Hook: Kamasan B170, size 10, medium wire hook or similar.
Thread: Olive Semperfli Nanosilk, 50 Denier, or any fine olive thread.
Eyes: Small, black metal, bead chain.
Tail: Olive marabou.
Rib: Small oval gold tinsel.
Abdomen: Olive marabou feather fibres.
Thorax cover: Cock pheasant centre tail fibres.
Legs: Thorax: Olive marabou, dubbed.

Photo 1. Place the hook in the vice, catch on the thread behind the eye and wind on a short bed of thread to the thorax position, cut off excess thread and return thread to about 2 mm. from the hook eye.
Photo 2. Catch in the bead chain under the hook shank and secure in position using figure of eight thread wraps over a small dab of superglue, then run the thread in touching turns down the shank to opposite the barb.
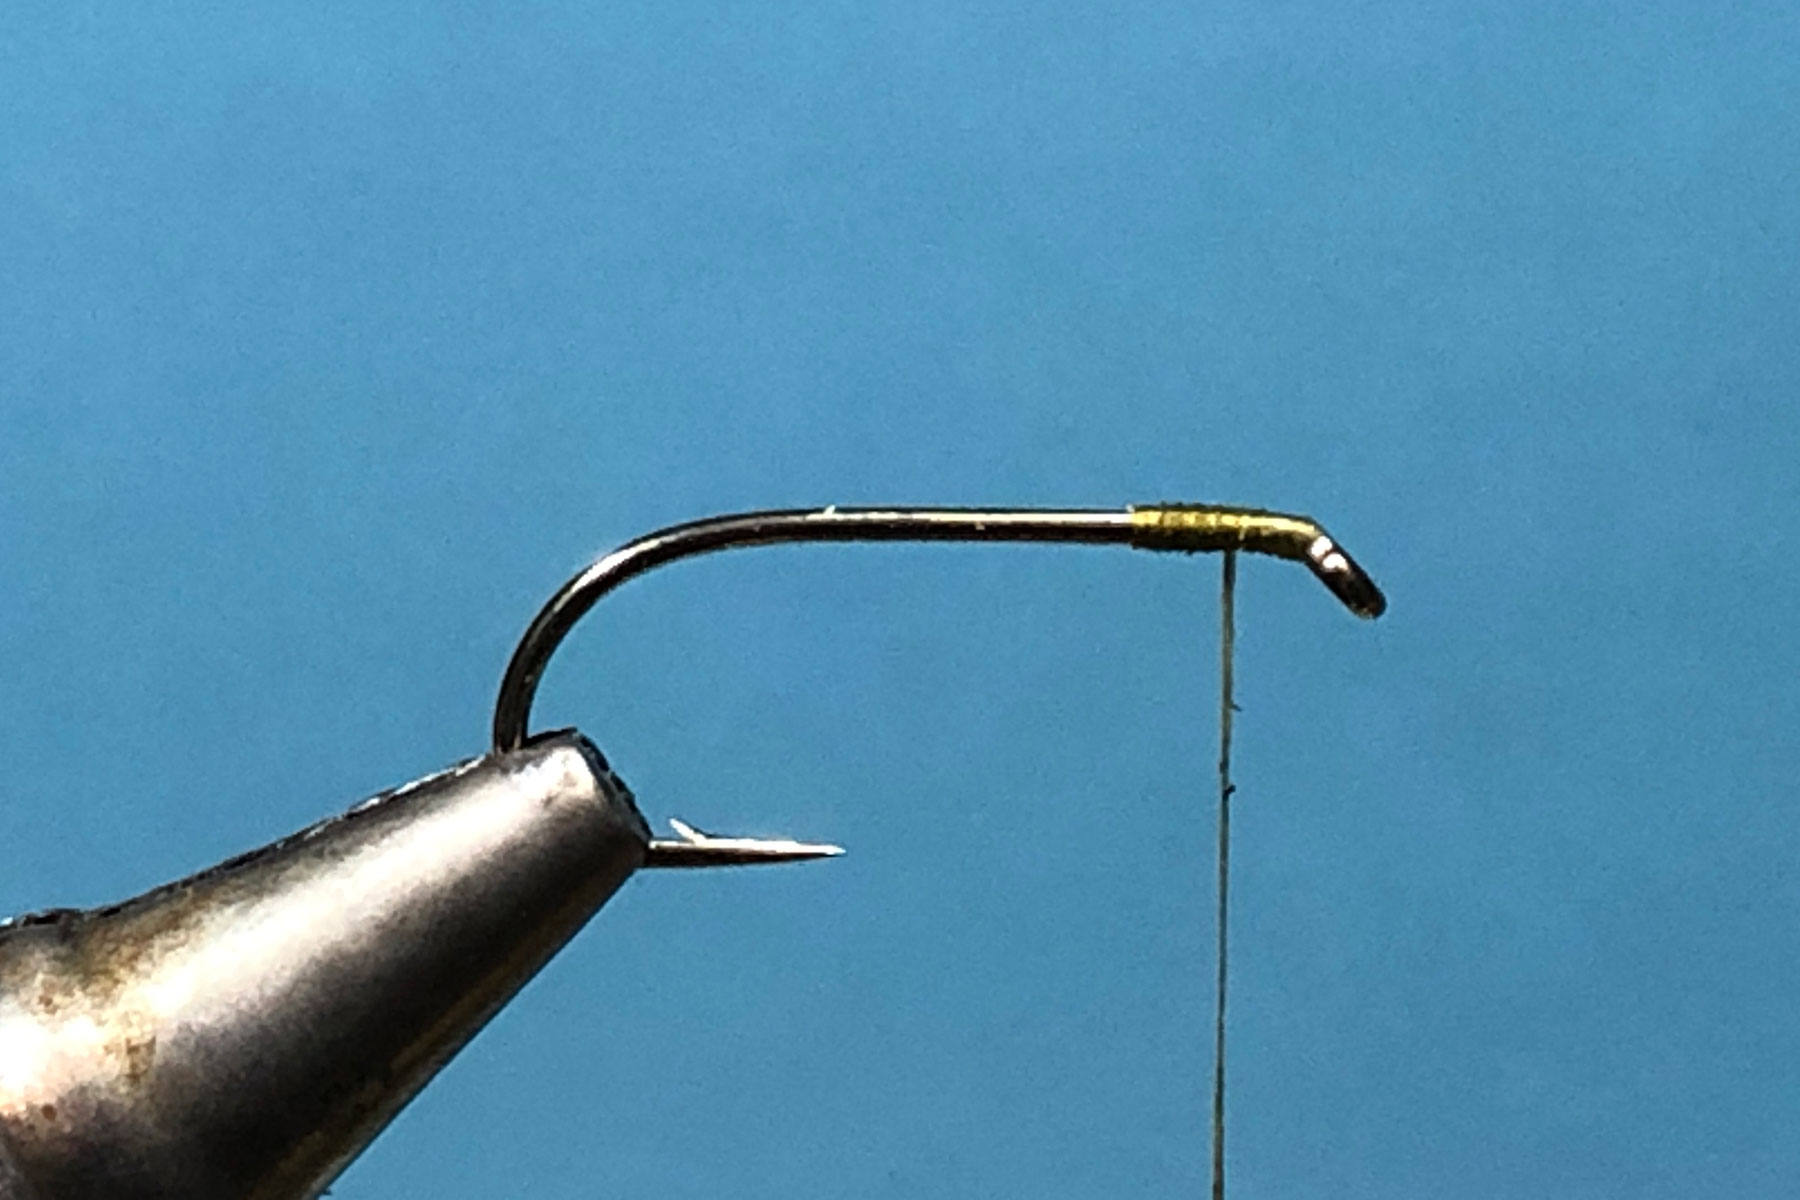

Photo 3. For the tail, tie in a small bunch of marabou fibres about the same length as the hook shank, then trim the waste ends at the thorax position. Catch in the oval gold tinsel rib with a couple of thread turns, ensuring the waste end stops at the thorax position. Follow this by tying in a small bunch of marabou fibres by their tips, with the tips extending to the thorax, then bind down all the loose ends with thread.
Photo 4. Without twisting the fibres, wind the fine marabou fibres up the shank, tie down at the thorax and remove the excess marabou. Now bring the oval tinsel rib up the abdomen in even, open turns, tie down at the thorax and trim off the excess tinsel.

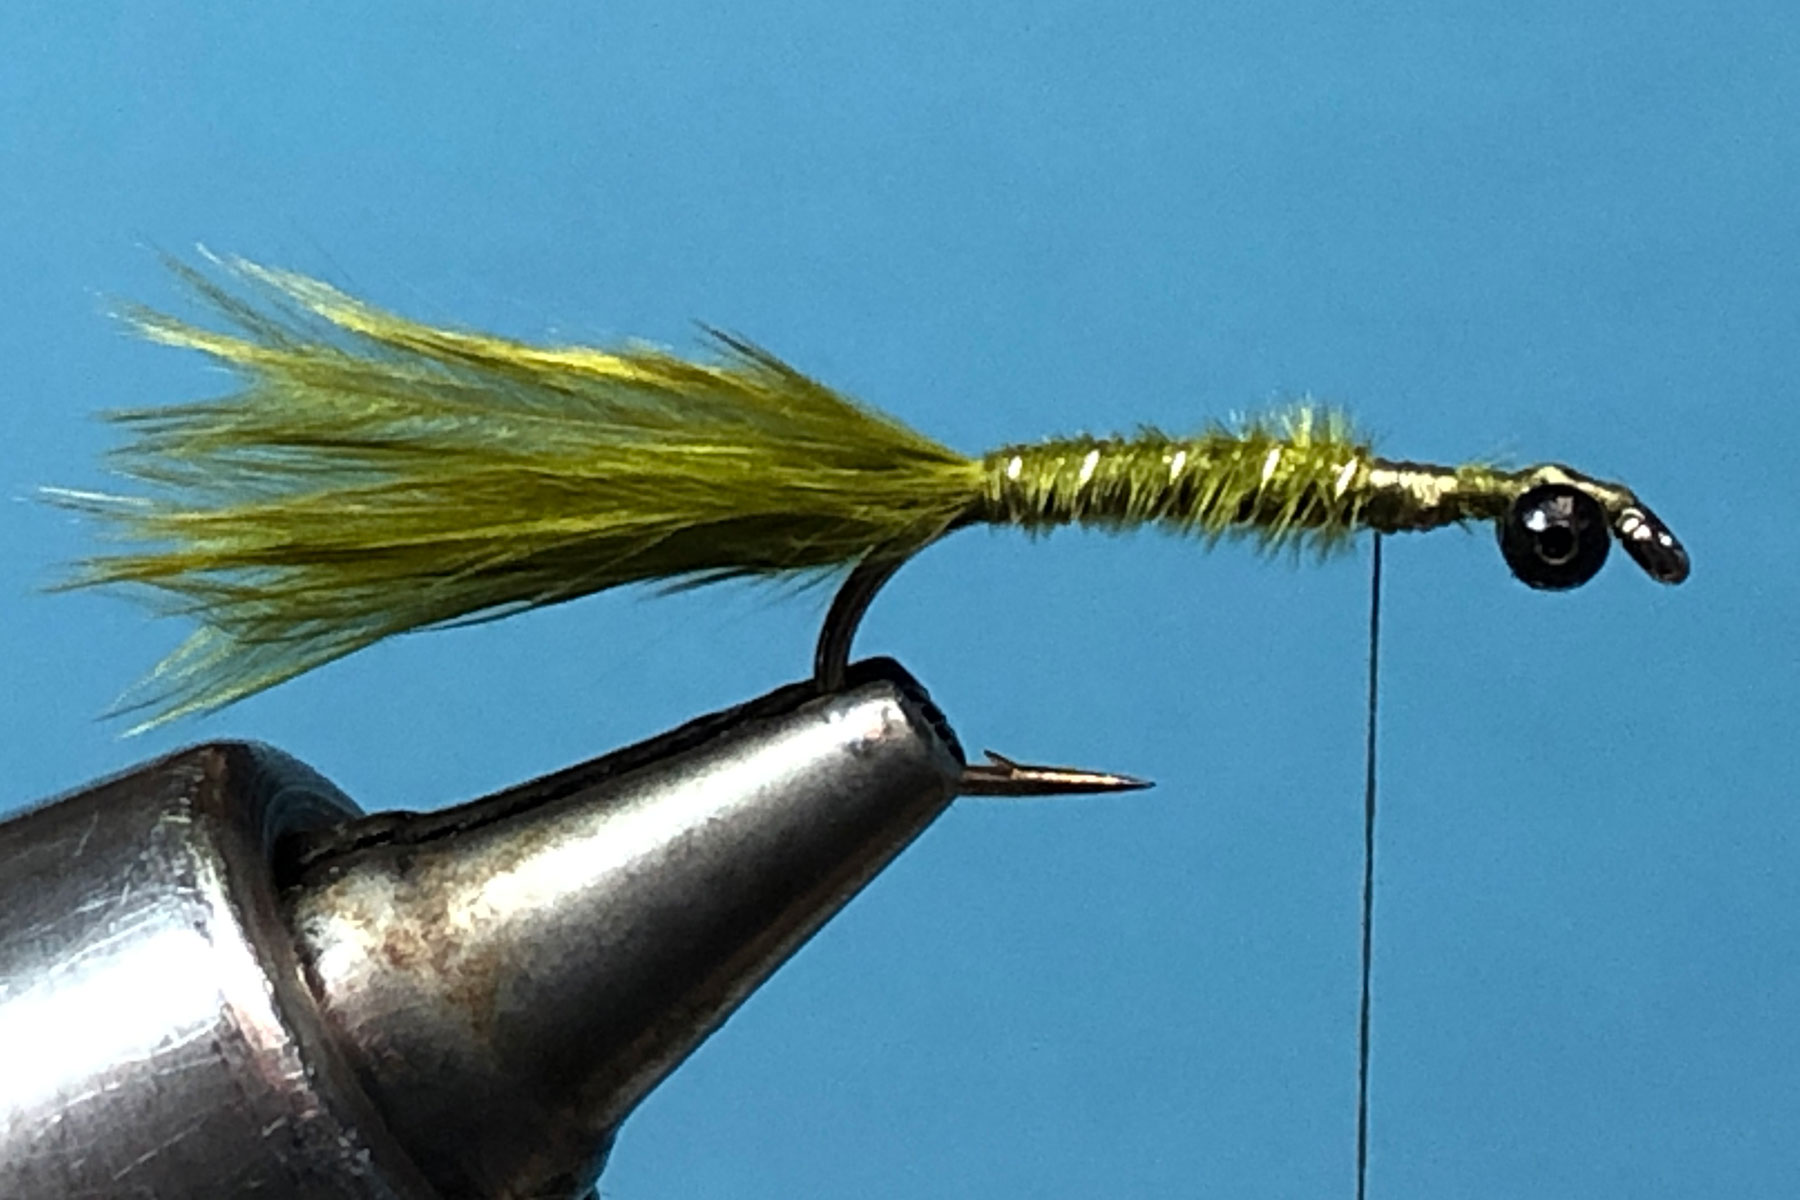
Photo 5. Take a small bunch of cock pheasant tail fibres and trim off the tips. With the fibres pointing out over the hook eye, tie in the bunch on top of the shank, and bind down the fibres to immediately behind the hook eye, then return the thread to the rear of the thorax.
Photo 6. To form the legs, snip out the tip of a dyed yellow partridge feather to form a V shape. Leave about 8 -10 fibres either side of the V and remove all the other fibres. Position the V on top of the shank with the fibres on either side of the shank, pointing rearwards to about the barb position, and tie in the feather securely. Remove the excess feather stalk.


Photo 7. Take the thread to immediately behind the hook eye, dub a couple of marabou fibres sparingly onto the thread and wind on the dubbing immediately behind the hook eye. Continue to dub marabou fibres in small quantities so that the dubbing can be wound neatly between the bead chain eyes and on to form a slim thorax. Leave the thread at the rear of the thorax.
Photo 8. Pull the pheasant tail fibres straight back between the bead chain eyes and over the thorax and tie down at the rear of the thorax with two turns of well waxed thread. Add a drop of varnish or superglue to the thread and whip finish through it using no more than 3 turns of thread, then remove the thread.


Photo 9. Trim off the excess pheasant tail fibres to leave a small stub pointing rearwards to complete the fly.
Tying Tips
- There is a tendency for many large olive lures to be described as damsel nymphs, but damsel nymphs are slim and only about 2 – 3 cm long, so this pattern is an attempt at a closer representation of the natural.
- Damsel nymphs move sinuously in the water, so keep materials to a minimum – fine and sparse is the way to go.
- Use a fine thread to avoid an unsightly thread build up at the rear of the thorax.
- Tying the bead chain eyes below the shank helps to stop the fly from swimming upside down. Always ensure the eyes are square to the shank before applying the superglue.
- A slim marabou tail of a dozen or so fibres will maximize movement in the water.
- Keep all the tie in lengths of material the same length as the abdomen. This will avoid any unsightly lumps and bumps when the abdomen is wound.
- Use long marabou fibres with a good gradation in the length of the flue. This will not only help with manipulation of the marabou, but it will also produce a nicely tapered abdomen, particularly if the fibres can be kept straight and untwisted.
- For added security, the marabou fibres used for the abdomen can be wound over wet varnish or superglue and left to dry thoroughly before completing the rest of the fly.
- When creating the thorax, dub the marabou fibres onto the thread a little at a time, starting immediately behind the eye. I dub the head, between the eyes, and the thorax separately, so as not to compromise the bead chain eyes.
- Damsel nymphs tend to darken as they mature, so for spring fishing it is worthwhile having a few patterns tied with pale olive marabou.
Les Lockey – June ’22
The Yellow Owl (Emerger) – A Fly for June
Hook: Kamasan B160, short shank hook, size 12.
Thread: Pale yellow Textreme micro floss, 110 Denier, from FLYBOX.
Rib: Black tying thread.
Abdomen: Same as for thread.
Shuttlecock: 4 to 6 natural CDC feathers, depending on feather quality.
Thorax: Hare’s ear fur or fox squirrel body fur, dubbed.

Photo 1. Place the hook in the vice, catch on the floss behind the eye and wind it in touching turns to the thorax, then remove the tag end of floss.
Photo 2. Catch in the black thread rib and continue to wind the floss in touching turns to part way round the hook bend, binding down the rib as you go.


Photo 3. Using touching turns, wind the floss back to the thorax, then wind the black thread in open spirals up the abdomen to the thorax. Secure with floss and remove the excess thread rib.
Photo 4. Align the tips of the CDC feathers and with the tips forward of the eye and about the same length as the hook shank, tie them in. Trim off the waste CDC at a slight angle and bind down the ends securely with floss.
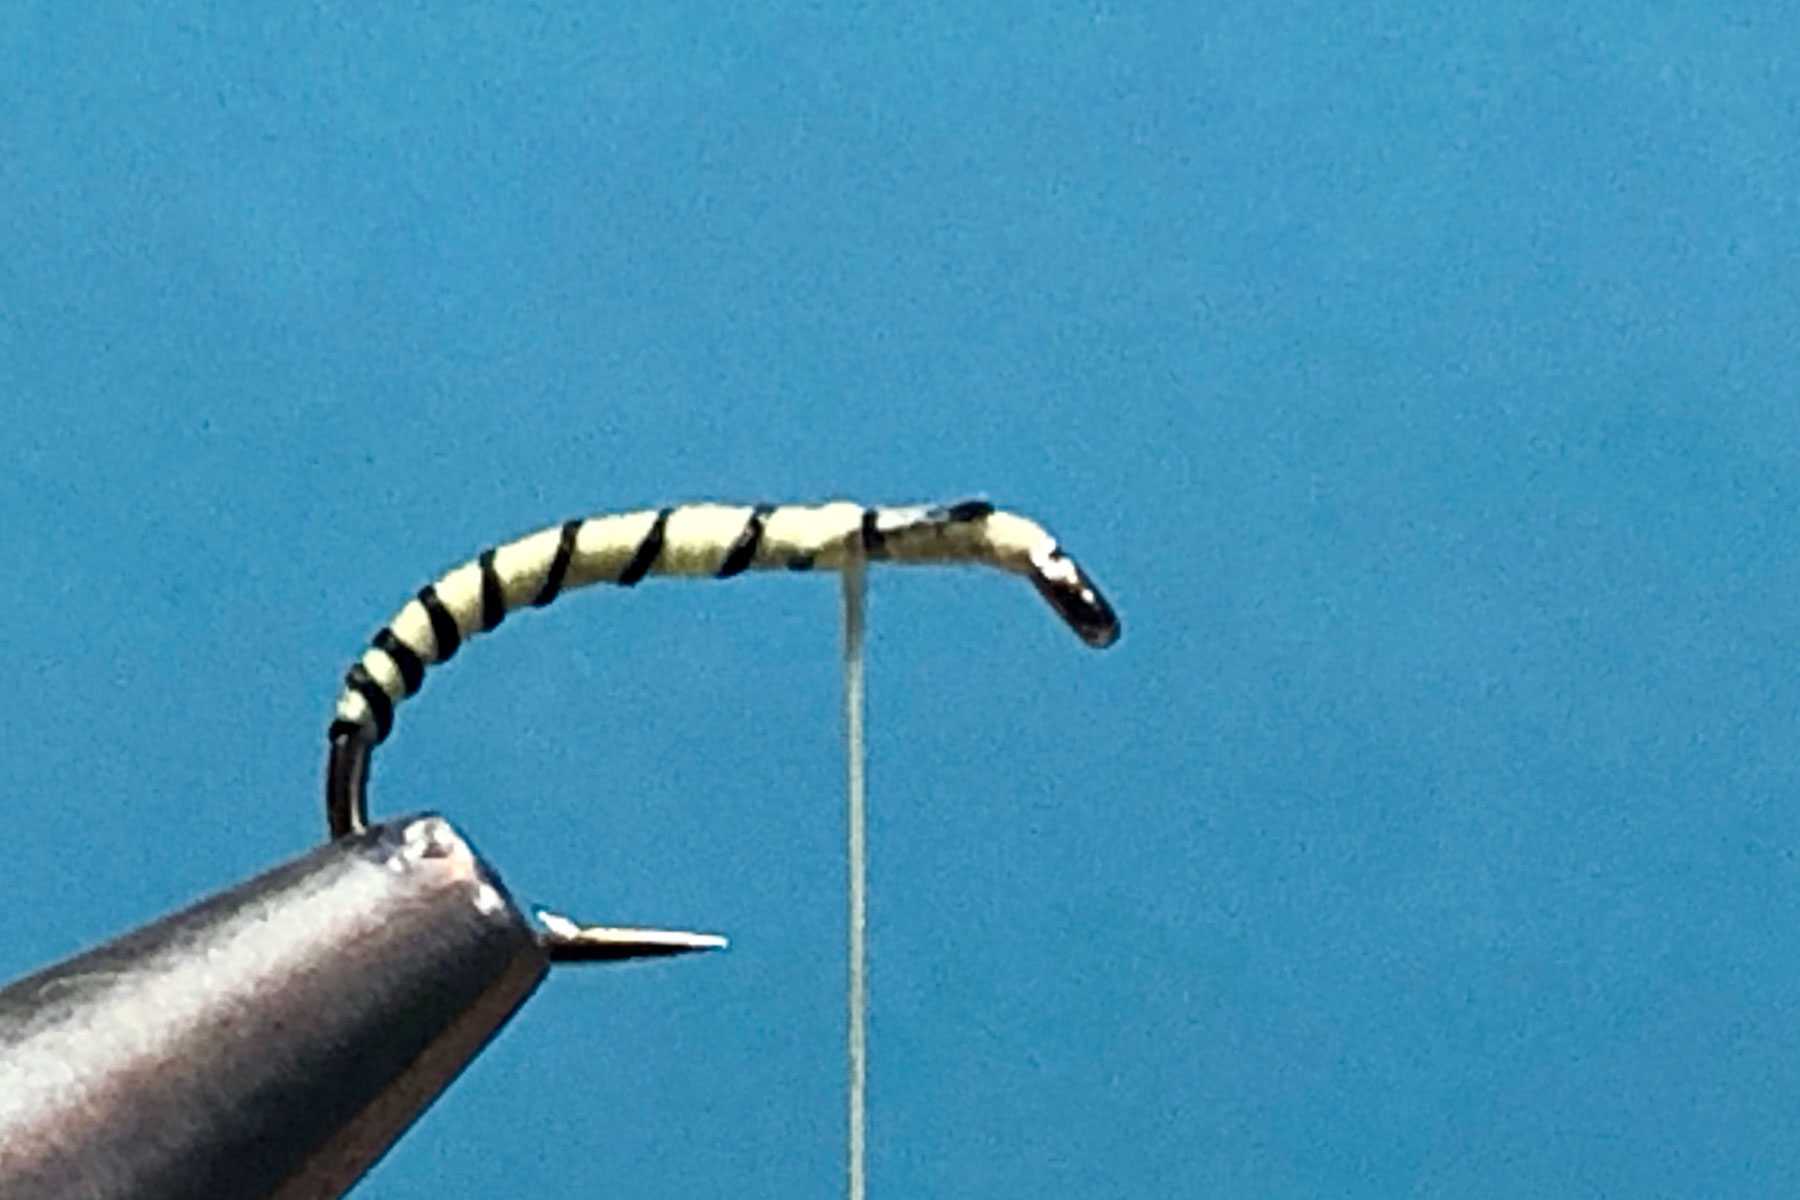
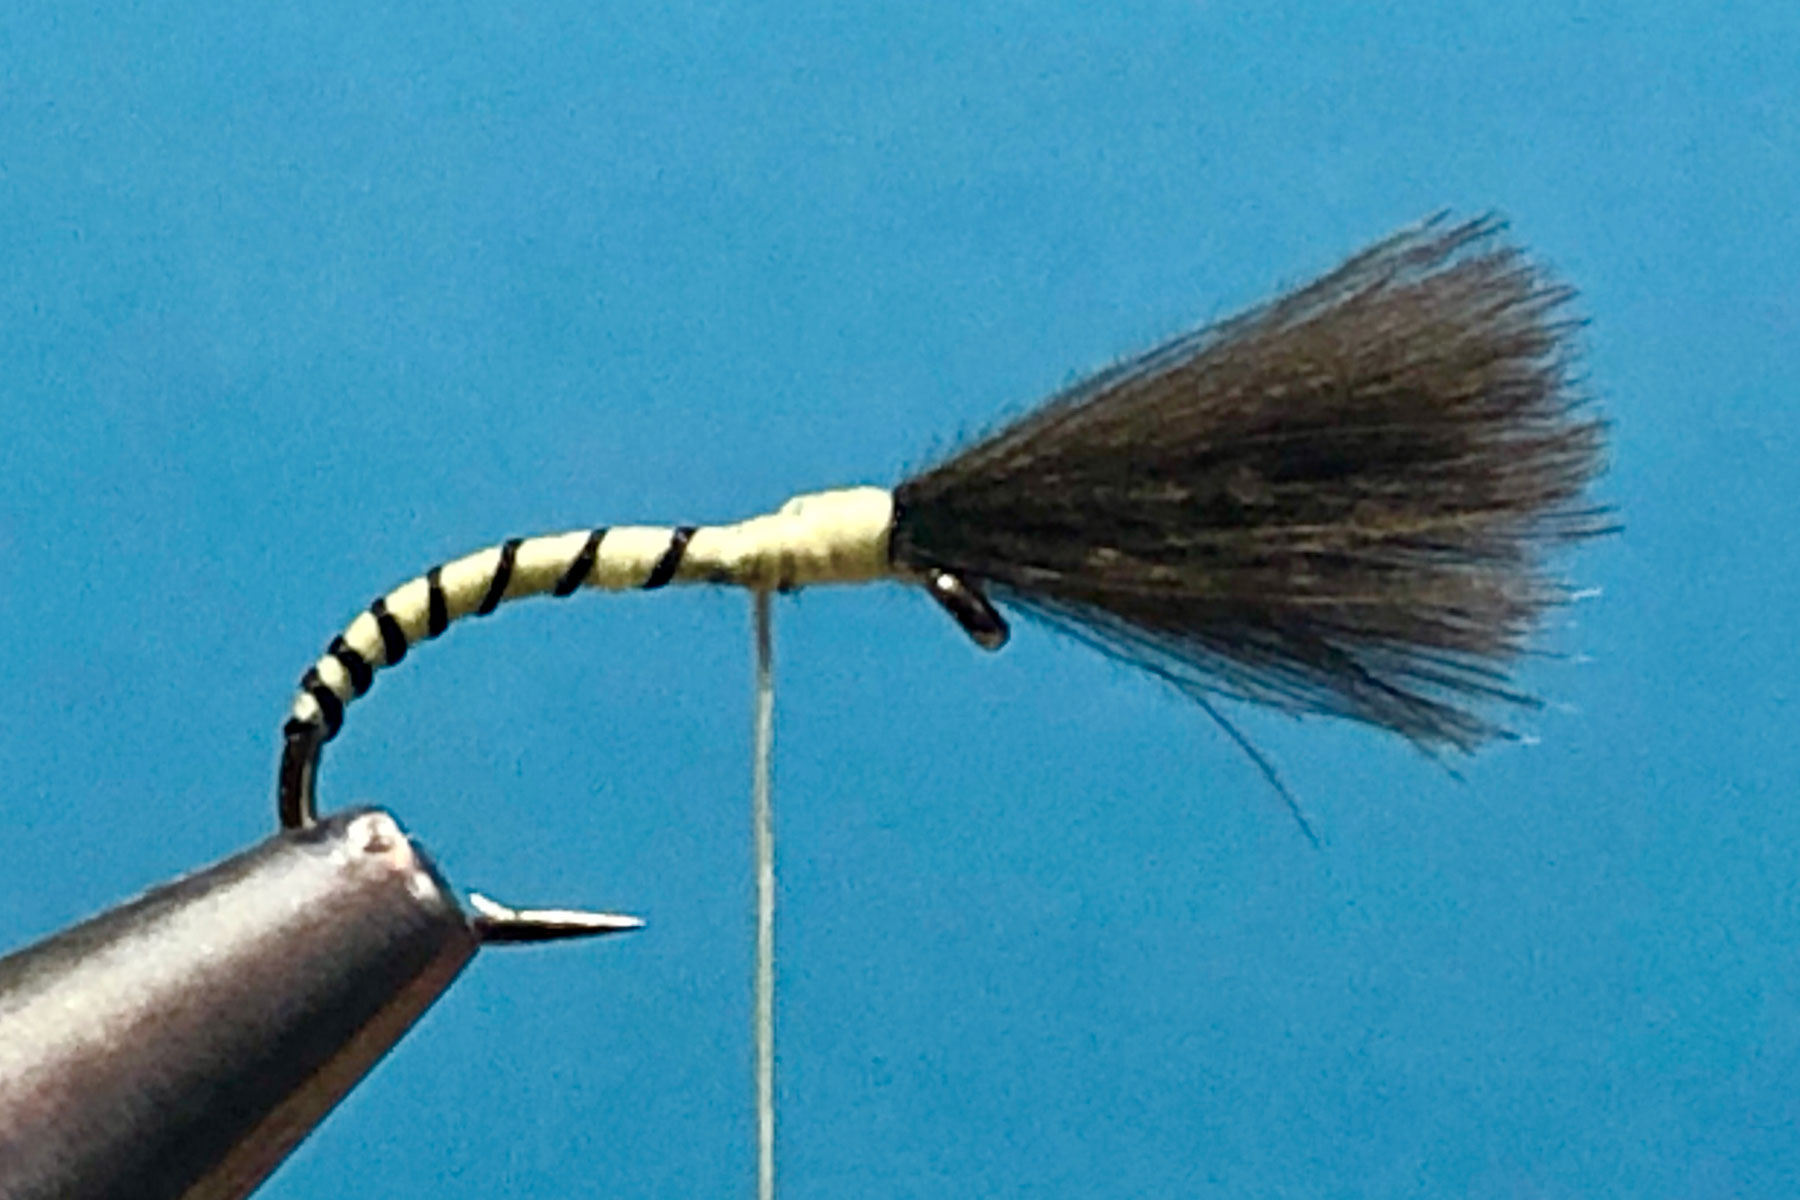
Photo 5. Dub the fur onto the floss and wind on the dubbing to form a small but spikey thorax.
Photo 6. Bring the floss in front of the CDC feathers, add a small drop of varnish or superglue to the floss and make a 3 turn whip finish though it then remove the floss to complete the fly.
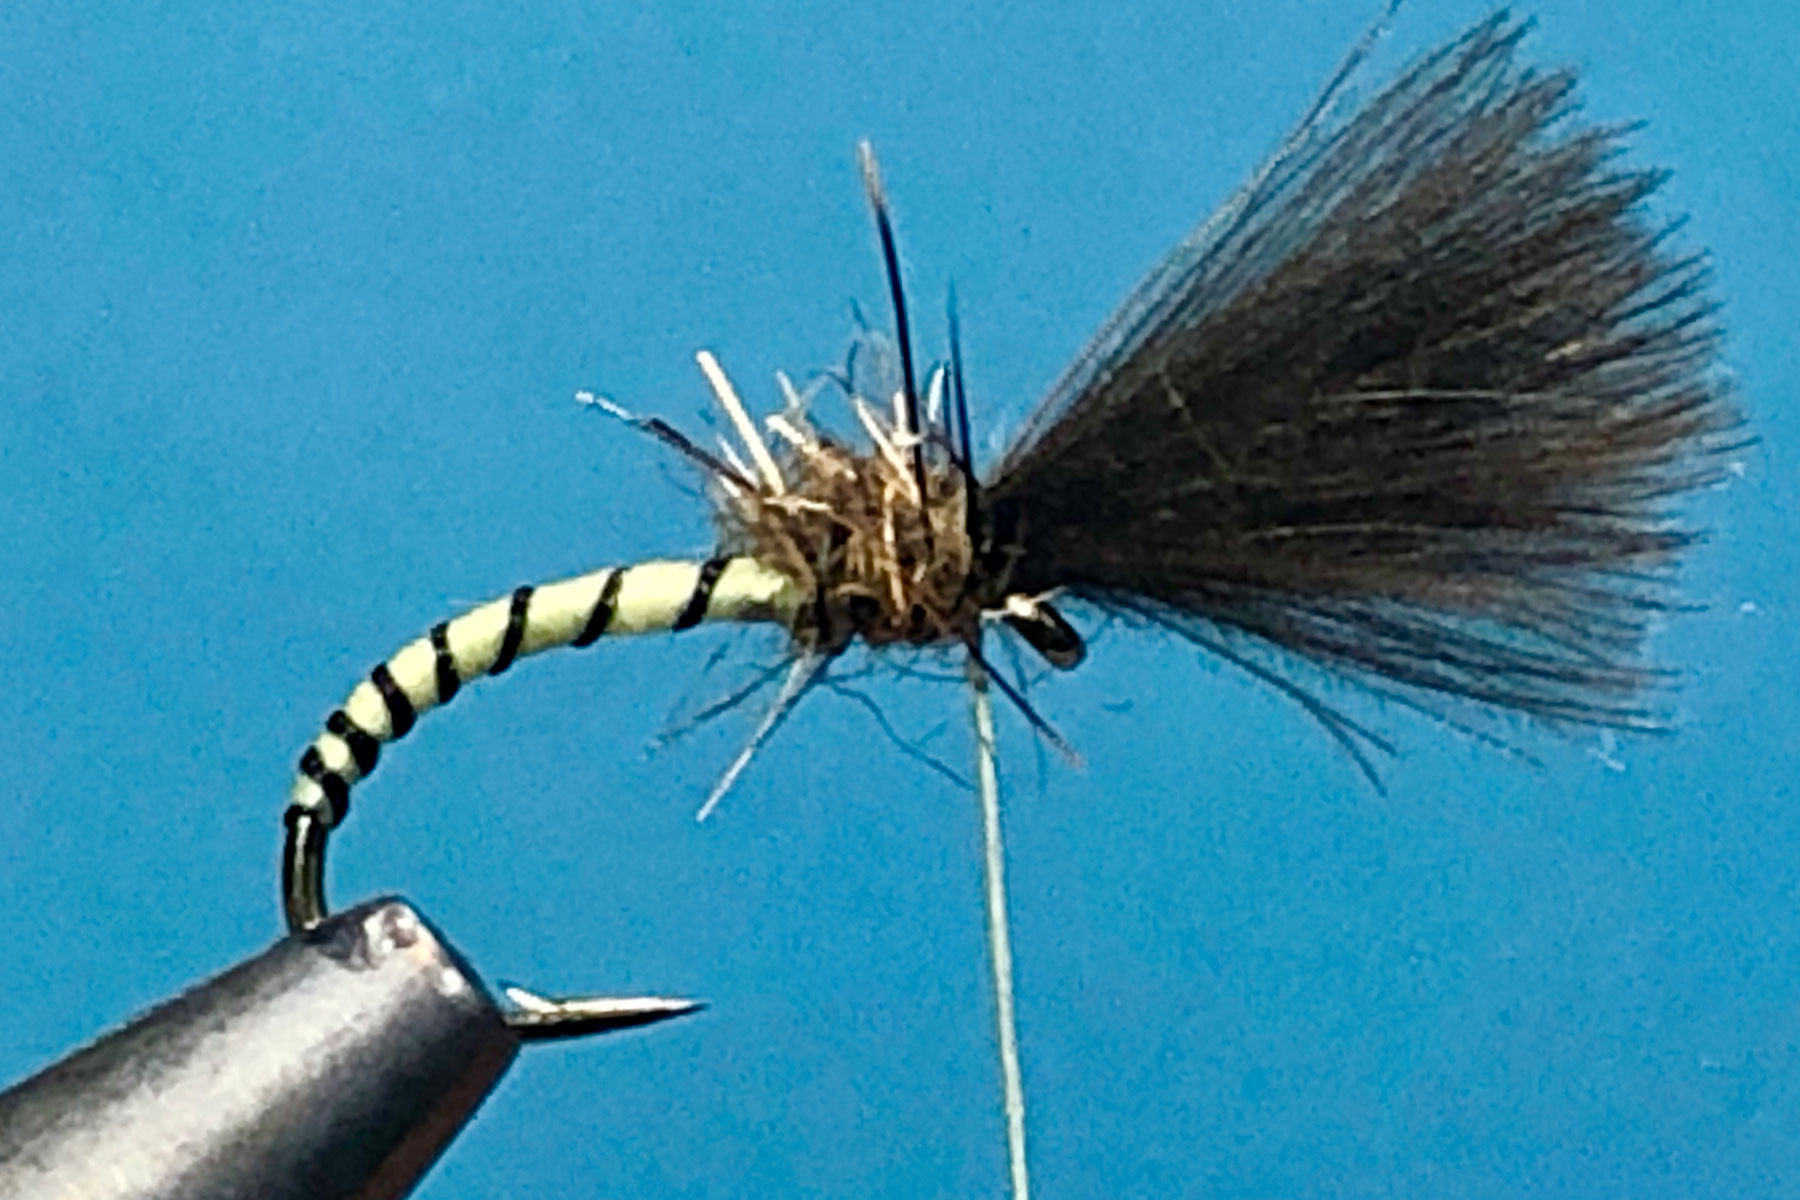

Tying Tips
- Textreme micro floss is relatively strong, but being multistranded, it is easily frayed which weakens it considerably, so I use the floss in a smooth bobbin holder and try to remember to keep it well away from hook points.
- If you don’t want to use floss, then Uni 8/0 in Light Cahill or Textreme 8/0 in cream are decent alternatives.
- Use a lightly waxed, twisted black thread for the rib.
- Whenever possible, I prefer to obtain my dubbing fur directly from the hide of the animal. However, as only limited quantities of the short spikey fur can be harvested from a pair of hare’s ears, I usually use fox squirrel body fur as a more cost-effective alternative.
- Prior to dubbing the thorax, spin the bobbin holder clockwise to twist the floss tight, then with moistened fingers, apply the fur to the floss a little at a time – a tiny amount of fur is all you need – apply too much and it either falls off, or clumps together resulting in a very bulky thorax.
- After the fly has been tied, I brush the CDC feathers with liquid Mucilin Dry Fly Silicone and leave to dry thoroughly for 24 hours. Newly treated feathers take on a waterlogged appearance, but after drying, a gentle finger rub restores them to their natural state, ready for your fly box. Treated flies will float like corks even after catching numerous fish.
- Leave the CDC quite long to cope with windy conditions, but in calm conditions, don’t be afraid to trim the CDC to half its normal length.
Les Lockey – May ’22
The Summer Bibio (dry) – A Fly for May
Hook: Kamasan B170, medium wire hook, size 14.
Thread: Black Semperfli Nanosilk, 30 Denier, or any fine black thread.
Rib: Black tying thread.
Abdomen: Black Superfine dubbing, or similar fine dry fly dubbing.
Legs: Natural CDC feather, wound as a hackle.
Under Wing (Optional): 2 Strands of pearl Krinkle Mirror Flash.
Over Wing: 2 Strands of white Aero Dry Wing.
Thorax: Black Ice Dub, or similar.
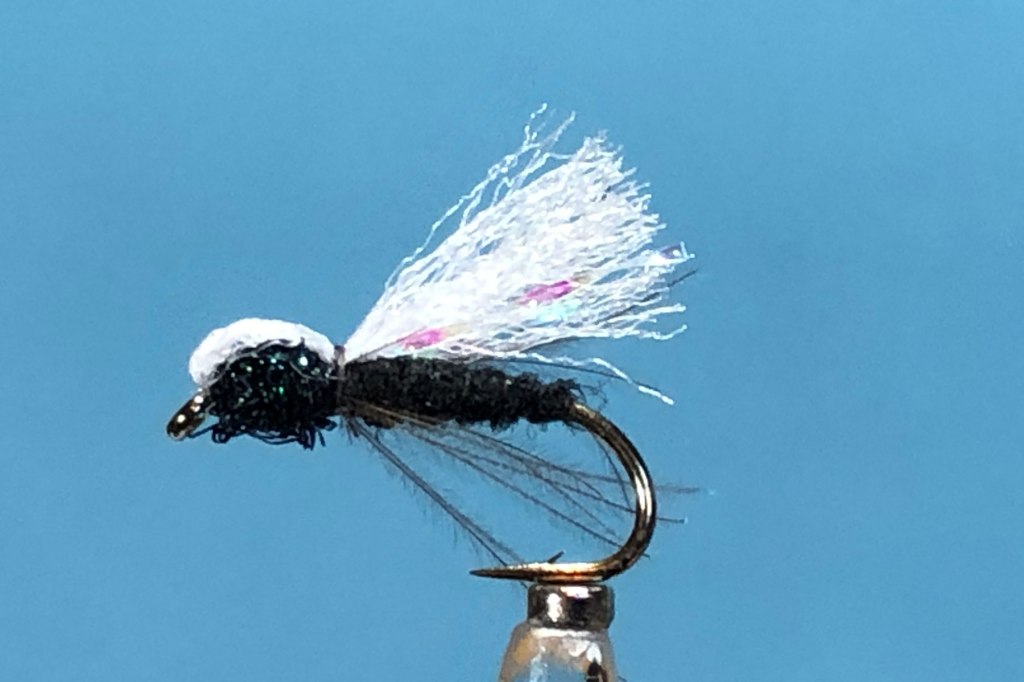
Photo 1.Place the hook in the vice and catch on the thread behind the eye leaving a long thread tag. Now wind the thread in touching turns to opposite the barb. Do not cut off the thread tag as this will be used for the rib.
Photo 2.Lightly dub a thin noodle of Superfine dubbing onto the thread then wind it up the shank to form a slim tapered abdomen, stopping at the thorax. Now, use the thread tag to rib the abdomen in open spirals and tie it down at the thorax and remove the excess tag.
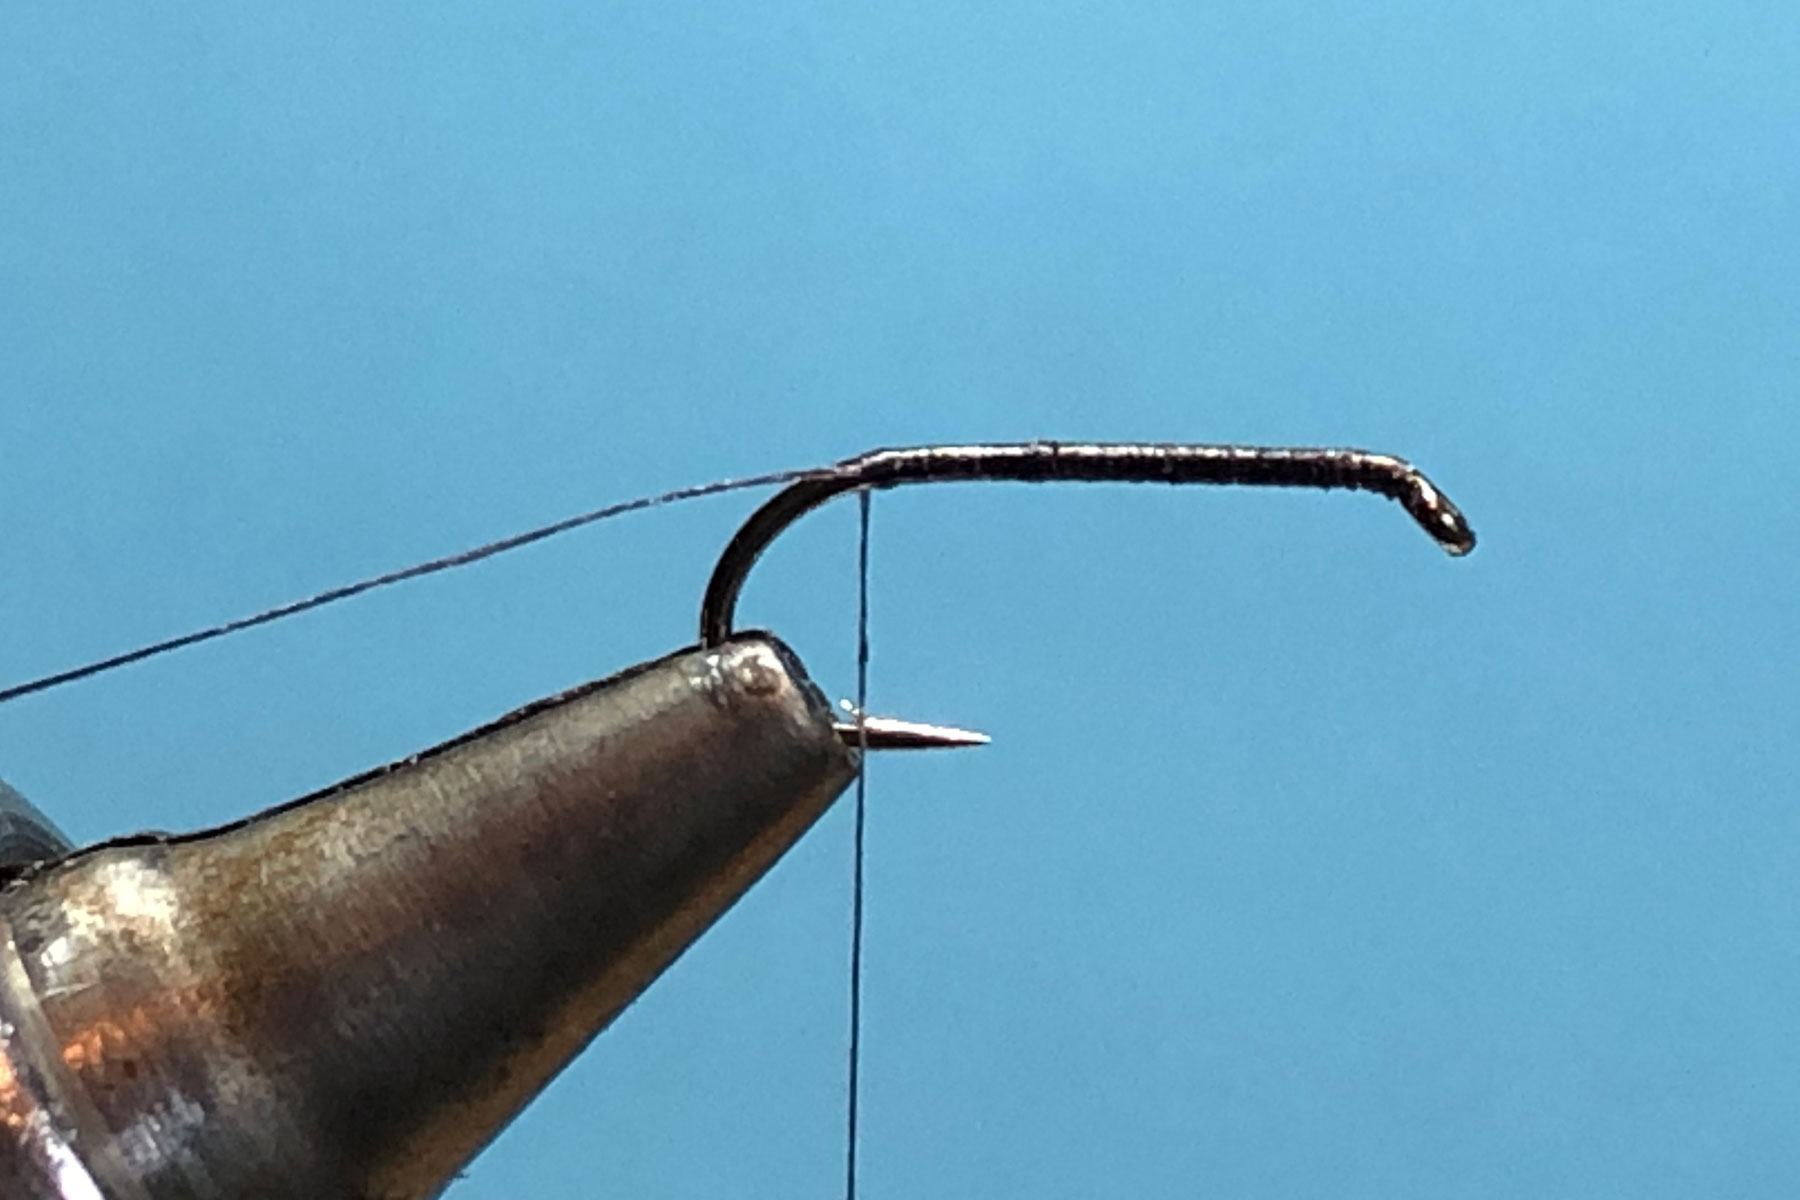

Photo 3.Tie in a small CDC feather by its tip using well waxed thread and remove any excess tip. Wind on one turn of the feather and secure it with thread before removing the excess feather.
Photo 4.Tie in 2 strands of Mirror Flash extending rearwards over the back of the fly.

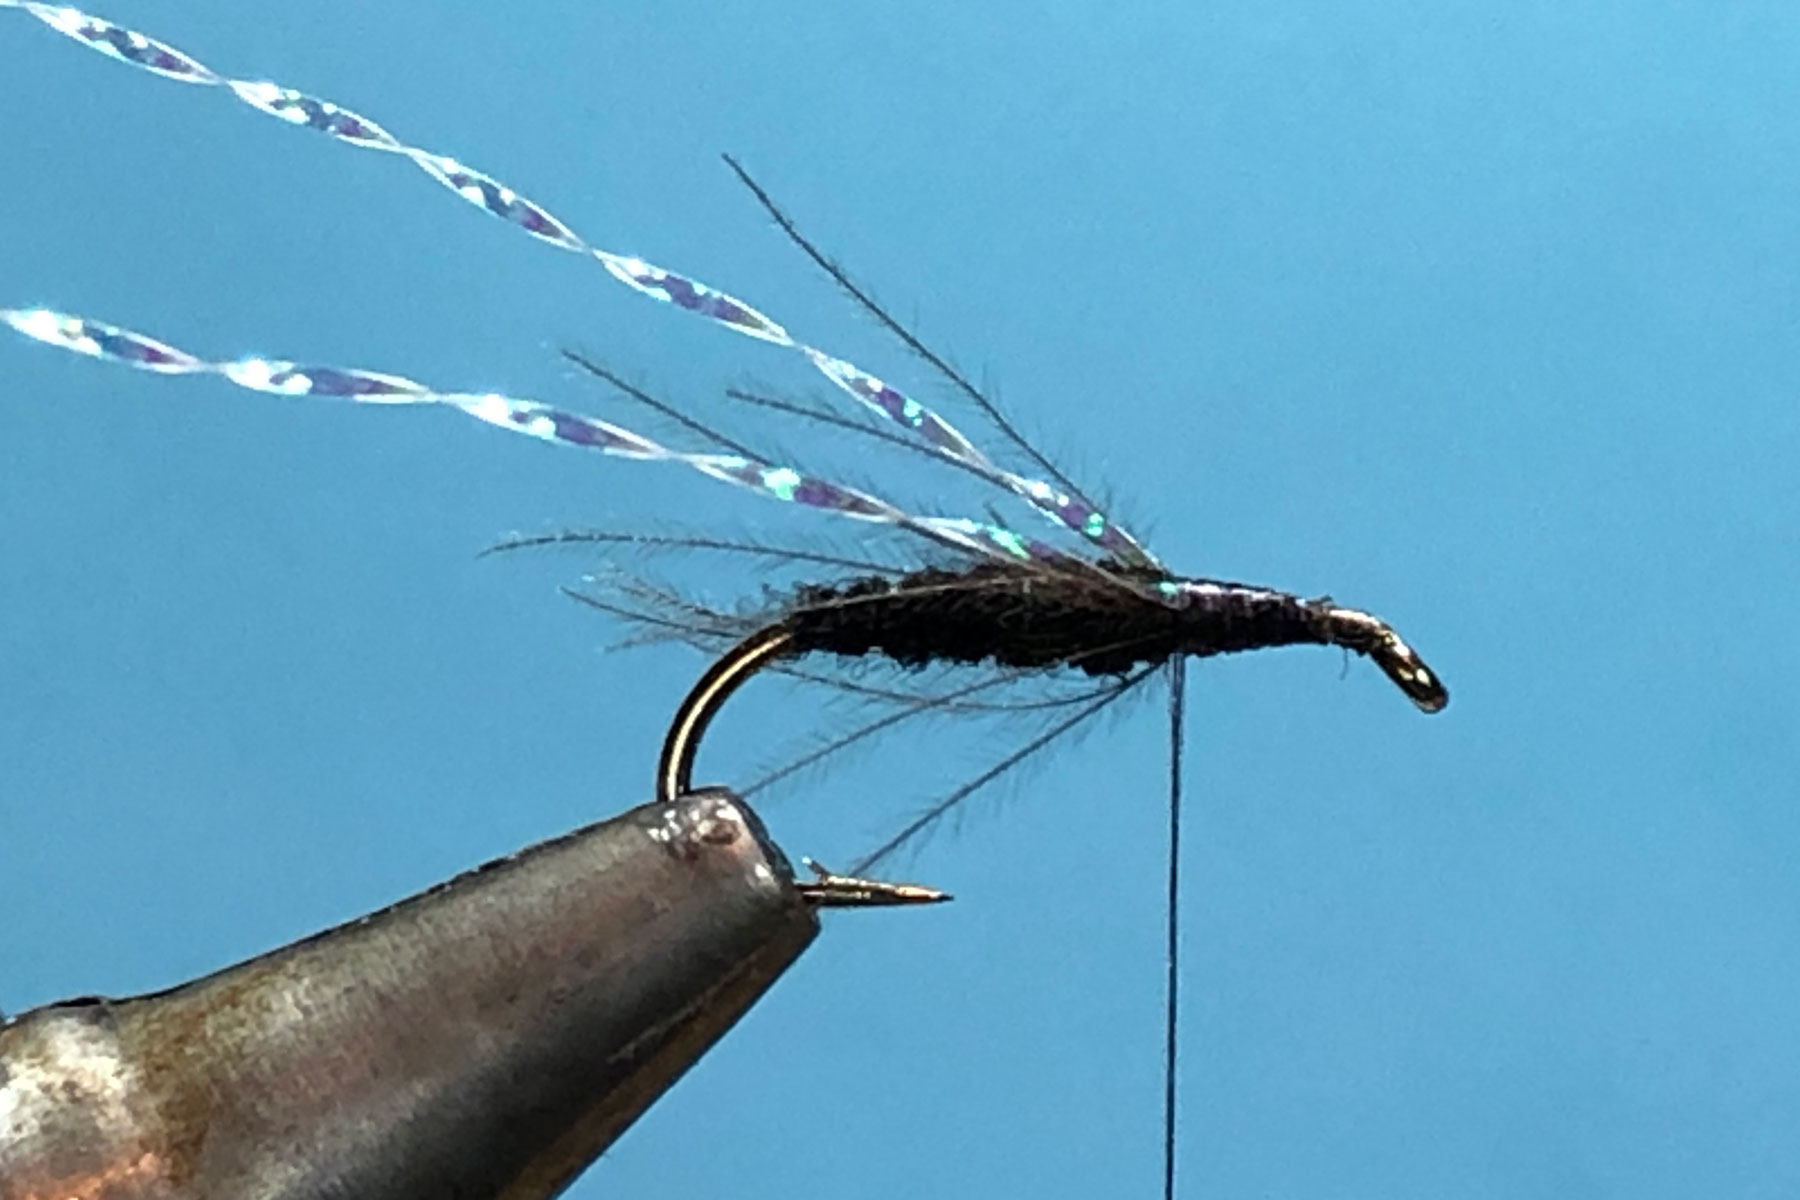
Photo 5.Tie in 2 strands of Aero Dry Wing forward over the eye, ensuring the thread finishes immediately behind the eye.
Photo 6.Dub a small pinch of Ice Dub onto the thread and wind it rearwards forming a small ball shaped thorax, leaving the thread immediately in front of the CDC fibres.

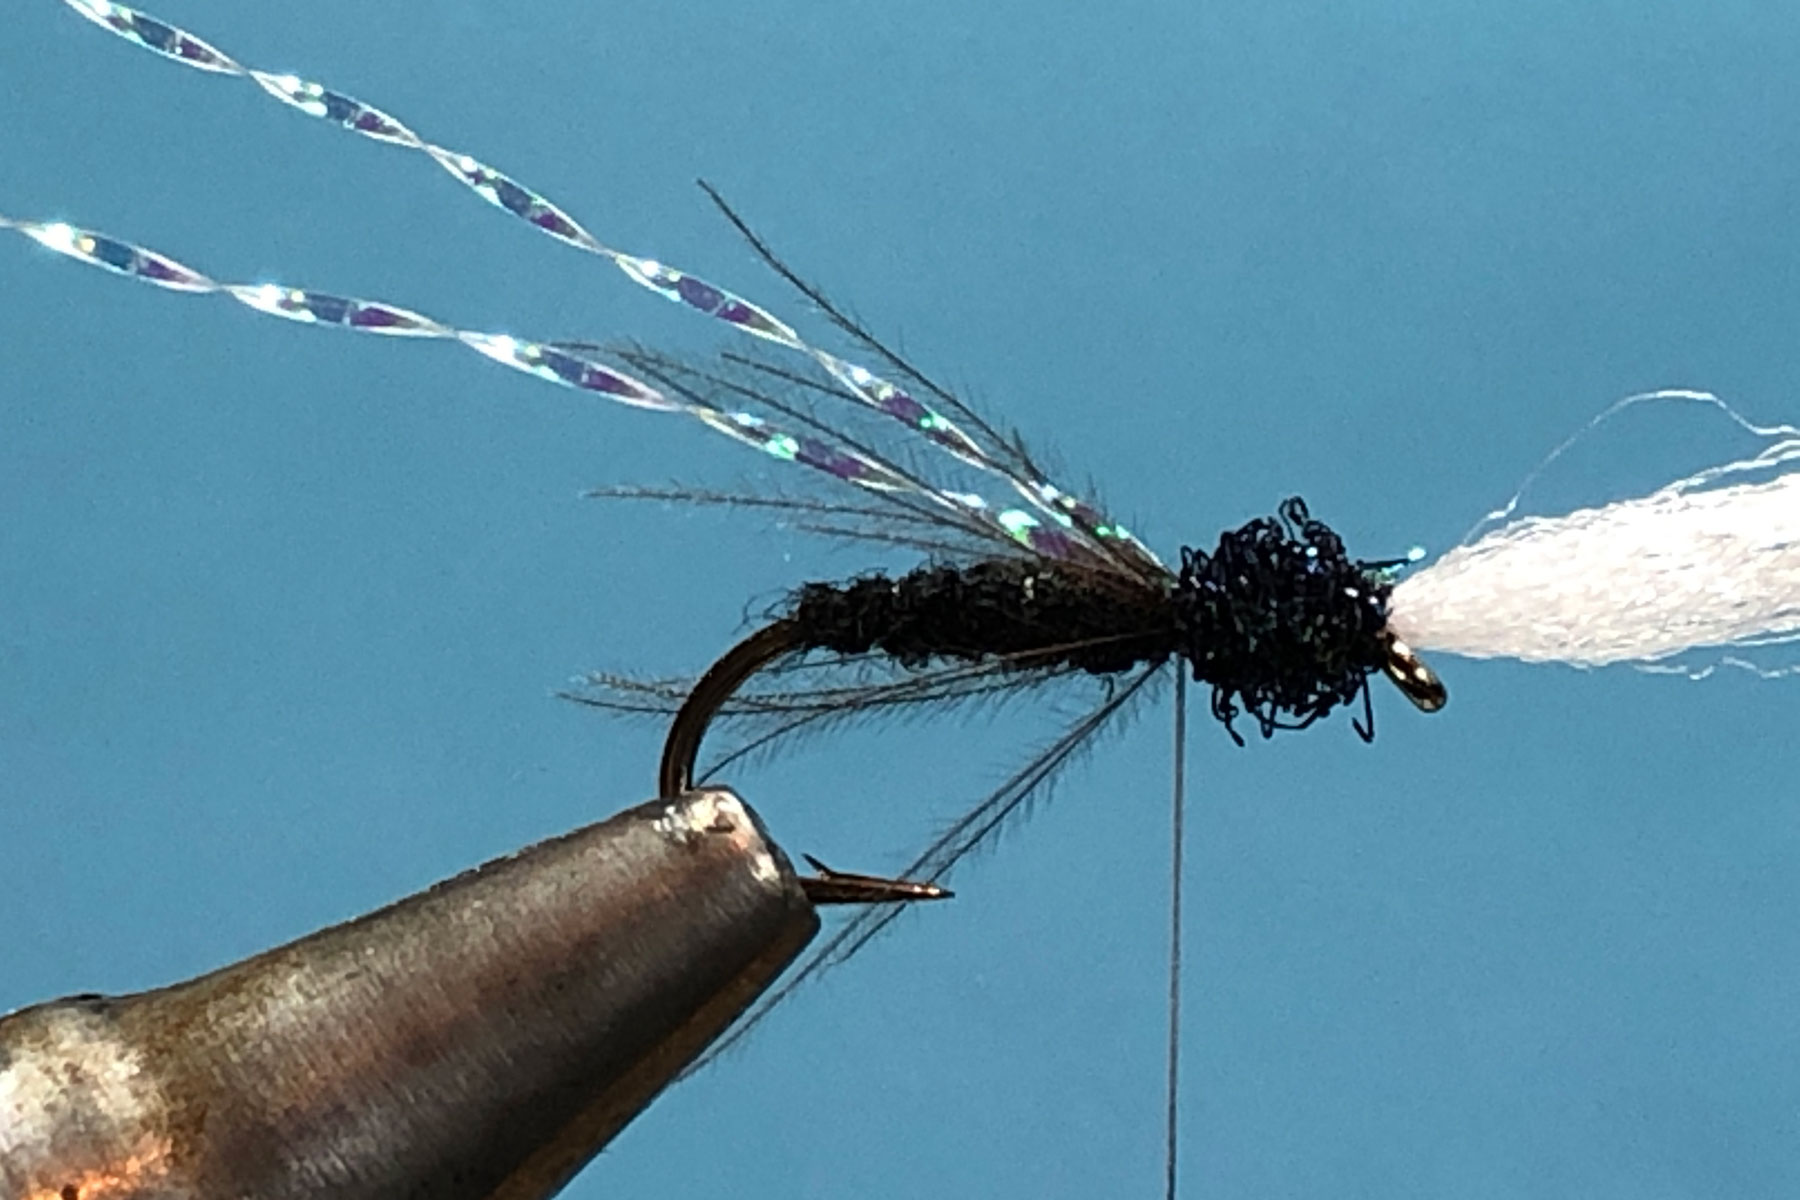
Photo 7.Pull the Aero wing material back over the top of the thorax and tie it down with just one turn of well waxed thread. Add a drop of varnish or superglue to the thread and whip finish though it with only 2 turns of thread and cut off the thread.
Photo 8.Trim both the Mirror Flash and Aero Dry Wing to the hook length to complete the fly.
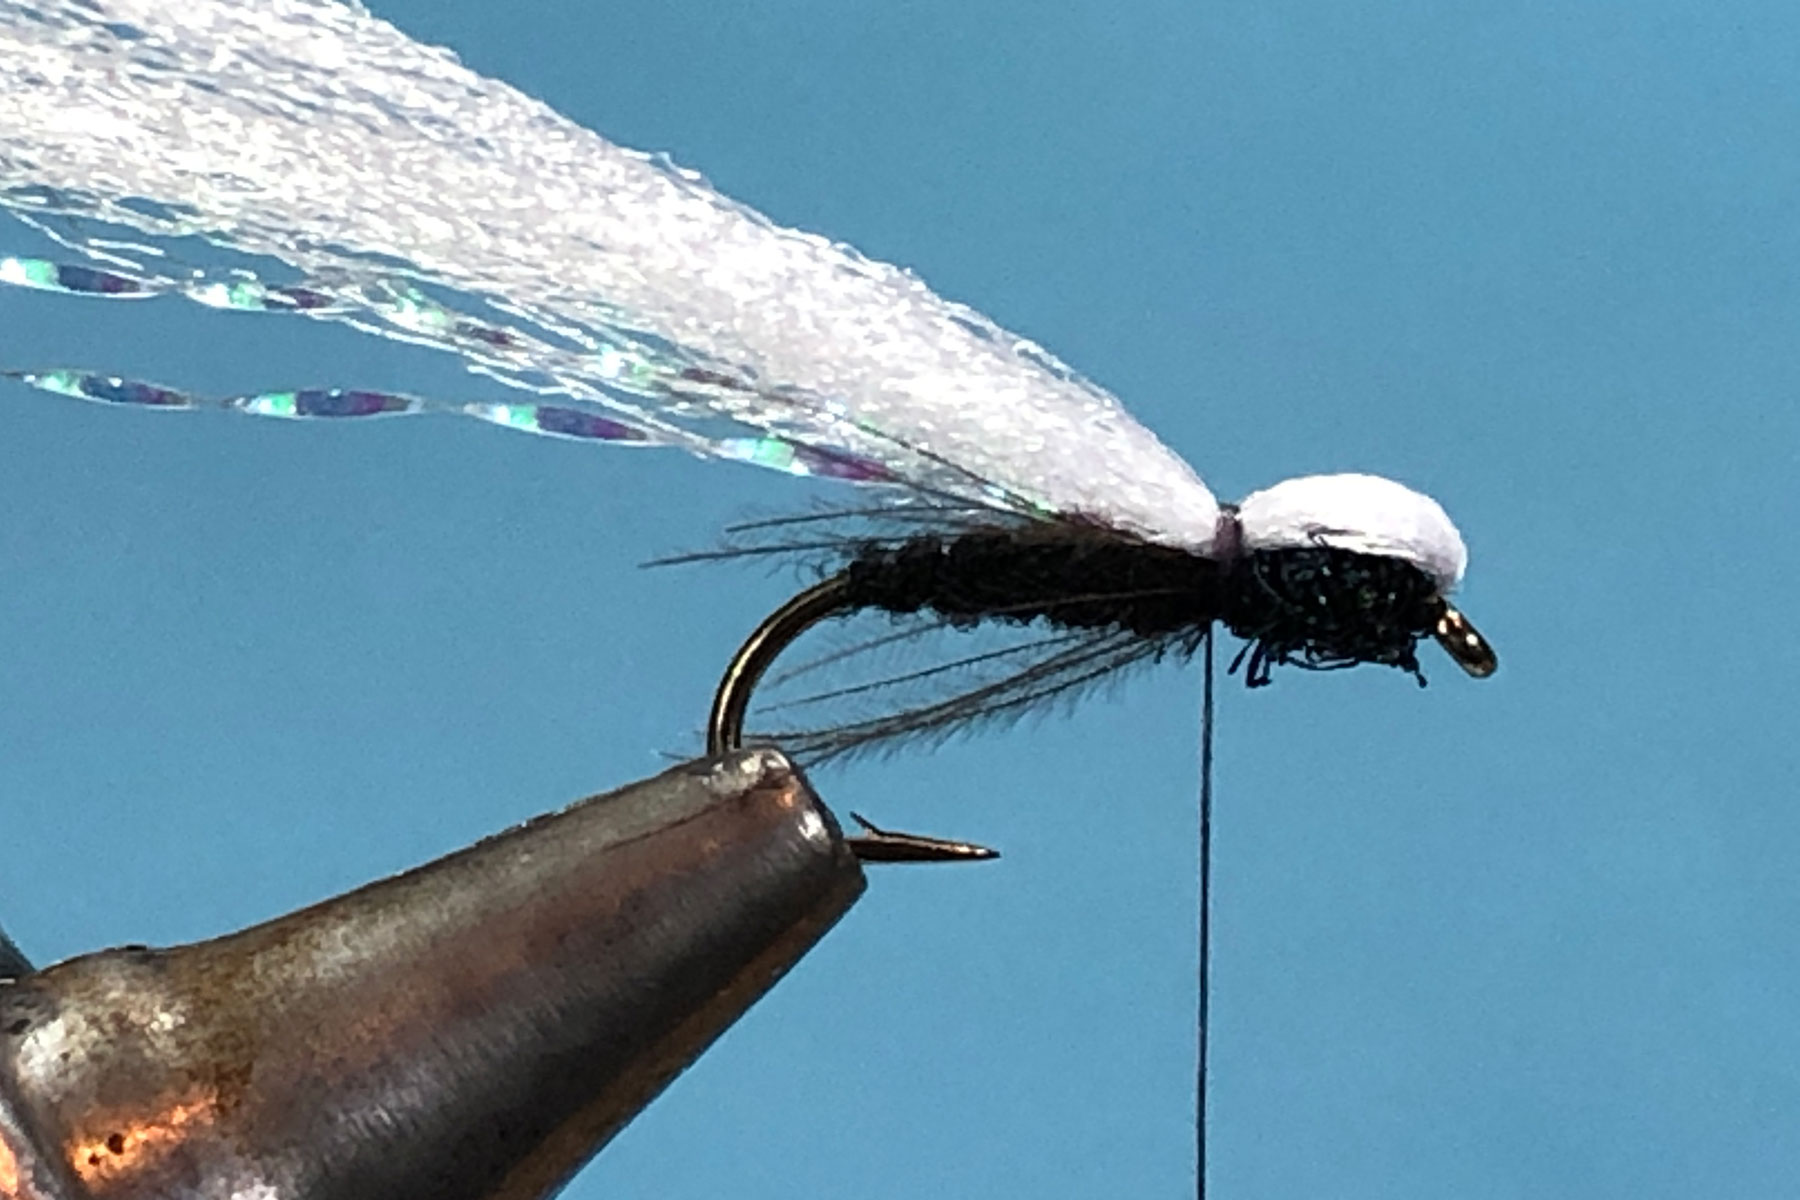

Tying Tips
- Fine threads such as Sheer 14/0 or Veevus 16/0 help to avoid an unsightly buildup of thread when finishing off behind the thorax. My preference is for 30 denier Semperfli Nanosilk, which is a very fine and unbelievably strong GSP (gel spun polyethylene) type of thread, but it does require regular waxing to stop it slipping.
- To help create an even thread base, hold the tag end of thread tight and at an angle of about 60 degrees to the hook shank, then wind the thread onto the tag just before the shank. In this way, the tag acts both as a stop, to prevent the thread from moving too far forward and as a guide, ensuring each thread turn naturally butts up against the previous turn.
- If the CDC legs are too long, a more natural result is produced by pinching off the excess with finger and thumb rather than cutting with scissors.
- I tie this fly both with and without the flash underwing, as sometimes the fish seem to prefer one over the other.
- To ensure the fly floats, brush it with liquid Mucilin Dry Fly Silicone and leave to dry thoroughly for 24 hours before transferring to your fly box.
Les Lockey – April ’22
Dennis the Menace Midge Pupa (Buzzer) – A Fly for April
Hook: Kamasan B160, short shank hook, size 12 to 16.
Thread: Black UTC 70.
Rib: Fine red wire.
Abdomen: Black UTC thread.
Wing buds/Cheeks: Medium holographic tinsel, red.
Thorax: Black UTC 70 thread.

Photo 1. Place the hook in the vice, catch on the thread behind the eye, wind it to the thorax position and remove the excess thread.
Photo 2. Catch in the wire rib underneath the hook shank and using touching turns of thread, bind it down to part way round the hook bend, returning the thread to the thorax position.


Photo 3. Wind the wire rib in open spirals up the abdomen and tie it in at the thorax. Continue to bind down the wire to the eye and worry off the excess wire.
Photo 4. Form the holographic tinsel into a loose loop behind the hook bend and secure the two ends underneath the thorax.
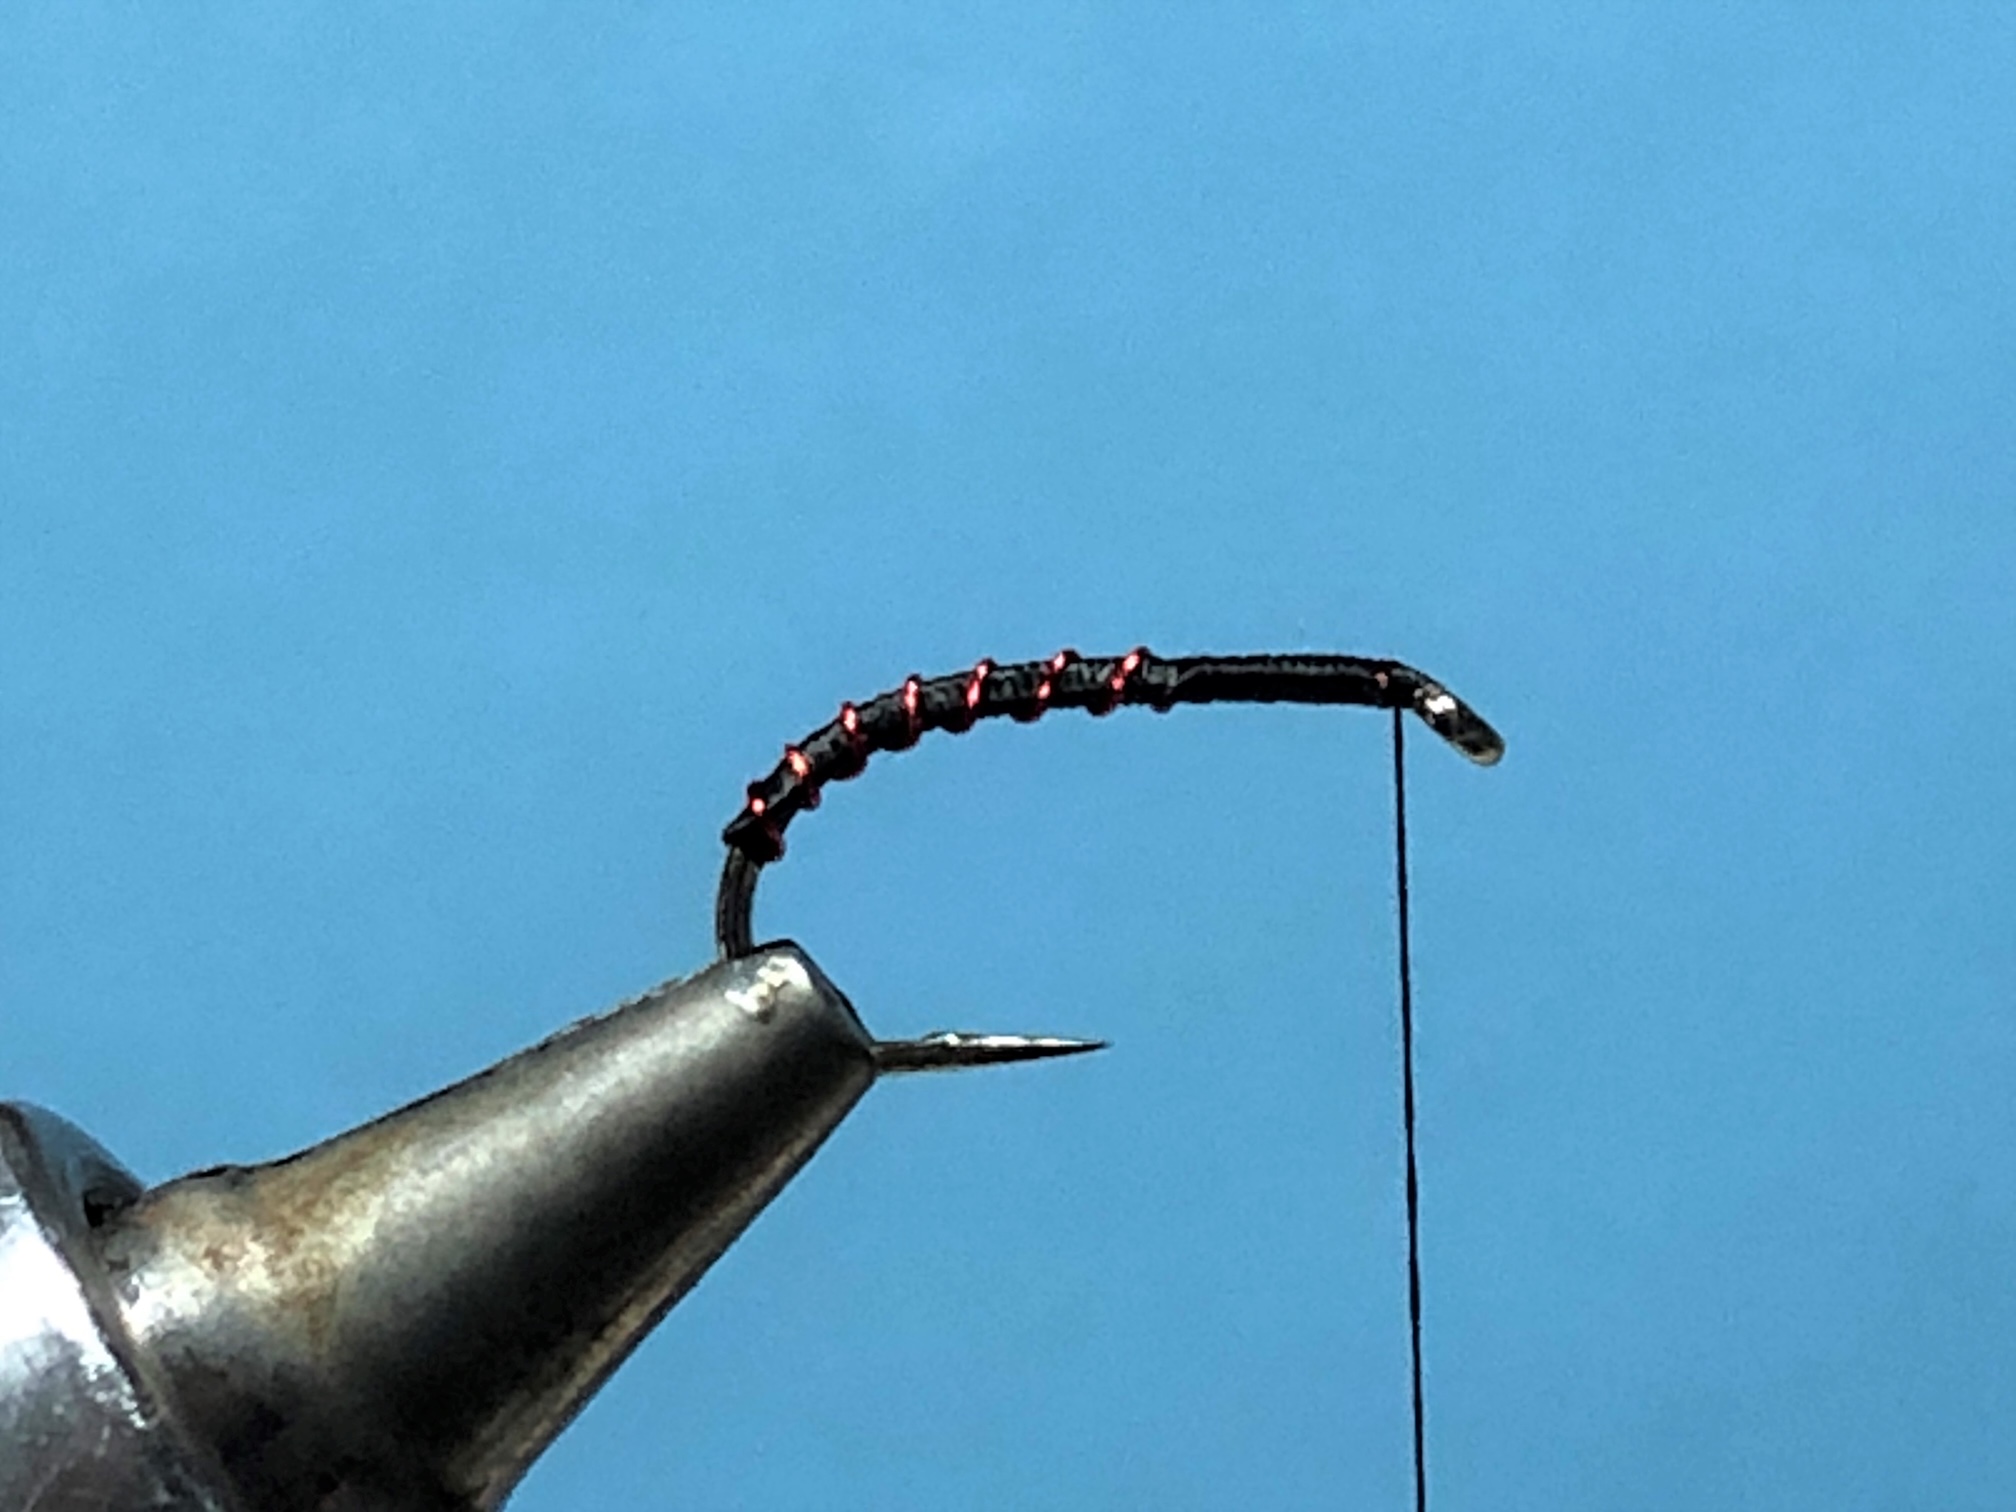
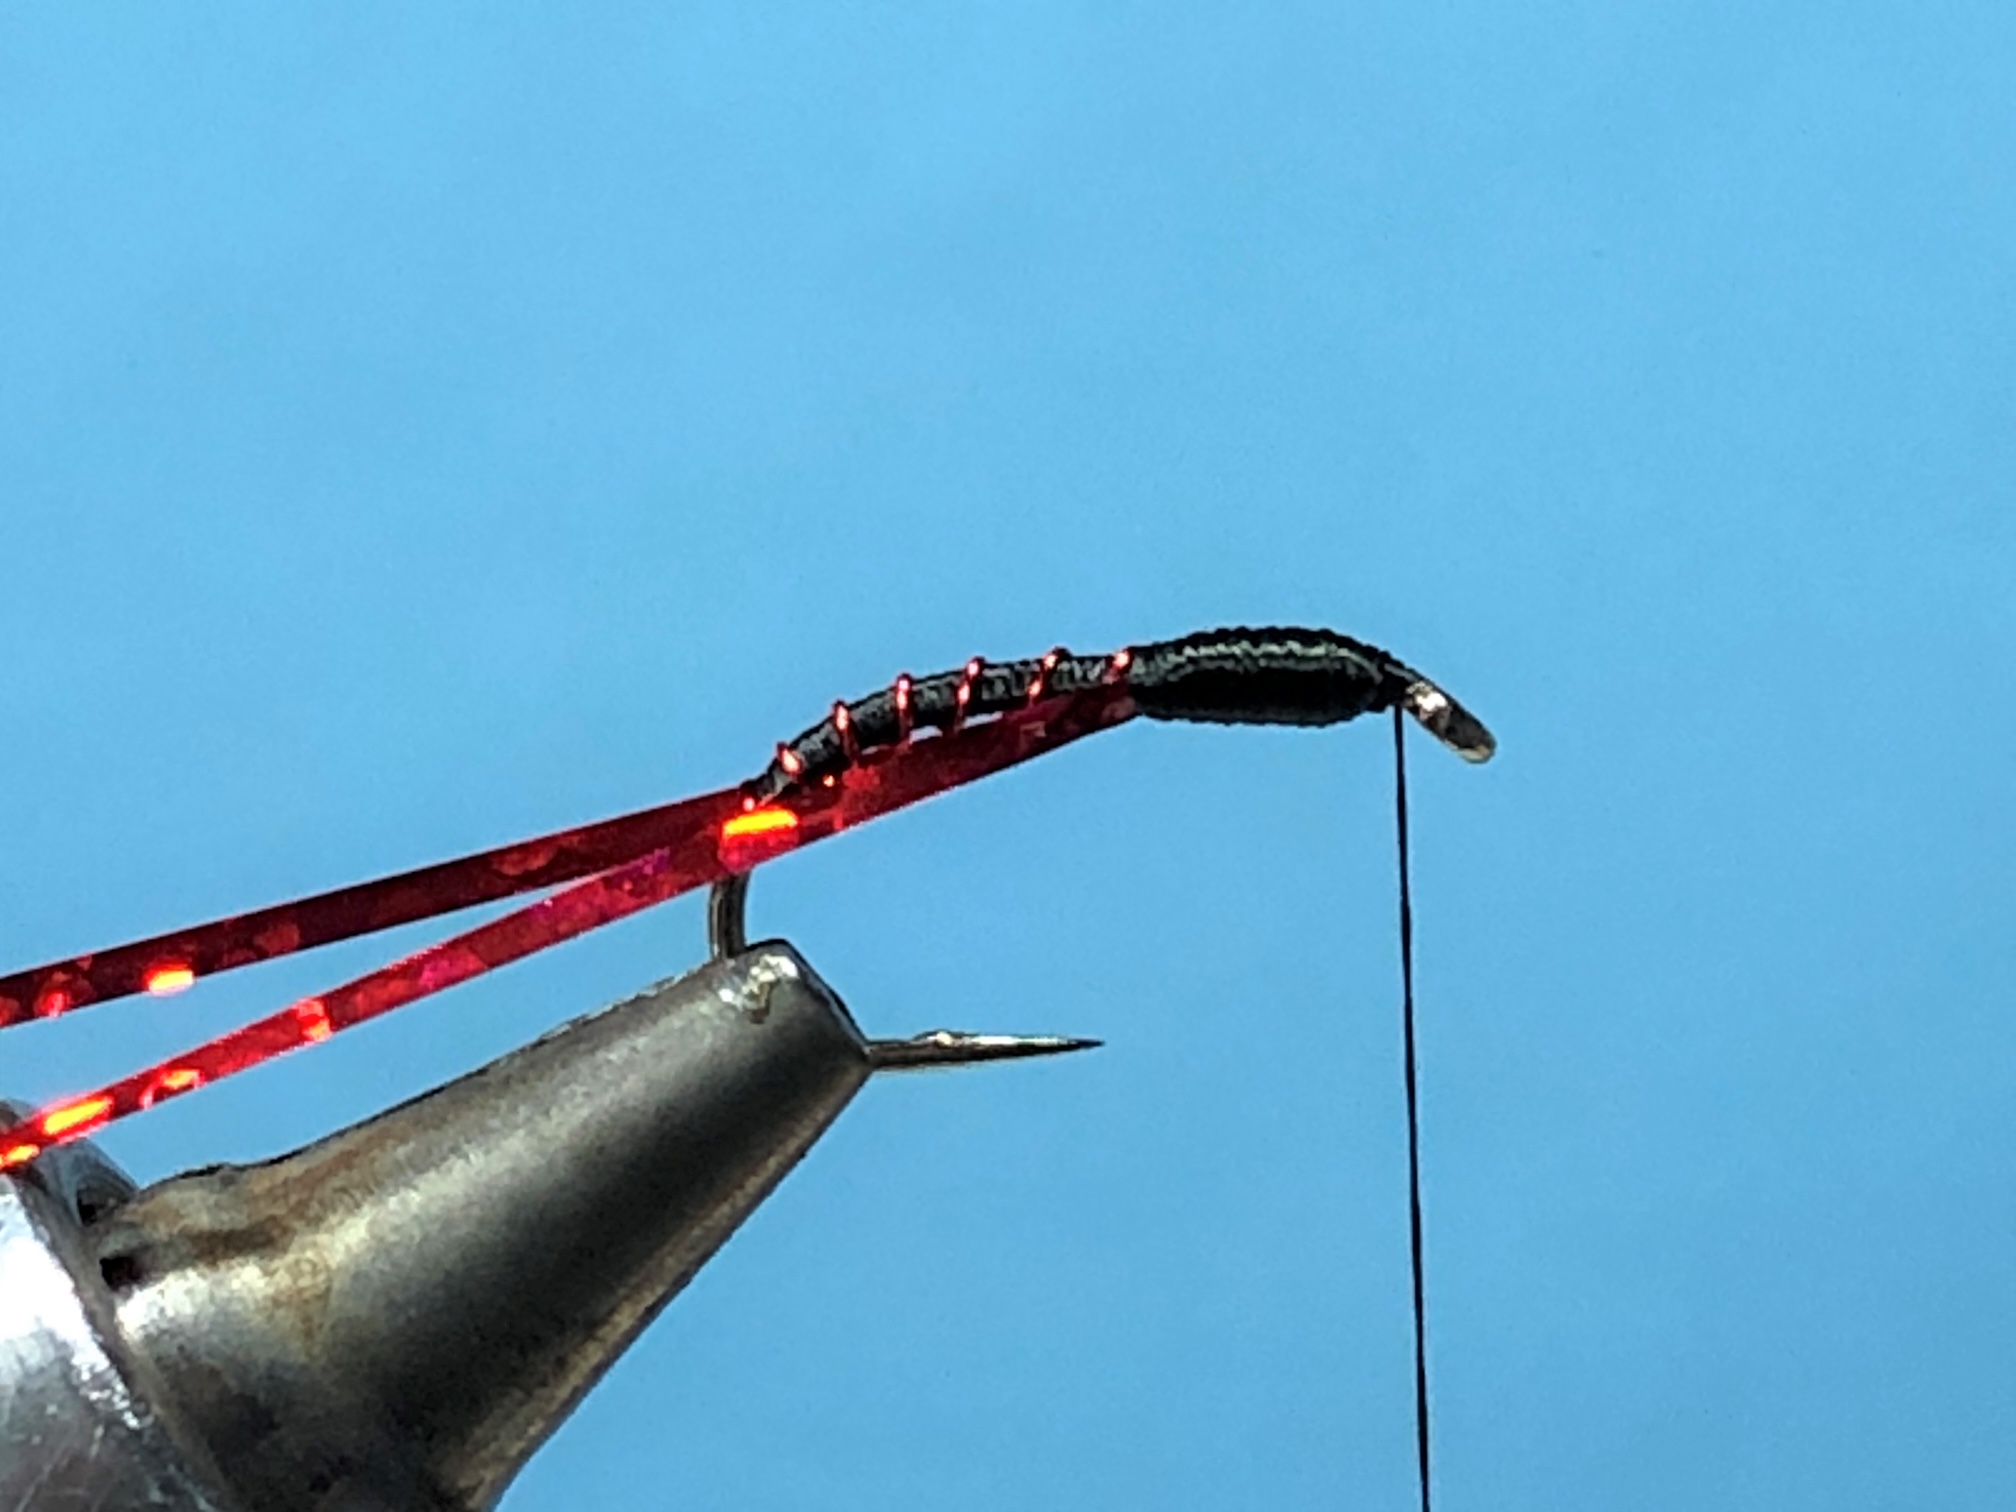
Photo 5. Wind the thread up and down the thorax area several times to produce a noticeable, but not bulbous thorax, leaving the thread at the head.
Photo 6. Bring the tinsel loop forward and over the top of the hook eye and secure it in place with tight turns of thread.
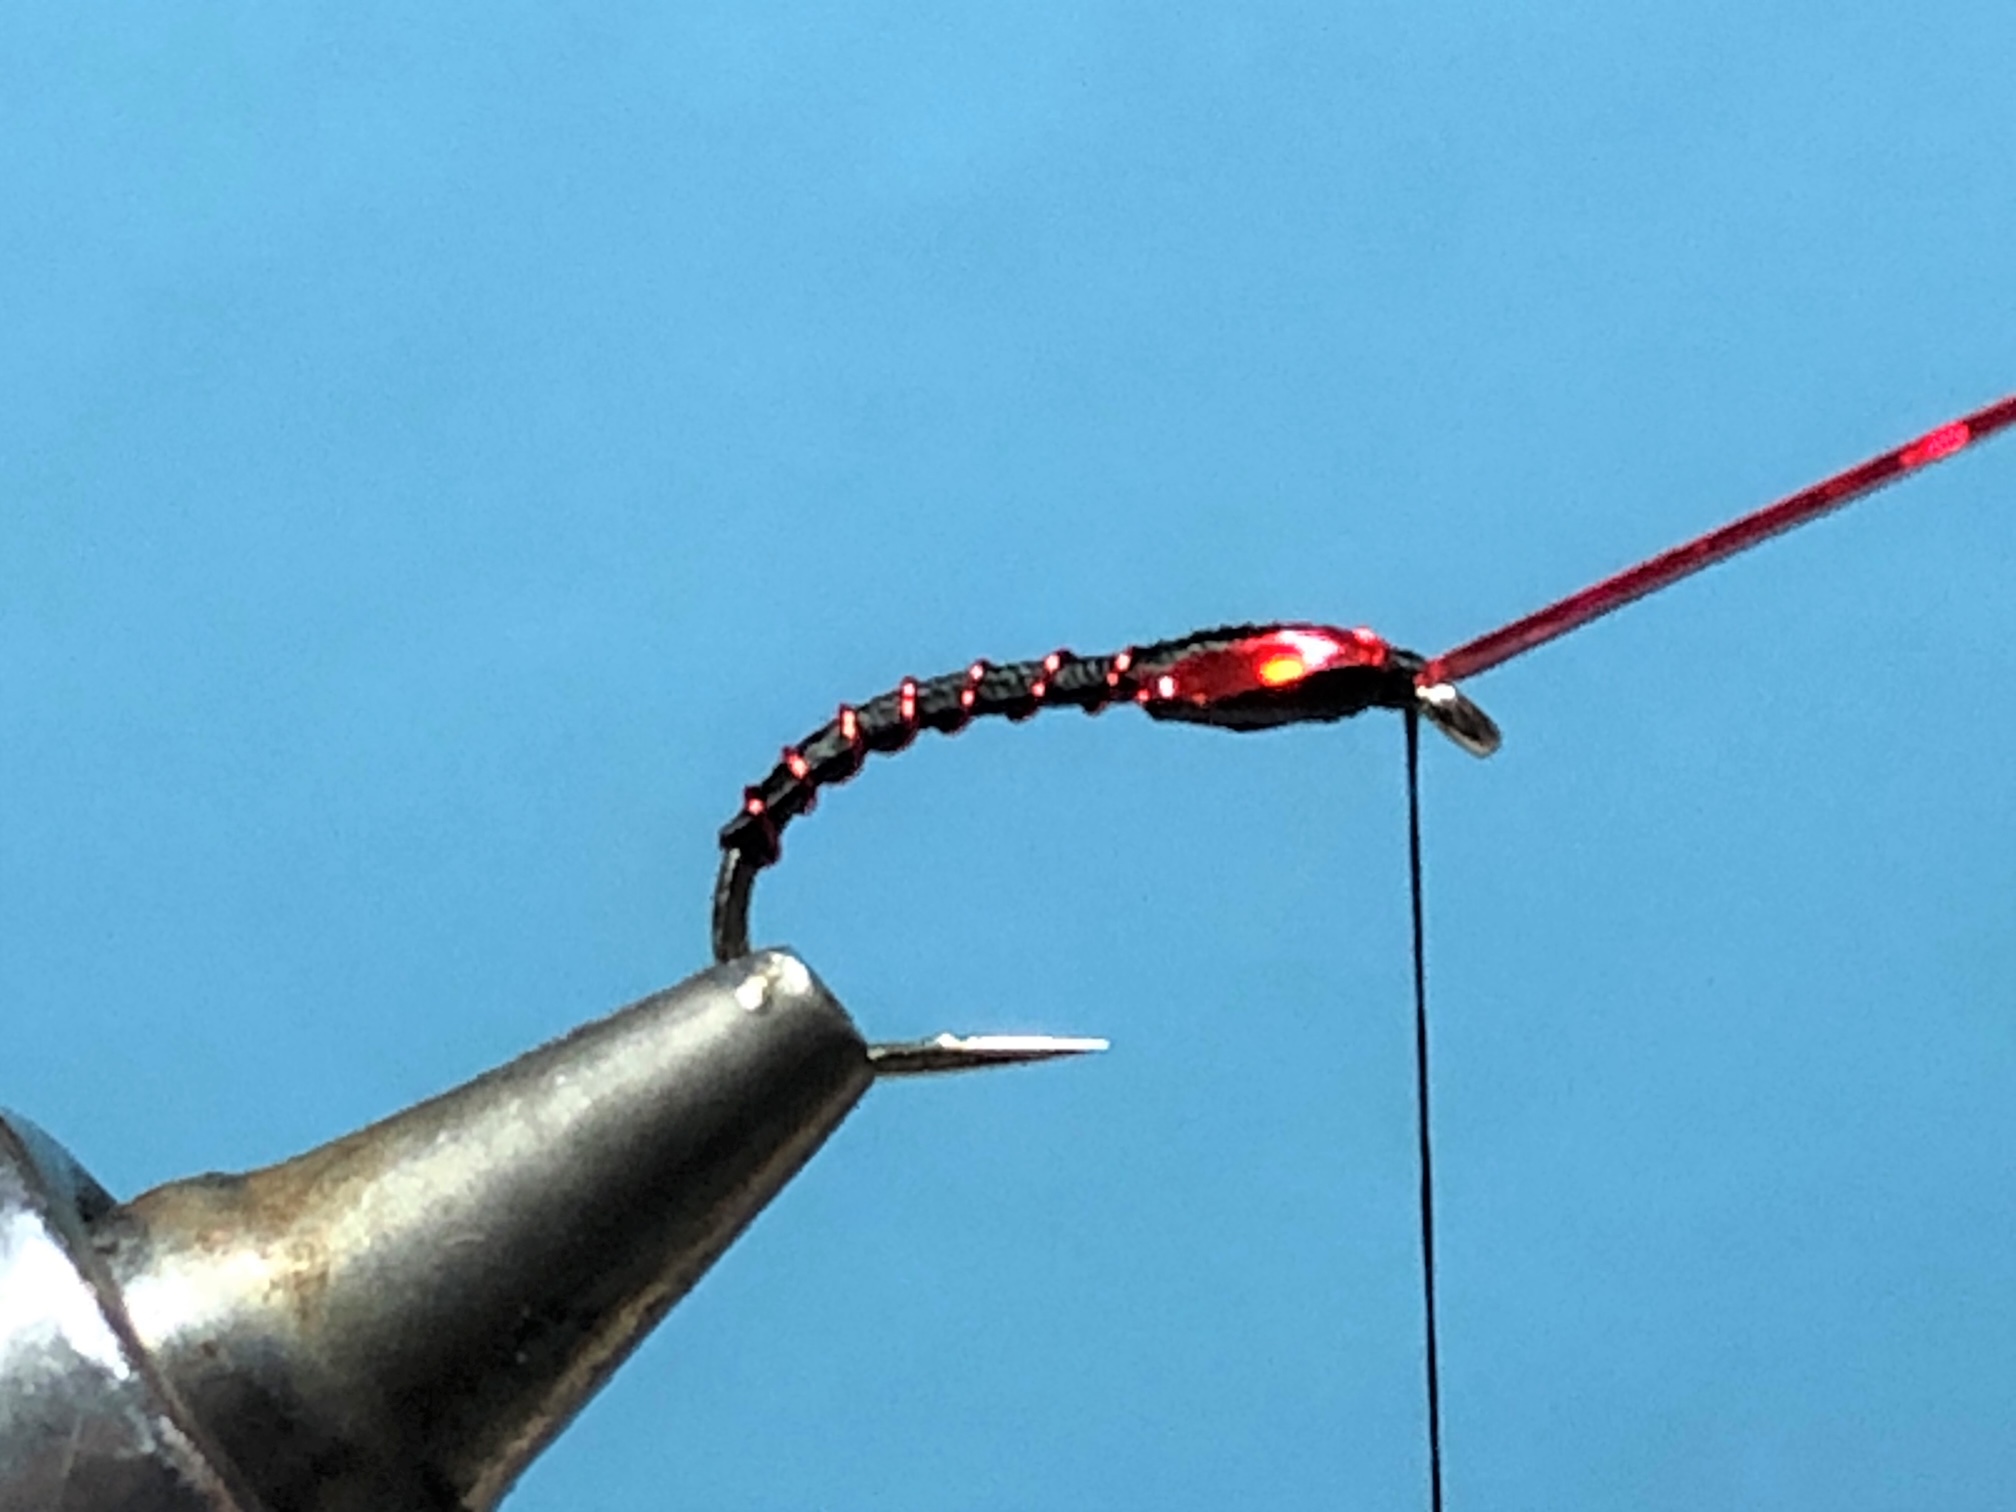

Photo 7. Take the thread in front of the tinsel and make 2 or 3 thread wraps rearwards trapping down the tinsel as you go. Now cut off the excess tinsel and continue to form the head, then whip finish and cut off the thread. Lightly coat the whole fly with UV resin and cure with a UV torch to complete the fly.
Tying Tips
- Early season buzzers are invariably small and black and are best represented using size 14 – 16 hooks.
- A flat thread helps to produce a slim, smooth body, but it can twist during winding. To counteract this, occasionally spin the bobbin holder anticlockwise until the thread becomes flat.
- When using UV resin, use it sparingly – a little goes a long way. Apply it using a fine brush or dubbing needle and always remove excess resin before curing with your torch. For more control, I apply and cure the resin in two stages – the thorax first, then the abdomen.
- Try changing the colour of the rib and wing buds to provide variety. A silver rib and orange wing buds or a pale blue rib and peacock green wing buds are good alternative options.
- As buzzers ascend the water column, they wiggle and are generally curved, but when they pause and fall back down the layers they lie straight, so tie up both curved and straight patterns to cover both scenarios.
Les Lockey – March ’22
A Privileged Happening
On a recent trip to Westlow Mere, I looked down and noticed what I thought were two Damsel Nymphs on the top of my bag. On closer inspection, I realised that one was the shuck and the other was actually the nymph. I kept putting my rod down, returning to see the progress of the nymph as it was going through the transition of growing the wings slowly out of the wing buds. I have read about this many times, but never actually witnessed it for real and I felt quite privileged. Below are a series of shots I took with my phone…..
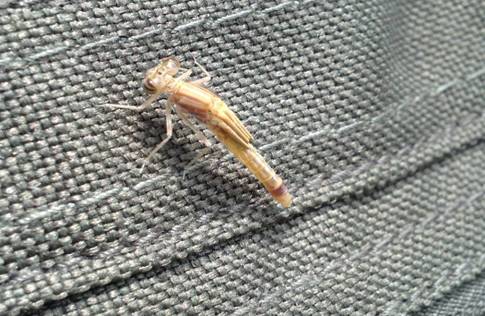
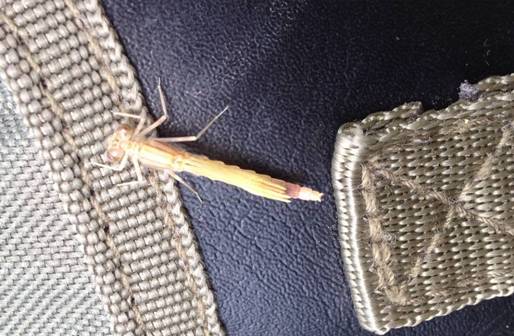


Mike Warburton – Aug ’16
Some more tips from one of our members.
O.K. So we are idle, we buy in our ‘hand stripped quills’ from Venyards or some other commercial source. How many times have you been faced with one of these splitting or snapping just before you use it to make a ‘segmented’ body, and then having to back up about 2 or 3 processes, or scrap the whole thing and restart the fly from square one? Has anyone told you that these little things benefit from being stored in a solution of 75% water and 25% hair conditioner, or soaked in plain water before use – no, I thought not. Me neither. That is until I read it up in a chapter pertaining to just this subject in the “The Fly Tiers Bench Side Reference” by T. Leeson and J. Schollmeyer, not a cheap addition to your library I must admit, but if you take your fly tying seriously one I strongly recommend.
HEAD CEMENT
Now here is one I have to thank Louis Noble for, the use of a head cement called Fly Rite, it is extremely thin and requires at least two to three applications, and because of this it:
1. Soaks in quite quickly.
2. Requires a little patience.
But what you end up with is a fairly resilient head which has been well soaked and will last a few “attacks” from the teeth of that hungry trout.
WINGS
Next is a thank you for Wendy Gibson. Knowing I had arthritis she pointed out the fact that as we get older the thumb and forefinger no longer ‘pinch’ together the same. Let me try to explain – in our ‘youth’ our thumb and fore finger pinches together with the finger nails more or less in the same plane, as you get older you have to pinch on progressive fingers to maintain the same situation. At 75 years old and with the arthritis creeping into my knuckles, to do a “pinch and loop” I am using my thumb and the finger next to my little finger (my ring finger), using my thumb and index finger results in my thumb nail being at right angles to my index finger nail leading to a natural tendency to put a twist into the wings.
For those of you who are new to the ‘game’ you will find several things are true concerning this pastime.
1. It can become obsessive
2. You will end up with far more tools than you will ever need (you only have two hands).
3. Eventually you will also find you have more capes, wings, feathers and materials in general than you have space for (and the missus will be the first to say “what is that smell”)?
Don’t get down hearted, you are not alone we are all in the same boat. My gear and reference books have taken over the whole of what used to be called the “box room”, it even has a tying bench stretching the length of the room made up of a piece of kitchen work top 3 Metres long, sat on top of 4 four drawer kitchen units.
Finally, a piece of advice, come along to your local Fly Dressers Guild meeting, you will find that there are people like yourselves, maybe not wanting to get into fly dressing any further than to tie their own flies and believe me there is no more satisfaction to be gained than that of catching on a fly that you have tried yourself.
Take care, and tight lines to you all
Ni the Fly
Ni Rogers – Aug ’16
A Trip to Brenig
The top tip for this month is to get to Brenig before the 1st of August. The team there have been having back problems, as new stock (average weight 11/2lbs) are due on the above date. Trouble is their old stock has got too big! Minimum stock size until then is 3lb and so causing some weightlifting problems. I visited the venue on Tuesday 5th July and did make the odd mistake. Firstly, I turned up on motorcycle. Next, I came with all the bits to fish boat with, such as a boat net, a drogue, several reels but only one travel rod and a lot of flies!


Not a problem, as long as you do not catch a lot of larger fish – it’s a room issue on a bike. I had a rucksack for most bits, but due to not booking a boat in advance, I needed to pack waders and several layers of clothes. The saddle bags catered for all these things with just enough room for a few fish.
The bag limit is six fish. I did take several thick plastic bags, just in case, so I could put a few fish in these, then in the saddle bags. Unfortunately, I did not plan for the odd large fish or even several big fish. I kept the 3 smallest fish of 7 fish caught (2 x 3lb and 1 x 4lb) I had to release the others up to 6lb+!
This was my first visit to Brenig in over 10 years, so had it changed? No not really, the fish still were in the same places, just bigger. Was I just lucky? No, as I returned to the “Centre” two bank angles were just packing up at 14:30hrs. They had both “bagged up” with 6 fish weighing 22lb in total each. When setting up and waiting for “Boat” time to start, I met up with a chap I used to shoot with and he and his boat partner were on their first visit to the venue. About 11am we met up on the lake, where I explained that I was having to return fish. At that point they were not doing well and had not managed to land a fish. I showed them what I was using – a slime line with one white lure fished 2’ – 4’ down. They accepted a few flies and moved to the next bay. 30 minutes later they called back to thank me as they had both caught several fish including a best of 6lb+.
When packing up I spoke to the guy in charge of stocking, who was happy to see the larger fish coming out. He explained that it was always difficult to please all, but the odd thing is, by accident I had stumbled on a successful way to catch these fish. In August when the new stock is put in, most will be caught on the top with dries or “damp” patterns, whereas these larger fish tend to feed lower in the water.


Why did I start with the slime line? As I was in a boat by myself and there was a good wind blowing it can be difficult to cast a dry line out and keep in contact, without stopping a large bow forming. I could have put out a drogue, but then again it can cause more problems for a single occupant, getting up and down.


The centre, by 14:30, with a bit of a wave plus the end of the “Arm” – no white horses, but still, a bit bumpy
Will I return? too right. I just need a day off from chauffeuring duties before the 1st August!
Eddie Wilkinson – July ’16
Casting for Recovery at Coniston Hotel and Country Estate.

On April 17th 2016 Bernie Ratcliffe and Mike Warburton, as part of GAIA, were both honoured to have been invited to take part in a special day for the charity, ‘Casting for Recovery’.
An amazing venue and amazing cause. A large group of ladies, all recovering from Breast Cancer, were entertained for a two-day event at the Coniston Hotel by GAIA and C.f.R.
On the second day each lady was paired up with a chap from the GAIA group. Quite a surprise for the ladies, as they had not been told about this arrangement. They were all kitted out with the correct gear, compliments of Orvis, and were quite excited about the prospect of spending the day with a personal mentor, fishing and having fun.

The day went fabulously well and everybody had a great time. Lunch was provided, followed later by a superb buffet for all. Speeches and presentations were made, with a certificate for every person who took part in the day.


Coniston Hall did a superb job of the entertaining and even supplied a glass of pink Champagne to welcome everybody to the buffet.
What a day! So rewarding for everybody involved and the venue…wow, stunning to say the least. Not many fish were caught, due to extremely hot weather and high pressure and …….
The event was run and organised by Vee & Bob Carlson, two lovely dedicated people, who put in an immense amount of work to make it happen.
Mike Warburton
